Make an Animated Grayscale Brush
An animated brush is made from an image having more than one layer. In the brushes dialog you will see brushes with a red corner on the lower right. Those brushes are animated. Open the brushes dialog by Ctrl + Shift + B and find the Sparks brush. You will notice that the lower right corner of the Sparks brush is red. Click the brush and hold the left mouse button down. You will see the various "layers" of the brush in action. That is why it is called an animated brush. When you paint with an animated brush the different layers of the brush are painted as you paint with the brush. Close the Brushes dialog.
A regular, non-animated brush has the file extension .gbr which stands for
gimp
brush. An animated brush has the file extension .gih which stands for
gimp
image
hose.
You will need saulgoode's combine background script. Click the link to get it:
sg-combine-bg.scm and save it in your /.gimp-2.6/scripts folder. After you have saved the script, Filters > Script-Fu > Refresh Scripts.
If you saved your leaf.xcf file from making a grayscale brush open it now. If you did not save it or did not do the grayscale brush tutorial, go
here and do Steps 1 - 6 in the Grayscale Brush Tutorial.
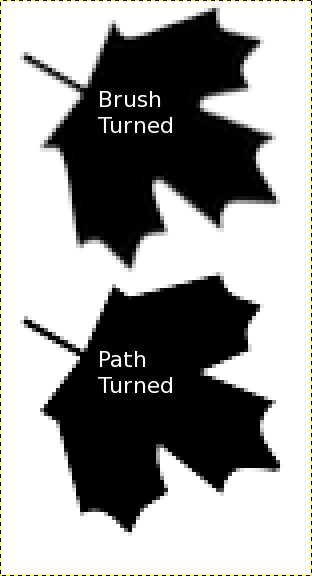
You will be rotating and using paths for your brush layers. You may wonder why you don't just rotate the image. Rotating an image makes the edges more "fuzzy" and you don't have the crisp edges a path makes.
Here is a zoomed image showing the difference between the turned image and the turned path.
- Right-click the layer the leaf is on and choose Layer to Image Size.
- Right-click the leaf layer again and choose Alpha to Selection.
- Select > To Path
- Select > None
- Make sure the leaf layer is the one selected and press the Delete key. (Yes, you are deleting your leaf.)
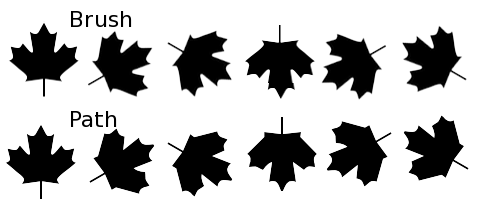
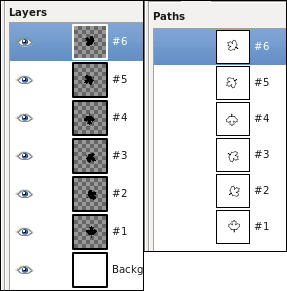
- Rename the leaf layer #1, then duplicate that layer enough times so that you have 6 layers. The top layer will be #6. Click layer #1 so that it is the selected layer.
- Click the Paths tab
 in the Layers window.
- There will be a path there named Selection. Double-click the path name and name it #1. Press the Enter key and you will have a path named #1.
- Press the Duplicate Icon
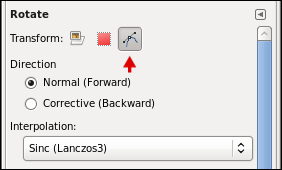
 at the bottom of the Paths window and you will have a path named #2. With Path #2 selected, in the Toolbox click the Rotate Tool
  . In the Rotate toolbox dialog, click the path icon so that the path will rotate.
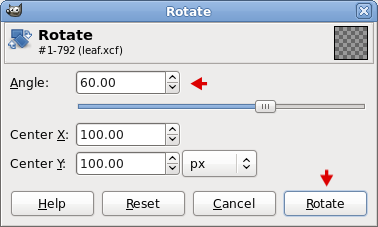
- Click in the Image window and when the Rotate dialog comes up, make the Angle 60 and click the Rotate button. You will see your path rotate.
- Duplicate path #2 so that you have path #3 (it will be automatically selected). Click the Rotate Tool, click in the Image window and, again, make the angle 60.
- Duplicate path #3, and rotate Path #4.
- Do that for each path by duplicating the last one rotated and rotate each 60 degrees. When you have reached path #6 and rotated it you are finished with rotating paths.
- Click Path #1 so that it is selected, choose Path to Selection
 in the paths window.
- Click the Layers tab and click layer #1 to make sure it is the active layer. Make the Foreground color black if it is not already. Select the bucket tool. Be sure that fill whole selection is selected in the Bucket Fill dialog. Click the selection in layer #1 to fill it with black.
- Click layer #2, click the paths tab and choose path #2. Path to Selection. Layers tab, fill layer #2 with black.
- Click layer #3, click the paths tab and select path #3. Path to selection. Layers tab, fill layer #3 with black.
- Click layer #4, click the paths tab, click path #4. Path to selection. Layers tab, fill layer #4 with black.
- Click layer #5, click the paths tab, click path #5. Path to selection. Layers tab, fill layer #5 with black.
- Click layer #6, click the paths tab, click path #6. Path to selection. Layers tab, fill layer #6 with black.
- Select > None. The worst is over. Sit back and take a quiet few moments. You need it.

This is how your layers and paths windows look now.
- In the Layers window turn the eye off next to the white background layer.
- Layer > New from Visible. You will now have a new layer named Visible. Select the Visible layer, Image > Autocrop Image.
- Delete the Visible layer.
- Make the background layer visible. Filters > Animation > Combine background. Each of your layers now have a white background. Delete the white background layer.
- Image > Mode > Grayscale.
Now it's time to save your animated brush.
- File > Save As > leafbrushanimated.gih. Browse to the /.gimp-2.6/brushes folder and click Save.
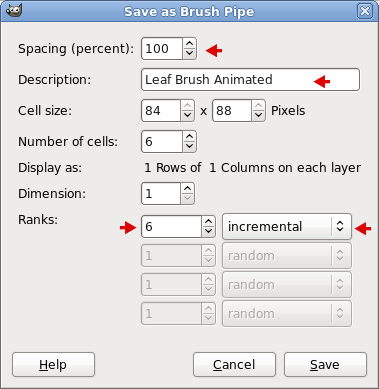
- In the Save as Brush Pipe dialog use the following settings that I have marked with red arrows:
Spacing (percent) 100
Description - Leaf Brush Animated
Ranks - 6 which are the number of cells which are the number of layers.
In the dropdown choose incremental. The incremental setting makes the brush rotate in an orderly manner.
- Close the brush image. Ctrl + Shift + B, click the Refresh button
 . You are finished and ready to paint with your new animated brush.