It is currently Sat Apr 27, 2024 6:00 pm


All times are UTC - 5 hours [ DST ]


Post new topic Reply to topic  [ 15 posts ] 
Author Message
 Post subject: Simple Imprint Icon Tutorial (Gimp 2.8+)
PostPosted: Tue Oct 08, 2019 3:39 pm  (#1) 
Offline
GimpChat Member
User avatar

Joined: May 10, 2013
Posts: 1389
Location: FInland
Simple quick tutorial to create imprint/press icon.
It utilizes only the Layerfx.py plug-in. Basic knowledge of Gimp and its tools required.

The result should look something like the button below, naturally you can use different colour for the gradient on the icon button
and any silhouette, initial etc.

The zip attachment includes the tutorial in .odt and .pdf format, and the icon sample in .xcf.
Made with Gimp 2.8 because 15 year-old HP workhorse finally bit the dust and I had Mint with 2.8 on another machine.

Image


Attachments:
Simple-Imprint-Icon-Tut.zip [1.03 MiB]
Downloaded 410 times
Share on Facebook Share on Twitter Share on Orkut Share on Digg Share on MySpace Share on Delicious Share on Technorati
Top
 Post subject: Re: Simple Imprint Icon Tutorial (Gimp 2.8+)
PostPosted: Sun Oct 13, 2019 5:53 pm  (#2) 
Offline
GimpChat Member
User avatar

Joined: Nov 04, 2015
Posts: 1333
This is a good tutorial. I feel the lighting of the icon is opposite to the lighting on the imprint.
For me that makes it hard to guess if the imprint is lower or higher than than the icon surface.

Image


Top
 Post subject: Re: Simple Imprint Icon Tutorial (Gimp 2.8+)
PostPosted: Mon Oct 14, 2019 4:49 am  (#3) 
Offline
GimpChat Member
User avatar

Joined: May 10, 2013
Posts: 1389
Location: FInland
Thank you Tas_mania. Hmm, I think you're right, the ghost might be little too dark. You can hide the layer or use lower opacity 15-20%.
There was a request in another thread, I tried to make something similar to the icon pack icon in the deviantart link image.

viewtopic.php?f=10&t=17716


Top
 Post subject: Re: Simple Imprint Icon Tutorial (Gimp 2.8+)
PostPosted: Mon Oct 14, 2019 5:38 am  (#4) 
Offline
GimpChat Member
User avatar

Joined: Mar 01, 2014
Posts: 12659
Location: Spain, Aragón
Thank you so much for your tutorial. I'll do it. :tyspin :paint :gimp

_________________
Image

Gimp 2.10.30(samj) portable _ OS Windows 10 Home_ 64bits
Don’t be afraid to start over. It’s a new chance to rebuild what you want.


Top
 Post subject: Re: Simple Imprint Icon Tutorial (Gimp 2.8+)
PostPosted: Mon Oct 14, 2019 8:48 am  (#5) 
Offline
GimpChat Member
User avatar

Joined: Mar 01, 2014
Posts: 12659
Location: Spain, Aragón
A very nice great tutorial. Easy to follow and I-ve enjoyed it a lot. Thank you so much, Nidhogg. :clap :tyspin
Here my result. :coolthup


Attachments:
IconTut by Nidhogg_Issa.png
IconTut by Nidhogg_Issa.png [ 173.36 KiB | Viewed 10691 times ]

_________________
Image

Gimp 2.10.30(samj) portable _ OS Windows 10 Home_ 64bits
Don’t be afraid to start over. It’s a new chance to rebuild what you want.
Top
 Post subject: Re: Simple Imprint Icon Tutorial (Gimp 2.8+)
PostPosted: Mon Oct 14, 2019 11:01 am  (#6) 
Offline
GimpChat Member
User avatar

Joined: May 10, 2013
Posts: 1389
Location: FInland
Glad you enjoyed trying it out Issabella, thank you for the compliments.
Your result came out perfect. It's a bucket? Or a cupcake yummmmm!


Top
 Post subject: Re: Simple Imprint Icon Tutorial (Gimp 2.8+)
PostPosted: Mon Oct 14, 2019 11:21 am  (#7) 
Offline
GimpChat Member
User avatar

Joined: Mar 01, 2014
Posts: 12659
Location: Spain, Aragón
Happy for your appreciation o my result. It's a bucket :hehe :hehe
Thanks again. :tyspin

_________________
Image

Gimp 2.10.30(samj) portable _ OS Windows 10 Home_ 64bits
Don’t be afraid to start over. It’s a new chance to rebuild what you want.


Top
 Post subject: Re: Simple Imprint Icon Tutorial (Gimp 2.8+)
PostPosted: Thu Oct 17, 2019 4:09 am  (#8) 
Offline
GimpChat Member
User avatar

Joined: Nov 04, 2015
Posts: 1333
Lots of people have had a go at the 'imprinted' effect with Gimp over the years.
The effect maybe an optical illusion but it seems harder to do than a 'raised' or 'embossed'effect
Image

Imprint

Image

Raised


The imprint effect is also called 'debossed' or 'engraved'. Maybe somebody out there knows how to do it well?
I used this method


Top
 Post subject: Re: Simple Imprint Icon Tutorial (Gimp 2.8+)
PostPosted: Thu Oct 17, 2019 5:12 am  (#9) 
Offline
GimpChat Member

Joined: Mar 04, 2011
Posts: 2424
One of my 'disagreements' with using pre-made scripts. Useful for many things but get to know the built-in Gimp tools first.
Might not be as good-as but it will be your own work

Suggestion.

1. The background can be a rectangular selection with rounded corners. Select -> Rounded Rectangle Fill with color / pattern / gradient (whatever you want) and apply Filters -> Decor -> Apply Bevel
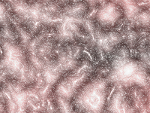
 https://i.imgur.com/LlCuPyJ.jpg

2. Now you can add the image, and this can be color or desaturated. Whichever type duplicate and if necessary desaturate and give it a small blur Filters -> Blur -> Gaussian Blur 
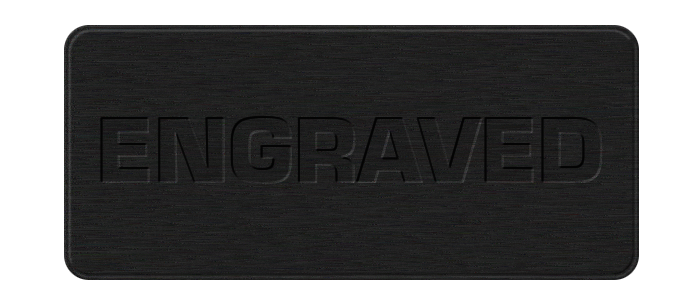
That is the bump map. https://i.imgur.com/Dlyl3yG.jpg

3. Back to the original image layer, Apply Filters -> Map -> Bump Map using the blurred layer (now with visibility off) as the Aux Input. Play around with the parameters.
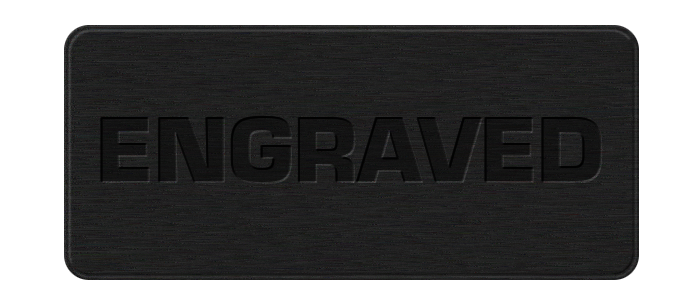
 https://i.imgur.com/8Xhc1Wd.jpg

4. A small point but consider direction of light. If necessary flip that beveled rectangle. https://i.imgur.com/yUdFs24.jpg

5. Need it all one colour. Layer -> New from Visible. Apply Colors -> Colorize to that layer. (plenty other ways as well) https://i.imgur.com/nojGXAx.jpg

Easy, but bump-mapping is used in so many processes, when you have a spare 5 minutes, practice using it.

_________________
Image


Top
 Post subject: Re: Simple Imprint Icon Tutorial (Gimp 2.8+)
PostPosted: Thu Oct 17, 2019 7:10 am  (#10) 
Offline
GimpChat Member
User avatar

Joined: May 10, 2013
Posts: 1389
Location: FInland
Tas_mania wrote:
The imprint effect is also called 'debossed' or 'engraved'. Maybe somebody out there knows how to do it well?

Depends on material and tool that is used to create the imprint.
If you for example used old traditional engraving machine or computer-guided engraver with a blade, the tip thickness and shape (angle) of the blade makes the difference how the edge turns out. Mostly you will be using flat-tipped blade (thin plastic or metal name signs) which means the edge is straight 90 degree angle. If you're engraving a motif for some other material, like rubber you have to use angle. The facet anyway will be totally sharp on plastic and metal, without softness or roundness like in the tutorial. But I wasn't trying it to make look like that. I was just looking at the deviantart button image to get a similar look fast, and wasn't thinking if it was plastic button and what would have been the tool.
Using laser engraver at work, they are bit different.

Will make another tut asap.


Top
 Post subject: Re: Simple Imprint Icon Tutorial (Gimp 2.8+)
PostPosted: Thu Oct 17, 2019 4:46 pm  (#11) 
Offline
GimpChat Member
User avatar

Joined: Nov 04, 2015
Posts: 1333
Nidhogg - I'm glad you did the tutorial because it reminded me I don't know how to get the effect.
I think laser engraving and vinyl cutting uses 'vector graphics'. It's different from normal printing which essentially places blobs of ink onto a surface.

Rod did a tutorial here on GC that used the bump map method.
I couldn't quite follow it :(

Thanks rich2005 for your instructions. I think it would be good to have a Gimp script that did a vector imprinting effect. I've used the effect by using a Gimp logo and deleting most of the layers except shading. (only works with text and I've forgotten which logo)


Top
 Post subject: Re: Simple Imprint Icon Tutorial (Gimp 2.8+)
PostPosted: Fri Oct 18, 2019 1:35 am  (#12) 
Offline
GimpChat Member
User avatar

Joined: May 10, 2013
Posts: 1389
Location: FInland
Tas_mania wrote:
Nidhogg - I'm glad you did the tutorial because it reminded me I don't know how to get the effect.
I think laser engraving and vinyl cutting uses 'vector graphics'. It's different from normal printing which essentially places blobs of ink onto a surface.

Rod did a tutorial here on GC that used the bump map method.
I couldn't quite follow it :(


Yes that's how it's done. You export the vector graphics (and cutting lines if you want to cut) to the engraver machine and let it do its job. I meant how the engraving result looks, it depends so much on the material you engrave.

I went through the rod tutorial, you can do it with 2.10 but you can't follow the tutorial meticulously. You have to use different figures and settings with the GEGL filters.
Use "layer to image size" on the plate layer and the text layer before applying bump map, and you don't need to play with offset.

I like to make the text just a bit darker than the plate surface, used the black text layer at 10% opacity.

Image

Darken only opacity 40%.

Image


Top
 Post subject: Re: Simple Imprint Icon Tutorial (Gimp 2.8+)
PostPosted: Sat Oct 19, 2019 12:57 pm  (#13) 
Offline
GimpChat Member
User avatar

Joined: Jul 06, 2013
Posts: 2606
Location: California
When you say, add your motif in your instructions in step 3, I think you should have explained how you got to that point instead of just jumping to open it and saying add it as a new layer. To me, that is what is missing in this tutorial.


Top
 Post subject: Re: Simple Imprint Icon Tutorial (Gimp 2.8+)
PostPosted: Sat Oct 19, 2019 4:56 pm  (#14) 
Offline
GimpChat Member
User avatar

Joined: May 10, 2013
Posts: 1389
Location: FInland
Okay. I thought it was the simplest thing, that's why I only mentioned it needs to be any black transparent silhouette image.
Anything you want to make or use like:

https://fi.wikipedia.org/wiki/Tiedosto: ... ouette.png

Or just type a letter, use dingbat font etc.


Top
 Post subject: Re: Simple Imprint Icon Tutorial (Gimp 2.8+)
PostPosted: Sat Oct 19, 2019 5:08 pm  (#15) 
Offline
GimpChat Member
User avatar

Joined: Jul 06, 2013
Posts: 2606
Location: California
Nidhogg wrote:
Okay. I thought it was the simplest thing, that's why I only mentioned it needs to be any black transparent silhouette image.
Anything you want to make or use like:

https://fi.wikipedia.org/wiki/Tiedosto: ... ouette.png

Or just type a letter, use dingbat font etc.


Oh, okay. I think I get it now. I will try the tutorial later.


Top
Post new topic Reply to topic  [ 15 posts ] 

All times are UTC - 5 hours [ DST ]


   Similar Topics   Replies 
No new posts Icon Pack

6

No new posts Attachment(s) FireFox Desktop Icon

10

No new posts Attachment(s) Gimp .xcp icon previews

9

No new posts Creating GIMP icon theme

1

No new posts Creating GIMP icon theme

1


* Login  


Powered by phpBB3 © phpBB Group