|
| GimpChat Member |
 |
Joined: Apr 27, 2010
Posts: 1453
Location: Sweden
|
I was asked for a go-through on how to do my animated signature. This won't be a full step-by-step tutorial with wip images (I don't have the time), rather a brief checklist of the steps taken. This is the signature: 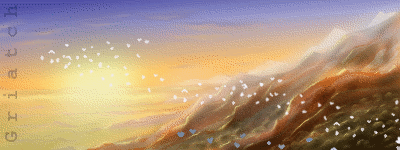 This uses GAP, Gimps Animation Plugin, which you might have to install separately (you can get it from gimp.org) - What I always start with (since I do animation so seldomly) is to review ccbarrs excellent GAP beginner tutorial just to know which GAP menu entries to click...
- All of the project is contained in a separate folder since there are plenty of files created by GAP (one for each frame)
- I created the background image as one xcf file. This is a normal painting of the right size.
- I created several separate xcf files for the birds. In each file I would draw a particular group of birds. I have two single birds and several "bird lines" of different angles, sizes and number of birds. All birds are really quite simple, basically just a white blob. Each "bird file" has 3-4 layers showing the birds in various stages of flapping their wings. Once can use Filters->Animation->Animate Cells... to check on the animation, but you should not save any animations, just keep them as regular multi-layered xcf files.
- So you should have one xcf with your background and several xcfs with birds, each having several layers to show them flapping their wings.
- Now, let's head into GAP. GAP is controlled from the Video menu. Make sure you have your background-xcf open, and head into the menu Video->Duplicate Frames. Copy your current frame (you have only one yet, so leave it as 0 to 0) 50 times. I use 50 frames for this animation, your mileage may vary. What the operation does is to take your background image and copy it into 50 new xcf files called **0000001.xcf etc. These are the individual frames of your animation. You never need to operate on those files manually, GAP handles everything.
- If you have a newer version of GAP you should already have the first frame (**000001.xcf) open. Otherwise, close your old background image and switch to the frame one. Now, what we want is to smoothly move the birds over those 50 frames. For that we need three things:
- We need the first frame of the animation open in a window
- We need to have one of our xcfs with birds open in another window. Choose a set of birds that are to be close to the camera (i.e. move fast).
- With the frame image open, select Video->Move Path...
- You should now be in GAPs mighty Move Path requester. Refer to ccbarrs tutorial for images on how to orient yourself in there. What the Move Path allows you to do is to take any of your open files (the birds, in our case) and move it across the frames of our animation. The first thing you want to do is to check the little Instant Apply checkbox. Unfortunately, this is something you'll have to do every time you enter the requester. It allows you to see what the heck you are doing in real time, which should not slow your computer down too much unless you have very archaic hardware. Also note that you can resize the requester - this causes the preview to grow too, up to full size.
- At the top of the Move requester you should see the layers of your bird image lister, along with a "Stepmode". Keep that at "Loop", that means that the birds will happily flap their wings, looping through their animation layers as they fly. You can make them flap slower by changing the Speedfactor to the right.
- You should see the birds you chose hanging in a corner of your background. Click and drag to move them around. Place them just outside the image, in the lower right corner. That's where they are on the first checkpoint.
- Click Add Point. This adds a checkpoint (it should now say Current point: [2] of [2]). Click and drag the birds diagonally across the image and you'll see a red line connecting their previous position and the new one. Place the birds outside the image in the upper left, so they will travel diagonally across the image. If you look to the lower right of the dialogue you can define how many of the frames are to be used for this transition. Leave it at 50 for now.
- Do NOT press OK unless you are sure you are happy with the result. Pressing OK will write to all the frames (i.e. xcf files) of the animation, and there is no way to change your mind once that has been done. Instead try things out with "Anim Preview", which creates a temporary image and animates that. In the Anim preview, choose "Exact object on frame" to see a full preview of the result (this is more important later as you add more and more birds). Adjust your move path as desired and when you are happy, press OK.
- You now have one line of birds flying across the image. You can look at the result using Video->VCR Navigator... Close the old bird image and open another one, this one with smaller, more distant birds.
- Back into the Move Path dialogue. You now want to have your birds travel slower across the screen since they are further away. To do this, you simply let them travel a shorter time during the same number of frames. For example, for half the speed of the foreground birds, let your more distant birds travel from the center of the screen this time, over to the top left (the reason to let it start in the middle is because otherwise all birds start at the same time and they will not be continuous. Preview as you want, then OK to write the frames. With the same birds open, go back into the Move Path, but this time you have them move from the lower right to the center, so that they at frame 50 are almost at the location they will be back at frame 1. To get this right you need to preview the animation several times to make the transfer smooth. Once you are done, press OK to write the frames. You now have two birds streaks travelling the image, one half the speed of the other.
- Continue to add more bird lines. You can play with how they look or make them even more distant and slower by letting it take three or even four steps to cross the image.
- GAP also allows you to do various image transforms at any animation node point. For example you can have the bird lines rotate or scale them as they go. I fun way is to switch the Mode of some birds to "Difference". That cause birds to go dark as they pass over brighter patches of background (see the lower left of my signature for an example)
- Finally add individual birds to break up the monotomy. Don't overdo it.
- You are now finished with the hard work. Select Video->Frames to Image. This will take all your frames and merge them all into a single image with many layers (the xcf frames are not lost though, it's just a copy).
- With your "merged" image, select Animation->Optimize for GIF if you, like me wants to have it as a sig. This prunes excess information from each layer to save space.
- Go to Image-Mode and change your merged image to Indexed mode. It's better to do this manually. Unfortunately GIF only supports 256 colours, so your image will see quality loss. Using dithering and an "optimized palette" is usually better.
- Lastly, save as GIF, making sure to save the layers as an animation.
- Enjoy.
Very brief, but hopefully of some use. Again, ccbarr's tutorial is really what you want to get a grip of using GAP. . Griatch
_________________
|
|