It is currently Thu Jul 04, 2024 3:35 am


All times are UTC - 5 hours [ DST ]


Post new topic Reply to topic  [ 15 posts ] 
Author Message
 Post subject: Using Custom Font Tools as part of the Animation Process
PostPosted: Fri Jun 30, 2023 3:52 am  (#1) 
Offline
GimpChat Member
User avatar

Joined: Aug 08, 2016
Posts: 2062
Location: East Midlands of England
There have been some amazing animations produced lately which reminded me that I did a guide on this subject over on GimpLearn that is, sadly, no longer accessible.

pdf for all three styles for those who prefer that format...
Attachment:


Please remember that I am only dealing with the text here – assume that you have already created a wonderful background that will replace my example.

I rarely have need for animations and I always have to start learning the technique all over again so forgive me if I make any obvious errors in the animation process itself. So, to reiterate, this is not a guide about how to create animations but about how to use the text elements with custom font tools as part of the animation process.

Attachment:
Grow_Text.gif
Grow_Text.gif [ 360.53 KiB | Viewed 3076 times ]


In order to do this you will need to use the FontSlab plug-in; this tool gives much greater control over the sizing, positioning and orientation of custom font characters along a path.

Attachment:
Font_Slab_Tabbed-v0_17.zip [39.07 KiB]
Downloaded 38 times


Download, extract and place in your user plug-ins folder.

Link To Expanding Text Style at post#4 Expanding Text Style

Link to Rotating Style at post#7 Rotating Text Style

Using FontSlab to create characters that grow along a path

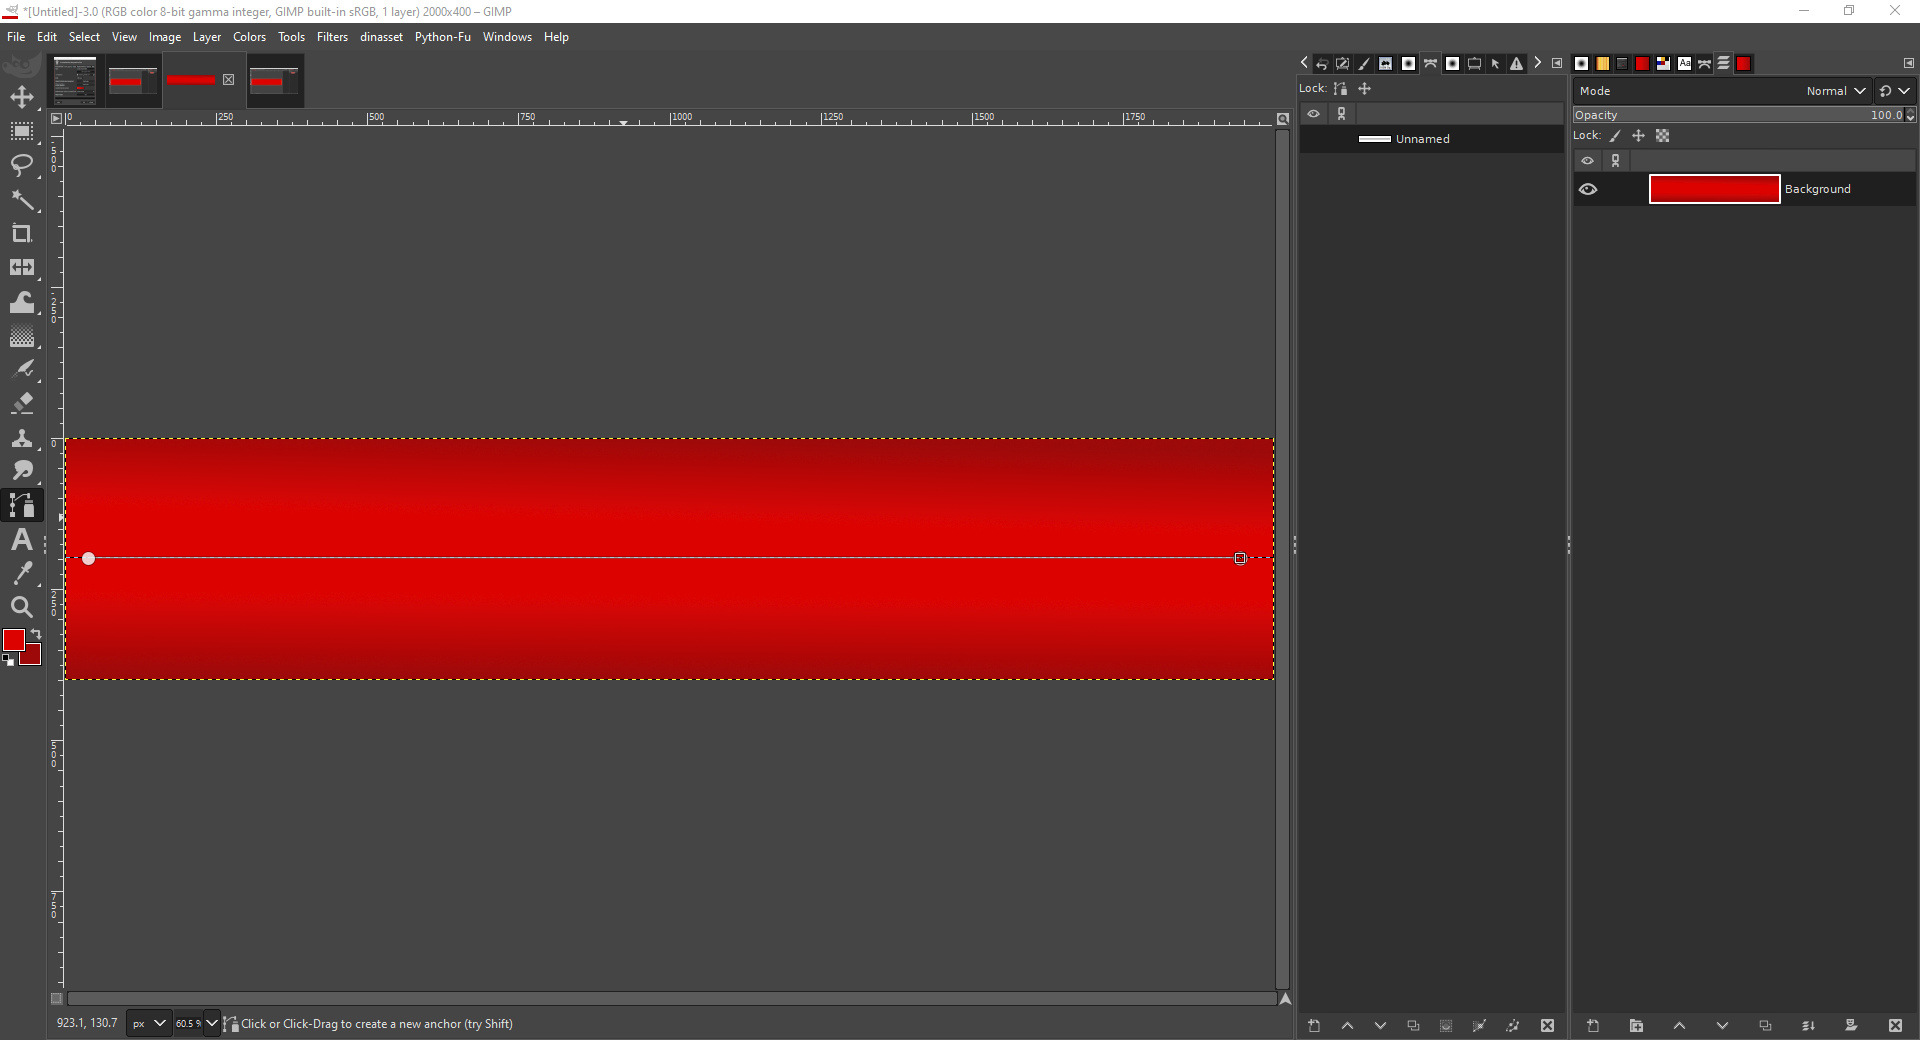
Add a new image to Gimp (mine is 2000x400 px).

File>>New… (Ctrl + N)

Create a suitable background but bear in mind the colour of the characters that you wish to add.

Add a path to the image (Ctrl + B); you can add a gently curving path if you wish. I added a guide and used this to help create a straight path.
Image

Call up the FontSlab plug-in:

Filters>>Custom Fonts>>Using Tools>>Font Slab Tabbed v0.17…

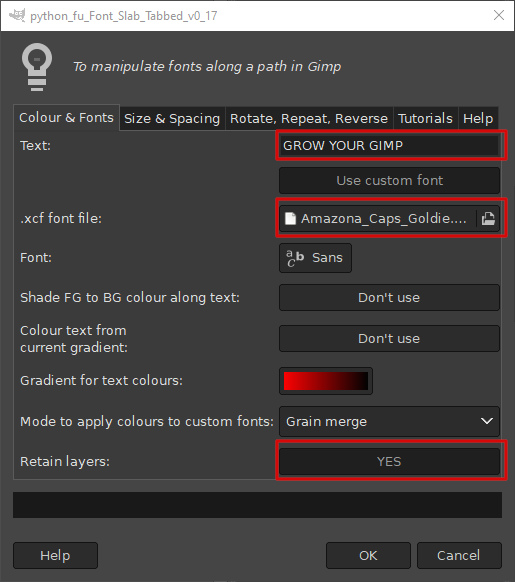
Use the first tab to select the custom font (you could use a normal font) to use and enter your text. Set the ‘Retain layers:’ option to ‘YES’.
Image

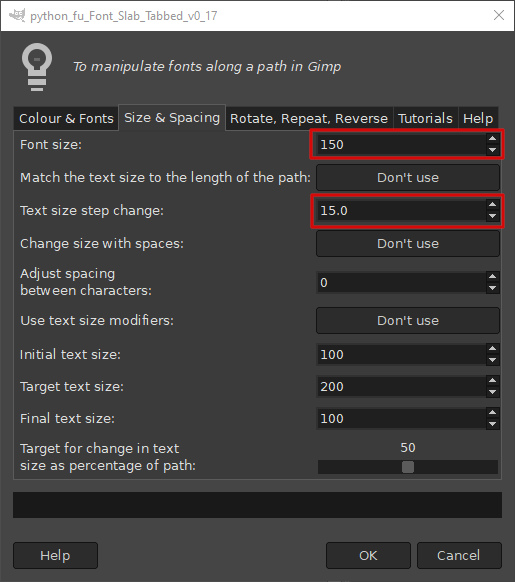
Use the second tab to set the initial font size and the size step change.
Image

I want to place my custom font text (‘GROW YOUR GIMP’) along this path so that the characters will increase in size from left to right.

Click on the dialog ‘OK’ button to test out the settings.

NB You could also leave the ‘Retain layers’ option set to ‘NO’ to see the effect of your choices and then undo the filter results before re-applying the settings with the option set to ‘YES’.

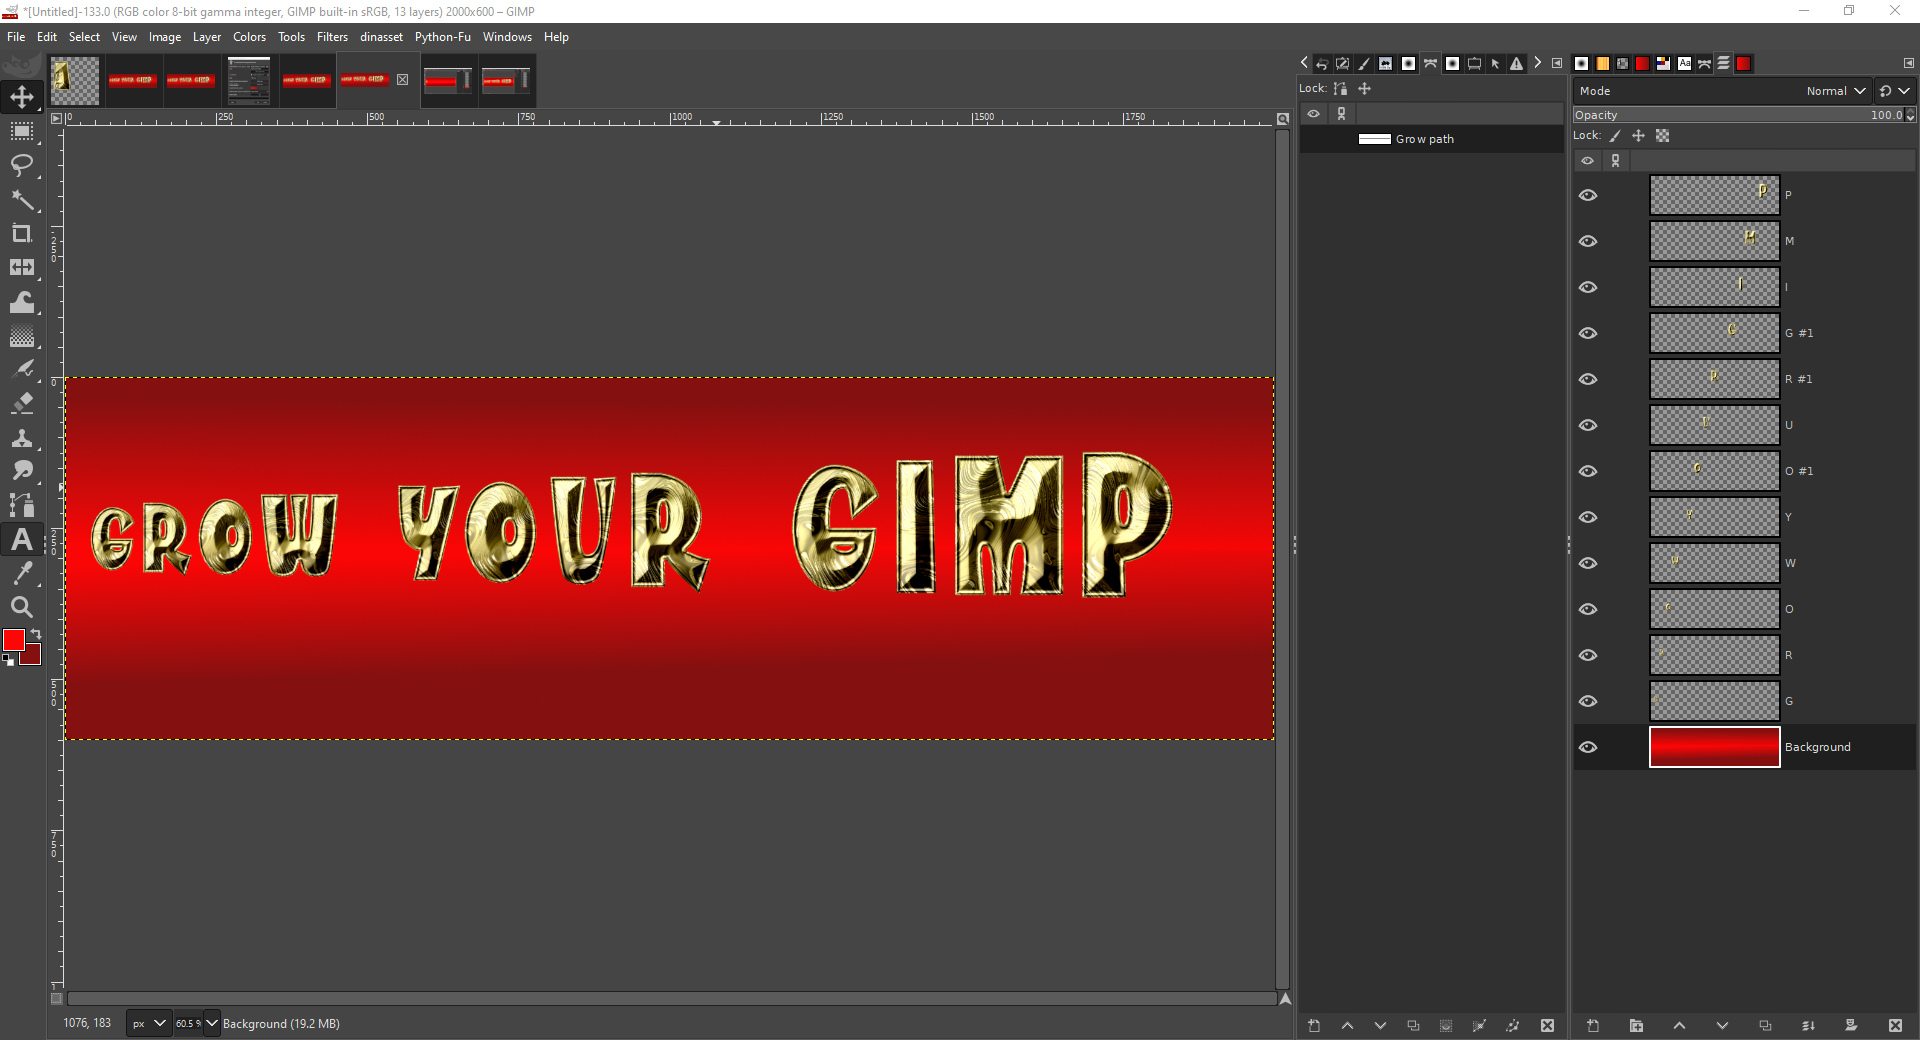
The results of the filter with my settings; you can see the background layer and all twelve distinct character layers (Fontslab obviously doesn’t render the space character).
Image

Since I am going to use these layers to create a Gif animation, I need to combine a copy of the background layer with each of the character layers before running the animation.

SHIFT select the background layer over its ‘eye’ to make it the only layer visible.
Make the first character layer visible by clicking over that layer’s eye in the layers tool dock.
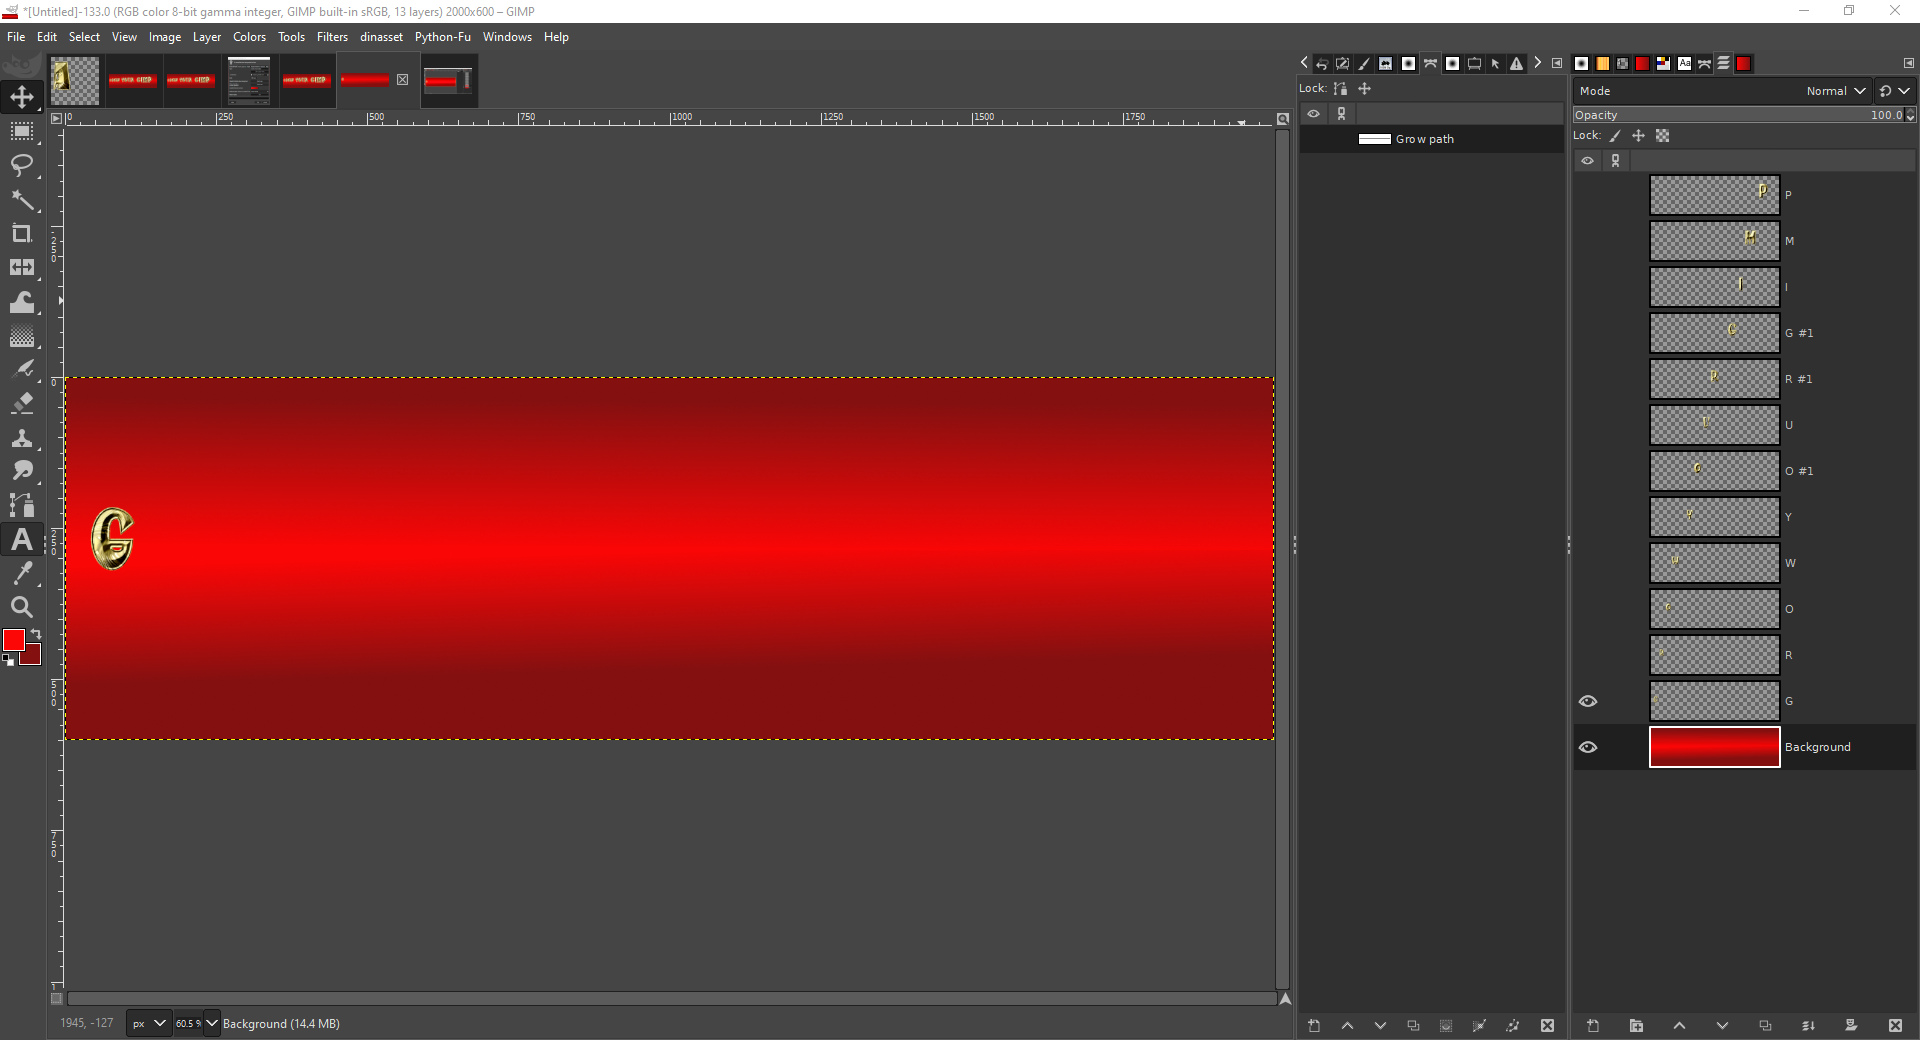
Image

Select the first character layer by calling the menu with the pointer over that layer
Select ‘Copy visible’ from that menu.
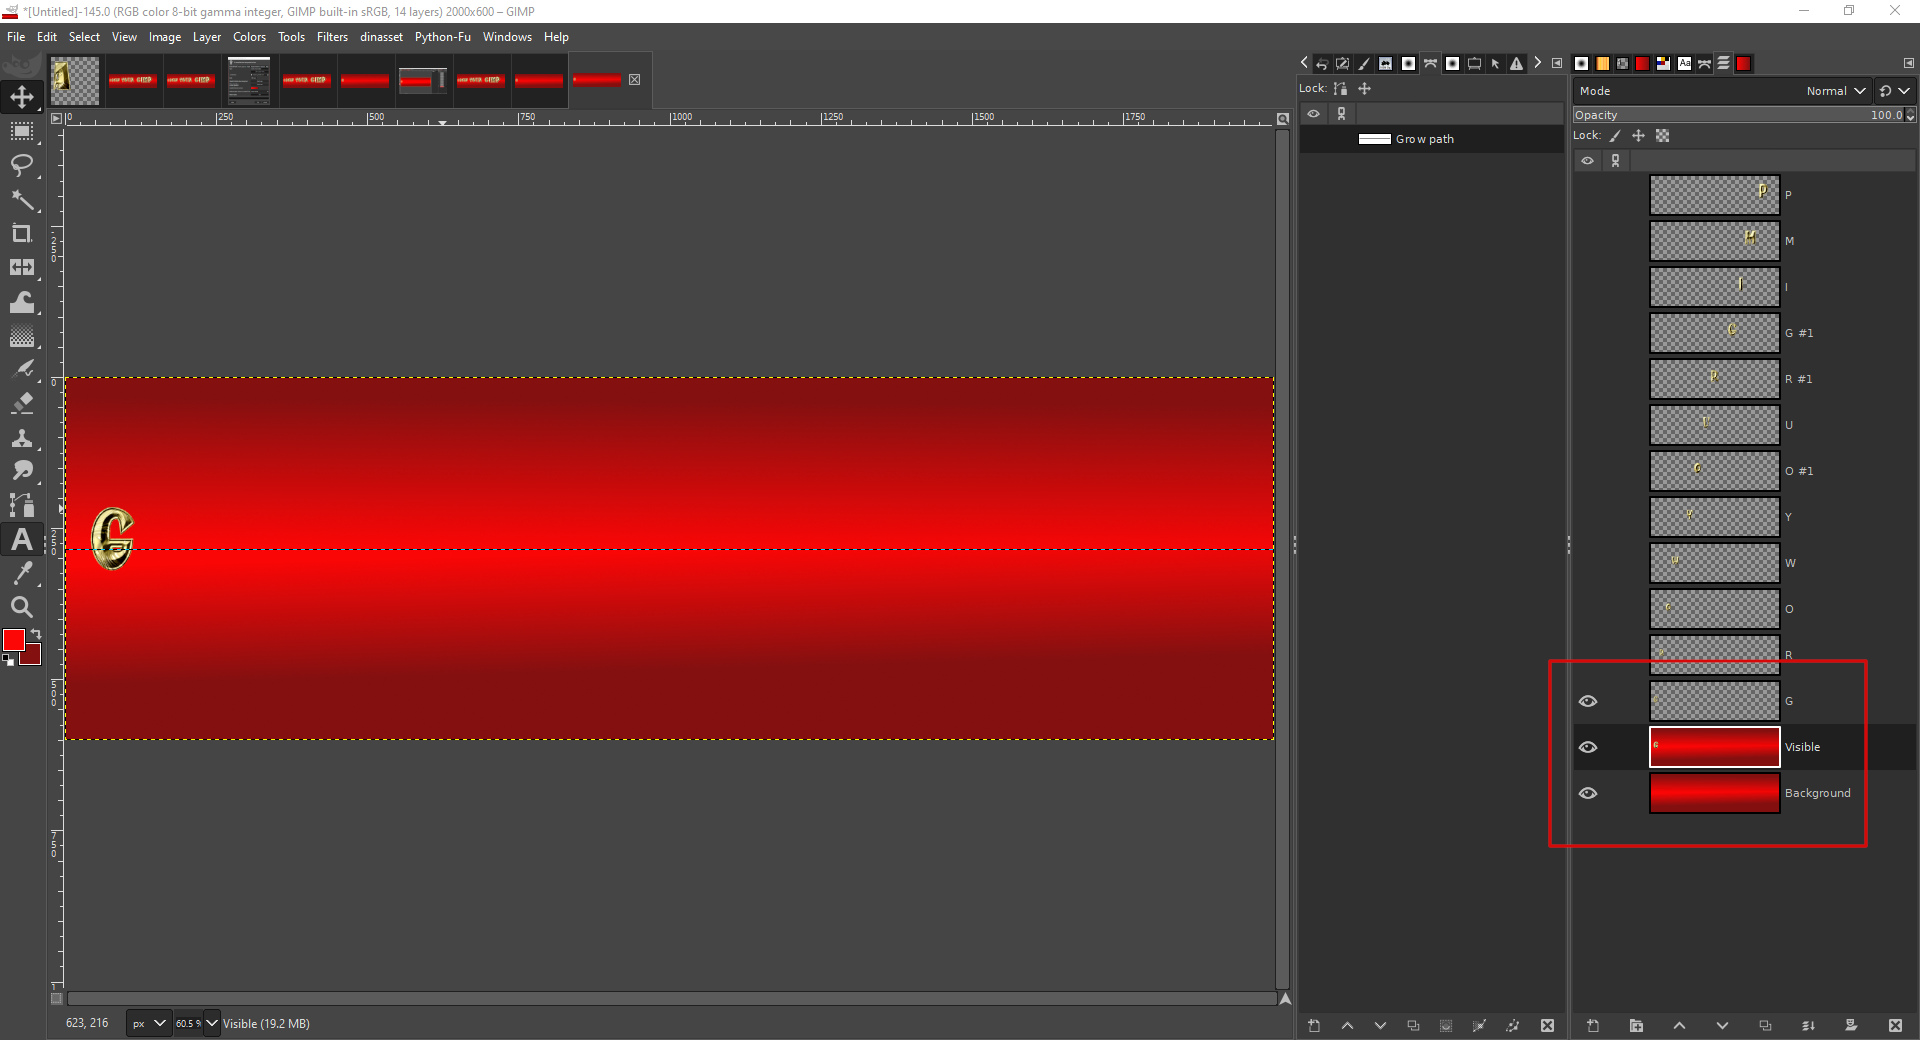
Image

You can speed up your workflow by using a keystroke combination to create a new layer from the visible layers.

Turn off the visibility of the first character layer by clicking on its ‘eye’ and make the second character layer visible instead.

Use this process to add a new visible layer for each character and the recently created visible layer. The idea is to create a new layer that shows one more letter than the previous layer.

At the end of the process I had my twelve layers containing the characters and the background layer.
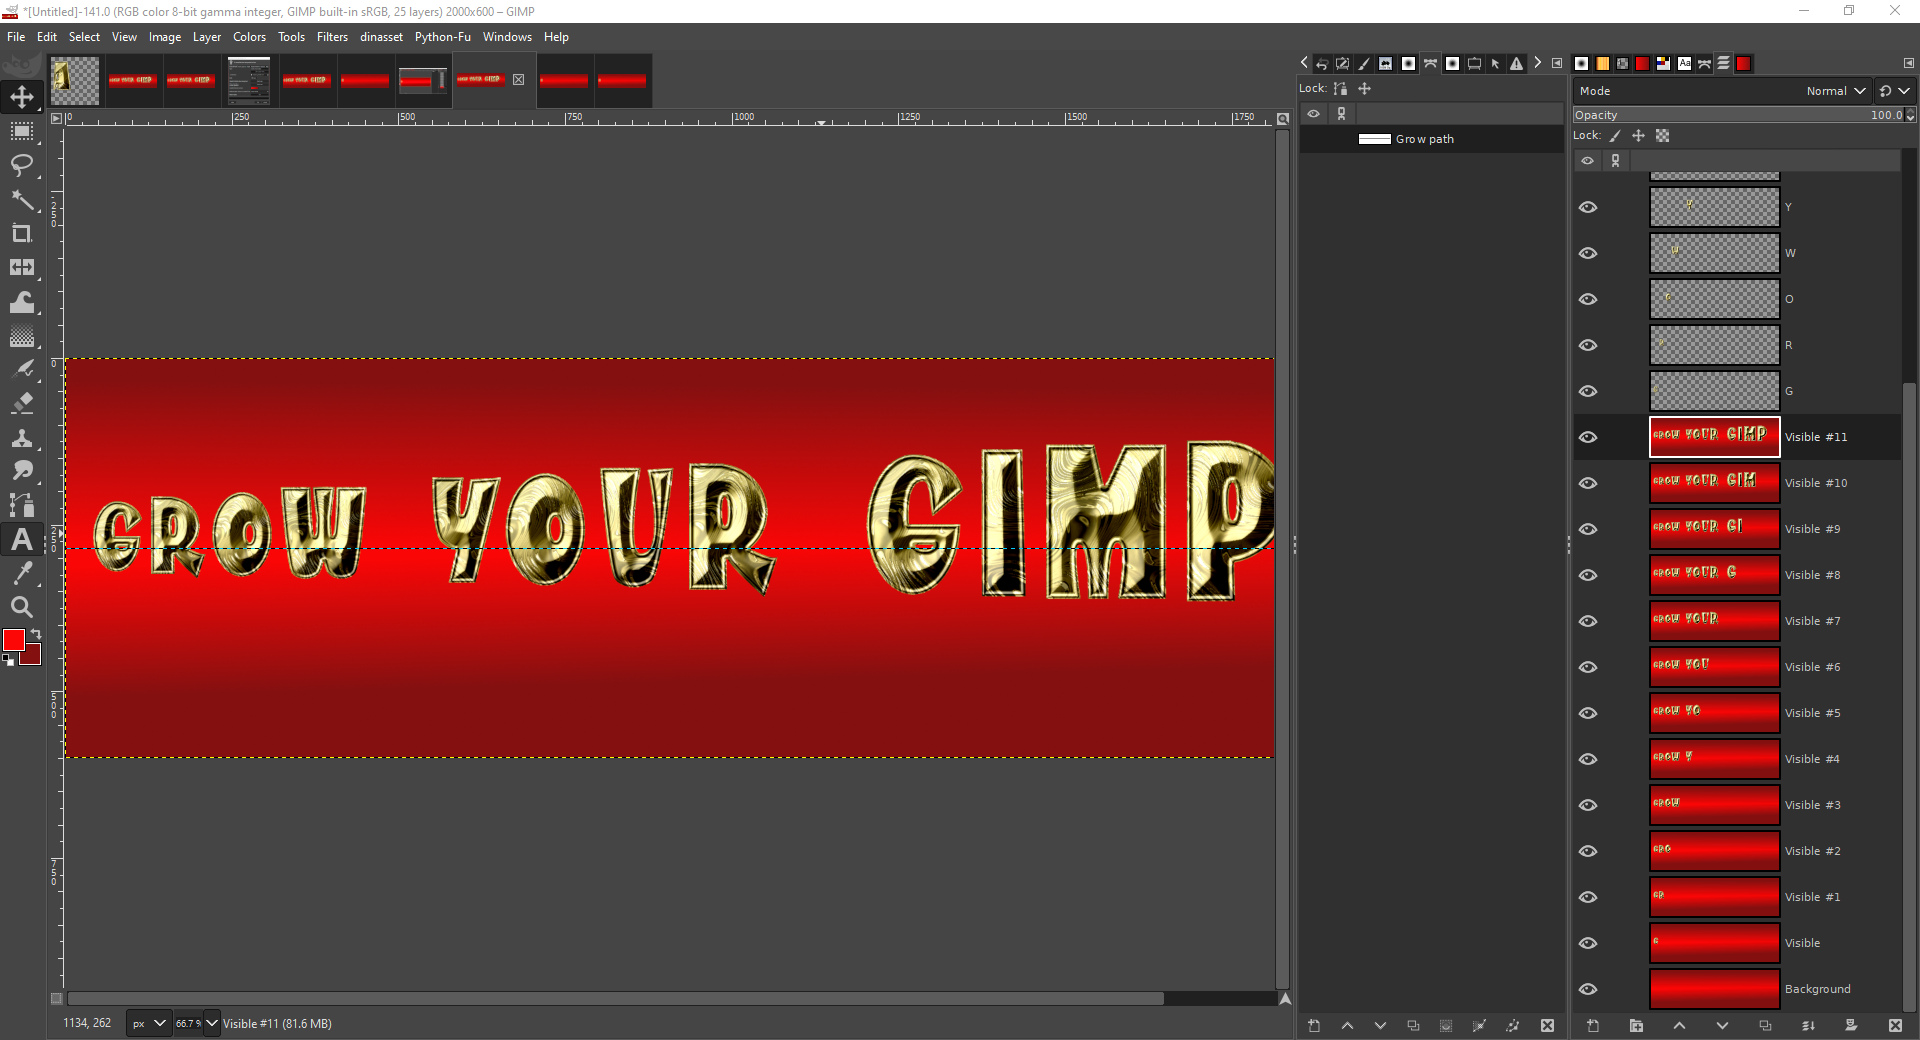
Image

The next step is to delete the unwanted character layers without a background and end up with a more manageable list of layers to work with.
Image

If you prefer to work on a copy of the file, just in case of mistakes, you can always do this with:

Image>>Duplicate (Ctrl +D)

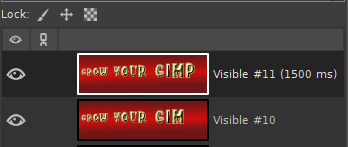
Note the renaming of the top layer by adding (1500ms) to the layer name in order lengthen the playback time used for this frame layer:
Image

Time to play the animation with:

Filters>>Animation>>Playback

This provides an idea of how the animated banner will run, although the file really needs optimizing to reduce it in size, before saving as a gif.

To reduce the filesize of the gif use:

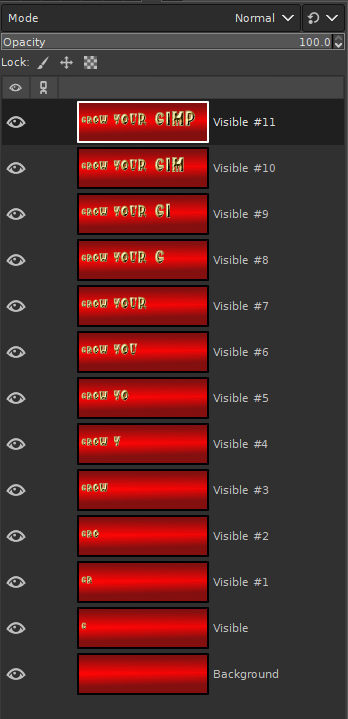
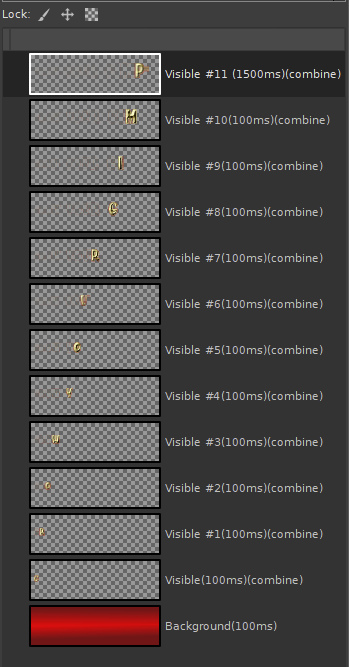
Filters>>Animation>>Optimize (for GIF)

The layer dock below gives an idea of the changes made by optimizing.
Image

Finally you can save the file as a gif by using the File>>Export As... option using the gif extension. Remember to check the 'As animation' option on the save dialog.

_________________
Image

"Let no one steal your dreams."
Paul Cookson


Latest plug-in update: Paragrapher v.1.4
Custom Font Links
Tools
Character Paths
White Bases


Last edited by Skinnyhouse on Wed Jul 05, 2023 2:34 am, edited 2 times in total.

Share on Facebook Share on Twitter Share on Orkut Share on Digg Share on MySpace Share on Delicious Share on Technorati
Top
 Post subject: Re: Using Custom Font Tools as part of the Animation Process
PostPosted: Fri Jun 30, 2023 5:09 am  (#2) 
Offline
GimpChat Member
User avatar

Joined: Mar 01, 2014
Posts: 12709
Location: Spain, Aragón
Skinnyhouse, Thanks a lot for your teaching tutorial, so good and explained in detail (just I need).
Thanks for your patience too. :tyspin

I collected each step in a pdf (I share it here) if someone prefers it in this format) Thanks skinnyhouse :tyspin


Attachments:
Custom Font_Animation_Process by Skinnyhouse.pdf [599.66 KiB]
Downloaded 43 times

_________________
Image

Gimp 2.10.30(samj) portable _ OS Windows 10 Home_ 64bits
Don’t be afraid to start over. It’s a new chance to rebuild what you want.
Top
 Post subject: Re: Using Custom Font Tools as part of the Animation Process
PostPosted: Fri Jun 30, 2023 6:18 am  (#3) 
Offline
GimpChat Member
User avatar

Joined: Aug 08, 2016
Posts: 2062
Location: East Midlands of England
:tyspin Thanks Issa; I forgot to upload one so you saved me a job.

_________________
Image

"Let no one steal your dreams."
Paul Cookson


Latest plug-in update: Paragrapher v.1.4
Custom Font Links
Tools
Character Paths
White Bases


Top
 Post subject: Re: Using Custom Font Tools as part of the Animation Process
PostPosted: Sat Jul 01, 2023 2:27 am  (#4) 
Offline
GimpChat Member
User avatar

Joined: Aug 08, 2016
Posts: 2062
Location: East Midlands of England
Using Custom Font FontSlab to Create Expanding Text

This animation style uses character spacing to create the illusion of the text expanding from the left.

Image

NB: This gif also has a fade sequence added after the expanding text sequence.

Add a new image to Gimp (2000x400 px).

File>>New… (Ctrl + N)

Create a suitable background and add a path for the letters to move along (I used a curving path).

Image

Call up the FontSlab plug-in (post#1):

Filters>>Custom Fonts>>Using Tools>>Font Slab Tabbed v0.17…

Use the first tab to select the custom font (you could use a normal font) to use and enter your text. The ‘Retain layers:’ option should be set to ‘Don’t use’.

Image

Use the second tab to set the initial font size and the size step change. You will probably need to adjust these values to accommodate the length of the path and the custom font you use.

The ‘Adjust spacing between characters’ option needs to be set to a negative value to give the impression that the characters are initially stacked up on the left hand side of the image. You will need to play about to find the value that gives you a satisfactory outcome: I settled on -80.

Image

Click on ‘OK’ to apply the filter and you should have the text as one layer stacked up at the start of your path.

Image

Now it is a matter of repeating the plug-in using smaller amounts of negative spacing for the ‘Adjust spacing between characters’ option until you reach 0 (zero).

I used steps of 5 until zero was reached.

To speed up your workflow make a copy of the visible layers after each use of FontSlab to prepare a set of layers for the animation. Use your keyboard shortcut to create the copy.

The screenshot below shows the layer dock with my newly created my copy of the two layers.

Image

Image

So in my case the next value to use for the ‘Adjust spacing between characters’ option would be -75.
My outcome:

Image

Next, make only the newly created layer and the background layer visible before creating a copy of the two. The screenshot of the layer dock shows the these two layers and the newly created composite layer (Visible #1).

Image

Just keep repeating this process...

Open FontSlab
Adjust the value of ‘Adjust spacing between characters’ on Tab 2 of the dialog
Click ‘OK’ on the dialog to create a new layer
Make only the new layer and the background layer visible
Create a ‘new from visible’ composite layer

...until you have reached a value of zero with the ‘Adjust spacing between characters’ option.

A partial layer dock view of all my character layers combined with the background:

Image

The next step is to delete all character layers without a background and then create an optimized version of the file:

Filters>>Animation>>Optimize (for GIF)

Finally you can save the file as a gif by using the

File>>Export As...

option using the gif extension.

Remember to check the 'As animation' option on the save dialog.

Attachment:

_________________
Image

"Let no one steal your dreams."
Paul Cookson


Latest plug-in update: Paragrapher v.1.4
Custom Font Links
Tools
Character Paths
White Bases


Top
 Post subject: Re: Using Custom Font Tools as part of the Animation Process
PostPosted: Sat Jul 01, 2023 12:33 pm  (#5) 
Offline
GimpChat Member
User avatar

Joined: Mar 01, 2014
Posts: 12709
Location: Spain, Aragón
This effect is superb! I love it. I hadn't done it for a very long time and I'm happy you have remebered it here. :coolthup :paint


Attachments:
Thanks Skinnyhouse.gif
Thanks Skinnyhouse.gif [ 438.17 KiB | Viewed 3017 times ]

_________________
Image

Gimp 2.10.30(samj) portable _ OS Windows 10 Home_ 64bits
Don’t be afraid to start over. It’s a new chance to rebuild what you want.
Top
 Post subject: Re: Using Custom Font Tools as part of the Animation Process
PostPosted: Sun Jul 02, 2023 11:01 am  (#6) 
Offline
GimpChat Member
User avatar

Joined: Aug 08, 2016
Posts: 2062
Location: East Midlands of England
Thank you Issabella - that means a lot to me.

The effect is my favourite too! :bigthup :bigthup

_________________
Image

"Let no one steal your dreams."
Paul Cookson


Latest plug-in update: Paragrapher v.1.4
Custom Font Links
Tools
Character Paths
White Bases


Top
 Post subject: Re: Using Custom Font Tools as part of the Animation Process
PostPosted: Sun Jul 02, 2023 11:24 am  (#7) 
Offline
GimpChat Member
User avatar

Joined: Aug 08, 2016
Posts: 2062
Location: East Midlands of England
Using Custom Font FontSlab to Create Rotating Text

Attachment:


Attachment:
Rotate_Go.gif
Rotate_Go.gif [ 5.3 MiB | Viewed 3002 times ]


This animation style adds custom font characters that decrease in size and rotates all characters along a path through 360 degrees; I have added a slight pause before the animation continues.

Add a new image to Gimp (2000x400 px).

File>>New… (Ctrl + N)

Create a suitable background and add a path for the letters to move along (I used a curving path).

Image

Call up the FontSlab plug-in:

Filters>>Custom Fonts>>Using Tools>>Font Slab Tabbed v0.17…

Use the first tab to select the custom font (you could use a normal font) to use and enter your text.

Image

Use the second tab to set the font size options: I want to control the final size used for the last character so I need to use text size modifiers. You will probably need to adjust these values to accommodate the length of the path and the custom font you use.

The values I used simply mean start with a size of 300 (initial text size), move along the path until you reach the target for change point (set at 25% of the path here) and reach the target size (300 in my case) and then gradually reduce the size to 20 (the final text size).

Image

Click on ‘OK’ to run the filter.

Image

You can see that the text size does not begin to reduce until it reaches the target position – I wanted to keep the letters in the word ‘GIMP’ at the larger size.

Next I want to begin to add some rotation to the characters.

Use the third tab to set the amount of rotation for the text. Use the ‘Add angle to existing slope’ option (new to version 0.17) to update the angle from it’s original value on the path.

Image

Click on ‘OK’ to run the filter.

Image

You can see the effect of the rotation angle change in the image – before I create a copy of each character layer on the background layer using a copy of the selected visible layers (as with the previous styles).

The screenshot below shows how these layers looked after this process in the layer dock:

Image

Now it is a matter of repeating the rotation step: I am incrementing the angle size by 20 degrees each time so the values I enter will be 20, 40, 60 etc until I get to 340 degrees. To improve your workflow make a visible copy of each new text layer and the background as you go along.

NB. One point to note is that the dialog spinner for the ‘Angle of rotation’ will only go up to 180 degrees (a hang over from its use with the jitter option).

Image

To continue rotating past this point (my next value would have been 200 degrees) switch to using negative values (-180 and 180 give the same outcome). So my next value will now need to be set to -160 degrees; then values of -140, -120, -100 etc.

Image

If you want the animation to keep rotating, without pausing, then you can stop at this point and delete all the unnecessary character layers without a background as well as the background layer.

Try viewing the animation:

Filters>>Animation>>Playback…

Save the animation:

My layer dock showing the layers at this point:

Image

If, however, you want to introduce a pause after each rotation of 360 degrees, make a duplicate of the very first layer and move it to the top of the layer stack.

Then rename the new top layer by adding ‘(2000ms)’ to the name to make this frame display for 2 seconds. (Use other values if you prefer.) The screenshot below shows this new, renamed layer now at the top of the stack.

Image

Save the animation with

File>>Export As...

option using the gif extension.

Remember to check the 'As animation' option on the save dialog.

I also adjusted the playback speed of the animation from the ‘Export as...’ gif dialog, entering the speed of 50 milliseconds to replace the default setting for unspecified layers.

Image

_________________
Image

"Let no one steal your dreams."
Paul Cookson


Latest plug-in update: Paragrapher v.1.4
Custom Font Links
Tools
Character Paths
White Bases


Top
 Post subject: Re: Using Custom Font Tools as part of the Animation Process
PostPosted: Tue Jul 04, 2023 2:47 pm  (#8) 
Offline
GimpChat Member
User avatar

Joined: Aug 08, 2016
Posts: 2062
Location: East Midlands of England
Using Custom Font FontSlab to Create Text with a Tremor

Image

This animation style adds custom font characters that appear to shake or quiver.

Add a new image to Gimp (1000x500 px).

File>>New… (Ctrl + N)

Create a suitable background and add a path for the letters to use with this effect. I used two paths but only want to use the effect to a word consisting of larger characters. My background layer:

Image

Call up the FontSlab plug-in:

Filters>>Custom Fonts>>Using Tools>>Font Slab Tabbed v0.17…

Use the first tab to select the custom font to use and enter your text.

Image

Use the second tab to enter the size to use for your custom font word. I didn’t use any text size step change – but you could if you wish.

Image

Click on ‘OK’ to create the new later with the custom font characters. At this point the image consists of two layers.

Image

Image

Make a ‘New from visible’ copy of the two layers, ready for animating later on.

The screenshot below shows this new composite layer in the layer dock.

Image

Now for the ‘tremor’: Make only the background layer visible before continuing.

Call up the FontSlab plug-in again:

Filters>>Custom Fonts>>Using Tools>>Font Slab Tabbed v0.17…

Open the third tab on the filter dialog and set the ‘Jitter range’ amount:

Image

The value of 20 will allow the filter to set a random angle between +/- 10 of the original character angle on the path. This should provide a gentle tremor effect. If you want a violent shake, increase the value of the jitter option.

Create more layers with exactly the same filter settings (Repeat Last) to make the tremor last as long as you wish. Remember to create a ‘New from visible’ copy of the new layer and the background layer as you go to speed up your workflow.

I repeated the filter six times and then made a copy of the original layer (the one without the jitter) and moved it to the top of the layer stack.

The screenshot below shows a portion of my layer dock; at the top you can see a couple of the custom font layers, then the ‘New from visible’ layers and at the very bottom you can see my background layer.

Image

To prepare for the animation, delete the unwanted background layer and all of the custom font character layers.

I added a frame delay of (1000ms) to the top layer name and (50ms) to the remaining layer names: I left the very bottom layer name as it was (Gimp will insert the default frame delay of 100ms).

Image

Save the animation with

File>>Export As...


option using the gif extension.

Remember to check the 'As animation' option on the save dialog.

pdf version of this guide:

Attachment:


Have fun...

_________________
Image

"Let no one steal your dreams."
Paul Cookson


Latest plug-in update: Paragrapher v.1.4
Custom Font Links
Tools
Character Paths
White Bases


Top
 Post subject: Re: Using Custom Font Tools as part of the Animation Process
PostPosted: Wed Jul 05, 2023 2:30 am  (#9) 
Offline
GimpChat Member
User avatar

Joined: Aug 08, 2016
Posts: 2062
Location: East Midlands of England
Once you have the custom font layers in place you can also use the layer opacity options to create fades and glow effects as part of an animation.

The one below uses two versions of the same custom font – one has an outer glow (applied using Custom Font Outer Glow).

Attachment:
Glow.gif
Glow.gif [ 4.39 MiB | Viewed 2959 times ]

_________________
Image

"Let no one steal your dreams."
Paul Cookson


Latest plug-in update: Paragrapher v.1.4
Custom Font Links
Tools
Character Paths
White Bases


Top
 Post subject: Re: Using Custom Font Tools as part of the Animation Process
PostPosted: Thu Jul 06, 2023 3:34 am  (#10) 
Offline
GimpChat Member
User avatar

Joined: Mar 01, 2014
Posts: 12709
Location: Spain, Aragón
Skinnyhouse, I am slow but I try to go :hehe
other nice attractive effect.


Attachments:
Tremor-Skinnyhouse.gif
Tremor-Skinnyhouse.gif [ 246.41 KiB | Viewed 2947 times ]

_________________
Image

Gimp 2.10.30(samj) portable _ OS Windows 10 Home_ 64bits
Don’t be afraid to start over. It’s a new chance to rebuild what you want.
Top
 Post subject: Re: Using Custom Font Tools as part of the Animation Process
PostPosted: Thu Jul 06, 2023 4:26 am  (#11) 
Offline
GimpChat Member
User avatar

Joined: Aug 08, 2016
Posts: 2062
Location: East Midlands of England
I love it Issa: :kpix

The guides have so much text in that it makes them a big investment in time to follow. More images could have helped perhaps?

_________________
Image

"Let no one steal your dreams."
Paul Cookson


Latest plug-in update: Paragrapher v.1.4
Custom Font Links
Tools
Character Paths
White Bases


Top
 Post subject: Re: Using Custom Font Tools as part of the Animation Process
PostPosted: Thu Jul 06, 2023 7:08 am  (#12) 
Offline
GimpChat Member
User avatar

Joined: Mar 01, 2014
Posts: 12709
Location: Spain, Aragón
Thanks Skinnyhouse. Your guides are very helpful and I haven't had problem to follow it. Thanks a lot because those effects are really nice to see and to do, too.
By the way, how clever to get minus grades to continue the rotation! :clap


Attachments:
Rotating 360 grados.gif
Rotating 360 grados.gif [ 438.33 KiB | Viewed 3236 times ]

_________________
Image

Gimp 2.10.30(samj) portable _ OS Windows 10 Home_ 64bits
Don’t be afraid to start over. It’s a new chance to rebuild what you want.
Top
 Post subject: Re: Using Custom Font Tools as part of the Animation Process
PostPosted: Thu Jul 06, 2023 7:19 am  (#13) 
Offline
GimpChat Member
User avatar

Joined: Aug 08, 2016
Posts: 2062
Location: East Midlands of England
:tyspin
Mesmeric

_________________
Image

"Let no one steal your dreams."
Paul Cookson


Latest plug-in update: Paragrapher v.1.4
Custom Font Links
Tools
Character Paths
White Bases


Top
 Post subject: Re: Using Custom Font Tools as part of the Animation Process
PostPosted: Sat Jul 08, 2023 4:06 am  (#14) 
Offline
GimpChat Member
User avatar

Joined: Mar 01, 2014
Posts: 12709
Location: Spain, Aragón
Thank lot, Skinnyhouse.
and....
Could each letter rotate on itself? But vertically, I mean.

_________________
Image

Gimp 2.10.30(samj) portable _ OS Windows 10 Home_ 64bits
Don’t be afraid to start over. It’s a new chance to rebuild what you want.


Top
 Post subject: Re: Using Custom Font Tools as part of the Animation Process
PostPosted: Sat Jul 08, 2023 5:52 am  (#15) 
Offline
GimpChat Member
User avatar

Joined: Aug 08, 2016
Posts: 2062
Location: East Midlands of England
:mrgreen:
That's one to work on for sure!
:cool

_________________
Image

"Let no one steal your dreams."
Paul Cookson


Latest plug-in update: Paragrapher v.1.4
Custom Font Links
Tools
Character Paths
White Bases


Top
Post new topic Reply to topic  [ 15 posts ] 

All times are UTC - 5 hours [ DST ]


   Similar Topics   Replies 
No new posts Attachment(s) Custom Font Tools Part Update

2

No new posts Attachment(s) Custom Font Tools Release 12

7

No new posts Attachment(s) Custom Font Tools Release 13

1

No new posts Attachment(s) Custom Font Tools: Release 14

0

No new posts Attachment(s) Custom Font Tools Release 10

1


* Login  


Powered by phpBB3 © phpBB Group