It is currently Sat Jul 20, 2024 8:21 pm


All times are UTC - 5 hours [ DST ]


Post new topic Reply to topic  [ 7 posts ] 
Author Message
 Post subject: Retro sunbeam, sunrays background, how to
PostPosted: Wed Jun 08, 2022 3:35 am  (#1) 
Offline
GimpChat Member
User avatar

Joined: May 24, 2021
Posts: 816
Location: SEA - South East Asia
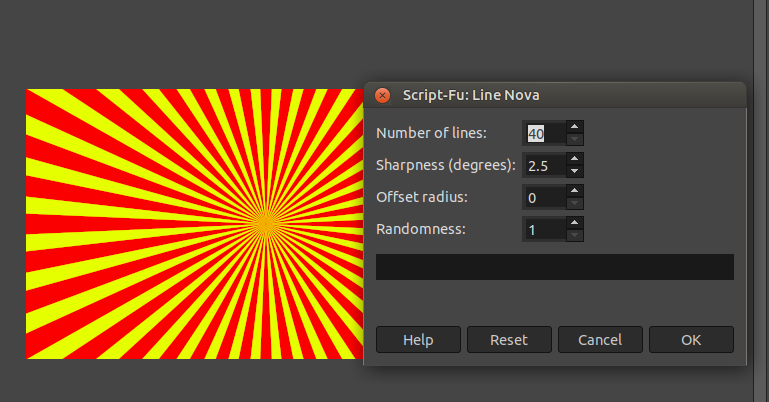
no G'MIC (Patterns/Rays), only with the GIMP tool
Image

2 Layers of different colors, I chose red and yellow for this exercise.
Then on the top layer (yellow) "Filters >> Distorts >> Kaleidoscope"
Make sure to reset the filter, and use 
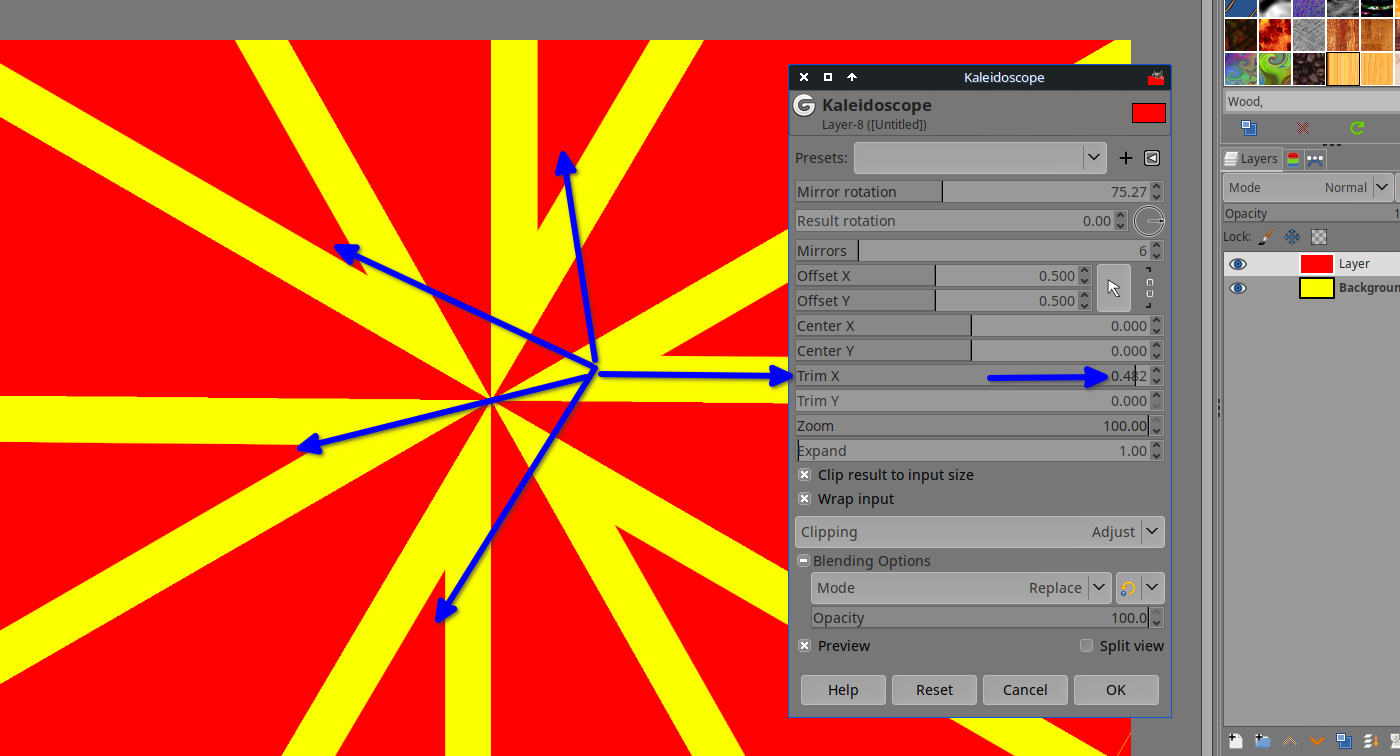
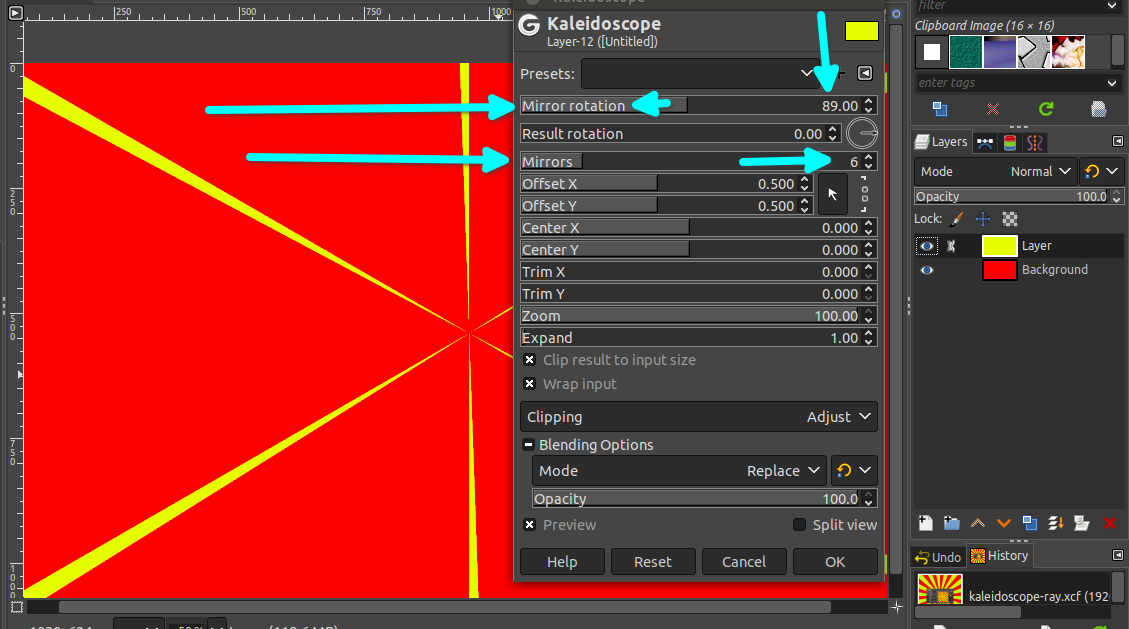
Mirrors for the number of yellow beams, and put the "Mirror rotation" (the first slider) to 90 degrees.
Image
Then slide down the cursor slowly :hehe
Done!

Below is for the curious and motivated....

A bit of math...
"Mirror rotation" is up to 180 degrees, thus to see appearing the start of the "fan" you do need to be at 90 (degrees), this will be the "maxima"
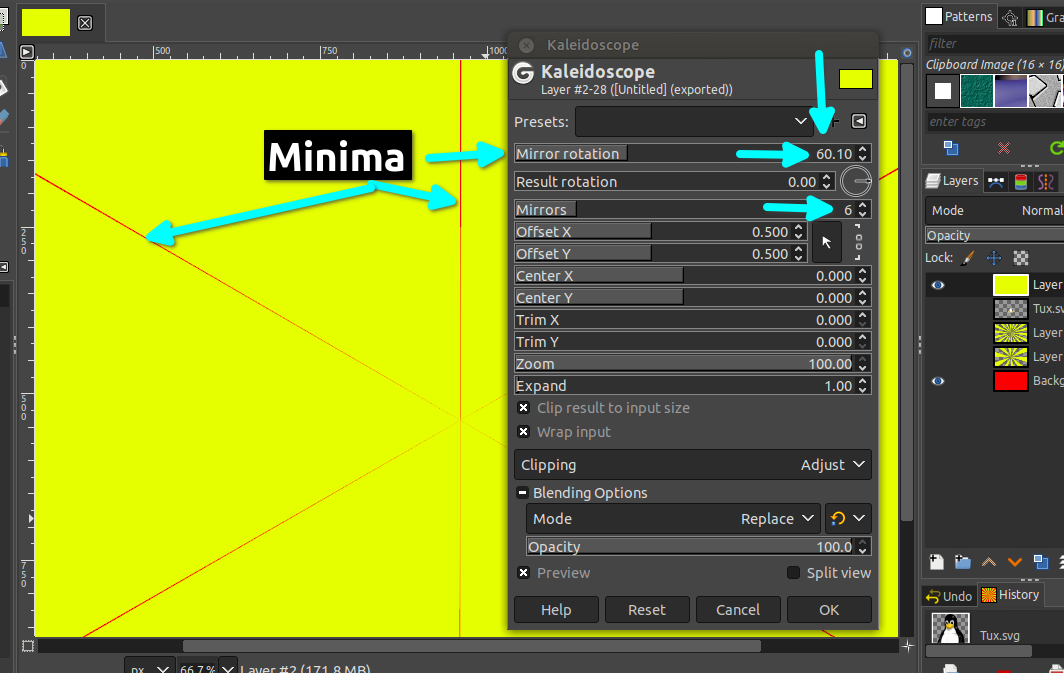
In the "Mirrors" slider (the number of mirrors) by default it's 6, this number will give you the "minima" angle
So all starting at 180 degrees (let's just take the numbers now without the 0/zero))
For 6 mirrors the minima will be:
18/6=3 => 9-3=6 = 60
Thus 90 degrees minus 60 degrees = 30 degrees >> the minima will be 90 - 30 = 60, you will see the "fans" spanning from 60 to 90 on the "Mirror rotation" slider,

Why I speak about that? because if you want the 2 colors having exactly the same span => 30/2 = 15 > +60 = 75 > set the slider at 75
Image

another example:
12 mirrors
18/12= 1.5 =(put back the 0/zero =15) 90-15= 75 so between 75 and 90 you will be able to see the "fans" spanning and to have the exact spread of red and yellow 15/2= 7.5 >> 90 -7.5= 82.5 set the top slider at 82.5

18 branches... 18/18=1 the spread is 10 thus 80 to 90, middle is 85 for equal spread
20 branches...18/20= 0.9 the spread is 9 thus 81 to 90, equal spread will be 81+4.5=85.5

I see the numbers in my head, I tried hard to explain how I see them, but I agree it' might not make any sense for some :roll:
You can just do it visually :bigthup

_________________
Patrice


Share on Facebook Share on Twitter Share on Orkut Share on Digg Share on MySpace Share on Delicious Share on Technorati
Top
 Post subject: Re: Retro sunbeam, sunrays background, how to
PostPosted: Wed Jun 08, 2022 4:52 am  (#2) 
Offline
Script Coder
User avatar

Joined: Oct 25, 2010
Posts: 4757
Also "Filters > Render > Line nova"

Attachment:
Nova.png
Nova.png [ 45.87 KiB | Viewed 2354 times ]

_________________
Image


Top
 Post subject: Re: Retro sunbeam, sunrays background, how to
PostPosted: Wed Jun 08, 2022 5:44 am  (#3) 
Offline
GimpChat Member
User avatar

Joined: May 24, 2021
Posts: 816
Location: SEA - South East Asia
ofnuts wrote:
Also "Filters > Render > Line nova"


Indeed, long time ago I did tried then forget it, and today because you speak about it, I told myself "Oh yes that was it" thus I did try it again :mrgreen:

Now I recall why I did used G'MIC
No visual reference when moving a cursor. Cannot go below 40 blades,
"Sharpness (degrees)" too confusing, never recalled what it does, now that I "understand" it's about more on one color than other, but still why 2.5 out of 10 make it equal?
On the other hand fans' edges are smoother with it,

For those who want to try it, start with this settings then push 1 slider at a time to see what it does (Ctrl+Z is your friend)
Image

_________________
Patrice


Top
 Post subject: Re: Retro sunbeam, sunrays background, how to
PostPosted: Wed Jun 08, 2022 7:46 am  (#4) 
Offline
GimpChat Member
User avatar

Joined: Jan 13, 2011
Posts: 2260
Location: Poland
Two surprises in one post: :hehe
old script-fu line-nova.scm is a tool and G'MIC is not?
Necessity of own installation precludes the TOOL name? :hoh
These are only developers choices - I have mine. :mrgreen:
I replaced script line-nova with this one (though old too, but with many more options).

_________________
Image

Slava
Ukraini!


Top
 Post subject: Re: Retro sunbeam, sunrays background, how to
PostPosted: Wed Jun 08, 2022 10:02 am  (#5) 
Offline
GimpChat Member
User avatar

Joined: Oct 31, 2020
Posts: 1480
I knew this and made a filter of it. Also the zz crap is gone thanks to MareroQ's discovery.


Top
 Post subject: Re: Retro sunbeam, sunrays background, how to
PostPosted: Wed Jun 08, 2022 11:27 am  (#6) 
Offline
Global Moderator
User avatar

Joined: Oct 06, 2010
Posts: 4050
I totally agree with Rich when he says we should learn to utilize what GIMP can offer in creating certain renders instead of relying on scripts, so I am happy to see others dropping those ideal ways to accomplish things. On the same token, it is hopeful that the mindset isn't about ridding innovation because script writers/coders/hackers have provided us with tools to speed up our process, and that isn't a bad thing, since all a script or plugin is doing is putting the steps into sequence in one get go. Just don't get lazy and rely solely on them. We old-timers (we all know who we are) won't be here forever and preparing the noobs to step in and take over is pretty much the goal.

_________________
"In order to attain the impossible, one must attempt the absurd."
~ Miguel de Cervantes


Top
 Post subject: Re: Retro sunbeam, sunrays background, how to
PostPosted: Fri Jun 10, 2022 7:32 pm  (#7) 
Offline
GimpChat Member
User avatar

Joined: May 24, 2021
Posts: 816
Location: SEA - South East Asia
@MareroQ That was not my meaning :rofl ,
Huge G'MIC fan here :yes , also I never said it, but the few scripts I have from you are absolute fantastic tools (thanks a lot) :clap , and this goes also for @Ofnuts fabulous tools and others like @Skinnyhouse, @dinasset, etc... (I can't put all the names), thank you so much guys :tyspin

@contrast_ Let's face it, this "tuto" is because of you! :rofl >> viewtopic.php?f=9&t=19948#p273837
I did tried your GEGL script, and in your post you spoke about "Kaleidoscope", I very rarely use this tool, thus I needed to understand more, thank you Beaver :bigthup

@mahvin I completely agree with Rich as well :bigthup

A little extra if you followed this "tuto" above, push (near the end) the "Trim X" slider after you see the 2 colors beams before clicking OK

Image

_________________
Patrice


Top
Post new topic Reply to topic  [ 7 posts ] 

All times are UTC - 5 hours [ DST ]


   Similar Topics   Replies 
No new posts Attachment(s) Create a retro Op Art Text plugin

0

No new posts Background patterns

3

No new posts Attachment(s) Background or Wallpaper

1

No new posts Attachment(s) 2 gif, 1 background, different speeds

10

No new posts Attachment(s) how could i make this background

7


* Login  


Powered by phpBB3 © phpBB Group