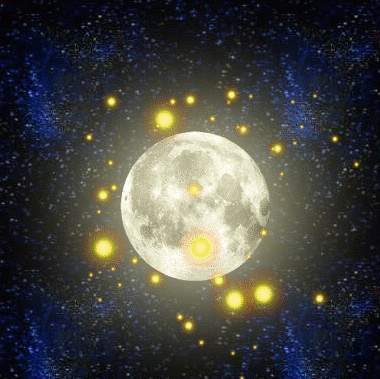
This is an example image of animating brushes. I used the Sparks brush that comes packaged with GIMP.
Lesson #1Open a new image, make it 600 x 600 pixels, fill the background layer with white. That will give you a lot of room to work. You may want to practice with smaller ones later.
Make a new transparent layer and name it Layer#1. Get in the habit of naming new layers by adding #1 to the name. No spaces between the name and the #1. When you duplicate it, it will automatically make it #2
Near the top of the Layers dialog there are 4 little tabs. Hover your mouse over each tab to see what each one is.
Stack of white papers = Layers
Stack of red, green, blue rectangles = Channels - color RGB
Line-like things = Paths
Yellow arrow = Undo history
First, add the Brushes tab to the Layers dialog. If you don't want to leave it there, after the lesson you can remove it.
Below the stack of white papers (Layers tab) is the word,
Layers; move your mouse to the right of the word
Layers and slide directly to the tiny arrow on the right. Hovering your mouse over the arrow, you'll see the words, "Configure this tab."
Click that tab and click Add tab. Go down to Brushes and click. Now you have brushes up in those tabs. Whatever the last brush was you selected will show there or the default black circle.
Click the Brushes tab. You can see the brushes. You can widen the palette and see more or move the slider up and down. I have my Brushes, Gradients, Patterns and Fonts there. They are so much easier to see there. If you ever want to take one of those tabs out, click on the tab of the one you want out and click the little arrow and select, Detach tab. It will show up as a separate dialog and you can click the X in the corner to get rid of it from your screen.
Click the Brushes tab if it isn't already open. Look closely at the brushes. Some have little red triangles by their plus signs. If you click one of those with the mouse and hold the mouse button down, it will show the brush in action. Down at the bottom of the Brushes tab is the refresh button. If you add a brush while GIMP is open, click that and the Brush will appear in the dialog.
Click the Layers tab (white stack of papers).
You should have two layers: Background and Layer#1. Click Layer#1 to be sure it is selected.
Now you're going to make a path.
Press the B button. That selects the Paths tool over in the main Toolbox.
Starting at the left of the image, make a zigzagged path by clicking from point to point across the image. You will see purple circles and a purple line.
Click the Paths tab. You will see your zigzagged line in the little white preview window there.
Note: I checked in v2.6.2 and there is no black path in the little preview window. It shows in v2.4x.
To get rid of those purple dots and lines, press the B key again. Click the eye next to the white preview window and you can see your path in the Image window. You won't need to see it all the time; I just wanted you to see that you can view the path in the Image window. Click the eye again and it's gone.
Now, stroke the path with a brush. Click the Brushes tab and select a brush, preferably animated but any brush will do for now.
Click the Paths tab again. Down at the bottom just to the left of the Trash can on the far right is the Paint along the path button. Hover your mouse over it to make sure you have the right one and click it.
In that dialog, tick Stroke with a paint tool and use the Paint brush which is the default brush. Click Stroke. Now you can see the brush following the zigzaggy path you made.
You may need to make the brush smaller, jitter it some, space it more.
In the Toolbox click the Paintbrush tool button. Down below the tool buttons you can see some options.
Scale changes the size.
I can't tell you what setting to use because I don't know which brush you are using. You'll have to scale it until you come up with a pleasing size.
Apply jitter makes it bounce around a bit instead of strictly following the path.
Jitter: The amount of jitter depends upon the brush you are using. Go ahead and make the jitter 3 for now.
Use color from gradient: You can tick that one, choose a gradient and your brush will take on the colors of the gradient.
Back over in the Layers dialog, click the brushes tab and look at the bottom.The spacing is down there. To make the brushes farther apart, move the slider to the right. Almost all of the brushes that I make are spaced 100. I space somewhere between 100 and 200 ... usually in the 160's. Just slide it over and then see what happens.
Go back to the Paths tab. Press delete and you have a blank image window again.
Click the Paint along the path button again and see what comes out. If you want to change anything, press the Delete key and go back and work with the settings. As you can see, it's not an exact science. Practice so that it becomes easy for you.
Time for a break. There is a lot to digest but nothing very difficult. It involves a lot of clicking.

This tutorial will have more lessons about animating the brushes. In the meantime practice, practice, practice. You'll probably get ideas and make some nice images just using this much.