It is currently Fri Apr 19, 2024 7:23 pm


All times are UTC - 5 hours [ DST ]


Post new topic Reply to topic  [ 53 posts ]  Go to page 1, 2, 3  Next
Author Message
 Post subject: Dials and Gauges
PostPosted: Fri Jul 02, 2010 1:09 pm  (#1) 
Offline
GimpChat Member
User avatar

Joined: May 16, 2010
Posts: 14709
Location: USA
I looked and looked on the net for a GIMP tutorial on the internet for gauges and found zippo so i figured id write my first one starring speedometers...hope you like it, and can follow it...lol.......enjoy!

This tutorial doesnt have alot of images of tools and what not and i suppose i probably should have used more of them, but if you have any questions, just ask me and ill explain better...here go's! =)

1) open gimp...create a new file 450x450
2) make a new layer white.
3) make a new layer fill it with a very dark color...black is fine call it dark back.
4) set up your grid for, view/snap to, and make sure its 25px in size.
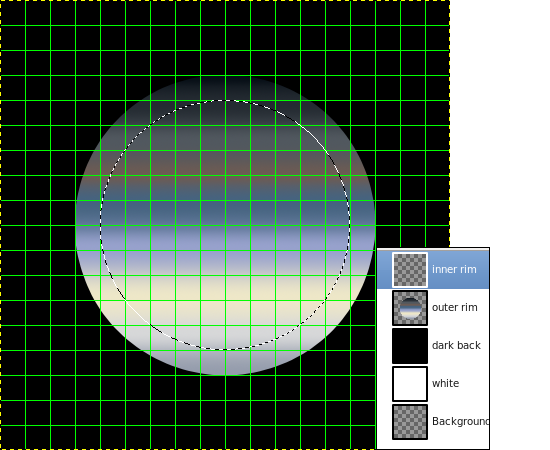
5) create a new transparent layer call it outer rim.
6) create a circle 300x300 fixed color it white,and snap to center of outer rim layer.
7) with the selection still selected use your gradient tool with the gradient metalic something and stroke a gradient in the white circle from top to bottom.
8) create a new layer name it inner rim
9) create a new fixed circle at 250x250 snap to center of image fill with black (inside outer rim circle)
10) select the outer rim layer and blur/motion blur /radial at angle 52
11) create a new transparent layer call it inner bevel
12) create a new circle 250x250 and stroke it gray at 3px i used 636363 center and snap it to grid
13) select none
14) now select scriptfu/layer effects/emboss
inner bevel
depth 3
direction up
size 5
soften 0
surface contour ring
angle 120
altitude 30
gloss contour linear
highlight mode screen
color white
highlight opacity 75
shadow mode multiply
color black
shadow opacity 75
scale 100
depth 100
and make sure to click preview and merge with layer
click ok
15) select your inner rim layer and alpha to selection fill it with black
16) select none
17) turn off all layers except your white one
18) create a new transparent layer call it gauge lines
19) create a new circle 250x250 stroke it 1 px black snap to center
20) select none
21) now select a nice blue color that looks good against black i used 0018fa.you can also use a green color if you want to.
22) create a new transparent layer call it gauge lines 2
23) now for the tricky part..making the actual lines for the gauge using the circle you just used as a template border.
select pencil tool/brush circle 05 and draw a line it doesnt matter if you go outside the circle it will be cut anyways.set pencil scale to .65/mode normal/opacity 100
24) now draw lines on the gauge lines 2 layer from left to right and top to bottom in the circle centered like a cross hair
25) duplicate that layer name it gauge lines 3 rotate to 45 degrees
26) duplicate that layer name it gauge lines 4 and rotate 22.5 degrees
27) duplicate that layer name it gauge lines 5 and rotate 11.25 degrees
28) duplicate that layer name it gauge lines 6 and rotate 33.11 degrees
29) duplicate that layer name it gauge lines 7 and rotate -146.06 degrees
30) duplicate that layer name it gauge lines 8 and rotate 45.45 degrees
31) ONE MORE TIME
duplicate last layer again name it gauge lines 9 and rotate 22.68 degrees
NOW try and get all the lines somewhat symmetrical and even all the way around best you can.i had to adjust gauge lines 8 :P
32) merge all gauge line layers except the one named gauge lines with the circle, make it invisible because you don't need it right now.(HINT) make all but the gauge line layers invisible and right click a layer and select merge visible layers.Now rename the merged layers layer..gauge lines.
33) select the gauge lines layer create a circle fixed center it 248x248...select/ invert/click delete key
34) select invert/select shrink 25px/delete
35) select none
36) make all layers visible again to check symmetry
37) duplicate the gauge lines layer call it gauge lines white alpha to selection color white/select none
38) make white lines layer invisible/select the blue layer (gauge lines blue) and starting from the top vertical line (12 0 clock ), skip and erase every other blue line, you should now have 16 blue lines.
39) make the blue line layer invisible now and select the white lines layer.. erase every other line starting with the 12 0 clock line.
40) with the white lines layer still selected, create another circle 220x220 and center it and hit delete.
your white lines should now be shorter than your blue ones.turn on the blue lines layer to make sure.
41) make a new layer call it outer bevel/make a circle 300x300/stroke it gray (636363) at 3 px.
42) refer to step #14 for bevel and emboss settings.
now we will create the numbers for our gauge.
43) create a new layer call it gauge numbers
44) turn off all layers except blue lines/dark black, and your new gauge numbers layer.
45) select white as your foreground color and select text tool, select a digital looking font, if you have one. create numbers 10 - 140 all on different layers.
46) arrange each number so it corresponds with a blue line starting from the 6 0 clock line place a 10, and going clockwise 20,30,40 ect to 140, now delete all the other blue lines that have no number next to them.i used the font DejaVu Sans at 12px.except for 100 - 140 make them 11px.
47) make # 140 color red, make 130 color orange, and 120 yellow.
48) arrange all the numbers to be pretty even, merge all the number(text layers)rename the layer speedometer numbers.
49) just above the inner rim layer create a new layer call it glass shine.
50) make a ellipse (long eggshell shaped) and blur/Gaussian blur 15...make sure you rotate it about 40 degrees and place it top left.now set the opacity to just try and make sure it looks like a shiny area...blur as needed.about 12 for opacity.
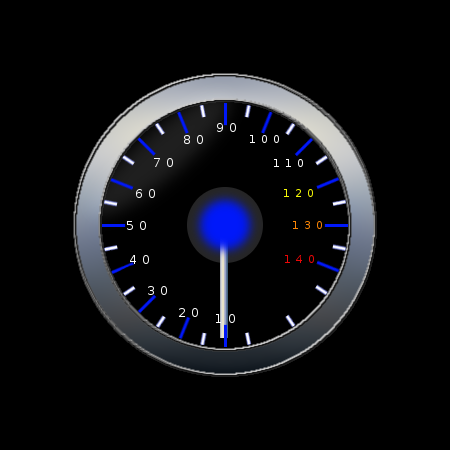
50) if all is well this is what you should have so far
Image
Now lets work on the center and needle.
51) Just above the inner rim layer create another layer call it dial
52) turn view grid and snap to grid back on if needed, create a circle fixed 50x50 and center it and fill with the same color blue as your lines.select/none/filters/blur/Gaussian blur 15
53)create another layer call it dial outer white /create a fixed circle 75x75 and center it and place the layer below the dial layer, set the opacity to 15.
54) turn off all layers except, dial.outer dial white, and inner rim (the black circle)..turn off the view grid for now...
NOW we will create our needle...
Before we go any further let me stress to save OFTEN!..
55) create a new layer call it dial needle
56) create a long rectangular shape and select the gradient tool and metallic something draw a gradient across the needle left to right.
57) align the needle with the center and pointed to 10 place the needle layer under the dial layer
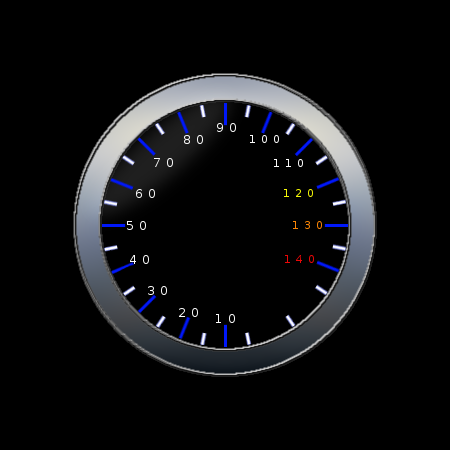
this is what it should look like now..
Image
58) select the layer gauge lines white and duplicate it scale it down to fit around the blue center area
59) just above the dial layer create a new layer call it dial center, make a circle fixed at 25px center on top of dial layer
fill it with black.
60) make a new transparent layer call it power gradient.use a gradient of yellow to red (romanian flag smooth...from bottom right to top left
on a new circle selection on the power gradient layer size 200x200 px fixed...center it also
61) now make another circle same size and use it to cut out a section that is sorta half moon shaped
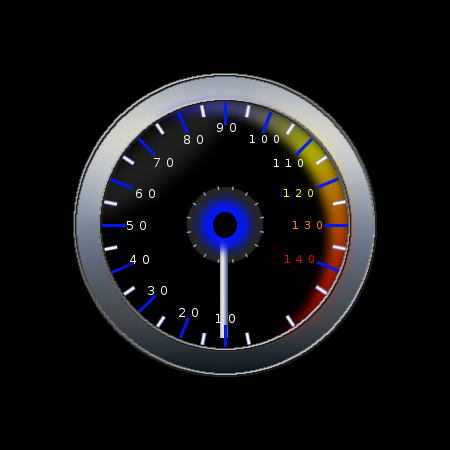
move it under our glass shine layer and blur by 15 now it should look like this, and were almost finished...we need a dash board. =)
Image
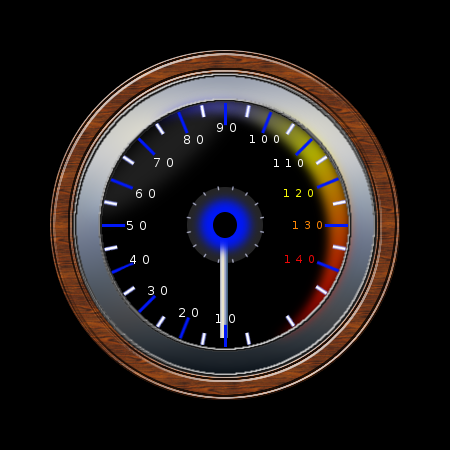
62)create a new layer call it dash board make a circle fixed 350x350 and fill it with wood pattern #2...now on this same layer create a fixed circle 300x300 and delete the inside of the dashboard wood circle.move that layer to the top.
using the same bevel emboss settings from step #14 bevel and emboss the dashboard layer...

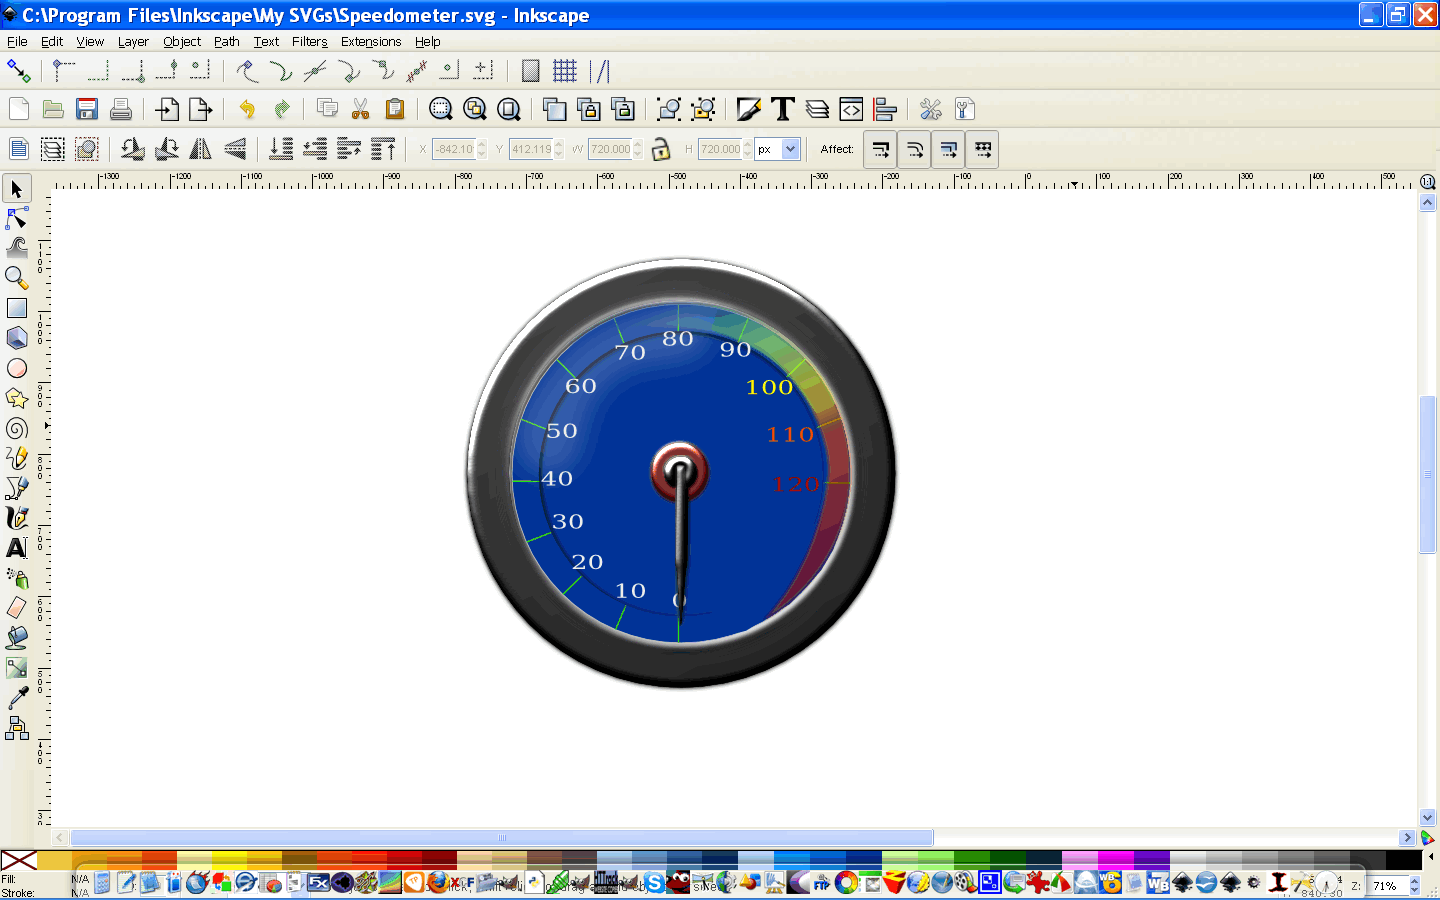
thats it were done...this is the final image..
Image

thanks for checking out my first tutorial here at Gimper.I know its not the best but ill use more pictures in my next one.

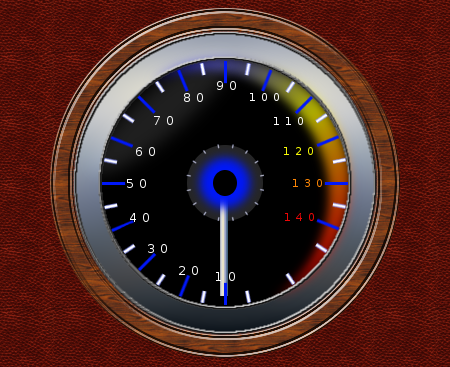
i added a leather layer
Image

arggghh...i forgot the 0 ...lol =P

_________________
Image
Edmund Burke nailed it when he said, "The only thing necessary for the triumph of evil is for good men to do nothing."


Last edited by Rod on Sat Jul 03, 2010 12:59 pm, edited 1 time in total.

Share on Facebook Share on Twitter Share on Orkut Share on Digg Share on MySpace Share on Delicious Share on Technorati
Top
 Post subject: Re: Dials and Gauges
PostPosted: Fri Jul 02, 2010 11:26 pm  (#2) 
Offline
Retired Staff
User avatar

Joined: May 22, 2008
Posts: 6947
Location: Somewhere in GIMP
Cool tut.

I'm in the process of doing it, got to step 9, have a 250x250 circle selection centered but what do I do with it now?

_________________
Image
World War IV will be fought with sticks and stones. - Albert Einstein


Top
 Post subject: Re: Dials and Gauges
PostPosted: Sat Jul 03, 2010 2:47 am  (#3) 
Offline
GimpChat Member

Joined: Jun 28, 2010
Posts: 61
Awesome!

_________________
Image


Top
 Post subject: Re: Dials and Gauges
PostPosted: Sat Jul 03, 2010 4:40 am  (#4) 
Offline
GimpChat Member
User avatar

Joined: May 16, 2010
Posts: 14709
Location: USA
Oregonian wrote:
Cool tut.

I'm in the process of doing it, got to step 9, have a 250x250 circle selection centered but what do I do with it now?

sorry O, all you need to do is snap it to the center of the image.The way i created the entire thing i tried to use
same bevels, and snap all the circles to center just to make it faster and easier.Im pretty sure all the circular shapes you make will snap to center.Then its just a matter of lowering or raising for effect looks.

hope that helps =)
here is one im working on in InkScape...not quite finished yet.
Image

_________________
Image
Edmund Burke nailed it when he said, "The only thing necessary for the triumph of evil is for good men to do nothing."


Top
 Post subject: Re: Dials and Gauges
PostPosted: Sat Jul 03, 2010 9:33 am  (#5) 
Offline
Retired Staff
User avatar

Joined: May 22, 2008
Posts: 6947
Location: Somewhere in GIMP
Rod wrote:
sorry O, all you need to do is snap it to the center of the image.The way i created the entire thing i tried to use
same bevels, and snap all the circles to center just to make it faster and easier.Im pretty sure all the circular shapes you make will snap to center.Then its just a matter of lowering or raising for effect looks.

hope that helps =)


Sorry, Rod, but it doesn't help. I still don't know what to do with the selection. Like, do I fill it with a color, stroke it, do something to it after making the selection?

Here is an image of what I have so far including the layers ... what goes into the inner rim layer?

Image

_________________
Image
World War IV will be fought with sticks and stones. - Albert Einstein


Top
 Post subject: Re: Dials and Gauges
PostPosted: Sat Jul 03, 2010 12:55 pm  (#6) 
Offline
GimpChat Member
User avatar

Joined: May 16, 2010
Posts: 14709
Location: USA
sorry that would be step 15 fill with black...guess i should edit this a bit.......lol
the rest of the tut looks good though.

fixed...
at step 10 make sure to do a alpha to selection and select only the circle.

_________________
Image
Edmund Burke nailed it when he said, "The only thing necessary for the triumph of evil is for good men to do nothing."


Top
 Post subject: Re: Dials and Gauges
PostPosted: Sat Jul 03, 2010 1:46 pm  (#7) 
Offline
Retired Staff
User avatar

Joined: May 22, 2008
Posts: 6947
Location: Somewhere in GIMP
Thank you. That makes more sense.

I feared I might have a permanent case of ants marching around in a circle in the inner rim layer. :-D

_________________
Image
World War IV will be fought with sticks and stones. - Albert Einstein


Top
 Post subject: Re: Dials and Gauges
PostPosted: Sun Jul 04, 2010 4:15 pm  (#8) 
Offline
GimpChat Member

Joined: May 13, 2010
Posts: 33
Location: Tennessee
That is a very nice tutorial! I liked it and I am currently experimenting with it now to see how I can alter it and make it a bit different! Again, THANKS!


Top
 Post subject: Re: Dials and Gauges
PostPosted: Sun Jul 04, 2010 4:39 pm  (#9) 
Offline
GimpChat Member
User avatar

Joined: May 16, 2010
Posts: 14709
Location: USA
M3SH wrote:
That is a very nice tutorial! I liked it and I am currently experimenting with it now to see how I can alter it and make it a bit different! Again, THANKS!


i do that too, create something dif from each tutorial.

LOL @ O! o.O

_________________
Image
Edmund Burke nailed it when he said, "The only thing necessary for the triumph of evil is for good men to do nothing."


Top
 Post subject: Re: Dials and Gauges
PostPosted: Mon Aug 23, 2010 2:06 pm  (#10) 
Offline
GimpChat Member
User avatar

Joined: Jul 04, 2010
Posts: 2253
Location: Retired Moderator Slowly Returning to the Living.
I love the tutorial! Here's mine. I have an extra pixel at the end of my dial needle, but will fix it some other time.


Attachments:
Guage.gif
Guage.gif [ 324.35 KiB | Viewed 18412 times ]

_________________
Artists aren't crazy! We're eccentric! ~G.M. Ross

Image

My Sigs = My Photos
Check out my work at http://www.flickr.com/photos/photomastergreg.
Top
 Post subject: Re: Dials and Gauges
PostPosted: Mon Aug 23, 2010 6:30 pm  (#11) 
Offline
GimpChat Member
User avatar

Joined: May 16, 2010
Posts: 14709
Location: USA
NICE! =)
You even animated yours....heheh

very cool

_________________
Image
Edmund Burke nailed it when he said, "The only thing necessary for the triumph of evil is for good men to do nothing."


Top
 Post subject: Re: Dials and Gauges
PostPosted: Tue Aug 24, 2010 8:50 am  (#12) 
Offline
Global Moderator
User avatar

Joined: Apr 07, 2010
Posts: 14182
That is g8 photomaster. very good job. :coolthup

_________________
Image


Top
 Post subject: Re: Dials and Gauges
PostPosted: Tue Aug 24, 2010 9:36 am  (#13) 
Offline
GimpChat Member
User avatar

Joined: Apr 30, 2010
Posts: 1937
Location: Missouri
I guess it's the steampunk in me but I've always liked the really old time gauges. I acquired a big box full of old gauges and knife switches when I was a kid and had them all over the walls in my room. Then when I got old I worked with electronic equipment all of my adult life and every chance i get to scrounge an old gauge or control I grab it and hang it up somewhere. Ok, this has nothing to do with the topic I guess.

_________________
Image
The last time I kept an open mind,
my brain fell out and the dog grabbed it.
Now it's full of dirt, toothmarks, and dog slobber.
No more open minds or dogs for me.


Top
 Post subject: Re: Dials and Gauges
PostPosted: Tue Aug 24, 2010 12:05 pm  (#14) 
Offline
GimpChat Member
User avatar

Joined: May 16, 2010
Posts: 14709
Location: USA
Gms9810 wrote:
I guess it's the steampunk in me but I've always liked the really old time gauges. I acquired a big box full of old gauges and knife switches when I was a kid and had them all over the walls in my room. Then when I got old I worked with electronic equipment all of my adult life and every chance i get to scrounge an old gauge or control I grab it and hang it up somewhere. Ok, this has nothing to do with the topic I guess.


Hahah .. you should see all the dials, light switches,gauges,bike ,and car parts i have in my shed...i know what you mean. ;)
I just can not seem to get rid of anything...lol
Maybe it is time for a yard sale? =P

_________________
Image
Edmund Burke nailed it when he said, "The only thing necessary for the triumph of evil is for good men to do nothing."


Top
 Post subject: Re: Dials and Gauges
PostPosted: Tue Aug 24, 2010 5:55 pm  (#15) 
Offline
GimpChat Member

Joined: Aug 10, 2010
Posts: 16
WOW

How i envy you guys doing fantastic artwork in here!

Simply AWESOME!


Top
 Post subject: Re: Dials and Gauges
PostPosted: Tue Aug 24, 2010 6:37 pm  (#16) 
Offline
GimpChat Member
User avatar

Joined: Apr 30, 2010
Posts: 1937
Location: Missouri
Nah, Pixelbean, don't underestimate yourself, give it time and you'll be making things just as good, the key is to look at everything and ask yourself "now how can I draw that?" Then try it, see what doesn't look right and tweak it until it does.

_________________
Image
The last time I kept an open mind,
my brain fell out and the dog grabbed it.
Now it's full of dirt, toothmarks, and dog slobber.
No more open minds or dogs for me.


Top
 Post subject: Re: Dials and Gauges
PostPosted: Wed Aug 25, 2010 7:15 pm  (#17) 
Offline
GimpChat Member
User avatar

Joined: May 16, 2010
Posts: 14709
Location: USA
Gms9810 wrote:
Nah, Pixelbean, don't underestimate yourself, give it time and you'll be making things just as good, the key is to look at everything and ask yourself "now how can I draw that?" Then try it, see what doesn't look right and tweak it until it does.

yes that is the key...look at things, think about how many layers does that look like it has...thinking in layers helps alot.

_________________
Image
Edmund Burke nailed it when he said, "The only thing necessary for the triumph of evil is for good men to do nothing."


Top
 Post subject: Re: Dials and Gauges
PostPosted: Wed Aug 25, 2010 10:16 pm  (#18) 
Offline
GimpChat Member
User avatar

Joined: Jul 04, 2010
Posts: 2253
Location: Retired Moderator Slowly Returning to the Living.
Pixelbean,
I'll let you in on the secret! Play with it and have fun! That's the biggest part of it!

_________________
Artists aren't crazy! We're eccentric! ~G.M. Ross

Image

My Sigs = My Photos
Check out my work at http://www.flickr.com/photos/photomastergreg.


Top
 Post subject: Re: Dials and Gauges
PostPosted: Wed Aug 25, 2010 11:22 pm  (#19) 
Offline
GimpChat Member
User avatar

Joined: Apr 30, 2010
Posts: 1937
Location: Missouri
yeah, what they said, I completely agree about layers. Invariably will looking at everything wondering how many layer it will take.

_________________
Image
The last time I kept an open mind,
my brain fell out and the dog grabbed it.
Now it's full of dirt, toothmarks, and dog slobber.
No more open minds or dogs for me.


Top
 Post subject: Re: Dials and Gauges
PostPosted: Mon Aug 30, 2010 1:57 pm  (#20) 
Offline
GimpChat Member

Joined: Aug 27, 2010
Posts: 491
Been working with GIMP for all of two days and just attempted this ... the equipment is far superior to the operator but this tutorial was well worth the time spent. This has me wanting to look around for more tutorials like it.


Top
Post new topic Reply to topic  [ 53 posts ]  Go to page 1, 2, 3  Next

All times are UTC - 5 hours [ DST ]


   Similar Topics   Replies 
No new posts Attachment(s) Any script for clock dials?

5


* Login  


Powered by phpBB3 © phpBB Group