It is currently Fri Apr 19, 2024 1:55 pm


All times are UTC - 5 hours [ DST ]


Post new topic Reply to topic  [ 17 posts ] 
Author Message
 Post subject: The Flaming Horse Tutorial
PostPosted: Thu Sep 23, 2010 9:59 pm  (#1) 
Offline
GimpChat Member
User avatar

Joined: May 16, 2010
Posts: 14709
Location: USA
Ok the first thing you need to do is download my gradient and brush...
Download my brush here
http://www.mediafire.com/?0sta80ykok7pa80 (brush no longer available). You will need your own horse or other brush to complete this tutorial. Here are some nice ones by Maureenolder.
http://maureenolder.deviantart.com/art/ ... e-83172782
Download the gradient file here
http://www.mediafire.com/?376a4okm63lz9i3
place each file in their proper folders and restart Gimp.

Now that we have our brush and our gradient ready, lets begin -
Open Gimp... I will be using Gimp 2.6.10 for this tutorial.
Create a new document 640x400, fill it with black.Right click this layer choose add alpha channel.
Create a new white layer, name it clouds. - select black for foreground color, and white as background color.
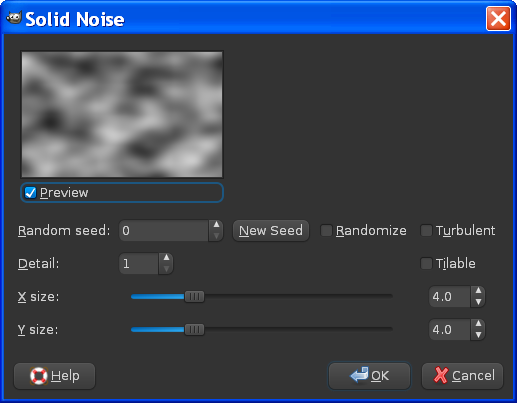
Go to filters/render/clouds/difference clouds - put in these settings.
Image
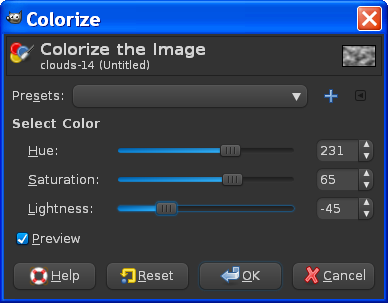
Select the clouds layer and go to colors/colorize and put in these settings -
Image
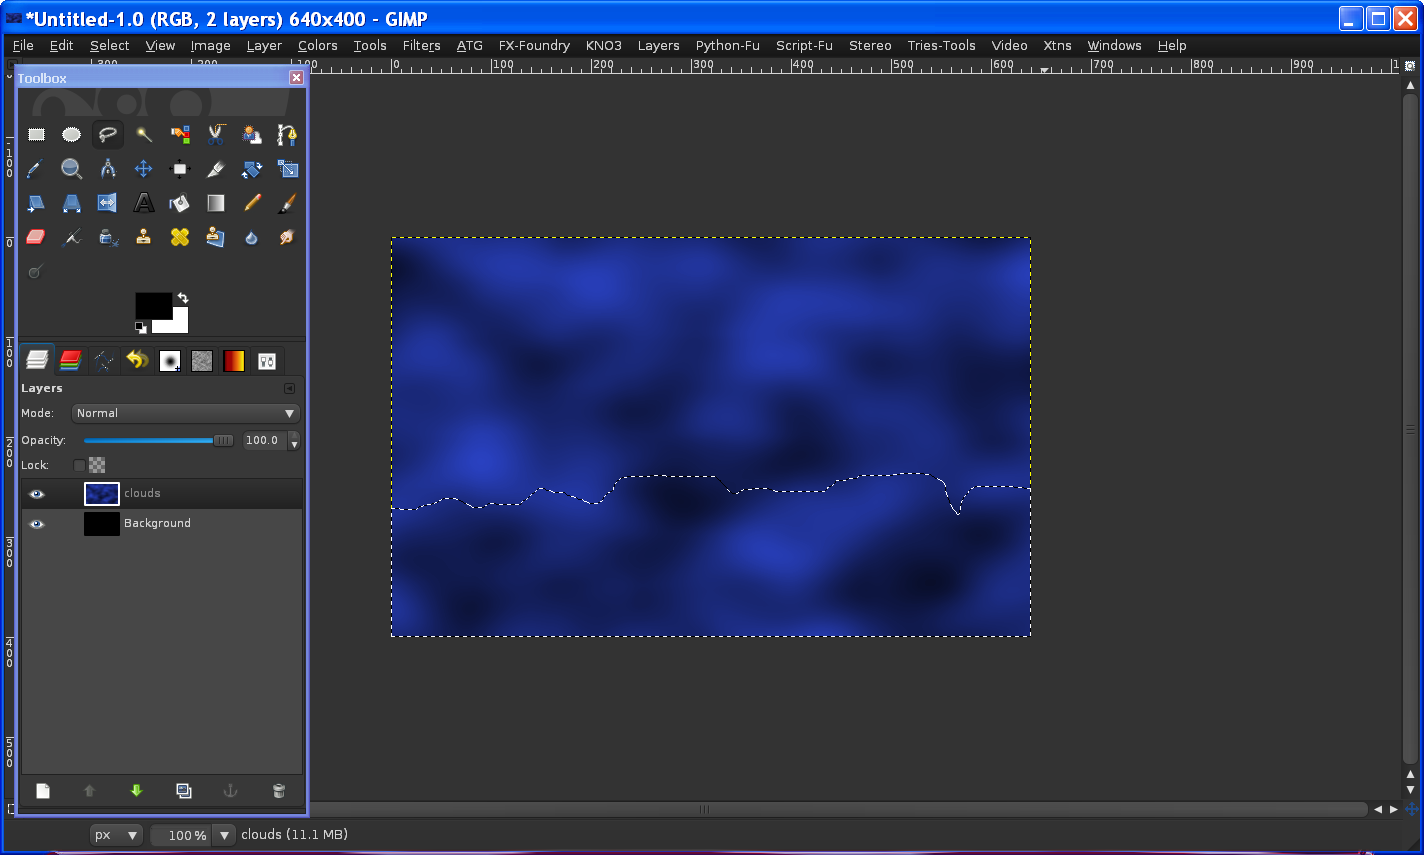
Now select the clouds layer and using the free select tool select a area at the bottom of the layer like this..
Image
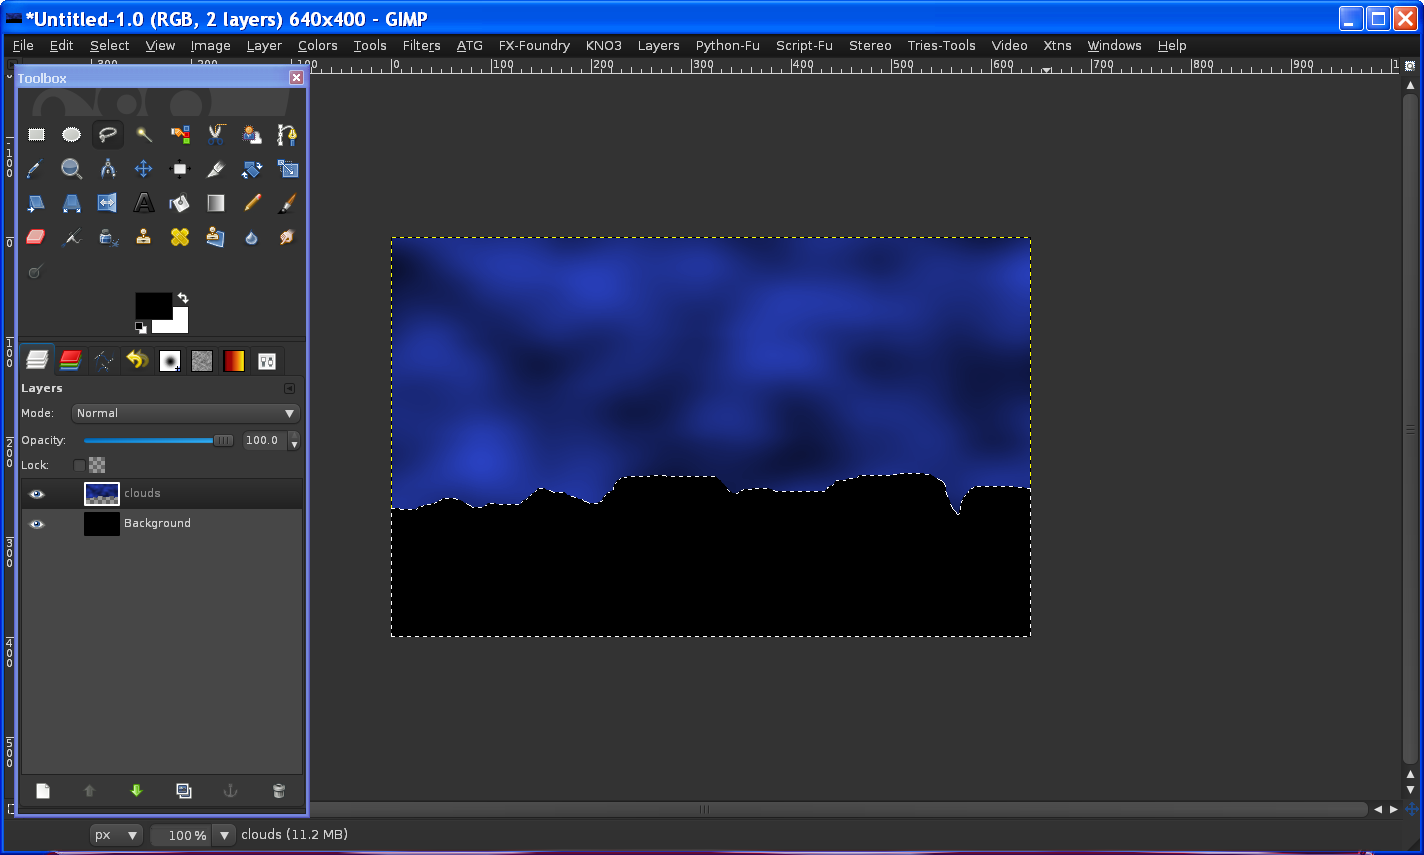
Go to Edit/clear.
Your image should now look like this
Image
Select/none to deselect all.
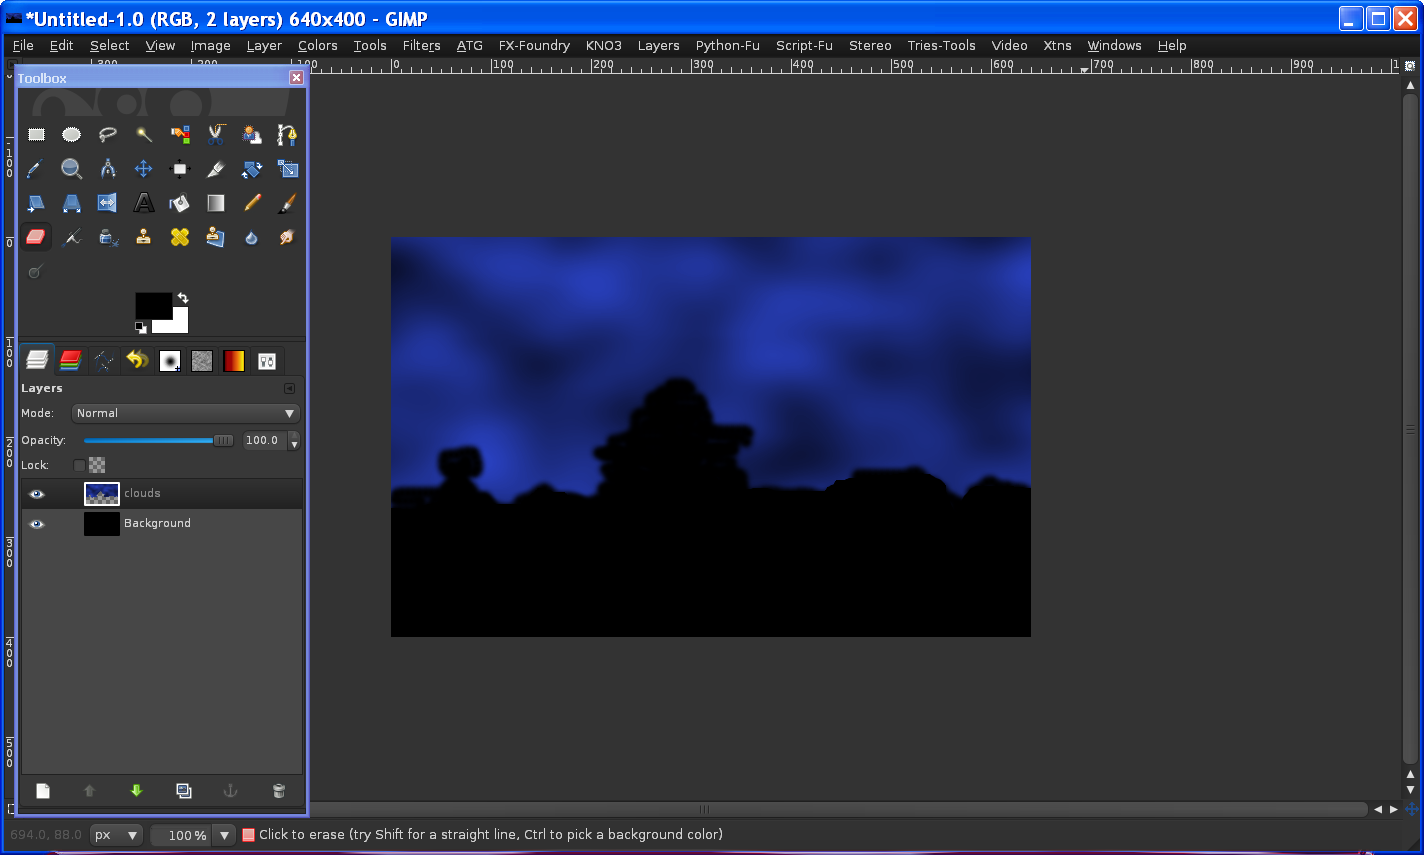
Now here is where your own creative juices come into play.Using the eraser tool select the clouds layer and erase out your cliffs like this..
Image
Use a size eraser about 1.25 for this..anything small enough to work with easily.
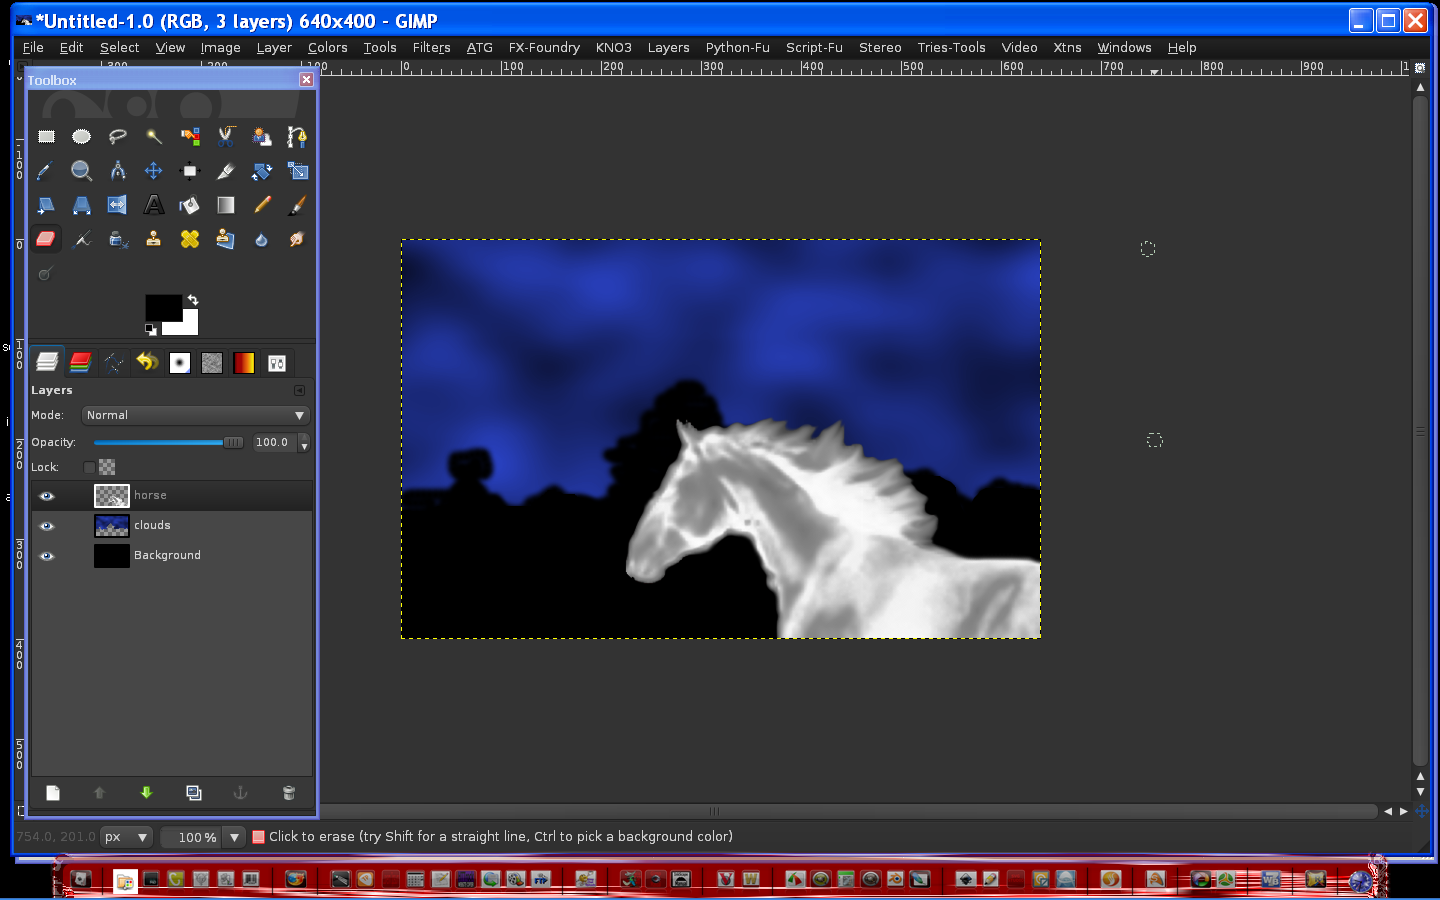
Now create a new transparent layer, name it horse - go into your brush folder and select the horse brush you downloaded.Use a nice big size.
Select the horse layer and decide where you want your horse to be in the image, and click on the image once to paste the brush like this.
Image
Grab the eraser tool and erase very carefully the dark edges around the horse

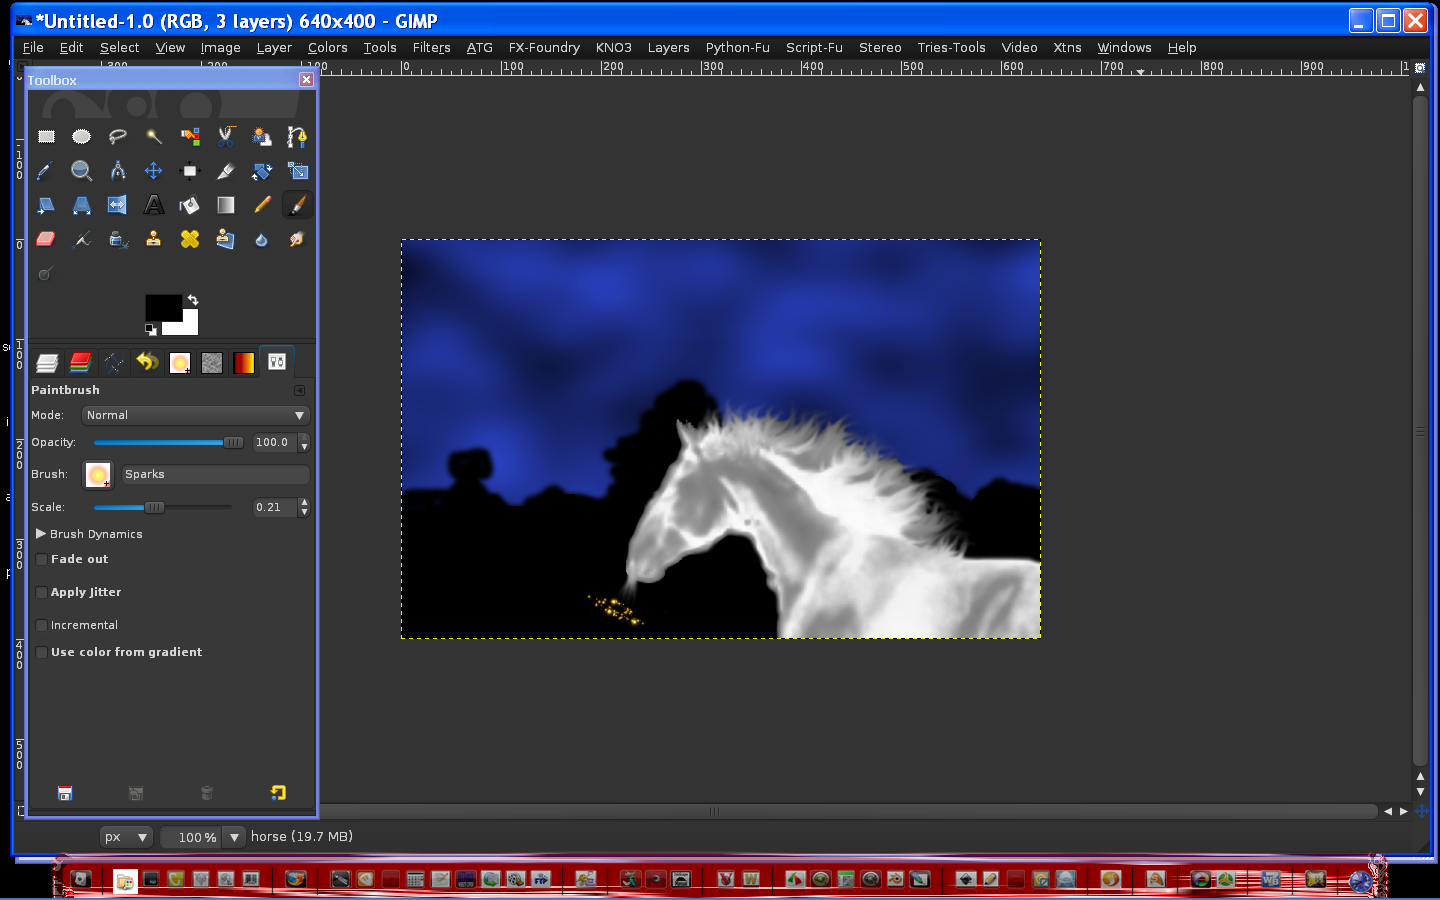
Now we need to make the mane of the horse more flamed out looking so grab the smudge tool and select the horse layer.
Using the smudge tool at a size of 0.70, smudge from inside the horses body to outside of the mane.
HINT: wiggle the tool as you smudge - this is also how i make text on fire in Gimp. It looks nice and realistic this way. =)
Using the sparks brush set it at 0.21 and create a cloud from the nostrils like he is breathing fire.Now your image
should look something like this.
Image
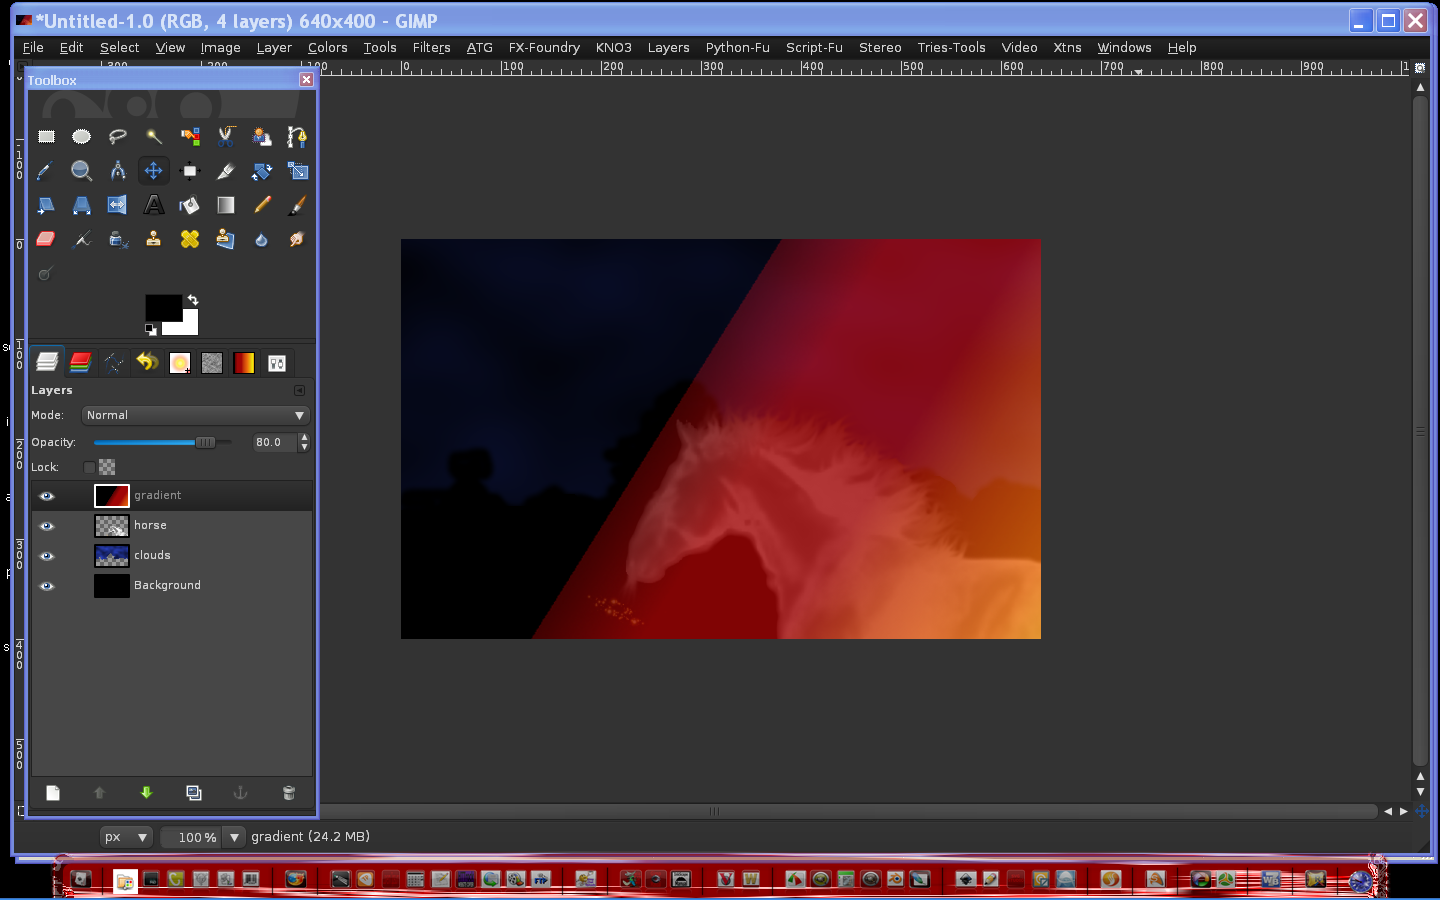
Create a new transparent layer name it gradient - Open Gradients Dialog - open your new Fire Storm gradient set it to linear , 38.6 offset -- Select the gradient layer and create a gradient from top left to bottom right corners.
Set the opacity to the gradient layer at 80.0 so you can see the horse under it.
Select the scale tool. and move the gradient over the entire horse...mostly the red and orange.
like this..
Image
Set the opacity of the gradient layer back to 100.
Right click the horse layer select alpha to selection...now select the gradient layer go to Edit/Copy
Select the horse layer again and go to Edit/Paste into - select create new layer to make a new layer from the floating selection...
Select/none to deselect all...
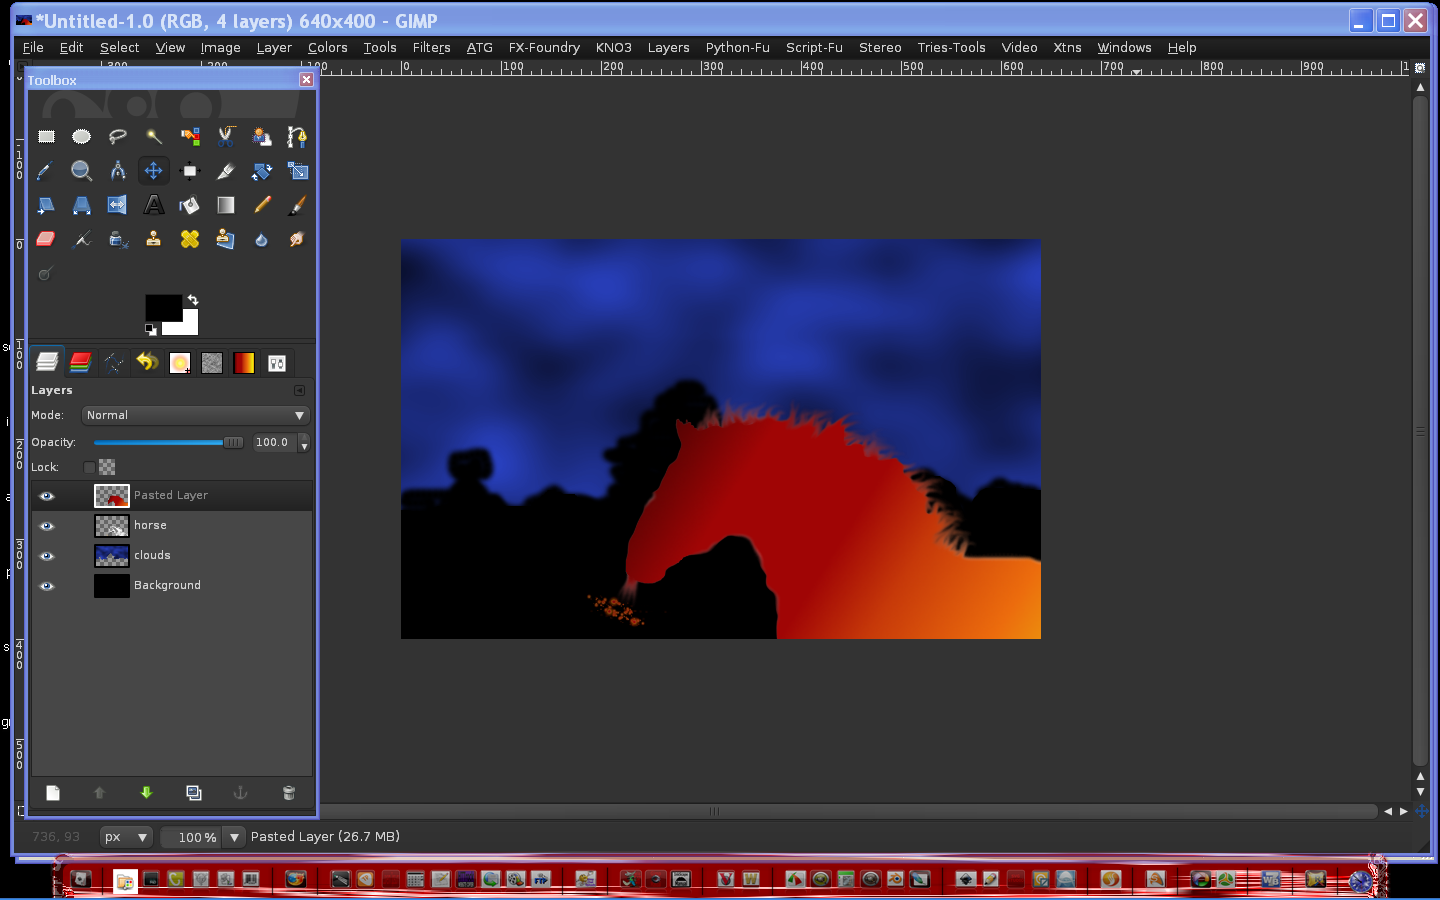
Delete the gradient layer.Your image should now look like this with all the layers.
Image
Rename the pasted layer gradient overlay
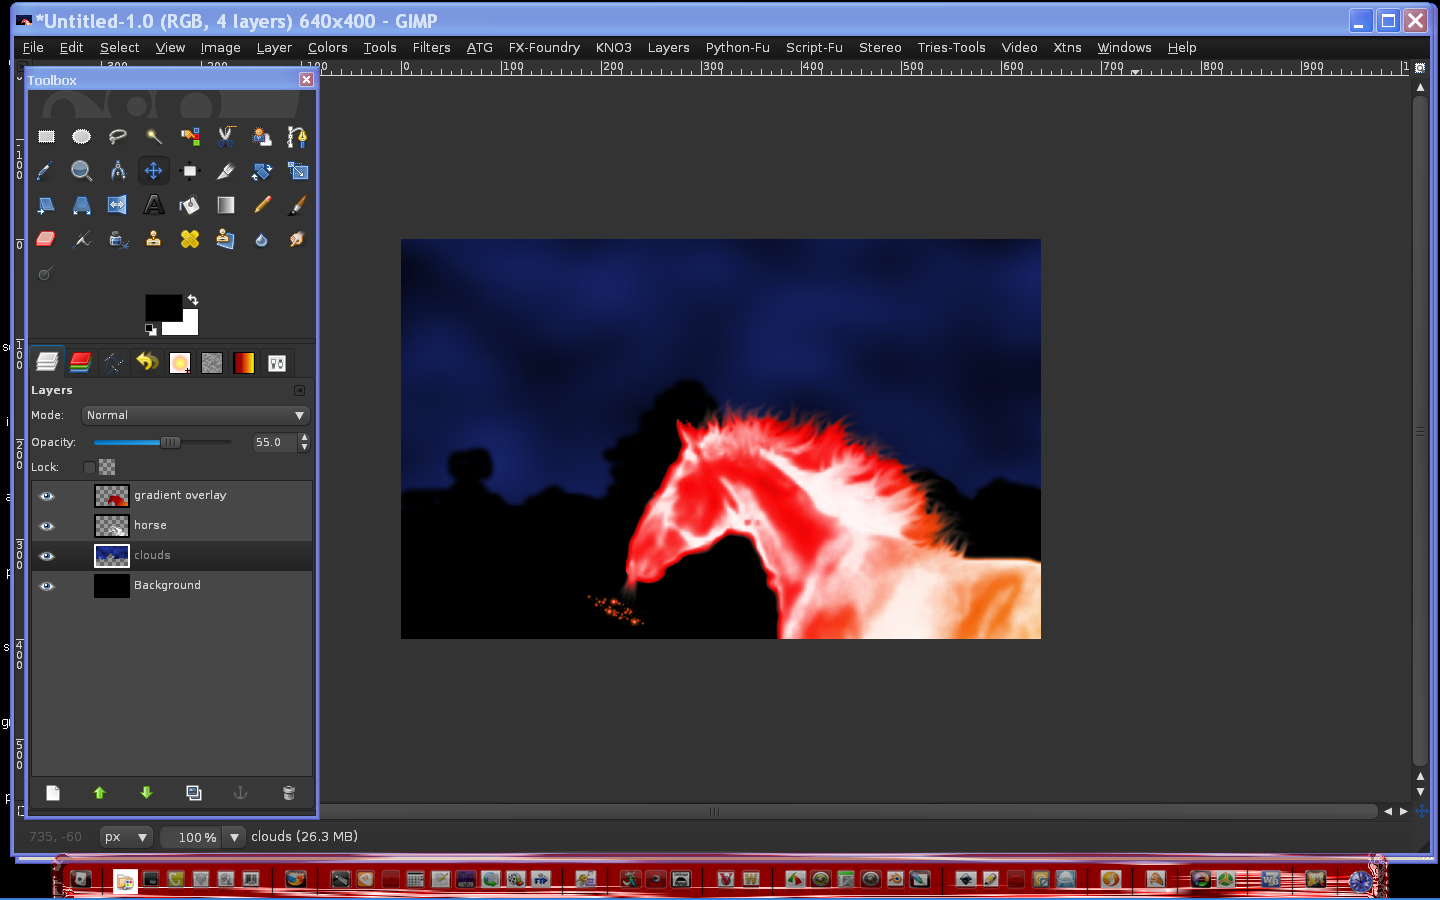
Select the gradient overlay layer and set the layer mode to color.
Set the clouds layer opacity to 55 so its nice and dark looking type of sky.
At this time you can also set the opacity of the horse and/or gradient overlay layers. =)
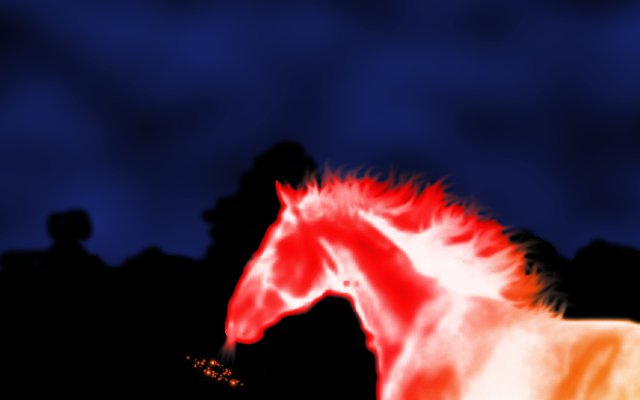
You could also have used Colors/Colorize after using the smudge tool, but what fun would that be?
finished image
Image

Image

I know you guys will make it even better so have at it!
I suppose you could add some motion blur or possibly wind to it.Maybe a moon or a tree...
You could make some pretty cool Halloween stuff with this method!
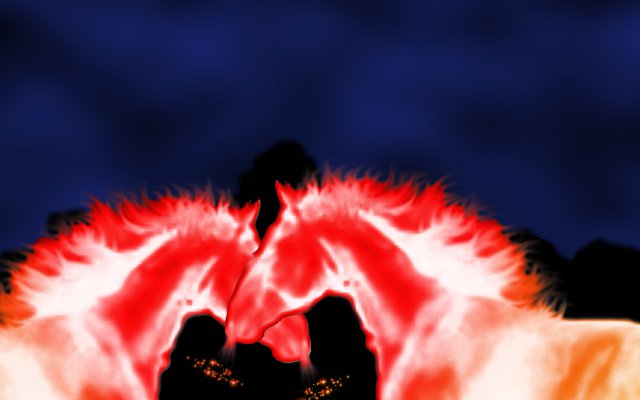
Oh and if you want more than one horse in the image just duplicate both the gradient overlay and horse layers...flip them or move them around, just make sure the gradient overlay layer is directly on top of the horse layer.
Two horses
Image

Hope you enjoyed the tutorial.

_________________
Image
Edmund Burke nailed it when he said, "The only thing necessary for the triumph of evil is for good men to do nothing."


Share on Facebook Share on Twitter Share on Orkut Share on Digg Share on MySpace Share on Delicious Share on Technorati
Top
 Post subject: Re: The Flaming Horse Tutorial
PostPosted: Fri Sep 24, 2010 12:46 am  (#2) 
Offline
Retired Staff
User avatar

Joined: May 22, 2008
Posts: 6947
Location: Somewhere in GIMP
That was great fun. Nice tutorial, Rod!

Image


Top
 Post subject: Re: The Flaming Horse Tutorial
PostPosted: Fri Sep 24, 2010 1:27 am  (#3) 
Offline
GimpChat Member
User avatar

Joined: May 16, 2010
Posts: 14709
Location: USA
Oh i love your moon! =)
Perfect for that canyon setting too.

_________________
Image
Edmund Burke nailed it when he said, "The only thing necessary for the triumph of evil is for good men to do nothing."


Top
 Post subject: Re: The Flaming Horse Tutorial
PostPosted: Fri Sep 24, 2010 1:33 am  (#4) 
Offline
Retired Staff
User avatar

Joined: May 22, 2008
Posts: 6947
Location: Somewhere in GIMP
Well here's my moon. You can download it. I put a gold layer over it to color it. Can't remember which layer mode but it's easy to figure out.


Attachments:
full_moon_large.png
full_moon_large.png [ 55.47 KiB | Viewed 9882 times ]
Top
 Post subject: Re: The Flaming Horse Tutorial
PostPosted: Fri Sep 24, 2010 2:18 am  (#5) 
Offline
GimpChat Member
User avatar

Joined: May 16, 2010
Posts: 14709
Location: USA
i created two of my own =)
Image

_________________
Image
Edmund Burke nailed it when he said, "The only thing necessary for the triumph of evil is for good men to do nothing."


Top
 Post subject: Re: The Flaming Horse Tutorial
PostPosted: Fri Sep 24, 2010 9:12 am  (#6) 
Offline
GimpChat Member

Joined: Aug 27, 2010
Posts: 491
I threw one of my own planets behind this and used O's moon. This was a lot of fun. I'll have to try it again with some other ideas. Thanks for sharing, Rod.

Image


Top
 Post subject: Re: The Flaming Horse Tutorial
PostPosted: Fri Sep 24, 2010 10:12 pm  (#7) 
Offline
GimpChat Member
User avatar

Joined: Apr 08, 2010
Posts: 5420
Location: Northwest Ohio
Humpf, GC not only kicked me off when I tried to click on full editor, but also made me re-log myself in! My computer must really be going downhill fast! I might need to start looking at prices of new!
Anyway, my result isn't all that good. I tried to do the tut using a render I had, instead of the horse brush. I blurred the render a bit and used curves, but it still doesn't look as glowing hot as it should.
Image


Top
 Post subject: Re: The Flaming Horse Tutorial
PostPosted: Sat Sep 25, 2010 12:56 am  (#8) 
Offline
GimpChat Member
User avatar

Joined: May 16, 2010
Posts: 14709
Location: USA
Oh 2-ton you need to have the brush properly prepared.
After you de-saturate it, invert it then save as brush.
That will give you the nice hot looking effect. =)

_________________
Image
Edmund Burke nailed it when he said, "The only thing necessary for the triumph of evil is for good men to do nothing."


Top
 Post subject: Re: The Flaming Horse Tutorial
PostPosted: Sat Sep 25, 2010 1:00 am  (#9) 
Offline
GimpChat Member
User avatar

Joined: May 16, 2010
Posts: 14709
Location: USA
2-ton wrote:
Humpf, GC not only kicked me off when I tried to click on full editor, but also made me re-log myself in! My computer must really be going downhill fast! I might need to start looking at prices of new!
Anyway, my result isn't all that good. I tried to do the tut using a render I had, instead of the horse brush. I blurred the render a bit and used curves, but it still doesn't look as glowing hot as it should.
Image


If you have recently cleared your history, that will happen.You will need to re-log-in to all your log-in pages.
That sounds more like a browser problem not your machine. =)

_________________
Image
Edmund Burke nailed it when he said, "The only thing necessary for the triumph of evil is for good men to do nothing."


Top
 Post subject: Re: The Flaming Horse Tutorial
PostPosted: Sat Sep 25, 2010 12:20 pm  (#10) 
Offline
GimpChat Member
User avatar

Joined: Apr 08, 2010
Posts: 5420
Location: Northwest Ohio
Rod wrote:
Oh 2-ton you need to have the brush properly prepared.
After you de-saturate it, invert it then save as brush.
That will give you the nice hot looking effect. =)

Oooh, thanks, no wonder I couldn't figure out how to get that molten hot metal look, lol.
...and I think my computer problem was actually a gimp problem. I had done a lot of undo's, and the gimp had started acting wierd with blinking and such. I managed to clear it up, but obviously not completely. All seems fine today. I had forgotten that gimp can get spazzy when you do too much of certain things.
Yes, better, but I am not sure how to make it look hotter, and not just colored.
Image


Top
 Post subject: Re: The Flaming Horse Tutorial
PostPosted: Sat Sep 25, 2010 11:21 pm  (#11) 
Offline
GimpChat Member
User avatar

Joined: May 16, 2010
Posts: 14709
Location: USA
Try selecting the brush layer and colors/colorize and color it a nice yellowish or orange-yellowish color.Then try all the layer modes. =)
Even brightness and contrast and boost the lightness way up.
Lots of possibilities.

_________________
Image
Edmund Burke nailed it when he said, "The only thing necessary for the triumph of evil is for good men to do nothing."


Top
 Post subject: Re: The Flaming Horse Tutorial
PostPosted: Sat Mar 22, 2014 8:40 pm  (#12) 
Offline
GimpChat Member
User avatar

Joined: Mar 10, 2014
Posts: 845
Thank Rod for the nice tutorial, I tried to redo the exercise
After correction
Image


Last edited by Marcello on Sun Mar 23, 2014 6:05 pm, edited 1 time in total.

Top
 Post subject: Re: The Flaming Horse Tutorial
PostPosted: Sat Mar 22, 2014 9:03 pm  (#13) 
Offline
GimpChat Member
User avatar

Joined: Apr 08, 2010
Posts: 5420
Location: Northwest Ohio
nice composition


Top
 Post subject: Re: The Flaming Horse Tutorial
PostPosted: Sun Mar 23, 2014 1:54 am  (#14) 
Offline
GimpChat Member
User avatar

Joined: May 16, 2010
Posts: 14709
Location: USA
Marcello wrote:
Thank Rod for the nice tutorial, I tried to redo the exercise

[ Image ]


Looks great! I like the way the horse is somewhat transparent as if it were real fire and vapor. :)
Nicely done.

The aura around your mountains can be removed by alpha to selecting the mountains (if they are on a separate layer) - select shrink by 2 pixels, and select feather by 5 (default), and then finally select inverse and delete.

That is if you were to want to get rid of that. I think it gives the image a cool looking definition myself.

_________________
Image
Edmund Burke nailed it when he said, "The only thing necessary for the triumph of evil is for good men to do nothing."


Top
 Post subject: Re: The Flaming Horse Tutorial
PostPosted: Sun Mar 23, 2014 6:09 pm  (#15) 
Offline
GimpChat Member
User avatar

Joined: Mar 10, 2014
Posts: 845
Rod : double thank you for the suggestion (made) and for the nice comment
2-ton : glad that you like it


Top
 Post subject: Re: The Flaming Horse Tutorial
PostPosted: Mon Mar 24, 2014 4:58 am  (#16) 
Offline
GimpChat Member
User avatar

Joined: Mar 01, 2014
Posts: 12643
Location: Spain, Aragón
Rod,your work is superb! Much art and imagination. I like it very much. Well Done! :coolthup :clap

_________________
Image

Gimp 2.10.30(samj) portable _ OS Windows 10 Home_ 64bits
Don’t be afraid to start over. It’s a new chance to rebuild what you want.


Top
 Post subject: Re: The Flaming Horse Tutorial
PostPosted: Mon Mar 24, 2014 11:23 am  (#17) 
Offline
GimpChat Member
User avatar

Joined: Dec 10, 2013
Posts: 1004
Great tutorial. I realized too late how to get the molten look - but now I know; next time.

Thank you Rod for your tutorial.

Image

_________________
Image
Macbook Air - MacOS Sierra 10.12
McGimp 2.8.14
G'mic 1.6.5


Top
Post new topic Reply to topic  [ 17 posts ] 

All times are UTC - 5 hours [ DST ]


   Similar Topics   Replies 
No new posts Attachment(s) ilzaf tutorial

1

No new posts IN SEARCH OF TUTORIAL

2

No new posts Attachment(s) Circlismic the Tutorial.

7


* Login  


Powered by phpBB3 © phpBB Group