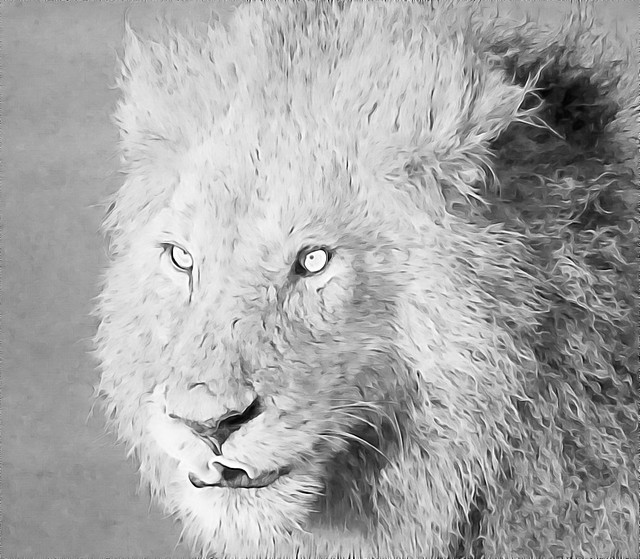
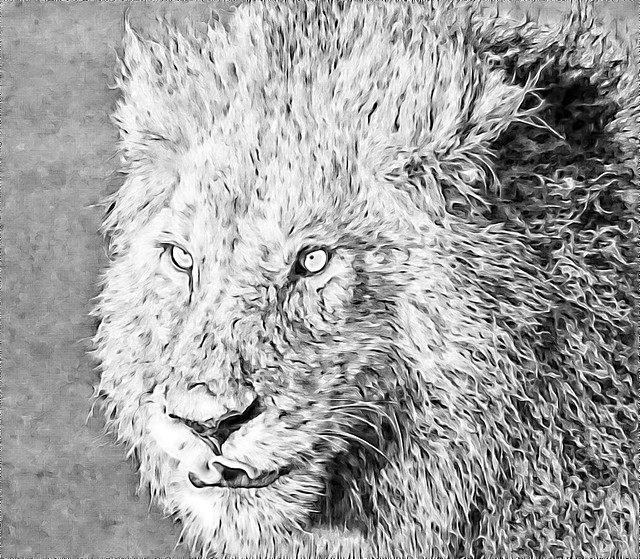
It is currently Tue Apr 23, 2024 4:16 pm


All times are UTC - 5 hours [ DST ]


Post new topic Reply to topic  [ 73 posts ]  Go to page 1, 2, 3, 4  Next
Author Message
 Post subject: (how to emulate ) Ink Wash
PostPosted: Tue Dec 28, 2010 5:56 am  (#1) 
Offline
GimpChat Member

Joined: Apr 12, 2010
Posts: 5870
Ink Wash is a very old and fascinating painting tecnique...
The most know artwork come are ancient Japanese paints but a similar technique was, and is still used also in the West and from long time

The technique is not so complex to explain ...just brushing with more or less dilute black ink on a wet or humid paper :hehe
(for more see http://www.mmwindowtoart.com/drawing/inkwash.html and http://en.wikipedia.org/wiki/Ink_and_wash_painting )


But if is a technique simple to describe is hard to master, i made many experiments in the past to find a digital equivalent , and now i automatized the process with a new gmic plugin

first some before/after examples :

DEFAULT

1
Image
Gmic-" Ink Wash" test DEFAULT by PhotoComiX, on Flickr

2
Image
Gmic-" Ink Wash" test-DEFAULT by PhotoComiX, on Flickr

From
1
Image
Dragon by wili_hybrid, on Flickr
2
Image
CSA-2005-10-14-091208x by MATEUS_27:24&25, on Flickr

here the filter interface

Attachment:
InkWashGui.png
InkWashGui.png [ 98.29 KiB | Viewed 15430 times ]


Before get scared you should know that more then half of the controls are optional , as default the 4 sliders at the bottom are disabled:
the result i show on top are with the default (with " Stretch Contrast " set on "NO",and so half of controls disabled )


There are other 2 options :
1 is "AUTOMATIC" and obviously don't require any effort, the change is quite strong as you may see here

1
Image
Gmic-" Ink Wash" test by PhotoComiX, on Flickr

2
Image
Gmic-" Ink Wash" test by PhotoComiX, on Flickr

Only the third option "Manual Controls" activate the slider to allow full control

Now some more example...as usual i forced myself to avoid any other edit, i only used the filter

Image
Gmic-" Ink Wash" test by PhotoComiX, on Flickr

BEFORE

Image
MILITARY-POLICE_060524-F-1178W-140 by MATEUS_27:24&25, on Flickr

Attachment:
sniper-png.jpg
sniper-png.jpg [ 184.04 KiB | Viewed 15454 times ]


BEFORE

Image
@SNIPER_CSA-2006-02-09-093100x by MATEUS_27:24&25, on Flickr


DEFAULT

Image
Gmic-" Ink Wash" test -DEFAULT by PhotoComiX, on Flickr

"AUTOMATIC" Contrast Stretch Option

Image
Gmic-" Ink Wash" test by PhotoComiX, on Flickr

ORIGINAL

Image
The King by chris.merwe, on Flickr

NEXT
How to install, how to use at best...and the code
(it was everything ready but i just get an idea on how to make more intuitive the control of the final result...but i will be soon back

_________________
My 3D Gallery on Deviantart http://photocomix2.deviantart.com/
Main gallery http://www.flickriver.com/photos/photocomix-mandala/
Mandala and simmetry http://www.flickriver.com/photos/photocomix_mandala/

Image

Mrs Wilbress


Last edited by PhotoComix on Tue Dec 28, 2010 2:42 pm, edited 3 times in total.

Share on Facebook Share on Twitter Share on Orkut Share on Digg Share on MySpace Share on Delicious Share on Technorati
Top
 Post subject: Re: (how to emulate ) Ink Wash
PostPosted: Tue Dec 28, 2010 6:35 am  (#2) 
Offline
Global Moderator
User avatar

Joined: Apr 07, 2010
Posts: 14182
Very nice PC.......

_________________
Image


Top
 Post subject: Re: (how to emulate ) Ink Wash
PostPosted: Tue Dec 28, 2010 7:58 am  (#3) 
Offline
GimpChat Member

Joined: Apr 12, 2010
Posts: 5870
HOW TO

the interface is modular see this screenshoot :

Attachment:
InkwashguiTUT.jpg
InkwashguiTUT.jpg [ 180.73 KiB | Viewed 15426 times ]


The first 2 sliders are for the "Ink" part of the Ink Wash :
you may use to get the contours and the detail of the image more clear and neat possible
They control 1 of the best "artistic" filter of Gmic "BW pencil

the SKIP all other steps has only 1 function:
you may check it to get visual control on this very first step
Note that is not needed and that YOU MUST Uncheck the box to proceed .

Below that box are the controls for the " Wash" part of Ink Wash, they control "GREYCstoration"( that now in gmic is called anisotropic smoothing)
The lower slider controls the amount of smoothing
that in the middle is very important , force to respect the image structure and the edges when smoothing
and the iteration of those 2 is the most important
that on top.. preserve the sharpness, you will not want much sharpness, and usually for artistic result will be better compensate more smoothing with more anisotropy , but may be needed to compensate the effect of the other 2


THIS IS THE ESSENTIAL, very often Ink Wash is used for delicate and not too contrasted effect

The OPTIONAL PART is for stretching the contrast:
Default is do not stretch
"Automatic" do NOT call some magick function but use a preset
"Manual Controls" is the ONLY of the 3 options that activate the last 4 sliders, and as the name says offer you the complete manual control

HERE THE CODE


############INK#WASH##############################
#@gimp Ink Wash : ink_wash, ink_wash(0)

#@gimp : note = note (""Ink Wash" controls")
#@gimp : Size = float(0.14,0,4)
#@gimp : Amplitude = float(23,0,200)
#@gimp : sep = separator ()
#@gimp : note = note ("Check if you wish visual control on this step )
#@gimp : SKIP all other steps = bool (false)
#@gimp : note = note ("UNcheck to reactivate the other controls ")
#@gimp : sep = separator ()
#@gimp : Smoother Sharpness = float(0.5,0,2)
#@gimp : Smoother Edge Protection = float(0.54,0,1)
#@gimp : Smoother Softness = float(2.25,0,10)

#@gimp :sep = separator ()

#@gimp : Stretch Contrast ? = choice ( NO, Automatic, Manual Controls )
#@gimp : note = note ("To activate the sliders below chose "Manual Controls"")

#@gimp :sep = separator ()
#@gimp : LN Amplititude = float(2,0,60)
#@gimp : LN Size = float(6,0,64)
#@gimp : LN Neightborhood-Smoothness = float(5,0,40)
#@gimp : LN Average-Smoothness = float(20,0,40)

ink_wash :
-gimp_pencilbw[-1] $1,$2,0,0,0
-if {$3==1} -return
-elif {$3==0} -gimp_anisotropic_smoothing 60,$4,$5,$6,1.1,0.8,30,2,0,1,1,0,1,0 -endif
-if {$7==0} -gimp_do_nothing
-elif {$7==1} -normalize_local 2,6,5,24,1,0,255
-elif {$7==2} -gimp_normalize_local $8,$9,$10,$11,1,3,0 -endif

###################END##########END###########END#################

_________________
My 3D Gallery on Deviantart http://photocomix2.deviantart.com/
Main gallery http://www.flickriver.com/photos/photocomix-mandala/
Mandala and simmetry http://www.flickriver.com/photos/photocomix_mandala/

Image

Mrs Wilbress


Top
 Post subject: Re: (how to emulate ) Ink Wash
PostPosted: Tue Dec 28, 2010 8:11 am  (#4) 
Offline
Retired Staff
User avatar

Joined: May 22, 2008
Posts: 6947
Location: Somewhere in GIMP
That is very nice, PhotoComix. You come up with some really cool stuff. I particularly like the two soldier ones.

I still don't have a clue as how to use your code though.

_________________
Image
World War IV will be fought with sticks and stones. - Albert Einstein


Top
 Post subject: Re: (how to emulate ) Ink Wash
PostPosted: Tue Dec 28, 2010 12:36 pm  (#5) 
Offline
GimpChat Member

Joined: Apr 12, 2010
Posts: 5870
Oregonian wrote:
That is very nice, PhotoComix. You come up with some really cool stuff. I particularly like the two soldier ones.
I still don't have a clue as how to use your code though.


Do you use Fedora, correct ?
Works for Frdora as any other Linux flavour: look the screenshoot of my Home directory

Attachment:
schermata3.png
schermata3.png [ 111.76 KiB | Viewed 15407 times ]


Do you see the file called .gmic ?
OOPSS not the green one , the other on the top left

That is it:
paste the code in a text editor save as .gmic (note the dot before the name)
That just for the first time, if you wish add more codes, you may just open your gmic file and past how much new codes you wish separate by a blanck space

Almost the same for XP the only difference is that in case the place is C:\Documents and Settings\Your name\Application Data
here the screenshot

Attachment:
gmic.png
gmic.png [ 59.22 KiB | Viewed 15407 times ]


In xp the Application Data is a hidden folder, but to see it is just needed to go in the file browser preference >Option for file and folder>
and there check "Show system and hidden files"

I can't help for 7 because i seldom use 7 , but even there should be not difficult find the right folder;
it is the same where is a gmic_def.1470 file

Last for Windows user: to save a file with the name starting with a dot,
the easiest way is get notepad++ that is also a excellent replacement for the MS notepad

So it is really easy...maybe even easier then install a script fu :yes

_________________
My 3D Gallery on Deviantart http://photocomix2.deviantart.com/
Main gallery http://www.flickriver.com/photos/photocomix-mandala/
Mandala and simmetry http://www.flickriver.com/photos/photocomix_mandala/

Image

Mrs Wilbress


Top
 Post subject: Re: (how to emulate ) Ink Wash
PostPosted: Tue Dec 28, 2010 12:45 pm  (#6) 
Offline
Retired Staff
User avatar

Joined: May 22, 2008
Posts: 6947
Location: Somewhere in GIMP
I don't have a folder named .gmic anywhere on my hard drive. I looked in my home folder and none there, then did a complete search of my hard drive ... nope.

I have the gmic plugin in .gimp-2.6 / plug-ins

_________________
Image
World War IV will be fought with sticks and stones. - Albert Einstein


Top
 Post subject: Re: (how to emulate ) Ink Wash
PostPosted: Tue Dec 28, 2010 1:26 pm  (#7) 
Offline
GimpChat Member

Joined: Apr 12, 2010
Posts: 5870
You should save the code as .gmic = you should create a .gmic file (NOT a folder !!) in your home directory.

After you have saved the first code, i mean once you create that .gmic file, you may paste on the same file (again same file , should NOT be a folder) more codes , just separated by a blanc line.

In linux all files and folders with name starting with a dot are as default invisible
But in the View menu of your file browser there is the option "show hidden files".

so is really simple.... literally save the code as .gmic in your home directory

(again do NOT save as Ink Wash.gmic or something similar...save simply as .gmic)

_________________
My 3D Gallery on Deviantart http://photocomix2.deviantart.com/
Main gallery http://www.flickriver.com/photos/photocomix-mandala/
Mandala and simmetry http://www.flickriver.com/photos/photocomix_mandala/

Image

Mrs Wilbress


Top
 Post subject: Re: (how to emulate ) Ink Wash
PostPosted: Tue Dec 28, 2010 1:58 pm  (#8) 
Offline
Retired Staff
User avatar

Joined: May 22, 2008
Posts: 6947
Location: Somewhere in GIMP
So what do you do when there's another one? Do you add the code to the one that's already there?

Thanks! :yes

Original image here.

Image

Image

_________________
Image
World War IV will be fought with sticks and stones. - Albert Einstein


Top
 Post subject: Re: (how to emulate ) Ink Wash
PostPosted: Tue Dec 28, 2010 2:06 pm  (#9) 
Offline
GimpChat Member
User avatar

Joined: Sep 24, 2010
Posts: 12516
Yes O; you concatenate the code in the same .gmic file. Now this one looks cool PC. Thanks for the new toy. :)

_________________
Lyle

Psalm 109:8

Image


Top
 Post subject: Re: (how to emulate ) Ink Wash
PostPosted: Tue Dec 28, 2010 2:38 pm  (#10) 
Offline
GimpChat Member

Joined: Apr 12, 2010
Posts: 5870
Oregonian wrote:
So what do you do when there's another one? Do you add the code to the one that's already there?

YES ! :yes
here a part of my .gmic file as example

.gmic wrote:
#@gimp Contrast Swiss Mask : contrast_swm , contrast_swm_preview(0)
#@gimp : sep = separator ()
#@gimp : Blur the mask = float(2,0.5,10)
#@gimp : sep = separator ()
#@gimp : note = note ("Contrast Mask need the negative of the mask")
#@gimp : SKIP to use the mask to boost = bool(false)
#@gimp : note = note ("Uncheck for Contrast Mask,Check for Contrast Boost")
#@gimp : sep = separator ()
#@gimp : Merge the Mask = choice (Overlay , Soft Light )
#@gimp : Intensity = float (0.90,0,1)

contrast_mb :
--luminance -to_rgb
-blur_xy[1] $1,$1
-if {$2==0} -negative[1] -elif {$2==1} -gimp_do_nothing -endif
-if {$3==0} -reverse [1,0] -gimp_compose_overlay[1,0] $4 -elif {$3==1} -reverse [1,0] -gimp_compose_softlight[0,1] $4 -endif

#####################################################################################
#@gimp Ink Wash : ink_wash, ink_wash(0)
#@gimp : note = note (""Ink " controls")
#@gimp : Size = float(0.14,0,4)
#@gimp : Amplitude = float(23,0,200)
#@gimp : sep = separator ()
#@gimp : note = note ("Check if you wish visual control on this step )
#@gimp : SKIP all other steps = bool (false)
#@gimp : note = note ("UNcheck to reactivate the other controls ")
#@gimp : sep = separator ()
#@gimp : note = note (""Wash " controls")
#@gimp : Smoother Sharpness = float(0.5,0,2)
#@gimp : Smoother Edge Protection = float(0.54,0,1)
#@gimp : Smoother Softness = float(2.25,0,10)

#@gimp :sep = separator ()

#@gimp : Stretch Contrast ? = choice ( NO, Automatic, Manual Controls )
#@gimp : note = note ("To activate the sliders below chose "Manual Controls"")

#@gimp :sep = separator ()
#@gimp : LN Amplititude = float(2,0,60)
#@gimp : LN Size = float(6,0,64)
#@gimp : LN Neightborhood-Smoothness = float(5,0,40)
#@gimp : LN Average-Smoothness = float(20,0,40)

ink_wash :
-gimp_pencilbw[-1] $1,$2,0,0,0
-if {$3==1} -return
-elif {$3==0} -gimp_anisotropic_smoothing 60,$4,$5,$6,1.1,0.8,30,2,0,1,1,0,1,0 -endif
-if {$7==0} -gimp_do_nothing
-elif {$7==1} -normalize_local 2,6,5,24,1,0,255
-elif {$7==2} -gimp_normalize_local $8,$9,$10,$11,1,3,0 -endif

#####################################################################################


the #### are not necessary ...are there just to help me to find the different filters

Oregonian wrote:
Original image here.

[ Image ]

[ Image ]


Nice Owls i like both :clap :jumpclap :hi5

In the beginning i tought to add some color effect as you did on the second Owl
but then i preferred made the filter more simple and straightforwarded possible

Anyway i explored a lot different combinations (i even posted here some) for add color my favorite till now are

1) the original as BG layer,
the Ink Wash layer above in Value mode
, a dup of the original on top in Overlay mode

2 Ink Wash layer as BG
Original in the middle in Overlay mode
a dup of the original on top in Multiply mode BUT with low or very low opacity

_________________
My 3D Gallery on Deviantart http://photocomix2.deviantart.com/
Main gallery http://www.flickriver.com/photos/photocomix-mandala/
Mandala and simmetry http://www.flickriver.com/photos/photocomix_mandala/

Image

Mrs Wilbress


Top
 Post subject: Re: (how to emulate ) Ink Wash
PostPosted: Tue Dec 28, 2010 2:44 pm  (#11) 
Offline
GimpChat Member
User avatar

Joined: Sep 24, 2010
Posts: 12516
I just used my new toy here PC (as a joke challenge to a thread started there). Yes, I like it b/w and then I can do my own color blending. :)

_________________
Lyle

Psalm 109:8

Image


Top
 Post subject: Re: (how to emulate ) Ink Wash
PostPosted: Tue Dec 28, 2010 4:03 pm  (#12) 
Offline
Retired Staff
User avatar

Joined: May 22, 2008
Posts: 6947
Location: Somewhere in GIMP
PhotoComix wrote:
Nice Owls i like both :clap :jumpclap :hi5

Owls? I thought that was a bear. Oh well. ~ Teasing you, PhotoComix ~ :mrgreen:

I put the original image below the washed image and set the layer mode to Value for the colored one.

_________________
Image
World War IV will be fought with sticks and stones. - Albert Einstein


Top
 Post subject: Re: (how to emulate ) Ink Wash
PostPosted: Tue Dec 28, 2010 4:50 pm  (#13) 
Offline
Global Moderator
User avatar

Joined: Oct 06, 2010
Posts: 4045
Absolute brilliance, PC! Hahaha, man I love the way you and Tom Keil think.

_________________
"In order to attain the impossible, one must attempt the absurd."
~ Miguel de Cervantes


Top
 Post subject: Re: (how to emulate ) Ink Wash
PostPosted: Wed Dec 29, 2010 8:23 am  (#14) 
Offline
GimpChat Member
User avatar

Joined: May 16, 2010
Posts: 14709
Location: USA
So if i write this new .gmic file in applications data, does that mean all my GMIC plugins will recieve this new filter?
In all my Gimp Programs?

It works nicely btw, thanks PC! :clap

Image

_________________
Image
Edmund Burke nailed it when he said, "The only thing necessary for the triumph of evil is for good men to do nothing."


Top
 Post subject: Re: (how to emulate ) Ink Wash
PostPosted: Wed Dec 29, 2010 9:24 am  (#15) 
Offline
GimpChat Member

Joined: Apr 12, 2010
Posts: 5870
@ROD
yes at least on XP i could not check yet for 7
Do you use 7 ?
i like the theme you use which is?

@Mahvin
thank for the encouragement , i like the filters be modular and somehow transparent, meaning that just using ( so without knowing their code ) it is possible see what each "piece" does and how they interact.

Also for that i enabled a "step preview" (the skip boxes) that also allow visual control of the intermediate steps

@Oregonian

Looking well (also in a English dictionary ) that really look as a bear
But may be also a proof of the theory of the evolution, and of the excellent mimetic skills developed by some new owls races
Few owl 's predators will try to attack something looking as a bear, even if is a owl

_________________
My 3D Gallery on Deviantart http://photocomix2.deviantart.com/
Main gallery http://www.flickriver.com/photos/photocomix-mandala/
Mandala and simmetry http://www.flickriver.com/photos/photocomix_mandala/

Image

Mrs Wilbress


Top
 Post subject: Re: (how to emulate ) Ink Wash
PostPosted: Wed Dec 29, 2010 3:51 pm  (#16) 
Offline
GimpChat Member
User avatar

Joined: May 16, 2010
Posts: 14709
Location: USA
"Aurora Midnight", is the theme i use on my desktop PC.
http://gimp-tutorials.net/downloads/gim ... s-v1-0.zip

No windows 7. I still use XP on both my desktop, and my laptop.

_________________
Image
Edmund Burke nailed it when he said, "The only thing necessary for the triumph of evil is for good men to do nothing."


Top
 Post subject: Re: (how to emulate ) Ink Wash
PostPosted: Wed Dec 29, 2010 9:43 pm  (#17) 
Offline
GimpChat Member

Joined: Dec 20, 2010
Posts: 49
This looks great. Can it be used in GIMP on a Mac?


Top
 Post subject: Re: (how to emulate ) Ink Wash
PostPosted: Wed Dec 29, 2010 11:17 pm  (#18) 
Offline
GimpChat Member

Joined: Apr 12, 2010
Posts: 5870
Sure ! just require the last gmic version (gmic is updated very often, last version has about a week )
i don't know where is the gmic_def.1470 file on MAC,(it is a file created at the first filter update ) but i suppose you may use the Finder to find it

Done that is sufficent paste the code on a text editor and save the file as .gmic

save a file as .gmic is so simple so easy...that everybody get confused, expecting something much more complex

see the messages before this in this topic to see how, in case you have doubts

_________________
My 3D Gallery on Deviantart http://photocomix2.deviantart.com/
Main gallery http://www.flickriver.com/photos/photocomix-mandala/
Mandala and simmetry http://www.flickriver.com/photos/photocomix_mandala/

Image

Mrs Wilbress


Top
 Post subject: Re: (how to emulate ) Ink Wash
PostPosted: Thu Dec 30, 2010 12:56 am  (#19) 
Offline
Retired Staff
User avatar

Joined: May 22, 2008
Posts: 6947
Location: Somewhere in GIMP
Original image here.

When I downloaded this image I kind of thought, "ho-hum." After I ran the Ink Wash filter I thought, "Wow!
It looks like a real water color." I like both ways, gray scale and color.

@ PhotoComix - I looked all over the picture for owls. I couldn't find any. No bears, either.

The filter really spiffed up this rather boring image.

Image

Image


~ snicker ~
Image

_________________
Image
World War IV will be fought with sticks and stones. - Albert Einstein


Top
 Post subject: Re: (how to emulate ) Ink Wash
PostPosted: Thu Dec 30, 2010 3:41 am  (#20) 
Offline
Global Moderator
User avatar

Joined: Oct 06, 2010
Posts: 4045
Here's your owl:

Image

A lighthouse winter scene:

Image

_________________
"In order to attain the impossible, one must attempt the absurd."
~ Miguel de Cervantes


Top
Post new topic Reply to topic  [ 73 posts ]  Go to page 1, 2, 3, 4  Next

All times are UTC - 5 hours [ DST ]


   Similar Topics   Replies 
No new posts how do I emulate "pixelhobby" with GIMP?

1


* Login  


Powered by phpBB3 © phpBB Group