can someone provide me the TEXTURIZER for in script fu

thank in advance,gimper
| GIMP Chat http://gimpchat.com/ |
|
| TEXTURIZER http://gimpchat.com/viewtopic.php?f=11&t=18369 |
Page 1 of 1 |
| Author: | gimper66 [ Fri May 22, 2020 4:55 am ] |
| Post subject: | TEXTURIZER |
can someone provide me the TEXTURIZER for in script fu thank in advance,gimper |
|
| Author: | racer-x [ Fri May 22, 2020 6:04 am ] |
| Post subject: | Re: TEXTURIZER |
I don't have the "Texturizer" script, but I did make a sand texture and used it to make a Brick pattern also. Attachment: Sand.jpg [ 1.05 MiB | Viewed 2833 times ] Attachment: Brick1_tile.png [ 191.15 KiB | Viewed 2833 times ] |
|
| Author: | gimper66 [ Fri May 22, 2020 6:29 am ] |
| Post subject: | Re: TEXTURIZER |
thanks racer,that's a nice sand texture, i saved it in my folder |
|
| Author: | rich2005 [ Fri May 22, 2020 6:31 am ] |
| Post subject: | Re: TEXTURIZER |
Getting the script is easy enough: http://www.gimphelp.org/texture_texturizer.html It does use gimpressionist, that should already be there but check Filters -> Artistic -> GIMPressionist but...all depends on the version of Gimp. As far as I know It works with Gimp 2.10.12 but not with Gimp 2.10.14 It works with Gimp 2.10.18 providing you do not want to change the pattern. Might be ok for you since the default pattern is the same as your screenshot. |
|
| Author: | gimper66 [ Fri May 22, 2020 9:41 am ] |
| Post subject: | Re: TEXTURIZER |
rich2005 wrote: Getting the script is easy enough: http://www.gimphelp.org/texture_texturizer.html It does use gimpressionist, that should already be there but check Filters -> Artistic -> GIMPressionist but...all depends on the version of Gimp. As far as I know It works with Gimp 2.10.12 but not with Gimp 2.10.14 It works with Gimp 2.10.18 providing you do not want to change the pattern. Might be ok for you since the default pattern is the same as your screenshot. thanks rich 2005,it's all right now 
|
|
| Author: | RonQ [ Fri May 22, 2020 7:23 pm ] |
| Post subject: | Re: TEXTURIZER |
Hi All, Scripts are fine, but there is always the very enjoyable alternative of doing it one's self, as Racer-x did with his bricks. Inspired by Racer-x's work I tried some bricks too, just for fun 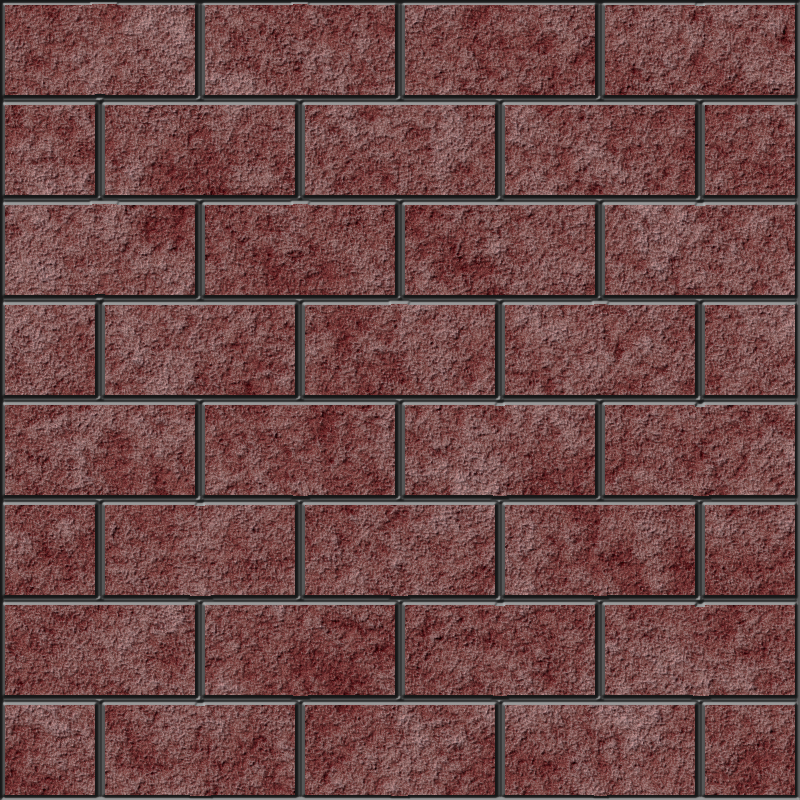 The brick texture was made with a Plasma adjusted with Gradient Map to a pair of bkgnd/forgnd colors approximating "brick". This was then Bump Mapped (a little too much perhaps!) on an Edge Detected copy, and all adjusted with Hue-Saturation to get color that seemed close. The mortar lines were made with two layers of Grid, selecting and clearing every other vertical line since Grid only makes squares, and I want rectangles. I then used Layer Effects, Inner Bevel, on Inverted Cone to approximate the mortar line contour (a bit over-done, but it's just a test). |
|
| Author: | nelo [ Sat May 23, 2020 3:16 am ] |
| Post subject: | Re: TEXTURIZER |
Great Outcome ... and thanks for telling your steps :-) |
|
| Author: | Konstantin [ Sat May 23, 2020 11:18 am ] |
| Post subject: | Re: TEXTURIZER |
RonQ wrote: This was then Bump Mapped (a little too much perhaps!) on an Edge Detected copy, and all adjusted with Hue-Saturation to get color that seemed close. The mortar lines were made with two layers of Grid, selecting and clearing every other vertical line since Grid only makes squares, and I want rectangles. I then used Layer Effects, Inner Bevel, on Inverted Cone to approximate the mortar line contour (a bit over-done, but it's just a test). Nice result ! Can you explain this step with a bit more detail, please ? Im assuming you are using Gimp 2.10. What Edge Detect do you use ? Quote: The mortar lines were made with two layers of Grid, selecting and clearing every other vertical line since Grid only makes squares, and I want rectangles. You can unlink the chain to make rectangles. Attachment: unlink.jpg [ 125.52 KiB | Viewed 2681 times ] Im wondering what could be done about these bumpmapping artifacts. Perhaps perform the bumpmapping in two seperate steps. One for the vertical and one for the horizontal lines so the blurring doesnt create those little circles, but that seems like too much work. Attachment: BMartifacts.jpg [ 192.23 KiB | Viewed 2681 times ] |
|
| Author: | racer-x [ Sat May 23, 2020 2:27 pm ] |
| Post subject: | Re: TEXTURIZER |
I just now made Granite Block patterns. One with mortared seams and one without. Enjoy. Attachment: granite1.jpg [ 159.87 KiB | Viewed 2665 times ] Attachment: granite2.jpg [ 135.86 KiB | Viewed 2665 times ] |
|
| Author: | RonQ [ Mon May 25, 2020 12:34 pm ] |
| Post subject: | Re: TEXTURIZER |
Nelo, Thanks for the encouraging words! |
|
| Author: | RonQ [ Mon May 25, 2020 1:11 pm ] |
| Post subject: | Re: TEXTURIZER |
Thanks, Konstantin. Last thing first: I too noticed the anomalies at the mortar intersections. I didn't bother with it because I was more interested in the bricks. The anomalies are the result of an "interference" between the highlight/shadow layers at the intersections. Your suggestion of doing the horizontal and vertical lines independently doesn't work either; in this case a new anomaly appears; the shadow layer of the upper line runs right through the intersection! Have to think about this later! I'm using GIMP 2.8.20 Sorry if my explanation was not clear; I was trying to keep it brief. The texture thing is very simple. I developed this years ago. I wanted randomness on two scales, variation across the sheet of texture as well as randomness in local surface effects, so I gravitated to the plasma filter. I have scads of variations on the basic theme, which I used on the bricks, and will describe in more detail here. One point though; with all the randomness it is impossible to reproduce exactly the same result from scratch. So, I don’t even try to reproduce the earlier brick texture here, but just show the basic steps. 1. Pick foreground and background colors. For this example, I chose a light and a dark “brown” (H=32). Avoid extremely dark or bright colors (referring to V values).   2. For the first layer, pull up the Plasma filter. Select one with not too much “turbulence”.  3. Next, select the plasma layer and go to Colors → Map → Gradient Map. Execute. This maps the foreground/ background colors, selected above, onto the plasma. 4. Now, duplicate this brownish layer so that there are two identical layers. On the upper layer (which, at this point, should be Mode Normal, Opacity 100%) perform an Edge Detection (Edge-Detect → Edge) using Sobel with Amount set to something like 30 ~ 45. 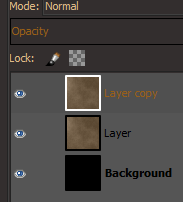  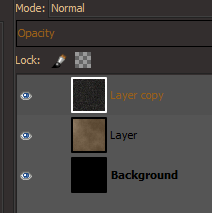 5. Select the lower layer containing the Gradient Mapped plasma. Execute Colors → Auto → Normalize. With this action, the brown plasma springs to life. 6. Practically there. Now, for the upper layer containing the edge detected version, start adjusting the opacity slider down, from 100%, until you reach something “pleasing”. This is largely a subjective judgement, but becomes easier after you’ve done this a couple of times and observed the outcomes. Finally, select the lower, plasma layer, and Bump Map it, selecting the edge detected layer as the map. There is room to play here, too, with the Bump Map settings. Done.  From this point the texture color can be manipulated to a desired hue. For the bricks, I started with browns, as here, and turned it red with Hue-Saturation and Colorize (not Colorify). The method offers a wide range of variations by playing with the various parameter settings in the filters used. Also, this simple start can be further manipulated using whatever comes to mind to obtain different textures. For example, by further manipulation of the method above, I made this flaky, peeling looking surface.   Edited 5/25 to add less saturated version of this image. |
|
| Author: | Konstantin [ Mon May 25, 2020 1:34 pm ] |
| Post subject: | Re: TEXTURIZER |
Thanks RonQ. Quality post and very appealing result ! I gave it a try. One thing that was new to me is that you can go higher than ten with the amount. In my Edge Detect menu the Amount-slider stops at ten, but you can use those little clicky bits to go higher. If you wanted to make the bumpmapping step non-destructive, you could bumpmap a mid gray (#808080) layer instead of the gradient mapped plasma layer, and set the layer mode to Hard Light. This has the advantage that you can apply curves on the relief without changing the colours of the plasma. |
|
| Author: | racer-x [ Mon May 25, 2020 3:25 pm ] |
| Post subject: | Re: TEXTURIZER |
Nice job on those textures RonQ. I've made a few using similar methods in the past. Here's a chrome brick texture I made with Bevel Reflect Logo plugin. Attachment: BRL.jpg [ 180.87 KiB | Viewed 1774 times ] |
|
| Author: | oldmangrumpy [ Mon May 25, 2020 4:50 pm ] | |||
| Post subject: | Re: TEXTURIZER | |||
I have enjoyed reading this thread and the methods noted for getting these textures. So I had a play with the methods I use and here are some textured bricks, obtained from a combo of 'CIE ich noise' and brush dynamic 'jitter', both used as bump maps. EDIT - added a second set of traditional wire cut bricks, made using cell noise, then distort shift and then bump map. EDIT2 - yes I realise that I employed the wrong tradesman, who did not offset each layer of bricks, but this was a quickie focusing on textures; might change them later today 
|
||||
| Author: | RonQ [ Mon May 25, 2020 8:37 pm ] |
| Post subject: | Re: TEXTURIZER |
All, Looks like we've hijacked Gimper66's Texturizer thread and made it a genearlized textures thread. Apologies, Gimper66! Racer-x, I like the granite texture, care to reveal? I also like oldmangrumpy's bricks, especially the red version. The vertical texture is exactly like some bricks I've seen. But I don't know anything about 'CIE ich noise' or brush dynamic 'jitter'. I'm also interested in wood texture. Does anyone have anything to share about the creation of wood? I've only attempted wood a couple of times, and that was about 20 years ago, with GIMP 1.2. |
|
| Author: | racer-x [ Tue May 26, 2020 5:34 am ] |
| Post subject: | Re: TEXTURIZER |
RonQ wrote: Racer-x, I like the granite texture, care to reveal? The granite texture is just an image of a granite slab. The mortar was made using a light gray, followed by CIE Ich noise and then bump-mapped. I'm having a lot of fun with BRL currently... Attachment: BRL2.jpg [ 170.96 KiB | Viewed 1732 times ] |
|
| Author: | oldmangrumpy [ Tue May 26, 2020 4:25 pm ] | ||
| Post subject: | Re: TEXTURIZER | ||
So I got the bricklayer back to build the wall correctly and look what happened
|
|||
| Author: | MareroQ [ Wed Jun 03, 2020 5:34 pm ] | |||
| Post subject: | Re: TEXTURIZER | |||
All very nice effects. In addition, other options: 1. G'mic - Bricks (created by Reptorian) 2. Texture Generator (works fine for Gimp 2.10) by Marco Crippa https://www.marcocrippa.it/page/gimp_texture.php 3. Helper for creating patterns brick.py (my new simple plugin ):viewtopic.php?f=9&t=18413#p251547
|
||||
| Page 1 of 1 | All times are UTC - 5 hours [ DST ] |
| Powered by phpBB © 2000, 2002, 2005, 2007 phpBB Group http://www.phpbb.com/ |
|