It is currently Wed Jul 24, 2024 6:33 pm


All times are UTC - 5 hours [ DST ]


Post new topic Reply to topic  [ 5 posts ] 
Author Message
 Post subject: Making of "Ray of Light" - WIP images (unfinished)
PostPosted: Sun May 26, 2013 3:45 pm  (#1) 
Offline
GimpChat Member
User avatar

Joined: Apr 27, 2010
Posts: 1453
Location: Sweden
Inspired by others posting "making of" threads here, I'd thought I'd also put up some WIP images of an ongoing project I've spent some hours on today. The Ray of Light image is a stab at lighting realism. It features one of my recurring characters, the Jester. :) I'll only briefly sum up the changes to each step here, I might make a more full tutorial later. This is all WIP, so the lighting is by no means consistent yet. If you have any questions or feedback though, just take it away. This is using Krita, but the techniques would work the same in GIMP or MyPaint.

Image
Initial sketch, placing the masses and rough gestures. I usually use ley figures to get a feel for a pose, but ley figures are very unflexible, especially in the hips - some poses are simply not possible. I found a very cool Android app called Pose tool that offers anatomical pose reference with a lot more flexibility than ever possible in a real-world ley figure. It's a good portable amatomical reference. It's not open source though, alas. It costs $4. An open-source alternative which I've used a lot is makehuman. This is intended as a way to make human models for Blender and other 3D renderers, but it also works fine as a powerful artistic pose reference.

ImageImageImage
Establishing the volumes. Note that I start with the background and light already at this stage. Things are still very rough.

Image
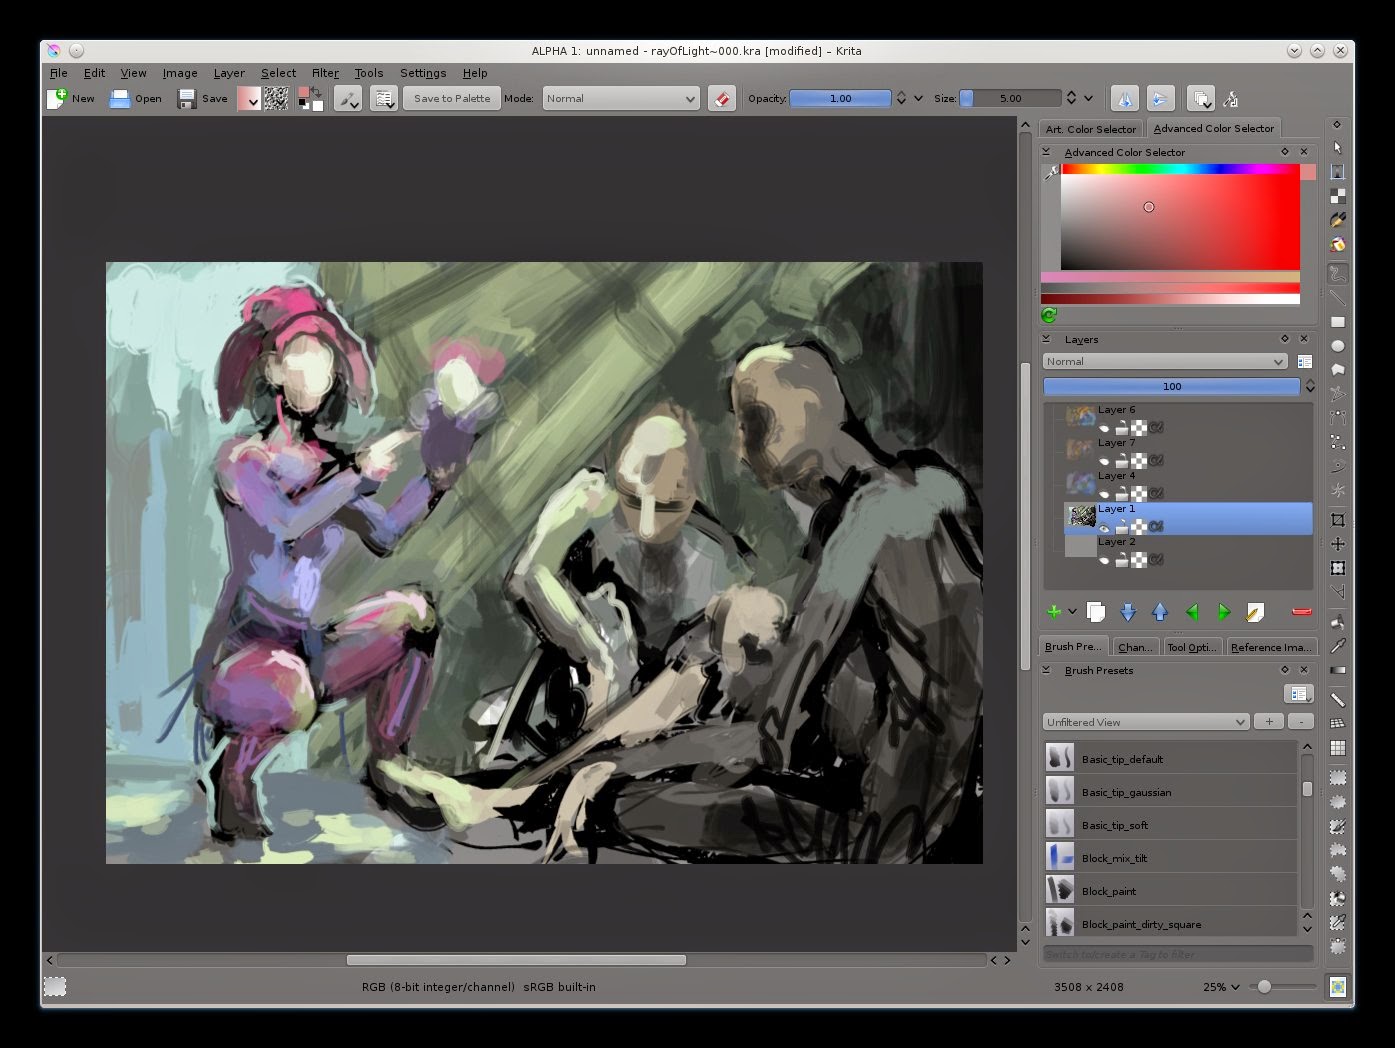
First version, with rough lighting. In the following I did some experiments with colors (This is done with a HSV color layer above the painting, then airbrushing the colours in place). . Still not decided on any of them, so I'm working on this set for now.

Image
Alternative color #1 - Colder light. Gives a harsh feel.

Image
Alternative color #2 - Warmer light. This feels rather fantasy-esque. Maybe less realistic though, and maybe suggesting a warmer climate.

Image
Alternative color #3 - Contrasting Cold/Warm foreground. I like how this makes the characters clearly separate. It also gives some symbolism to the image. If used one should use a more subtle palette than this though.

Image
Starting to establish the characters more.

Image
Felt the image needed more people to respond to the Jester, so added a woman + child. Shifted and rescaled the men quite a bit to make everything fit. Also refined the background, ad-libbing a statue and a city wall.

Image
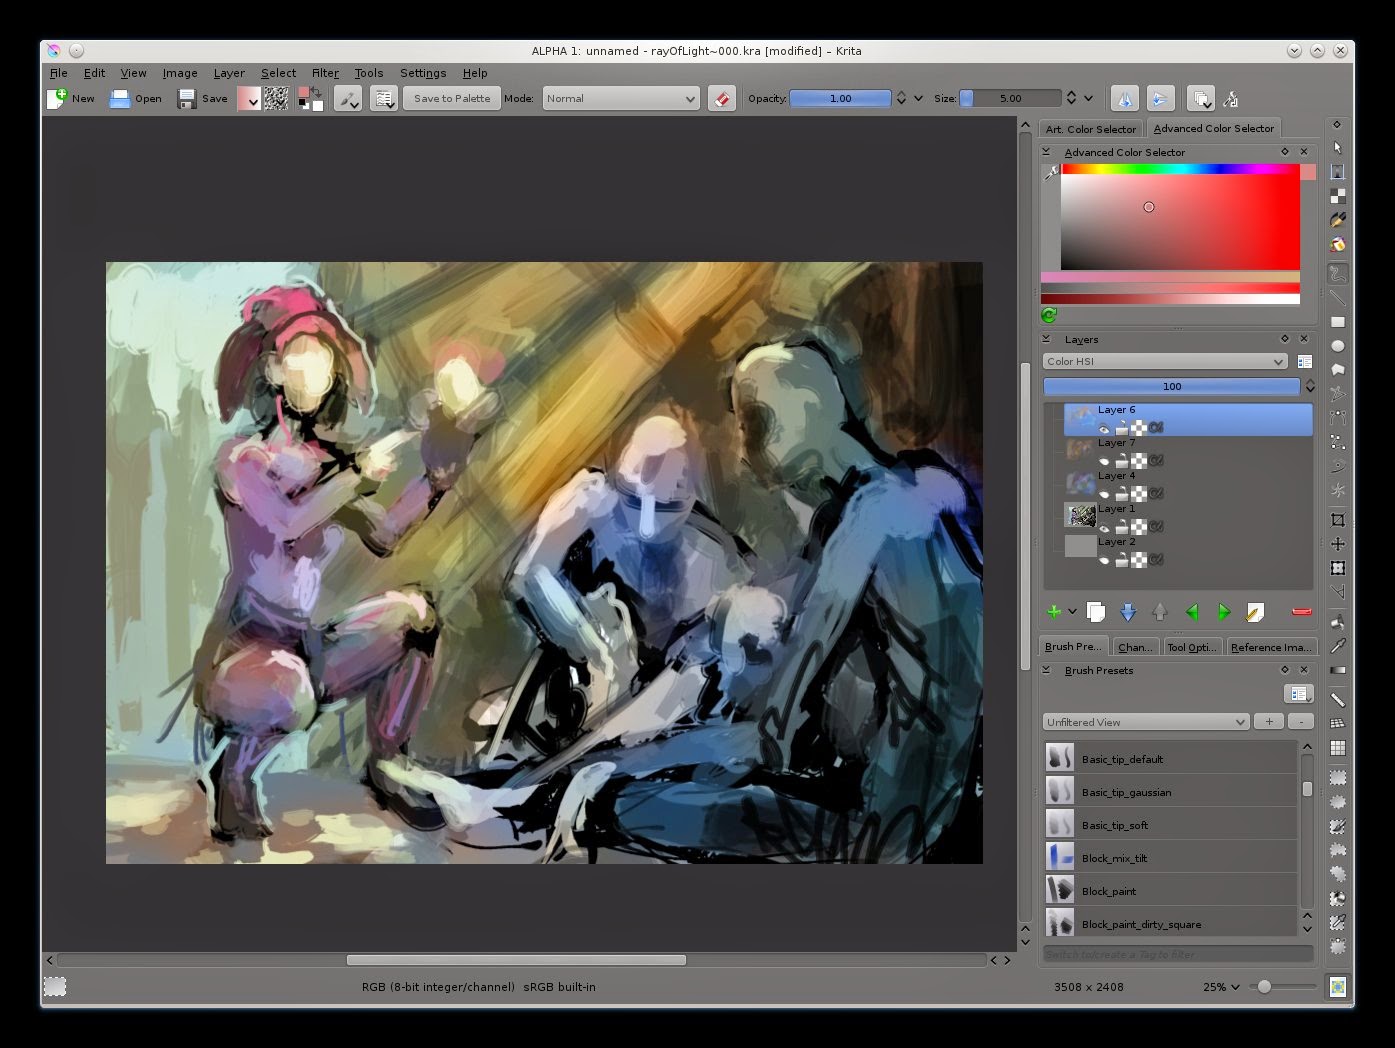
Current status. Still a long way to go. I'll need to adjust anatomy further but otherwise I think I'm ready to start detailing the faces at this point.

I'll update this post as I continue. :)
.
Griatch

_________________


Share on Facebook Share on Twitter Share on Orkut Share on Digg Share on MySpace Share on Delicious Share on Technorati
Top
 Post subject: Re: Making of "Ray of Light" - WIP images (unfinished)
PostPosted: Sun May 26, 2013 4:51 pm  (#2) 
Offline
GimpChat Member
User avatar

Joined: Aug 16, 2012
Posts: 4271
Location: Göteborg, Sweden
griatch: thanks for sharing this, it's fascinating to see how other people work and i look forward to seeing this picture completed :).

_________________


Top
 Post subject: Re: Making of "Ray of Light" - WIP images (unfinished)
PostPosted: Sun May 26, 2013 8:30 pm  (#3) 
Offline
GimpChat Member
User avatar

Joined: Aug 28, 2012
Posts: 3062
Location: Idk where I am.
Interesting! I think the Jester's head is a bit small, but I'm used to drawing very big heads so that could just be preference. xD

Make sure you make that puppet as cute as always! :P :D

_________________
Image
Reality is a lovely place...But I wouldn't wanna live there.


Top
 Post subject: Re: Making of "Ray of Light" - WIP images (unfinished)
PostPosted: Mon May 27, 2013 1:36 pm  (#4) 
Offline
GimpChat Member
User avatar

Joined: Apr 27, 2010
Posts: 1453
Location: Sweden
I find it's a lot of fun myself to see how others go about things. :)

@Moko
I'll revise the anatomy some more, we'll see if I change the head at some point. I'm aiming for realistic proportions after all.
.
Griatch

_________________


Top
 Post subject: Re: Making of "Ray of Light" - WIP images (unfinished)
PostPosted: Tue May 28, 2013 6:55 am  (#5) 
Offline
GimpChat Member
User avatar

Joined: Mar 23, 2012
Posts: 7316
Location: Göteborg at last!
It's always interesting and useful to see how other artists work. This is looking really good Griatch.


Top
Post new topic Reply to topic  [ 5 posts ] 

All times are UTC - 5 hours [ DST ]


   Similar Topics   Replies 
No new posts Attachment(s) My light for peace

6

No new posts Attachment(s) Savoring the light

8

No new posts Attachment(s) How to select color from light spectrum graph ?

2

No new posts Attachment(s) Light-Sabre - glow your existing selection

3

No new posts Attachment(s) Zoobka Art: Beautiful effects of light and matter

9


* Login  


Powered by phpBB3 © phpBB Group