It is currently Sat Apr 20, 2024 2:53 am


All times are UTC - 5 hours [ DST ]


Post new topic Reply to topic  [ 28 posts ]  Go to page 1, 2  Next
Author Message
 Post subject: Re: Licensed To GIMP
PostPosted: Sun Nov 03, 2013 9:24 am  (#11) 
Offline
GimpChat Member
User avatar

Joined: Apr 08, 2010
Posts: 5420
Location: Northwest Ohio
nice one Mike...I really like how the letters look like they are raised. All I need to find, now, is a bolt or screw top brush.


Top
 Post subject: Re: Licensed To GIMP
PostPosted: Sun Nov 03, 2013 9:33 am  (#12) 
Offline
GimpChat Member

Joined: Aug 27, 2010
Posts: 491
2-ton wrote:
nice one Mike...I really like how the letters look like they are raised. All I need to find, now, is a bolt or screw top brush.


I have some but apparently .gih files cannot be uploaded. :hoh


Top
 Post subject: Re: Licensed To GIMP
PostPosted: Sun Nov 03, 2013 9:35 am  (#13) 
Offline
Global Moderator
User avatar

Joined: Apr 07, 2010
Posts: 14182
Here are some nice screw to and other nice brushes by chris if you want them 2-ton, or anyone


Attachments:
Chris Stuff.tar.gz [5.88 MiB]
Downloaded 148 times

_________________
Image
Top
 Post subject: Re: Licensed To GIMP
PostPosted: Sun Nov 03, 2013 9:56 am  (#14) 
Offline
GimpChat Member

Joined: Aug 27, 2010
Posts: 491
Thank You, Molly :bigthup


Top
 Post subject: Re: Licensed To GIMP
PostPosted: Sun Nov 03, 2013 10:21 am  (#15) 
Offline
GimpChat Founder
User avatar

Joined: May 22, 2008
Posts: 5242
Location: Gimpville
Mike wrote:
I have some but apparently .gih files cannot be uploaded. :hoh

Mike,

Only image files can be "uploaded" via the upload button Image
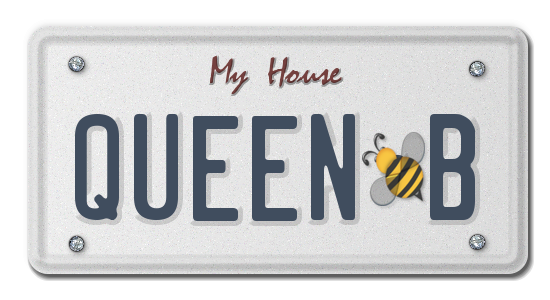
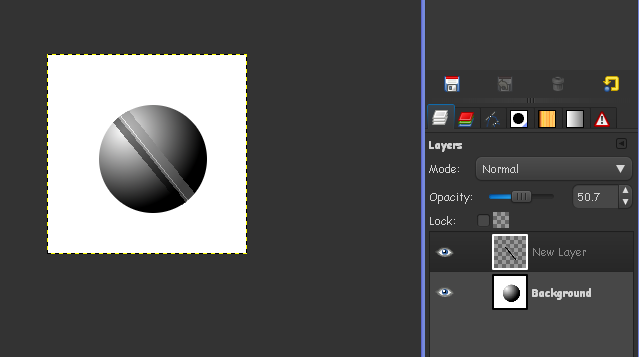
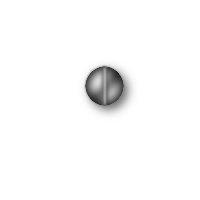
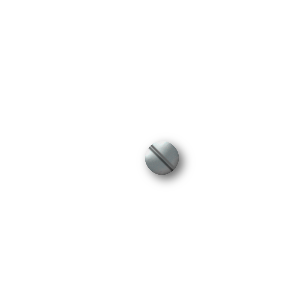
. Other files need to be attached. The following GIMP files formats can be attached directly.

gbr, ggr, gih, pat, scm, xcf

You can also attach compressed archives using the following formats: 7z, bz2, gtar, gz, tgz, tar, rar, and zip.

_________________
“If you reach for the stars, you just might land on a decently sized hill.” - Stuart Hill


Top
 Post subject: Re: Licensed To GIMP
PostPosted: Sun Nov 03, 2013 10:41 am  (#16) 
Offline
GimpChat Member

Joined: Aug 27, 2010
Posts: 491
Thank you, Tux. I knew it was most likely my fault. :oops:


Attachments:
Phillips Screw Head.gih [197.93 KiB]
Downloaded 125 times
Bolt Head Spaced.gih [351.72 KiB]
Downloaded 136 times
Top
 Post subject: Re: Licensed To GIMP
PostPosted: Sun Nov 03, 2013 2:09 pm  (#17) 
Offline
GimpChat Member
User avatar

Joined: Jun 25, 2013
Posts: 142
Location: Wyoming, Michigan
Nice_tutorial.


Attachments:
LICENSE2.png
LICENSE2.png [ 103.82 KiB | Viewed 2007 times ]

_________________
Image
http://tonysteeleebw.deviantart.com/
Top
 Post subject: Re: Licensed To GIMP
PostPosted: Sun Nov 03, 2013 6:36 pm  (#18) 
Offline
GimpChat Member
User avatar

Joined: Jul 06, 2013
Posts: 2606
Location: California
My plate turned out not so good.. I'll attempt it later.


Top
 Post subject: Re: Licensed To GIMP
PostPosted: Sun Nov 03, 2013 9:03 pm  (#19) 
Offline
GimpChat Member
User avatar

Joined: Apr 08, 2010
Posts: 5420
Location: Northwest Ohio
Thanks for those brushes, and Tony, that is an awesome looking license plate!


Top
 Post subject: Re: Licensed To GIMP
PostPosted: Sun Nov 03, 2013 10:50 pm  (#20) 
Offline
GimpChat Member
User avatar

Joined: Jul 06, 2013
Posts: 2606
Location: California
Here's my attempt. It doesn't look good since I tried combining both license plate tutorials.

Image


Top
 Post subject: Re: Licensed To GIMP
PostPosted: Mon Nov 04, 2013 7:05 am  (#21) 
Offline
GimpChat Member

Joined: Aug 27, 2010
Posts: 491
@mackenzieh It looks like you did the tutorial correctly. It's amazing what a difference the text color makes to this effect.

Image

Alpha-To-Selection on your original text layer, Bucket Fill whole selection with a bright color (#829DBF used here), Select None, Lower layer opacity to +/- 75% ... Also works with other bright colors. ;)


Top
 Post subject: Re: Licensed To GIMP
PostPosted: Mon Nov 04, 2013 1:35 pm  (#22) 
Offline
GimpChat Member
User avatar

Joined: Jul 06, 2013
Posts: 2606
Location: California
Mike wrote:
@mackenzieh It looks like you did the tutorial correctly. It's amazing what a difference the text color makes to this effect.

[ Image ]

Alpha-To-Selection on your original text layer, Bucket Fill whole selection with a bright color (#829DBF used here), Select None, Lower layer opacity to +/- 75% ... Also works with other bright colors. ;)


Thanks for the tip Mike, I'll keep that in mind. :)


Top
 Post subject: Re: Licensed To GIMP
PostPosted: Tue Jan 07, 2014 11:33 pm  (#23) 
Offline
GimpChat Member
User avatar

Joined: Dec 10, 2013
Posts: 1004
Thank you for the great tutorial.

Image

_________________
Image
Macbook Air - MacOS Sierra 10.12
McGimp 2.8.14
G'mic 1.6.5


Last edited by Dalia on Wed Jan 08, 2014 8:03 pm, edited 2 times in total.

Top
 Post subject: Re: Licensed To GIMP
PostPosted: Wed Jan 08, 2014 10:26 am  (#24) 
Offline
GimpChat Member
User avatar

Joined: May 16, 2010
Posts: 14709
Location: USA
Just a quick tip on making screw heads easily.
Create a new doc and then a new transparent layer. Select the new transparent layer.
Using the ellipse selection tool create a perfect circle any size (smaller looks more realistic IMOH). Select to PATH but keep the selection.
Using the gradient tool, apply a radial gradient (reversed) from about 10:00 down to 4:00 (according to clock numbers) to the selection
That's the head. Now just use a black pencil line across it and another 50% gray line right next to the black one.You can add an optional white line in the center if you wish (very thin).
Now select the PATH and do right click path to selection then select invert and select the line layer and hit delete.
Set the lines layer to 50% opacity.

Results
Image

_________________
Image
Edmund Burke nailed it when he said, "The only thing necessary for the triumph of evil is for good men to do nothing."


Top
 Post subject: Re: Licensed To GIMP
PostPosted: Wed Jan 08, 2014 8:04 pm  (#25) 
Offline
GimpChat Member
User avatar

Joined: Dec 10, 2013
Posts: 1004
Rod, I tried your excellent mini tutorial and, as a newbie, I couldn't even find "path to selection". Took the lazy way out and used a brush. :oops:

_________________
Image
Macbook Air - MacOS Sierra 10.12
McGimp 2.8.14
G'mic 1.6.5


Top
 Post subject: Re: Licensed To GIMP
PostPosted: Mon Jan 13, 2014 7:07 pm  (#26) 
Offline
Administrator
User avatar

Joined: Aug 10, 2012
Posts: 13011
Location: Native to NYC living in Arizona, Gimp 2.8 & 2.10, Win 11 PC.
Rod wrote:
Just a quick tip on making screw heads easily.
Create a new doc and then a new transparent layer. Select the new transparent layer.
Using the ellipse selection tool create a perfect circle any size (smaller looks more realistic IMOH). Select to PATH but keep the selection.
Using the gradient tool, apply a radial gradient (reversed) from about 10:00 down to 4:00 (according to clock numbers) to the selection
That's the head. Now just use a black pencil line across it and another 50% gray line right next to the black one.You can add an optional white line in the center if you wish (very thin).
Now select the PATH and do right click path to selection then select invert and select the line layer and hit delete.
Set the lines layer to 50% opacity.

Results
[ Image ]

Nice mini tutorial Rod. :bigthup

PS... Notice my bottom signature image. ;)

_________________
Image
"A wise man learns more from a foolish question than a fool can learn from a wise answer"
Image


Top
 Post subject: Re: Licensed To GIMP
PostPosted: Tue Jan 14, 2014 1:49 pm  (#27) 
Offline
GimpChat Member
User avatar

Joined: Dec 10, 2013
Posts: 1004
Not one to give up, I gave it a couple of other tries. The first is from somewhere I don't recall where and the second is Rod's tutorial. I really like your tut Rod over the other.
ImageImage

_________________
Image
Macbook Air - MacOS Sierra 10.12
McGimp 2.8.14
G'mic 1.6.5


Top
 Post subject: Re: Licensed To GIMP
PostPosted: Tue Jan 14, 2014 1:53 pm  (#28) 
Offline
Administrator
User avatar

Joined: Aug 10, 2012
Posts: 13011
Location: Native to NYC living in Arizona, Gimp 2.8 & 2.10, Win 11 PC.
Dalia wrote:
Not one to give up, I gave it a couple of other tries. The first is from somewhere I don't recall where and the second is Rod's tutorial. I really like your tut Rod over the other.
[ Image ][ Image ]

Well done Dalia! :jumpclap

_________________
Image
"A wise man learns more from a foolish question than a fool can learn from a wise answer"
Image


Top
Post new topic Reply to topic  [ 28 posts ]  Go to page 1, 2  Next

All times are UTC - 5 hours [ DST ]


* Login  


Powered by phpBB3 © phpBB Group