Salvaging color and lighting
Tue Sep 13, 2022 2:44 pm
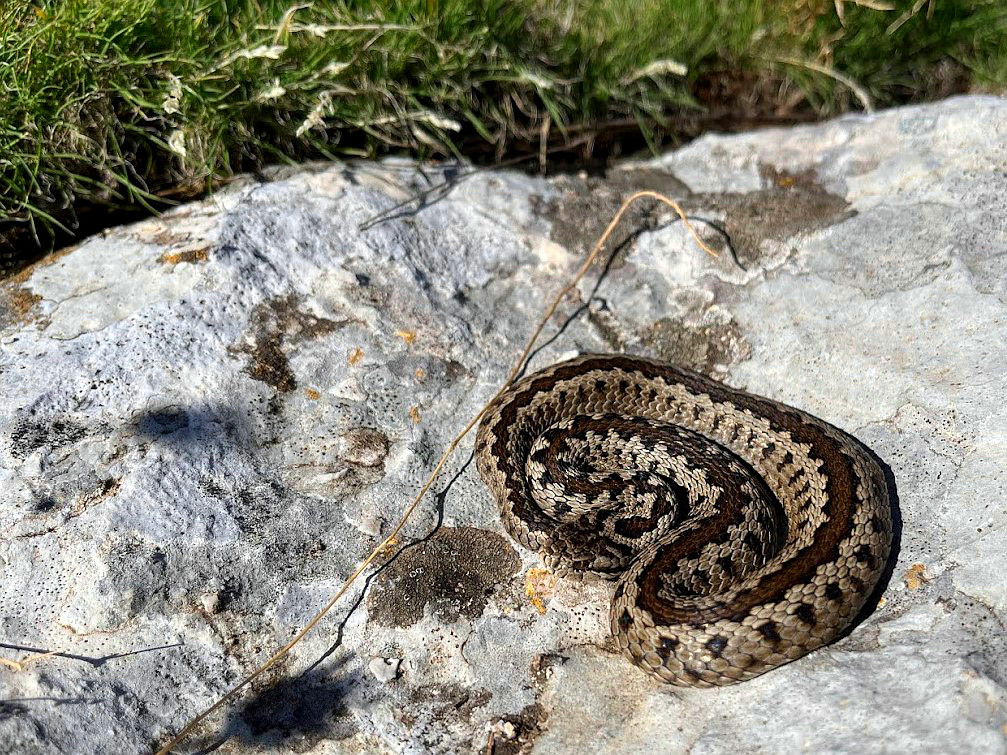
I was on a recent herping trip where my proper camera died so I had to make do with my phone. This presented a lot of limitations and left my pictures wanting in terms of technical quality. I'm okay with that, they don't need to be perfect or artistic, for my purposes I can even live with them not being tack sharp. The one thing I'm not okay with, however, is that colours - or lack thereof, and lighting lead to my subjects being severely misrepresented, looking flat and bland. I'm okay with a bad picture, I'm not okay with a picture that clearly conveys an image of the subject as significantly duller than it was in real life. I've tried editing my photos, but I'm getting nowhere, it just isn't working. Here's an example of one of my phone pictures and a picture my friend took of the same snake with a proper camera. His picture is far from perfect but it does convey the actual colors much better than mine does. Would someone give a shot at editing my photo to achieve a similar effect in terms of coloration (or perhaps even something that looks more natural, as I suspect some of you might even have the expertise to see what the flaws are in his, which I lack the expertise to pinpoint) and be kind enough to explain, whether in detail or just in brief, what you see and the steps you've performed so that I might try my hand by myself on other pictures?
Thanks in advance for any and all help.
My pic:
His pic:
Thanks in advance for any and all help.
My pic:
- IMG_0423.jpg (352.19 KiB) Viewed 1953 times
His pic:
- 306374326_1858842077660331_8733388139138758300_n.jpg (3.83 MiB) Viewed 1953 times
Re: Salvaging color and lighting
Tue Sep 13, 2022 3:38 pm
Not sure if this is what you are looking for and typically, photo editing of this type is not my thing. However, here are the steps I took to obtain this re-coloured snake.
1. Created paths to enabling selection of just the coiled snake
2. Copied that selection from the image
3. Pasted that selection as the layer above your image, then applied screen mode at 80% opacity on that copied layer
4. Colour picked the stripe down the snakes back and selected a lighter version of that colour as the foreground colour
5. Applied the selection from the paths again, created a new transparent layer then filled the selection with the new foreground colour (c89078)
6. To that layer I applied soft light mode at 24% opacity
I'm sure there are better qualified photo editors/manipulators in the forum that can assist, but hopefully this is helpful too.
Re: Salvaging color and lighting
Tue Sep 13, 2022 6:06 pm
Comparing both images, a major point of your friend's picture is that the brown streak on the back is somewhat lighter so I just tried to lighten the darker part with Curves:
Which gives this:
- ksnip_20220914-010155.png (57.57 KiB) Viewed 1921 times
Which gives this:
- CurvedSnake.jpg (229.51 KiB) Viewed 1921 times
Re: Salvaging color and lighting
Tue Sep 13, 2022 9:42 pm
First I cropped it to make it closer like your friend's photo was. Then using levels I dragged the top middle slider back towards the left to lighten the picture. I then selected what I thought was the eye and lightened that some more

Re: Salvaging color and lighting
Wed Sep 14, 2022 1:01 am
Thanks for the effort to both of you.
Very interesting to hear about the approaches as I am surprised they are both with only local alterations. My intuition for something like this would always be to try to apply a fix to the picture as a whole as my thinking is that basically whatever my camera does with the colors it does to the entire image and it's just on the snake that I really notice it. I would think making the altercations only locally would just make everything look less natural, but my efforts actually suffer even more from that.
I have a lot to learn...
Re: Salvaging color and lighting
Wed Sep 14, 2022 1:21 am
I'm not going anywhere near that snake! LOL! Just sayin. 
Re: Salvaging color and lighting
Wed Sep 14, 2022 3:54 am
@krismunk
You can apply a look-up-table (CLUT) to correct colours. In Gimp it is via the gmic plugin http://www.gmic.eu
If you have a good before-after pair of images, you can make your own CLUT, otherwise there are hundreds of presets incorporated in gmic, something for every occasion. Because some of the preset collections are large, to save wading through one-by-one, preview as a montage of thumbnails, to get an idea of effects.
It think this works quite well with your image and in gmic it is Colors -> Color Presets -> Filtergrade Cinematic -> Cine Warm.
A comparison.
...and a very quick (don't blink) example of gmic with comparisons. https://i.imgur.com/dXlkQhb.mp4
...My intuition for something like this would always be to try to apply a fix to the picture as a whole as my thinking is that basically whatever my camera does with the colors it does to the entire image and it's just on the snake that I really notice it...
You can apply a look-up-table (CLUT) to correct colours. In Gimp it is via the gmic plugin http://www.gmic.eu
If you have a good before-after pair of images, you can make your own CLUT, otherwise there are hundreds of presets incorporated in gmic, something for every occasion. Because some of the preset collections are large, to save wading through one-by-one, preview as a montage of thumbnails, to get an idea of effects.
It think this works quite well with your image and in gmic it is Colors -> Color Presets -> Filtergrade Cinematic -> Cine Warm.
A comparison.
- gmic-preset.jpg (273.94 KiB) Viewed 1876 times
...and a very quick (don't blink) example of gmic with comparisons. https://i.imgur.com/dXlkQhb.mp4
Re: Salvaging color and lighting
Wed Sep 14, 2022 5:41 am
Re: Salvaging color and lighting
Sun Sep 18, 2022 3:59 am
Rod wrote:I'm not going anywhere near that snake! LOL! Just sayin.
As venomous snakes go, this is about as harmless as they get, though
Re: Salvaging color and lighting
Sun Sep 18, 2022 4:03 am
...My intuition for something like this would always be to try to apply a fix to the picture as a whole as my thinking is that basically whatever my camera does with the colors it does to the entire image and it's just on the snake that I really notice it...
You can apply a look-up-table (CLUT) to correct colours. In Gimp it is via the gmic plugin http://www.gmic.eu
If you have a good before-after pair of images, you can make your own CLUT, otherwise there are hundreds of presets incorporated in gmic, something for every occasion. Because some of the preset collections are large, to save wading through one-by-one, preview as a montage of thumbnails, to get an idea of effects.
It think this works quite well with your image and in gmic it is Colors -> Color Presets -> Filtergrade Cinematic -> Cine Warm.
Thanks for the tip. I think I'll toy around with that a bit
Re: Salvaging color and lighting
Sun Sep 18, 2022 4:05 am
Re: Salvaging color and lighting
Sun Sep 18, 2022 7:46 am
krismunk wrote:Rod wrote:I'm not going anywhere near that snake! LOL! Just sayin.
As venomous snakes go, this is about as harmless as they get, though
I was going by the shape of the head. Looks venomous to me.
Course i am not a snake wrangler either.

Re: Salvaging color and lighting
Sun Sep 18, 2022 8:17 pm
krismunk wrote:The Warrior wrote:[ Image ]
I quite like this. Nice & subtle
May I ask how it was done?
Thanks. I used FX-Foundry>Color>Lasm'sLabWow>ColorPunch with the Tai Chi Curves set to 26, then went to Filters>Enhance>Sharpen set to I believe 35.
Re: Salvaging color and lighting
Sun Sep 18, 2022 9:46 pm
krismunk wrote:The Warrior wrote:[ Image ]
I quite like this. Nice & subtle
May I ask how it was done?
Animation showing the difference:
Re: Salvaging color and lighting
Mon Sep 19, 2022 9:46 am
Friends photo, resized. This time, the tai chi curves was set to the stock 42 setting. Perhaps a bit over saturated, but just to give you the idea:
Re: Salvaging color and lighting
Sat Sep 24, 2022 5:42 pm
Rod wrote:krismunk wrote:Rod wrote:I'm not going anywhere near that snake! LOL! Just sayin.
As venomous snakes go, this is about as harmless as they get, though
I was going by the shape of the head. Looks venomous to me.
Course i am not a snake wrangler either.
...and you're quite right, it is venomous. Just much less potently so, than nearly all other viper species
Re: Salvaging color and lighting
Sat Sep 24, 2022 5:43 pm
The Warrior wrote:krismunk wrote:The Warrior wrote:[ Image ]
I quite like this. Nice & subtle
May I ask how it was done?
Thanks. I used FX-Foundry>Color>Lasm'sLabWow>ColorPunch with the Tai Chi Curves set to 26, then went to Filters>Enhance>Sharpen set to I believe 35.
Thanks. Good to know. Always new tools to discover, it seems
Re: Salvaging color and lighting
Sun Sep 25, 2022 4:08 am
Just my 2 cents
Add a colored layer above to warm up the skin, playing with opacity slider will give you a range of warm light you wish
Then add a bit of blue light with Curves on the snake's layer, to get back the rock on the "white side" (optional), and eventually decrease the darks with the "Value" channel while Curves are opened
Add a colored layer above to warm up the skin, playing with opacity slider will give you a range of warm light you wish
- screenshot_20220925-165730.png (1.45 MiB) Viewed 1943 times
Then add a bit of blue light with Curves on the snake's layer, to get back the rock on the "white side" (optional), and eventually decrease the darks with the "Value" channel while Curves are opened
- screenshot_20220925-165725.png (1.43 MiB) Viewed 1943 times