It is currently Wed Apr 17, 2024 8:48 pm


All times are UTC - 5 hours [ DST ]


Post new topic Reply to topic  [ 29 posts ]  Go to page 1, 2  Next
Author Message
 Post subject: How to clean this picture
PostPosted: Thu Feb 21, 2013 8:58 am  (#1) 
Offline
GimpChat Member

Joined: Oct 31, 2011
Posts: 112
Hello all, could you take a look here: http://en.wikipedia.org/wiki/File:Justu ... ,_1636.jpg

and tell me how to clean the white dots/blocky/patches thingy? I don't know how to do it with my arsenal of GIMP knowledge. The picture is big, 2500x3176.

Thank you :D


Share on Facebook Share on Twitter Share on Orkut Share on Digg Share on MySpace Share on Delicious Share on Technorati
Top
 Post subject: Re: How to clean this picture
PostPosted: Thu Feb 21, 2013 9:32 am  (#2) 
Offline
GimpChat Member
User avatar

Joined: May 26, 2012
Posts: 342
Location: France
I'd see two methods:

- Lazy easy: go for a gentle overall blur then erase the blur you don't want for critical details.
Pros: fast, Cons: difficult to maintain a unified grain.

- No rush: try to select what makes the dots clashing with the rest, try color selection maybe then erase what you don't want in this selection, then play with curves or brightness/contrast to finetune those cracks and dots to your need.
Pros: possibly more grain accurate, Cons: trial and error is longer.


Top
 Post subject: Re: How to clean this picture
PostPosted: Thu Feb 21, 2013 11:04 am  (#3) 
Offline
GimpChat Member

Joined: Mar 04, 2011
Posts: 2418
You can get carried away with technicalities and overlook the obvious.

The first thing I thought was 'fast-fourier-transform' (maxed out the cpu with this one, lol) or maybe a 'wavelet-denoise'
but a simple filters -> generic -> erode works just as well with this image. The face and the hands do suffer, so work on a duplicated layer then add a layer mask and restore those areas.

screenshot with inset for a comparison. Image

_________________
Image


Top
 Post subject: Re: How to clean this picture
PostPosted: Thu Feb 21, 2013 11:21 am  (#4) 
Offline
GimpChat Member
User avatar

Joined: Jan 20, 2013
Posts: 14816
Location: roma, italy
I got an acceptable result with:
1 - duplicate layer
2 - apply Filters/GMIC > Enhancements > Smooth (mean-curvature)
3 - apply Filters/Enhance/Despeckle
4 - changing the layer mode to "Darken only"
5 - file > export or override
You can try various amounts on the filter (checking on the preview), I used high values

_________________
"Where am I ?"


Top
 Post subject: Re: How to clean this picture
PostPosted: Thu Feb 21, 2013 12:53 pm  (#5) 
Offline
GimpChat Member

Joined: Apr 12, 2010
Posts: 5870
oh cool let try ...

The problem i see is that the photo seems no too bad but the is the painting to have suffered for the passing time ... it may be enhanced digitally anyway this may be no truthful to the original

And also i will not start trying if i had to be too faithful to the original...

_________________
My 3D Gallery on Deviantart http://photocomix2.deviantart.com/
Main gallery http://www.flickriver.com/photos/photocomix-mandala/
Mandala and simmetry http://www.flickriver.com/photos/photocomix_mandala/

Image

Mrs Wilbress


Top
 Post subject: Re: How to clean this picture
PostPosted: Thu Feb 21, 2013 1:27 pm  (#6) 
Offline
GimpChat Member

Joined: Apr 12, 2010
Posts: 5870
the idea is to edit at original size , correct ?

i am exploring a idea , for sure i had some adapt plugin (i think " wavelet denoise " , followed by a very delicate use of gimp anistropic smoothing would do most of the trick ) that should do even better


...but i want try manually something different ...

_________________
My 3D Gallery on Deviantart http://photocomix2.deviantart.com/
Main gallery http://www.flickriver.com/photos/photocomix-mandala/
Mandala and simmetry http://www.flickriver.com/photos/photocomix_mandala/

Image

Mrs Wilbress


Top
 Post subject: Re: How to clean this picture
PostPosted: Thu Feb 21, 2013 2:13 pm  (#7) 
Offline
GimpChat Member

Joined: Apr 12, 2010
Posts: 5870
Done a detail to show the effect at original size

Image

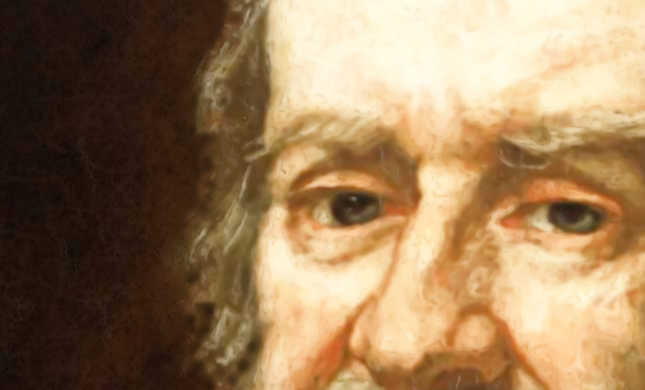
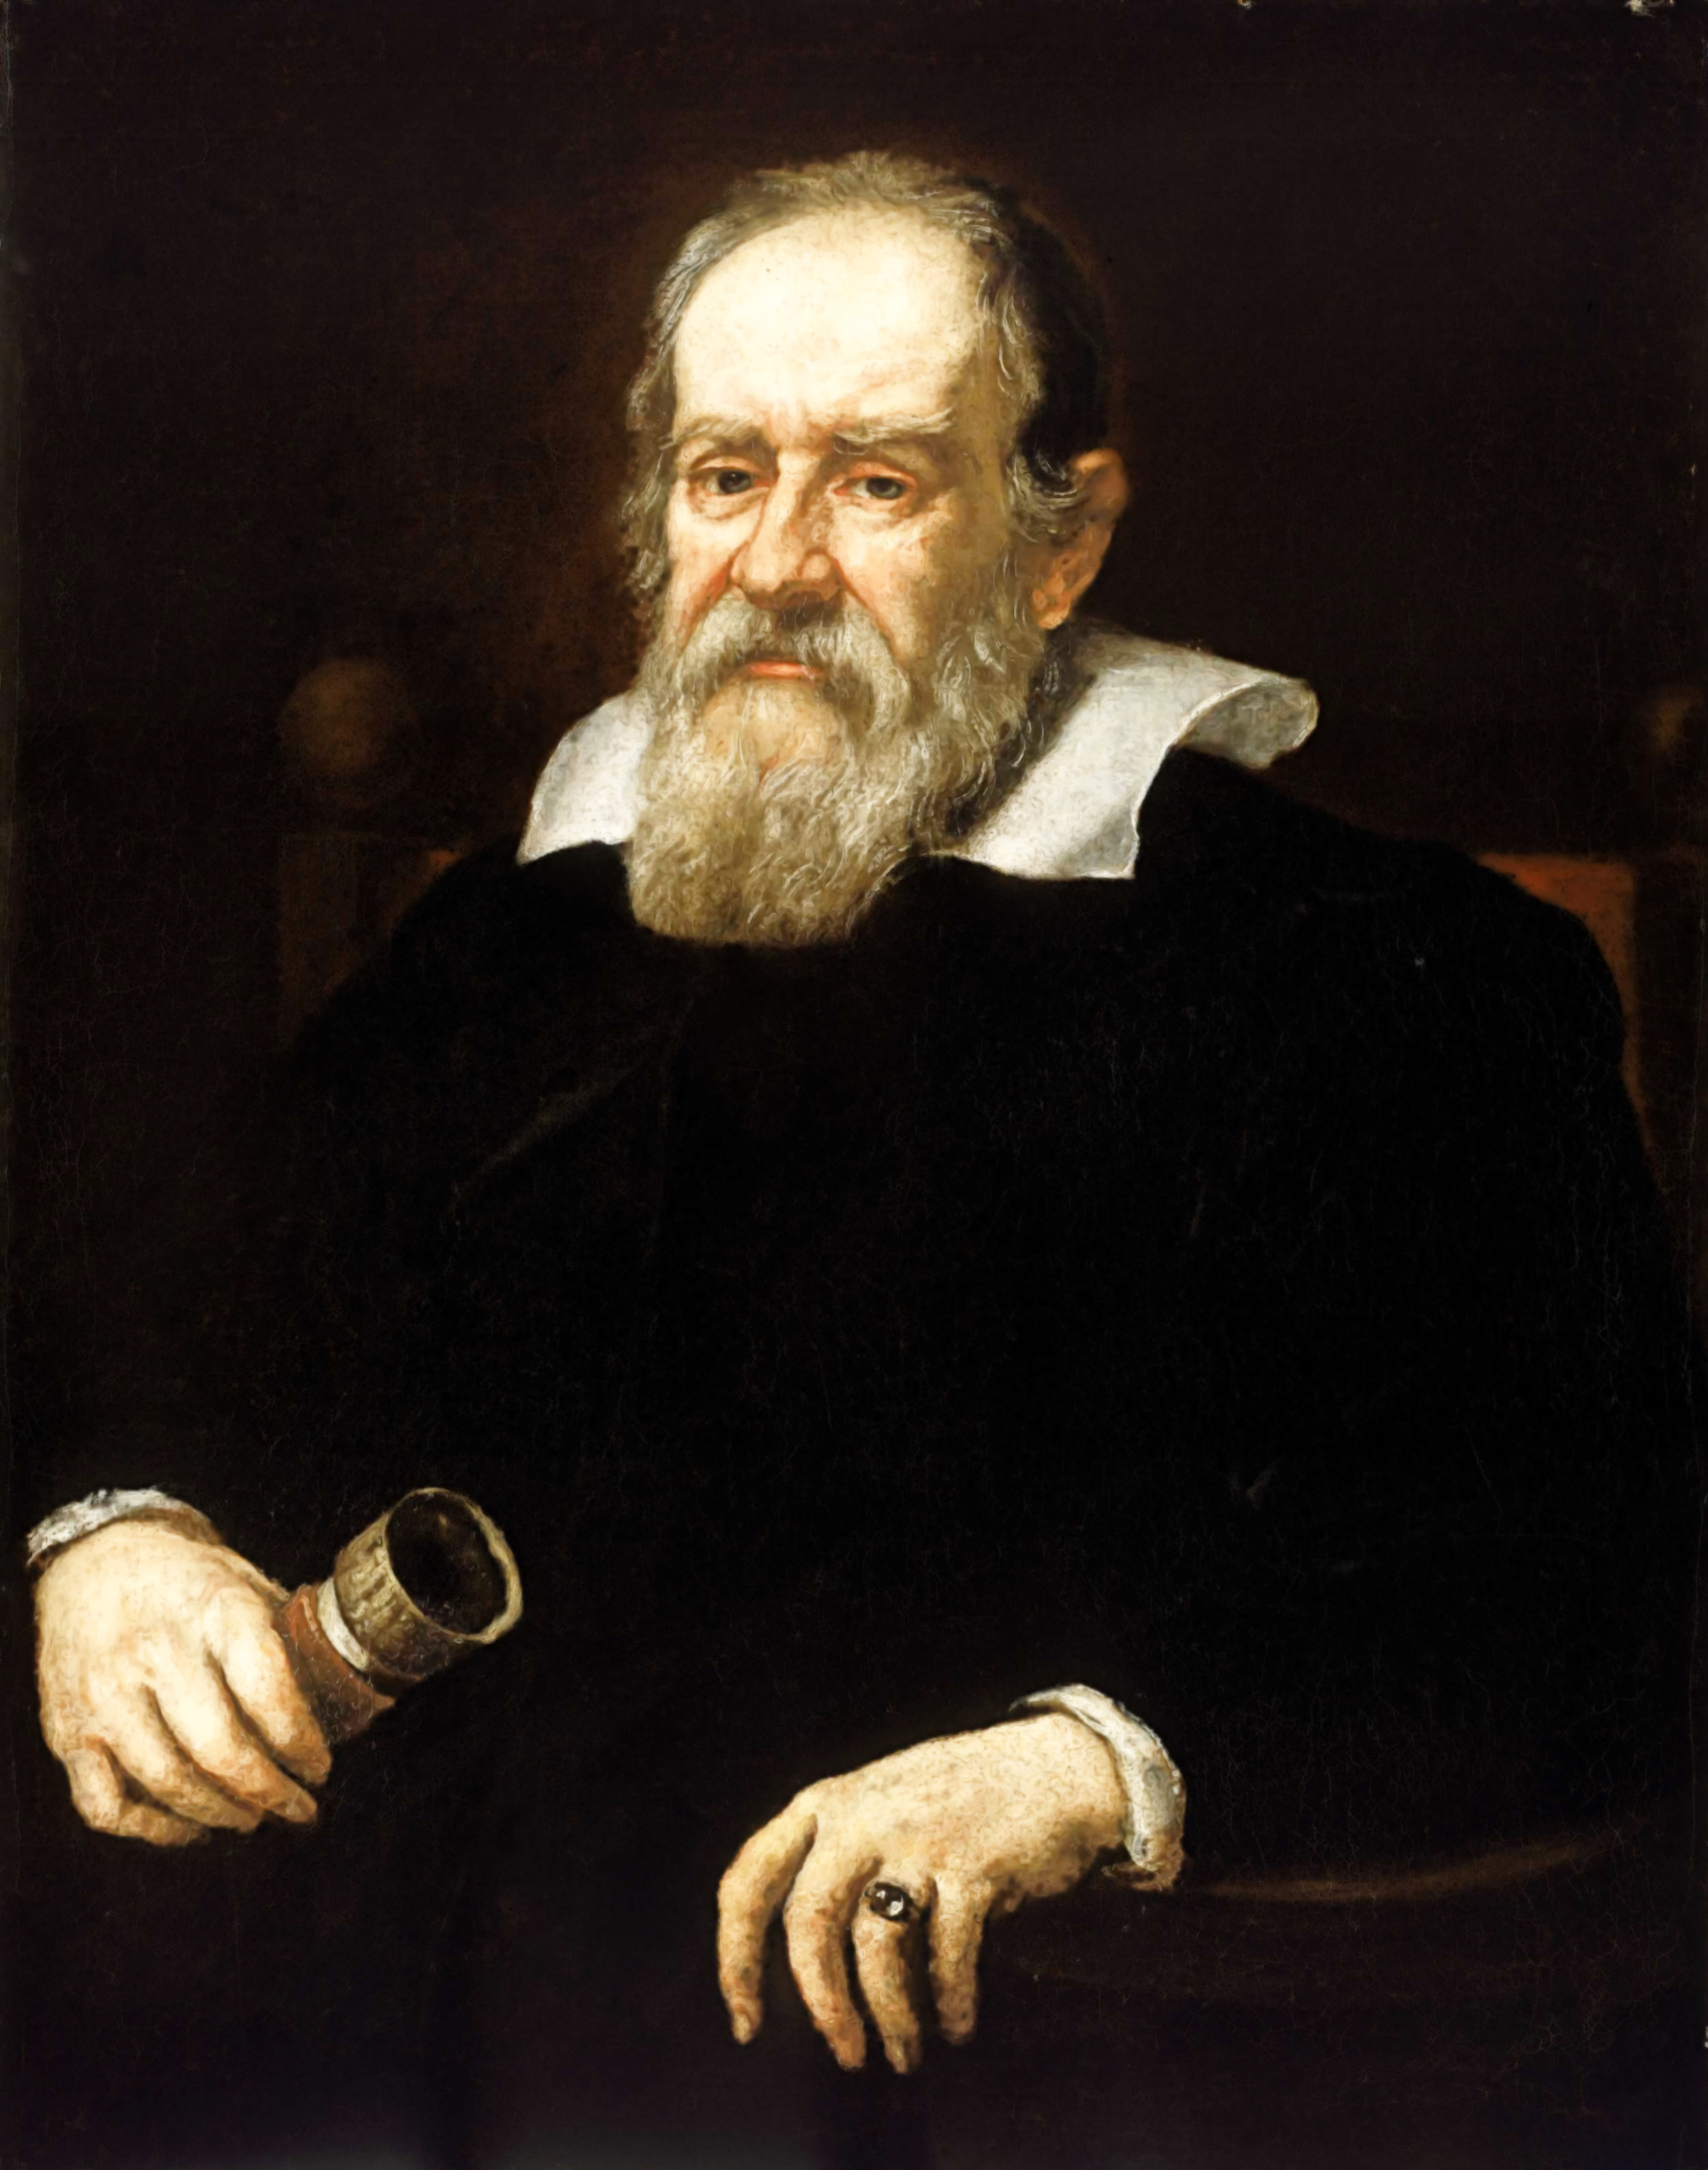
the last of the 2 is at original size ( i uploaded by mistake ) this just below was instead scaled for gc

Image

Image


what i did :

to get rid out of the white noise on dark area

Even before start edit duplicate the layer and work with the dup

1) selecte the face ,hands and the few other whitish area
(first using color selector, then polishing in quickmask)
2 feathered and inverted the selection
3) a generous amount of gaussian blur , on original size were 16 in the darkest area were no details that could get lost by blur ...also because next step very important
4) EDIT/FADE , change mode from default "replace" to "darken only" ...so the effect of 3, the blur will mostly work on white noise but with almost no side effect on dark area ( the highlight to protect were already deselected),...you may lower opacity a bit so the noise instead that be totally merged remain as a hint of a vague texture

5) invert selection , start gmic , change "output option " to "new layer"
I used Graphic Novel, , setting used are embedded in the layer name ,in the xcf i am going to post :
6) again as for 5 but for the inverted selection, this new layer was used with low opacity
7) new layer from visible and blur of 1px
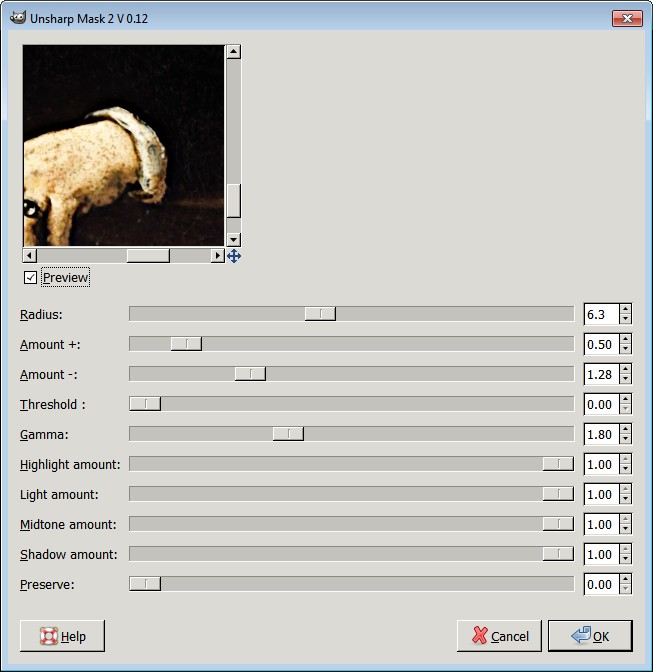
8 ) duplicate of the layer apply unsharpmask2

Image

blur again this time of 4 and change layer mode to "Darken only " this is to softly enhance contrast of dark details in the hands face and lightest area

not sure where upload at original size the xcf or even the png...humm maybe on my DA


PS then to make more similar to the original would be possible add some grain
Except that original painting should have no any "grain" but brush strokes that were no visible in the photo ... :lol

_________________
My 3D Gallery on Deviantart http://photocomix2.deviantart.com/
Main gallery http://www.flickriver.com/photos/photocomix-mandala/
Mandala and simmetry http://www.flickriver.com/photos/photocomix_mandala/

Image

Mrs Wilbress


Top
 Post subject: Re: How to clean this picture
PostPosted: Fri Feb 22, 2013 2:14 am  (#8) 
Offline
GimpChat Member
User avatar

Joined: Sep 24, 2010
Posts: 12516
No one technique work (i.e., don't ask; lol. OK; some hints. Anisotrophic smoothing, bilateral filter, and gausean blur (9pix) using edge detect to amplify the specs for a mask. Then additional manipulations such as selective smudging and clone/heal brush). Still had some fine cracks that shown, so hid most of that with using a Virtual Photographer preset which added glow to the piece (and dupped that layer separating light and dark with various opacities). Can use some more tlc, but I tire after spending more then 25 minutes. lol

:)


Attachments:
Justus_Sustermans_-_Portrait_of_Galileo_Galilei,_1636.jpg
Justus_Sustermans_-_Portrait_of_Galileo_Galilei,_1636.jpg [ 594.34 KiB | Viewed 9656 times ]

_________________
Lyle

Psalm 109:8

Image
Top
 Post subject: Re: How to clean this picture
PostPosted: Fri Feb 22, 2013 4:08 am  (#9) 
Offline
GimpChat Member

Joined: Feb 13, 2013
Posts: 86
I used Iain's Noise Reduction G'MIC filter as a first pass to remove low level noise. The spots and cracks remain. Then I created a new layer with a small radius median filter to remove the small cracks and spots on the dark areas using a mask. Then a another layer with a wider median filter, set to darken only, and more masking to remove the bigger cracks. And the last layer is duplicated, set to lighten only, and the mask edited so that the dark marks on the skin are removed. Finally I used the original image, with a mask to replace some of the areas that were obviously degraded.


Attachments:
Justus_Sustermans_-_Portrait_of_Galileo_Galilei,_1636-clean.jpg
Justus_Sustermans_-_Portrait_of_Galileo_Galilei,_1636-clean.jpg [ 813.16 KiB | Viewed 9644 times ]
Top
 Post subject: Re: How to clean this picture
PostPosted: Fri Feb 22, 2013 5:16 am  (#10) 
Offline
GimpChat Member
User avatar

Joined: Jan 10, 2013
Posts: 863
Several techniques, different opinions that their method leads to a good result.
Just the result is the difference, but here is perhaps the ideal! I think we should preserve the most original, and just attack the imperfections.

But it is interesting to see what you get with images and different techniques. At least I learn a lot from this.

PhotoComix, why your Unsharp Mask is so different? Mine only has 3 settings: Radius, Amount and Threshold :hoh

lylejk, Nice result, that "Virtual Photographer preset" has in Gimp? Interessant!

_________________
bbbbbbbbbbbImage
bbbbbbbbbbb Be patient, English is not my language.


Top
 Post subject: Re: How to clean this picture
PostPosted: Fri Feb 22, 2013 5:51 am  (#11) 
Offline
GimpChat Member

Joined: Mar 04, 2011
Posts: 2418
Quote:
... I think we should preserve the most original, and just attack the imperfections...

I thought that as well, There is so much character just in the head that in this case "less is best". Easy to smooth it out and lose the vitality, although Iain's filter looks good.

That plugin, unsharpmask2 is one of photocomix own http://registry.gimp.org/node/14810

_________________
Image


Top
 Post subject: Re: How to clean this picture
PostPosted: Fri Feb 22, 2013 6:35 am  (#12) 
Offline
GimpChat Member
User avatar

Joined: Jan 10, 2013
Posts: 863
rich2005 wrote:
I thought that as well, There is so much character just in the head that in this case "less is best". Easy to smooth it out and lose the vitality, although Iain's filter looks good.

That plugin, unsharpmask2 is one of photocomix own http://registry.gimp.org/node/14810


Thx Rich2005!

Did download and after to read "HOW TO USE + EXTRA TIPS PDF" i am playing in tests here! :tyspin :bigthup

_________________
bbbbbbbbbbbImage
bbbbbbbbbbb Be patient, English is not my language.


Top
 Post subject: Re: How to clean this picture
PostPosted: Fri Feb 22, 2013 8:36 am  (#13) 
Offline
GimpChat Member
User avatar

Joined: Sep 24, 2010
Posts: 12516
Akros wrote:
.......

lylejk, Nice result, that "Virtual Photographer preset" has in Gimp? Interessant!


No; called Shellout and ran it via XNView (it's a PS filter and also a stand-alone (Virtual Studio) but I've not installed the stand-alone since I upgraded to Win7). I guess you could Shellout into Virtual Photographer too if you like. lol

Oh; by the way, it's free too. :)

http://www.optikvervelabs.com/

_________________
Lyle

Psalm 109:8

Image


Top
 Post subject: Re: How to clean this picture
PostPosted: Fri Feb 22, 2013 10:19 am  (#14) 
Offline
Global Moderator
User avatar

Joined: Apr 01, 2012
Posts: 7712
Location: On the other side of this screen
Have worked on a few older pictures that were spotted or creased and by using the cloning method have been reasonably successful at getting rid of most impurities without giving the photo a completely different look.
Every one here has done an awesome job with this photo though.

_________________


Last edited by sallyanne on Fri Feb 22, 2013 11:31 am, edited 1 time in total.

Top
 Post subject: Re: How to clean this picture
PostPosted: Fri Feb 22, 2013 11:19 am  (#15) 
Offline
GimpChat Member
User avatar

Joined: Jan 10, 2013
Posts: 863
lylejk,

"I guess you could Shellout into Virtual Photographer too if you like."

Really it's tempting!
I did not know this software, but it looks very interesting!
But I do not have PS on this computer, and my OS is Win7.

"virtualPhotographer is an 8-bit Photoshop Plug-in Filter that works on Microsoft Vista (32-bit) Windows XP, ME, and '98 operating systems - virtualPhotographer is a Photoshop-compatible plugin and as such requires a host image-editing program that supports Photoshop Plug-ins. "

Humm, Anyway, which means "Shellout into"? :puzzled
Don't know that term, and google translator did not help me. :oops:

Thx you! :tyspin :bigthup

_________________
bbbbbbbbbbbImage
bbbbbbbbbbb Be patient, English is not my language.


Top
 Post subject: Re: How to clean this picture
PostPosted: Fri Feb 22, 2013 2:36 pm  (#16) 
Offline
GimpChat Member
User avatar

Joined: May 26, 2012
Posts: 342
Location: France
sallyanne wrote:
Have worked on a few older pictures that were spotted or creased and by using the cloning method have been reasonably successful at getting rid of most impurities without giving the photo a completely different look.


+1 here!
...But it depends on the desired purpose, question is: smooth re-render or grain preservation ?
Question is asked to hanciong.


Top
 Post subject: Re: How to clean this picture
PostPosted: Fri Feb 22, 2013 2:53 pm  (#17) 
Offline
Global Moderator
User avatar

Joined: Apr 07, 2010
Posts: 14182
Akros wrote:
lylejk,

"I guess you could Shellout into Virtual Photographer too if you like."

Really it's tempting!
I did not know this software, but it looks very interesting!
But I do not have PS on this computer, and my OS is Win7.

"virtualPhotographer is an 8-bit Photoshop Plug-in Filter that works on Microsoft Vista (32-bit) Windows XP, ME, and '98 operating systems - virtualPhotographer is a Photoshop-compatible plugin and as such requires a host image-editing program that supports Photoshop Plug-ins. "

Humm, Anyway, which means "Shellout into"? :puzzled
Don't know that term, and google translator did not help me. :oops:

Thx you! :tyspin :bigthup


http://registry.gimp.org/node/24977
works with XNView

_________________
Image


Top
 Post subject: Re: How to clean this picture
PostPosted: Fri Feb 22, 2013 2:58 pm  (#18) 
Offline
GimpChat Member
User avatar

Joined: Sep 24, 2010
Posts: 12516
Akros wrote:
lylejk,

"I guess you could Shellout into Virtual Photographer too if you like."

Really it's tempting!
I did not know this software, but it looks very interesting!
But I do not have PS on this computer, and my OS is Win7.

"virtualPhotographer is an 8-bit Photoshop Plug-in Filter that works on Microsoft Vista (32-bit) Windows XP, ME, and '98 operating systems - virtualPhotographer is a Photoshop-compatible plugin and as such requires a host image-editing program that supports Photoshop Plug-ins. "

Humm, Anyway, which means "Shellout into"? :puzzled
Don't know that term, and google translator did not help me. :oops:

Thx you! :tyspin :bigthup


Read through this thread Akros and you can Shellout too. :)

viewtopic.php?f=9&t=970&hilit=shellout

_________________
Lyle

Psalm 109:8

Image


Top
 Post subject: Re: How to clean this picture
PostPosted: Fri Feb 22, 2013 6:33 pm  (#19) 
Offline
GimpChat Member
User avatar

Joined: Jan 10, 2013
Posts: 863
molly wrote:
http://registry.gimp.org/node/24977
works with XNView

Thx Molly!

Humm but i don't know that xnview :oops:
And, the Shellout is python script.

Can I use python script based products, in Win7? :puzzled :lame
Normally when I see a thread, filter or plugin in Python, do not pay attention, because I think that will only run on linux.

Thank you Molly! :tyspin
You as always very helpful! :bigthup

_________________
bbbbbbbbbbbImage
bbbbbbbbbbb Be patient, English is not my language.


Top
 Post subject: Re: How to clean this picture
PostPosted: Fri Feb 22, 2013 6:43 pm  (#20) 
Offline
GimpChat Member
User avatar

Joined: Jan 10, 2013
Posts: 863
lylejk wrote:
Read through this thread Akros and you can Shellout too. :)

viewtopic.php?f=9&t=970&hilit=shellout

Oh my God!
That isn't a thread... but a book! 27 pages, 256 posts. :shock:
I read only the first page. Also I'm lazy! :mrgreen:

Well, I have another PC running Win XP, I'll test it virtualStudio.

Thx very much lylek! :tyspin

_________________
bbbbbbbbbbbImage
bbbbbbbbbbb Be patient, English is not my language.


Top
Post new topic Reply to topic  [ 29 posts ]  Go to page 1, 2  Next

All times are UTC - 5 hours [ DST ]


   Similar Topics   Replies 
No new posts Attachment(s) A picture says it all.

4

No new posts Attachment(s) how to place text exactly into the picture - is there any help?

8

No new posts WebP picture for the attachment

1

No new posts Attachment(s) Feather in gimp gives unwanted lines in picture - SOLVED

9


* Login  


Powered by phpBB3 © phpBB Group