Tutorial: Make a Pumpkin Shape for a Jack O' Lantern
Sat Oct 16, 2010 9:56 pm
This tutorial is for making a basic pumpkin to turn into your own Jack O' Lantern design.
Download my attached pumpkin gradient and put it into your .gimp/gradients folder. Refresh your gradients or close and re-open GIMP.
Another way to try is to fill your 650x650 image with the striped gradient placed more closely together and Filters > Map > Map Object and make a sphere. Then go to iWarp.
This is an image I made last year before I made the pumpkin gradient.

Download and unzip the pumpkin.ggr file into your gradients folder.
Download my attached pumpkin gradient and put it into your .gimp/gradients folder. Refresh your gradients or close and re-open GIMP.
- Make a new image, 650x650 and fill the layer with white.
- Make a new transparent layer and name it pumpkin.
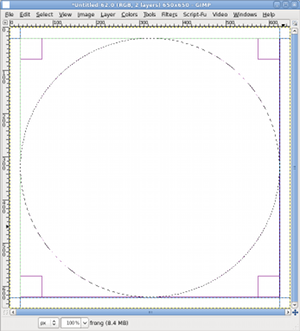
- Click Image > Guides > New Guide
Make horizontal guides at 25 and 625.
Make vertical guides at 25 and 625. - Select the pumpkin layer and click the Ellipse selection tool
In the toolbox make a Fixed size circle that is 600x600.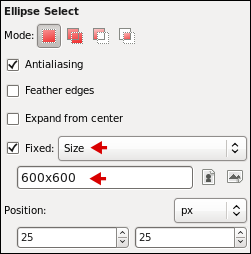
- Draw the ellipse and center it in the guides.
- Select the Blend (gradient) tool
Find the pumpkin gradient.
Settings
Sawtooth wave
Check Adaptive Supersampling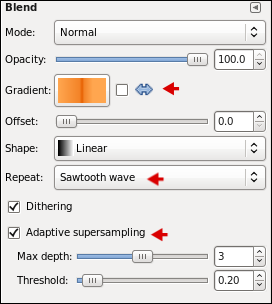
- While holding down the Ctrl key put the cursor in the circle and place it so that the beginning triangle on the ruler bar is somewhere between 175 and 250 and drag it to about 325. The closer to 325 you start dragging, the narrower and more plentiful the stripes you will get. The result is a striped circle that has a light orange stripe about in the center. It's not necessary for it to be exact, just close.
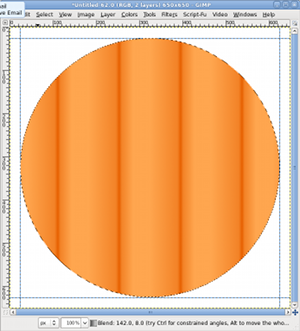
- Unselect (Ctrl + Shift + A).
- Filters > Distorts > Lens Distortion
Settings
Main = 100
Edge = 100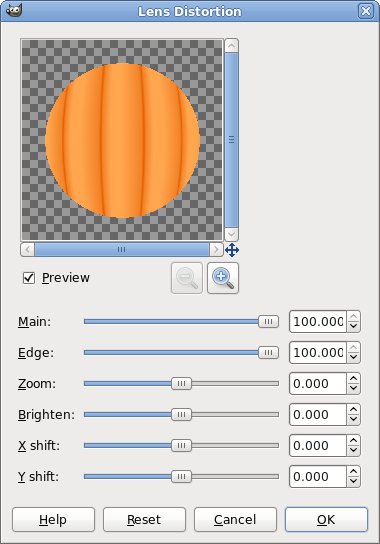
- Repeat Lens Distortion 3 or 4 times or until you have an image that looks like a round pumpkin with curved sections.
- Image > Scale Image > Break the chain to the right of the Width & Height settings.
Settings
Width = 700
Height = 600
This makes the pumpkin not so round. You can make the settings different for a pumpkin that is taller than it is wide. Pumpkins come in different shapes.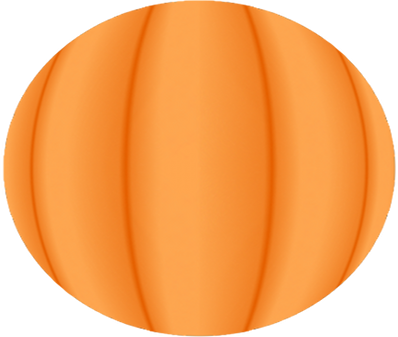
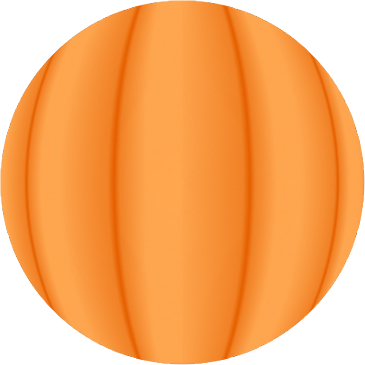
- Right-click the pumpkin layer and choose Alpha to Selection.
- Select > Grow 10.
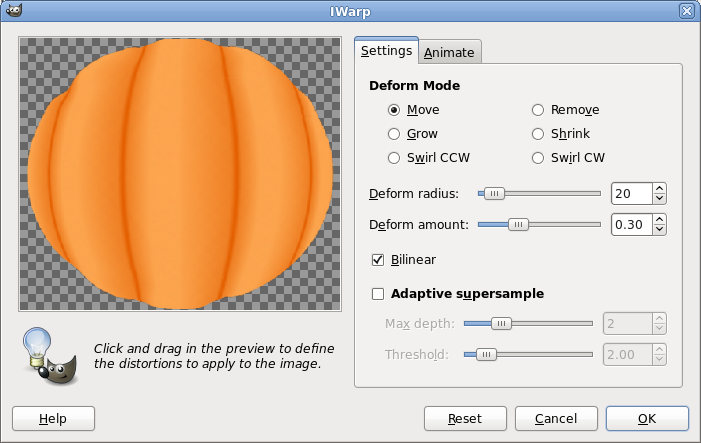
- Filters > Distorts > iWarp
- Leave the default settings in iWarp and along the top and bottom edges sections push slightly inward on the darker lines trying to trace back along the lines as best you can. Pull the lighter edges outward smoothing as you go. Be gentle. Try to get smooth, rounded edges on the light orange sections. Keep in mind that no pumpkin is perfectly symmetrical.
- If you are not happy with your first try, right-click the layer and Alpha to Selection. Again, grow the selection by 10 and go back to iWarp, or you can press Ctrl + Z which will undo the iWarp changes and return to the iWarp dialog. It may take several tries to get it how you want it - it did me.
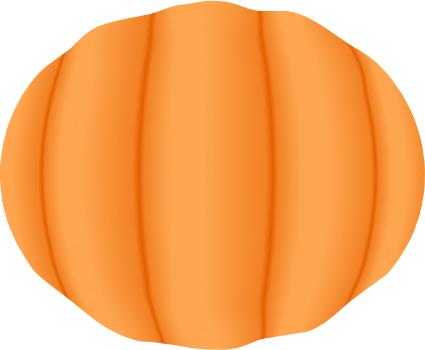
- Unselect. Your basic shape is finished.
Another way to try is to fill your 650x650 image with the striped gradient placed more closely together and Filters > Map > Map Object and make a sphere. Then go to iWarp.
This is an image I made last year before I made the pumpkin gradient.
Download and unzip the pumpkin.ggr file into your gradients folder.
Re: Tutorial: Make a Pumpkin Shape for a Jack O' Lantern
Sat Oct 16, 2010 11:37 pm
Cool tut O; might give it a go later. 
Re: Tutorial: Make a Pumpkin Shape for a Jack O' Lantern
Sun Oct 17, 2010 4:27 am
Very nice tute "O"
Re: Tutorial: Make a Pumpkin Shape for a Jack O' Lantern
Sun Oct 17, 2010 9:18 am
Quick try before running off to work.

Re: Tutorial: Make a Pumpkin Shape for a Jack O' Lantern
Sun Oct 17, 2010 9:28 am
very cute 2-ton
Re: Tutorial: Make a Pumpkin Shape for a Jack O' Lantern
Sun Oct 17, 2010 11:38 am
Very nice quick try, Toni.2-ton wrote:Quick try before running off to work.

Excellent job on the curving in iWarp.