Another way to make a pencil portrait.
Sat Dec 08, 2012 1:28 pm
Although in my site I've a translator widget, I'll try to do a tutorial for this way.
Re: Another way to make a pencil portrait.
Sat Dec 08, 2012 1:52 pm
Wow did you draw that jamac4k?
Re: Another way to make a pencil portrait.
Sat Dec 08, 2012 1:56 pm
Molly: Gimp and me, from a picture.
Re: Another way to make a pencil portrait.
Sat Dec 08, 2012 1:57 pm
It is fantastic. Kudos
Re: Another way to make a pencil portrait.
Sat Dec 08, 2012 3:57 pm
Fantastic result Jama. 
Re: Another way to make a pencil portrait.
Sat Dec 08, 2012 4:57 pm
Nice job! Can't wait to see a tutorial on that.
Re: Another way to make a pencil portrait.
Sat Dec 08, 2012 5:24 pm
Excellent result.
Thanks jamac4k!
Thanks jamac4k!
Re: Another way to make a pencil portrait.
Sat Dec 08, 2012 5:42 pm
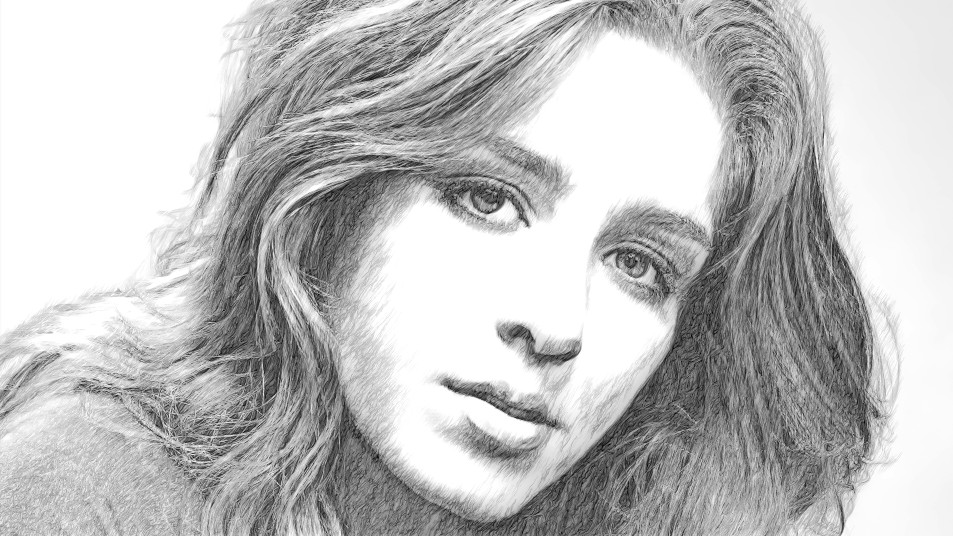
Another way to make a pencil portrait.
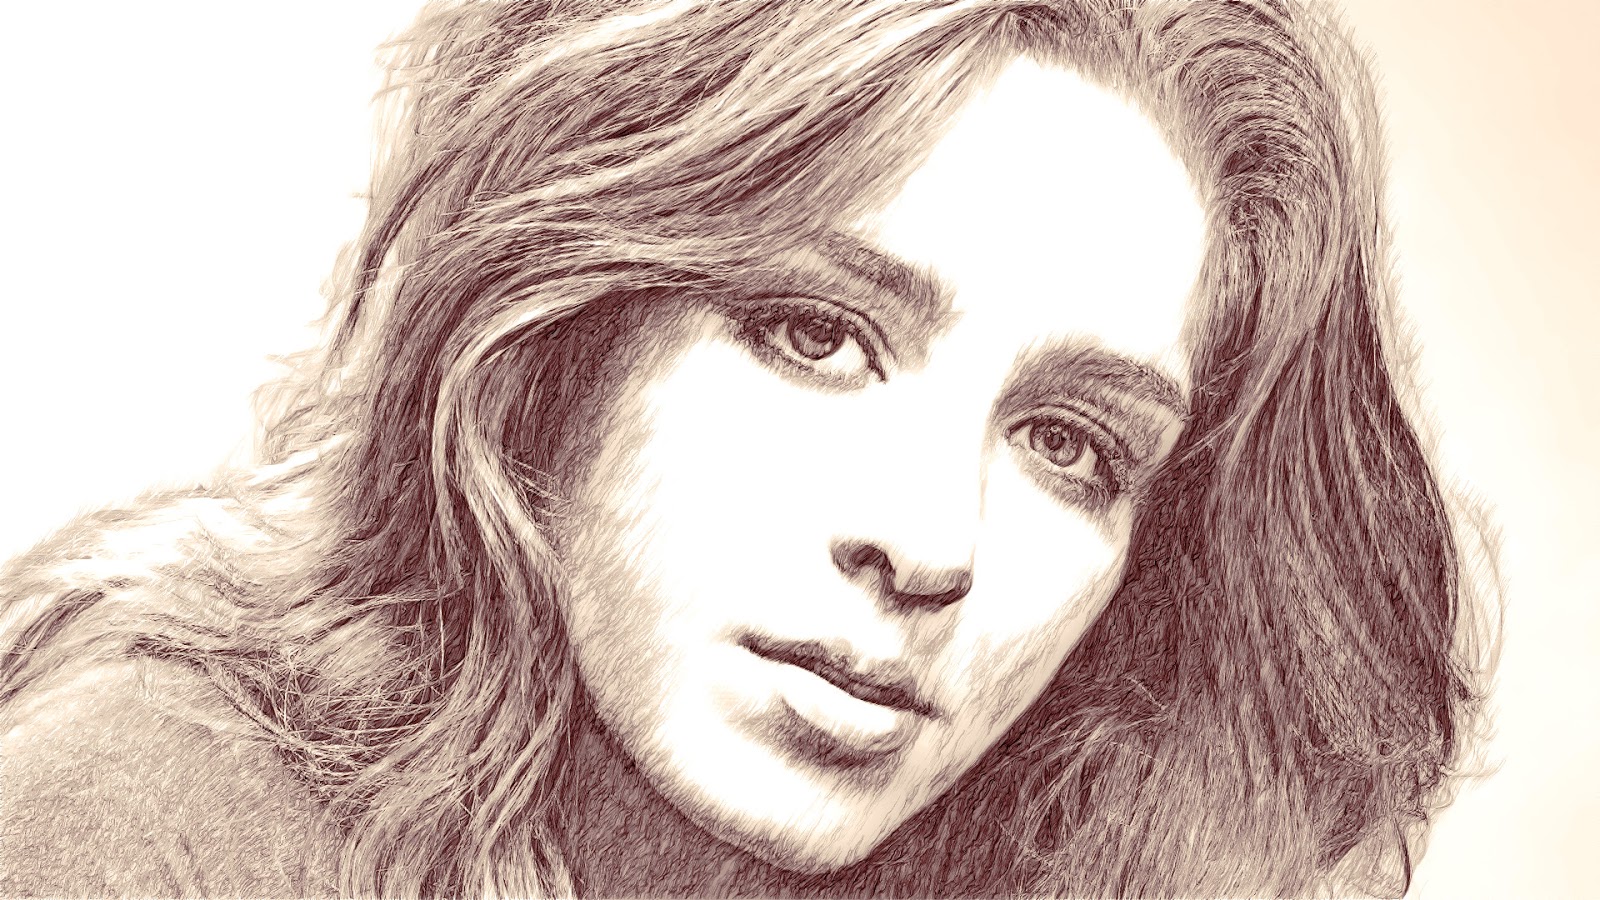
We start with the following photographic portrait of Esmee Denters

downloaded from http://www.a-gc.com/images/2012/10/blondes-women-eyes-faces-esmee-denters-portraits-HD-Wallpapers.jpg
Duplicate the layer twice L1 and L2. To L2 layer we apply Gaussian Blur about 33 px both in x and y. Then set the layer mode: Divide

With L2 selected, create New from visible, and desaturate it (mode: luminosity), getting this one:
Now we'll select the Background layer, or the layer L1, and go to G'mic, where we select, in Black & White, filter Ink Wash and apply the values:
[G'MIC] Ink wash:-gimp_ink_wash 0,167.164,0,0.5,0.54,2.25,0,2,6,5,20
to obtain:
Then, place this layer, Ink Wash, under Visible layer. Selecte now Visible layer, we'll apply the following G'mic's filters:
Hard Sketch, with current values: [G'MIC] Hard sketch:-gimp_hardsketchbw 86.2069,32.7586,1.89655,0.211207,31.4655,0,0,0
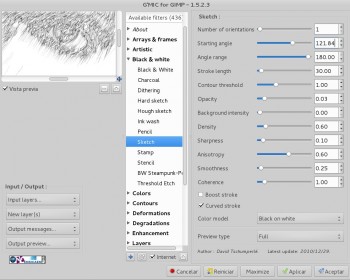
Sketch, with current values: [G'MIC] Sketch:-gimp_sketchbw 1,121.846,180,30,1,0.03,0,0.6,0.1,0.6,0.25,1,0,1,0,0
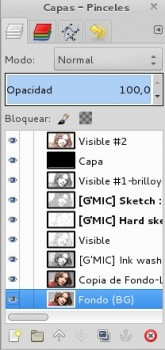
Now will set in the layers:
Ink Wash: mode Normal, 100% Opacity
Visible : so Burn , 100% opacity
Hard Sketch : Mode Multiply , 50 % Opacity
Sketch : mode Lighten only , 50% opacity
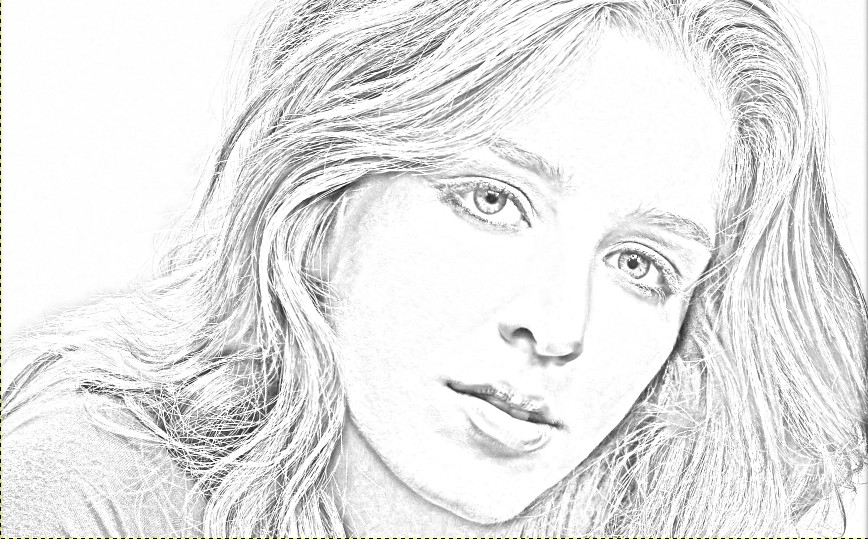
Must be, the output, something like this:
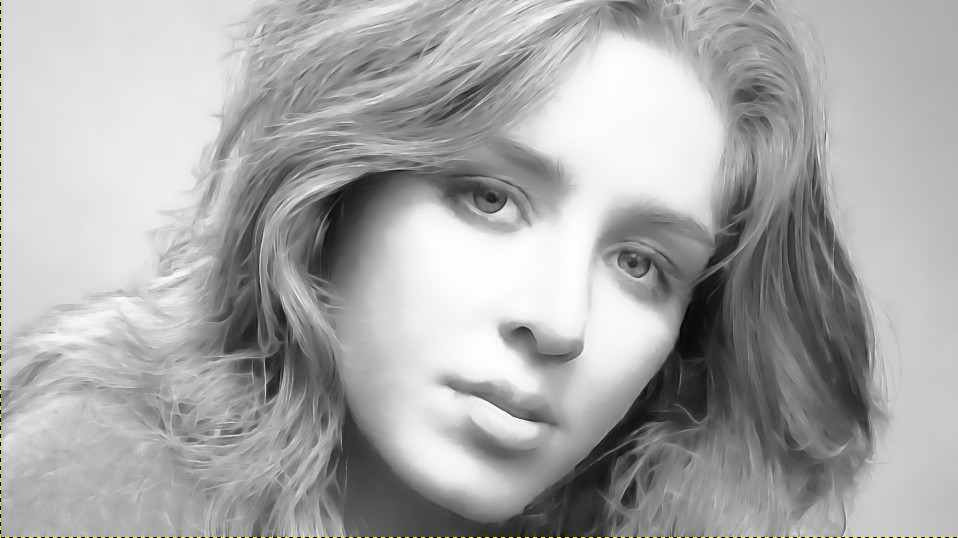
We create another visible layer (Visible # 1), New from visible, and apply it Brightness and Contrast in our opinion:
We add new transparent layer and fill it with black (# 000000), layer mode:color and opacity:100%. And now,we'll create, again, New from visible (Visible # 2), and in Colors select Color Balance and give the following values:
Points of light: Red (12) Yellow (- 13)
Midtones: Red (12)
Shadows: Red (61)
and we should get a picture like this:
We start with the following photographic portrait of Esmee Denters
downloaded from http://www.a-gc.com/images/2012/10/blondes-women-eyes-faces-esmee-denters-portraits-HD-Wallpapers.jpg
Duplicate the layer twice L1 and L2. To L2 layer we apply Gaussian Blur about 33 px both in x and y. Then set the layer mode: Divide
With L2 selected, create New from visible, and desaturate it (mode: luminosity), getting this one:
Now we'll select the Background layer, or the layer L1, and go to G'mic, where we select, in Black & White, filter Ink Wash and apply the values:
[G'MIC] Ink wash:-gimp_ink_wash 0,167.164,0,0.5,0.54,2.25,0,2,6,5,20
to obtain:
Then, place this layer, Ink Wash, under Visible layer. Selecte now Visible layer, we'll apply the following G'mic's filters:
Hard Sketch, with current values: [G'MIC] Hard sketch:-gimp_hardsketchbw 86.2069,32.7586,1.89655,0.211207,31.4655,0,0,0
Sketch, with current values: [G'MIC] Sketch:-gimp_sketchbw 1,121.846,180,30,1,0.03,0,0.6,0.1,0.6,0.25,1,0,1,0,0
Now will set in the layers:
Ink Wash: mode Normal, 100% Opacity
Visible : so Burn , 100% opacity
Hard Sketch : Mode Multiply , 50 % Opacity
Sketch : mode Lighten only , 50% opacity
Must be, the output, something like this:
We create another visible layer (Visible # 1), New from visible, and apply it Brightness and Contrast in our opinion:
We add new transparent layer and fill it with black (# 000000), layer mode:color and opacity:100%. And now,we'll create, again, New from visible (Visible # 2), and in Colors select Color Balance and give the following values:
Points of light: Red (12) Yellow (- 13)
Midtones: Red (12)
Shadows: Red (61)
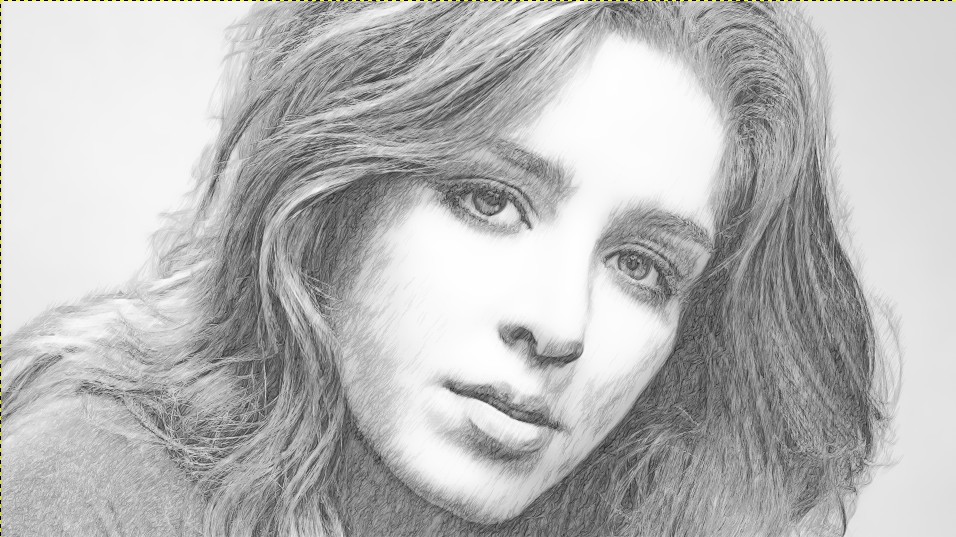
and we should get a picture like this:
Re: Another way to make a pencil portrait.
Sat Dec 08, 2012 6:03 pm
Excellent results and thanks for the tutorial.
Re: Another way to make a pencil portrait.
Sun Dec 09, 2012 1:28 am
jamac4k, could you explain this part
Now will set in the layers:
Ink Wash: mode Normal, 100% Opacity
Visible : so Blacken , 100% opacity
Hard Sketch : Mode Multiply , 50 % Opacity
Sketch : mode Lighten only , 50% opacity
should the gmic output be on layer copies or the (default) actual layers,and what does 'so Blacken' refer to
Re: Another way to make a pencil portrait.
Sun Dec 09, 2012 4:32 am
Graechan:
G'mic outputs will be in New layers(s) mode.
I've had to install Gimp in english and the idiom, in tutorial, darken refers to Burn mode in blend layers mode.
G'mic outputs will be in New layers(s) mode.
I've had to install Gimp in english and the idiom, in tutorial, darken refers to Burn mode in blend layers mode.
Re: Another way to make a pencil portrait.
Sun Dec 09, 2012 9:50 am
I'd like to note here how awesome I think molly is for making all these tuts into pdf now.
Re: Another way to make a pencil portrait.
Sun Dec 09, 2012 10:09 am
Thank you EK22.
I do that because I can fit a pdf on my desktop better and have Gimp open beside it. It makes it easier for me but maybe for others as well.
I do that because I can fit a pdf on my desktop better and have Gimp open beside it. It makes it easier for me but maybe for others as well.
Re: Another way to make a pencil portrait.
Sun Dec 09, 2012 12:19 pm
@jamac...I don't understand all your numbers that you have in the GMIC portion of your tutorial. Here is what I mean...Hard Sketch, with current values: [G'MIC] Hard sketch:-gimp_hardsketchbw
86.2069,32.7586,1.89655,0.211207,31.4655,0,0,0
Sketch, with current values: [G'MIC] Sketch:-gimp_sketchbw
1,121.846,180,30,1,0.03,0,0.6,0.1,0.6,0.25,1,0,1,0,0
I understand what categories to go to but where do I place all those numbers? They don't look at all familiar from what the default ones are. Could you do some screen shots of the dialogue?
Re: Another way to make a pencil portrait.
Sun Dec 09, 2012 1:04 pm
These serial of numbers belong to the values that we set in the filter gui:
[G'MIC] Ink wash : -gimp_ink_wash 0,167.164,0,0.5,0.54,2.25,0,2,6,5,20
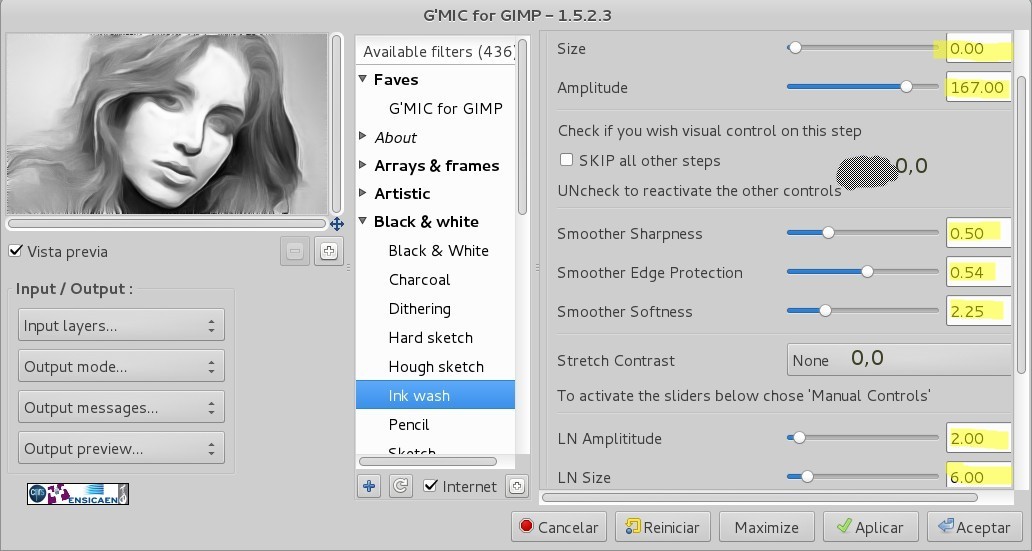
Each number between commas is the setting that we input in the filter's parameters. The serial starts top to bottom.
In this case:
(size:)0, (amplitude:)167.164,(no selected Skip:)0, (smoother sharpness:)0.5, (smoother edge protection:)0.54, (smoother softness:)2.25, (strecht contrast=none:)0, (LN amplitude:)2, (LN size:)6, (LN neighborhood s.5, (LN average-s. 20
I had to do it because I fotgot make Gui captures.
[G'MIC] Ink wash : -gimp_ink_wash 0,167.164,0,0.5,0.54,2.25,0,2,6,5,20
Each number between commas is the setting that we input in the filter's parameters. The serial starts top to bottom.
In this case:
(size:)0, (amplitude:)167.164,(no selected Skip:)0, (smoother sharpness:)0.5, (smoother edge protection:)0.54, (smoother softness:)2.25, (strecht contrast=none:)0, (LN amplitude:)2, (LN size:)6, (LN neighborhood s.
I had to do it because I fotgot make Gui captures.
Re: Another way to make a pencil portrait.
Sun Dec 09, 2012 1:13 pm
thank you, that takes care of that layer, then we get to sketch and hard sketch, those numbers are confusing too. 
Re: Another way to make a pencil portrait.
Mon Dec 10, 2012 8:03 am
jamac4k, could you put in the settings numbers for the sketch and hard sketch also. please
BTW when we get to the step New from visible (Visible # 2)
and visible layer (Visible # 1), New from visible, should all the layers be turned on before doing this. It doesn't show in the tute if the layers should be turned off or on? Thanks
If these things get sorted out I will make a new pdf
BTW when we get to the step New from visible (Visible # 2)
and visible layer (Visible # 1), New from visible, should all the layers be turned on before doing this. It doesn't show in the tute if the layers should be turned off or on? Thanks
If these things get sorted out I will make a new pdf
Re: Another way to make a pencil portrait.
Mon Dec 10, 2012 9:02 am
Molly:
I don't understand exactly what means "BTW", I hope that these pics would be that you need

I don't understand exactly what means "BTW", I hope that these pics would be that you need
Re: Another way to make a pencil portrait.
Mon Dec 10, 2012 9:14 am
Hi jamac4k,
BTW => By the way
Very good tutorial
BTW => By the way
Very good tutorial
Re: Another way to make a pencil portrait.
Mon Dec 10, 2012 9:26 am
Thank you jamac4k