Year Calendar Tutorial
Sun Dec 26, 2010 5:20 pm
DOWNLOADS
Saulgoode's Calendar Script
Click here and then click the Download button on the menu. - 12/28/2010 - Please note, this link has been updated. It is the one used here for saulgoode's new Calendar Year Script-Fu (beta).
Border Script
Get the Add_Border_Script_by_Insanity_Prevails.scm. This is my favorite border script.
Click here
Test the font color on whatever background you want to use for your finished calendar so that you can check the visibility of it over the background.
Make a Year Calendar
Make a new image 150x130 and fill the background layer with white. If you are working with light-colored text, fill with black. Save it as an xcf file and name it smallcalendar.xcf.
Make another new image 640x480. Fill the background layer with white (or black).
Save it as yearcalendar.xcf.
Make the Foreground color the color you want for the text in your calendar.
Select the smallcalendar.xcf image, then Filters > Render > Calendar.
Choose the Layout you want for the small calendar.
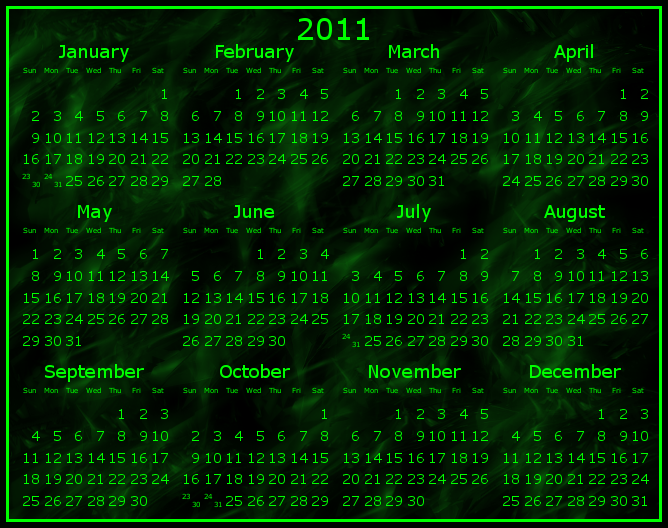
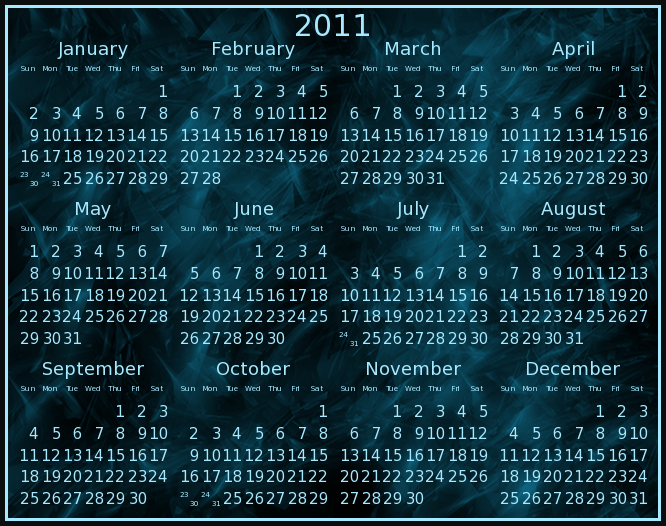
Here are plain examples of each type of layout. I put borders in just as examples.

Click OK. You have a small January, 2011 calendar. Filters > Reshow "Calendar" and change the month to February. Repeat until you have all of the months in layers in smallcalendar.xcf. File > Save or Ctrl + S.
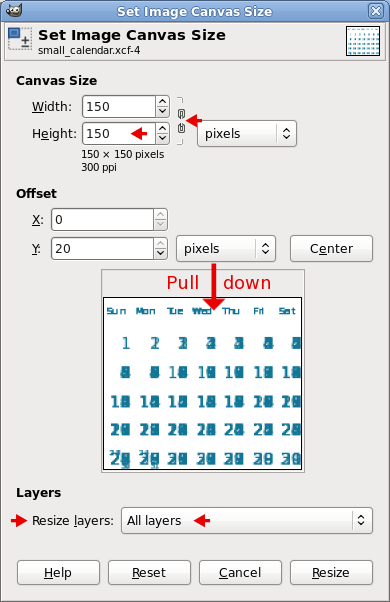
To make room for the name of the month, Image > Canvas Size. Break the chain and make the Height 150, press Enter, drag the image down to the bottom of the dialog box. Resize layers, choose All layers in the dropdown. Click Resize. Refill the background layer with white (black).
Press Ctrl + E. It's called shrink wrap but in this case it's grow wrap so that all of the image shows within the padding.
Select the Background layer. Press the Shift key and click the eye to the left of the layer. Visibility of the rest of the layers is off.
Drag the Layer Preview of January, 2011 into the year calendar image, use the Move tool to position it in the top left grid box and move it to the upper left corner of the grid. There will be 10 pixels of space left on the right and bottom in the grid box. Do the same for each completed month layer until you have the 12 months arranged in the large calendar layout.

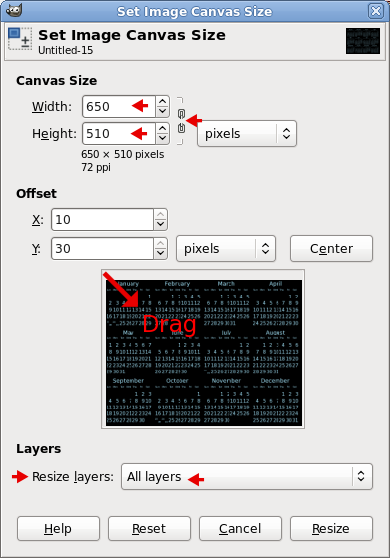
After you have each month aligned in the year calendar, Image > Canvas Size. Unlink, make the Width 650 and the Height 510, Resize layers: All layers, press Enter and drag the calendar to the bottom and to the right in the dialog, click Resize. Fill the background layer with white (black).
View > Uncheck Show Grid and Snap to Grid.
Select the top layer in the calendar, select the Text Tool , make the Font Size 30, type the year numbers. Align top and center with the alignment tool
  as you did in the small calendars.
If you want to fill the background with a pattern, gradient or image, select the Background layer, add a new, transparent layer and fill with what you want. You may need to lower the opacity for the numbers to show well.
It's up to you whether you want to keep the extra Background layer. If you have lowered the opacity on a new layer filled with a pattern, etc., you may want it to back your color layer.
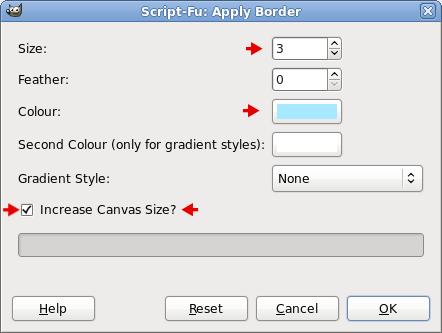
Select the Background layer and Filters > Decor > Apply Border. Border size 3. Make the border color the same color as your text by dragging the box of the Foreground color into the Border Color Dialog on the top color row in there. Be sure to check the box, Increase Canvas Size.
Look over your calendar to make sure everything looks OK. Save it in layers as the xcf file to change later if you want.
Ctrl + D to make a duplicate. Close yearcalendar.xcf.
I put an additional 5-pixel black border around mine so that the light blue border would stand out better.
Press Ctrl + E.
Right-click a layer and select Merge Visible Layers. Save as your finished year calendar.
Saulgoode's Calendar Script
Click here and then click the Download button on the menu. - 12/28/2010 - Please note, this link has been updated. It is the one used here for saulgoode's new Calendar Year Script-Fu (beta).
Border Script
Get the Add_Border_Script_by_Insanity_Prevails.scm. This is my favorite border script.
Click here
Test the font color on whatever background you want to use for your finished calendar so that you can check the visibility of it over the background.
Make a Year Calendar
Make a new image 150x130 and fill the background layer with white. If you are working with light-colored text, fill with black. Save it as an xcf file and name it smallcalendar.xcf.
Make another new image 640x480. Fill the background layer with white (or black).
- Image > Configure Grid
- Line Style: Solid
- Foreground Color: 00ff00 (It's neon green, you can choose any color you prefer)
- Spacing: Width & Height = 160
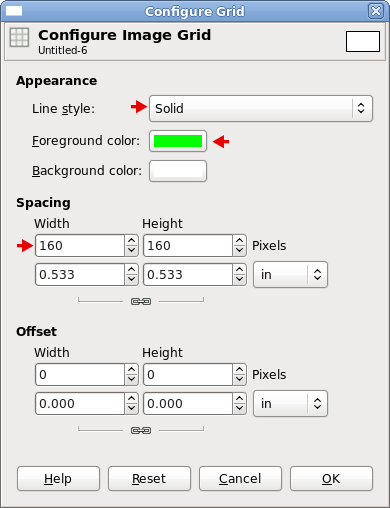
- View > Show Grid
- View > Snap to grid
Save it as yearcalendar.xcf.
Make the Foreground color the color you want for the text in your calendar.
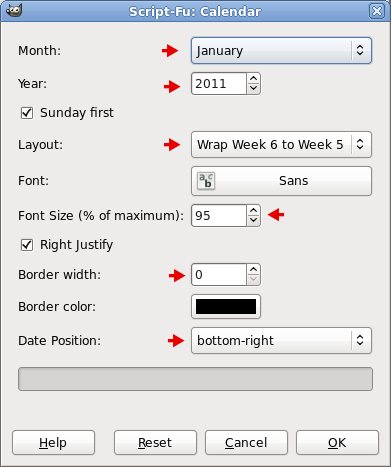
Select the smallcalendar.xcf image, then Filters > Render > Calendar.
- January
- Year = 2011
- Layout - See the choices for Layout below in the list and images.
- Font = Default Sans in the script
- Font Size (% of maximum) = 95
- Border Width = 0
- Date Position = Bottom Right
Choose the Layout you want for the small calendar.
- Allow 6 weeks (resizing text for optimal fit)
- Force 6 weeks (use six rows of weeks in all cases, even for a 4-week February)
- Wrap week 6 to week 1 (the approach proposed by wbool)
- Wrap week 6 to week 5 (and if needed compressing two days into a single cell)
Here are plain examples of each type of layout. I put borders in just as examples.
Click OK. You have a small January, 2011 calendar. Filters > Reshow "Calendar" and change the month to February. Repeat until you have all of the months in layers in smallcalendar.xcf. File > Save or Ctrl + S.
To make room for the name of the month, Image > Canvas Size. Break the chain and make the Height 150, press Enter, drag the image down to the bottom of the dialog box. Resize layers, choose All layers in the dropdown. Click Resize. Refill the background layer with white (black).
Press Ctrl + E. It's called shrink wrap but in this case it's grow wrap so that all of the image shows within the padding.
Select the Background layer. Press the Shift key and click the eye
to the left of the layer. Visibility of the rest of the layers is off. - Go to the January, 2011 layer, select it, and turn on the visibility of that layer (the plain January layer is empty - it was for the borders).
- Text Tool > Sans font > Size = 18. Type, January.
- Click the Alignment Tool then click in the text.
- Click the middle icon
 in the Alignment tool dialog which aligns the text horizontally, then click the bottom
  left icon which moves the text to the top of the image.
 - Merge the January text layer down to the January, 2011 layer.
- Turn off the visibility of the January, 2011 layer and select the February, 2011 layer. Turn on the visibility of that layer and use the Text tool to type in the word, February.
- Follow the steps for naming each month.
Drag the Layer Preview of January, 2011 into the year calendar image, use the Move
tool to position it in the top left grid box and move it to the upper left corner of the grid. There will be 10 pixels of space left on the right and bottom in the grid box. Do the same for each completed month layer until you have the 12 months arranged in the large calendar layout.After you have each month aligned in the year calendar, Image > Canvas Size. Unlink, make the Width 650 and the Height 510, Resize layers: All layers, press Enter and drag the calendar to the bottom and to the right in the dialog, click Resize. Fill the background layer with white (black).
View > Uncheck Show Grid and Snap to Grid.
Select the top layer in the calendar, select the Text Tool
, make the Font Size 30, type the year numbers. Align top and center with the alignment tool as you did in the small calendars.If you want to fill the background with a pattern, gradient or image, select the Background layer, add a new, transparent layer and fill with what you want. You may need to lower the opacity for the numbers to show well.
It's up to you whether you want to keep the extra Background layer. If you have lowered the opacity on a new layer filled with a pattern, etc., you may want it to back your color layer.
Select the Background layer and Filters > Decor > Apply Border. Border size 3. Make the border color the same color as your text by dragging the box of the Foreground color into the Border Color Dialog on the top color row in there. Be sure to check the box, Increase Canvas Size.
Look over your calendar to make sure everything looks OK. Save it in layers as the xcf file to change later if you want.
Ctrl + D to make a duplicate. Close yearcalendar.xcf.
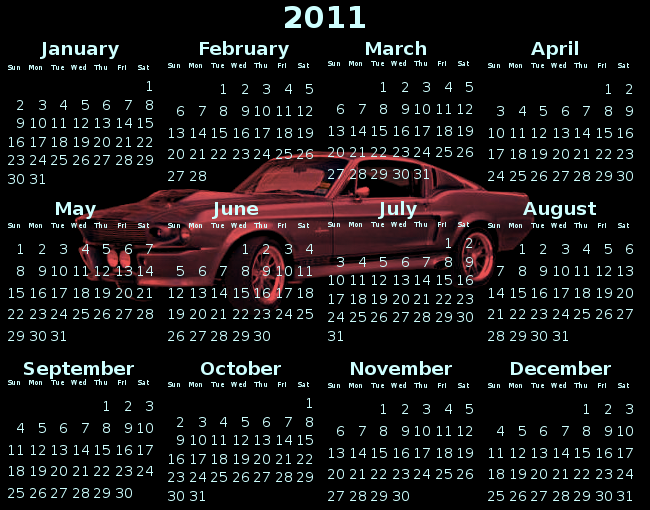
I put an additional 5-pixel black border around mine so that the light blue border would stand out better.
Press Ctrl + E.
Right-click a layer and select Merge Visible Layers. Save as your finished year calendar.
Re: Year Calendar Tutorial
Sun Dec 26, 2010 10:03 pm
I love it, nice tutorial O! =)
Re: Year Calendar Tutorial
Sun Dec 26, 2010 10:19 pm
I love the car in the background. Had to run over to gimper.net to see if it was the same car you have in your sig. Yep. 
Nice job! Thanks for doing my tutorial.
Nice job! Thanks for doing my tutorial.
Re: Year Calendar Tutorial
Sun Dec 26, 2010 10:25 pm
I flubbed the date alignment though. =)
That tutorial was very easy to follow too.
That tutorial was very easy to follow too.
Re: Year Calendar Tutorial
Mon Dec 27, 2010 12:16 am
Rod wrote:I flubbed the date alignment though. =)
You didn't really flub it. By default the script autosizes the font and the layout to completely fill the original layer and the alignment changes depending upon whether the month spans 4, 5, or 6 weeks. This is a good choice for producing a calendar with each month on a separate page, but if a full year is placed on one page then the other choices for the Layout option will keep things aligned better.
Re: Year Calendar Tutorial
Mon Dec 27, 2010 8:55 am
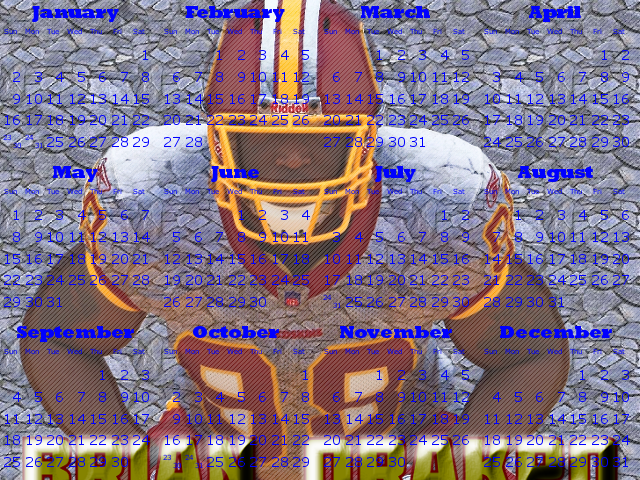
I like the result with this tutorial ... 
Re: Year Calendar Tutorial
Mon Dec 27, 2010 9:23 am
Very nice Mike. You might have lowered the opacity on your background image a little to make the numbers more visible. I love your picture and subject though. Love the scanlines and the stonework showing through the guy's shirt. Good work! The calendar takes time and gets a bit tedious to do. You stuck it out. 
Re: Year Calendar Tutorial
Mon Dec 27, 2010 10:02 am
Oregonian wrote:Very nice Mike. You might have lowered the opacity on your background image a little to make the numbers more visible. I love your picture and subject though. Love the scanlines and the stonework showing through the guy's shirt. Good work! The calendar takes time and gets a bit tedious to do. You stuck it out.
I thought I had turned off the scanlines layer. It appears not.
 Well, I have some free time today. I'll probably give it another try later. I have the .xcf file saved but simply lowering the opacity or turning off the scanlines isn't much fun.
 Re: Year Calendar Tutorial
Mon Dec 27, 2010 10:10 am
Mike wrote:I have the .xcf file saved but simply lowering the opacity or turning off the scanlines isn't much fun.
 GIMP is fun a lot of the time, but ya gotta do slogwork in it as well. The fun stuff will only get you so far in it.
Re: Year Calendar Tutorial
Mon Dec 27, 2010 10:30 am
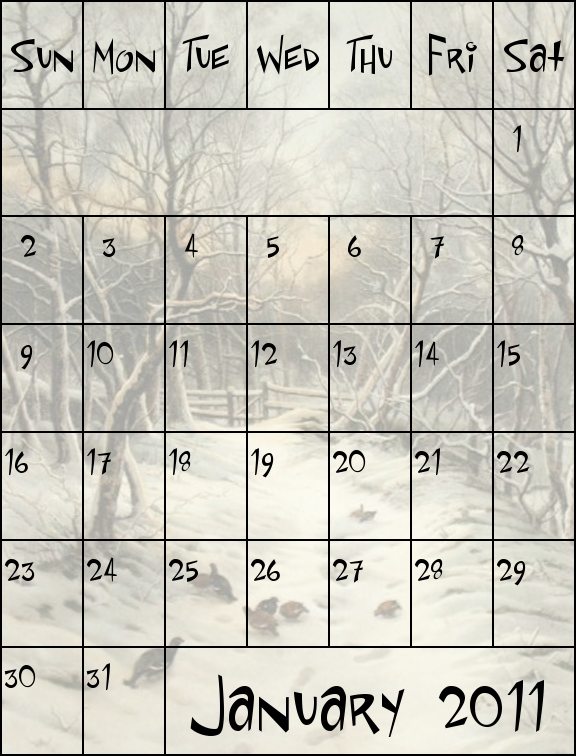
One of the things I love about this script is that you can make a single month calendar and print it out. This one I made 8 x 10.5" to fit on a sheet of paper.
Re: Year Calendar Tutorial
Mon Dec 27, 2010 10:59 am
that is beautiful "O", love the backround.
Re: Year Calendar Tutorial
Mon Dec 27, 2010 12:32 pm
I guess I could direct this question to Saul: How hard would it be to make the calendar script create a lay-out similar to O's (4 columns by 3 rows), an automated process?
Re: Year Calendar Tutorial
Mon Dec 27, 2010 12:38 pm
Everyone's work is awesome! Getting over being sick, so maybe in a bit I'll do one myself.
Re: Year Calendar Tutorial
Mon Dec 27, 2010 1:32 pm
mahvin wrote:I guess I could direct this question to Saul: How hard would it be to make the calendar script create a lay-out similar to O's (4 columns by 3 rows), an automated process?
Interesting question mahvin and it sounds complicated to do. If anyone can do it, though, saulgoode can.
Here's a link to the discussion page and the trials and tribulations we all put saulgoode through when he wrote the script. It's kind of fun and interesting reading.
http://www.gimptalk.com/forum/anyone-ever-made-a-calendar-in-gimp--p324827.html#p324827
@ Greg: Sorry you've been ill. 'Tis the season though. Get well fast!
Re: Year Calendar Tutorial
Mon Dec 27, 2010 1:46 pm
Burried under 2+ feet of snow, I wanted something warm!
Re: Year Calendar Tutorial
Mon Dec 27, 2010 2:01 pm
Ahhh, that's so pretty, Greg. Yeah. Some warm sounds good.
Re: Year Calendar Tutorial
Mon Dec 27, 2010 2:02 pm
Awesome background ... very nice.
Re: Year Calendar Tutorial
Mon Dec 27, 2010 2:18 pm
Yeah that totally warms me up.Nice choice of colors. =)
Re: Year Calendar Tutorial
Mon Dec 27, 2010 2:23 pm
O: Yeah, I understand how asking something that seems simple in theory can actually be quite the task in implementing. I try to refrain from asking as much as possible, and seek out answers myself, first. The thing is, though, I know where I stand on scripting (I'm still slogging through the basics in Python) and have no Scheme (Script-Fu) experience, whatsoever. So, I don't kid myself and try to pretend to know what I am doing. I am, admittedly, a duplication monkey. Unfortunately, it only applies to simple tasks.
I recall doing this tutorial from Gimp Talk (last year?), and seeking out other methods of creating a yearly calendar (Google, Scribus, Open Office, independent calendar software, etc.), to simplify this tedious process of creating 12 months, into one shot. The closest I came was to using a spreadsheet (Excel or OO Calc both work fine). The downside is it requires being set up, then being saved to a pdf file and opened in GIMP. The upside is that it's editable (font style, colors, etc.). It's just not a GIMP process, and the whole idea of using GIMP, for me, is to keep everything within GIMP.
I recall doing this tutorial from Gimp Talk (last year?), and seeking out other methods of creating a yearly calendar (Google, Scribus, Open Office, independent calendar software, etc.), to simplify this tedious process of creating 12 months, into one shot. The closest I came was to using a spreadsheet (Excel or OO Calc both work fine). The downside is it requires being set up, then being saved to a pdf file and opened in GIMP. The upside is that it's editable (font style, colors, etc.). It's just not a GIMP process, and the whole idea of using GIMP, for me, is to keep everything within GIMP.
Re: Year Calendar Tutorial
Mon Dec 27, 2010 6:42 pm
Greg, Yours is so beautiful. I just love it. SWEET is a better word....