GIMP Chat
http://gimpchat.com/

How to create and simple Easter egg using GIMP and G'MIC
http://gimpchat.com/viewtopic.php?f=23&t=19872
Page 1 of 1

Author:  Pocholo [ Tue Mar 15, 2022 10:37 am ]
Post subject:  How to create and simple Easter egg using GIMP and G'MIC

In this tut I will show you how to create an egg for Easter using GIMP and G'MIC sources. Bear with me, because I hardly create tutorials, just plugins.

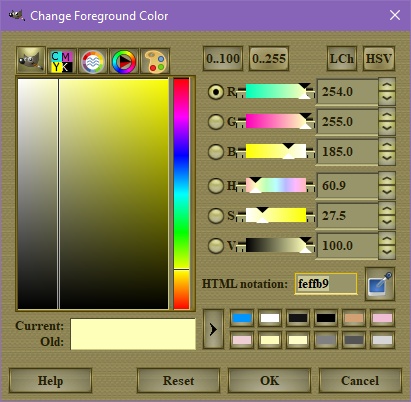
1. Create a new image with a background area 600 x 800 px and fill it with color #feffb9
Image

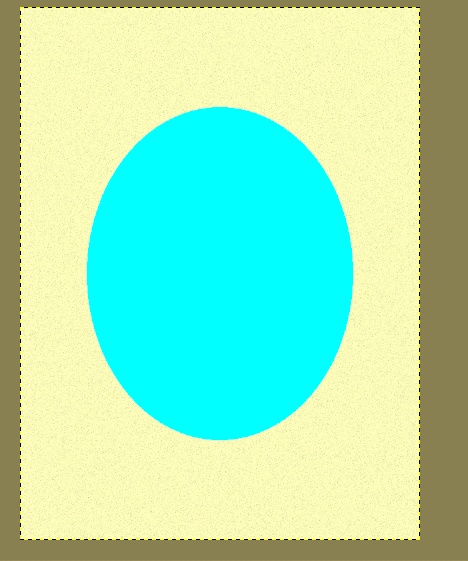
2. Create a new layer with the size 400 x 500 px and fill the layer with a blue (for the purpose of the tutorial, but you can fill it with the color you like). Move the layer to the center using the Alignment tool.
Image

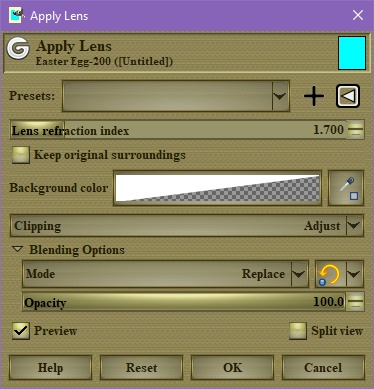
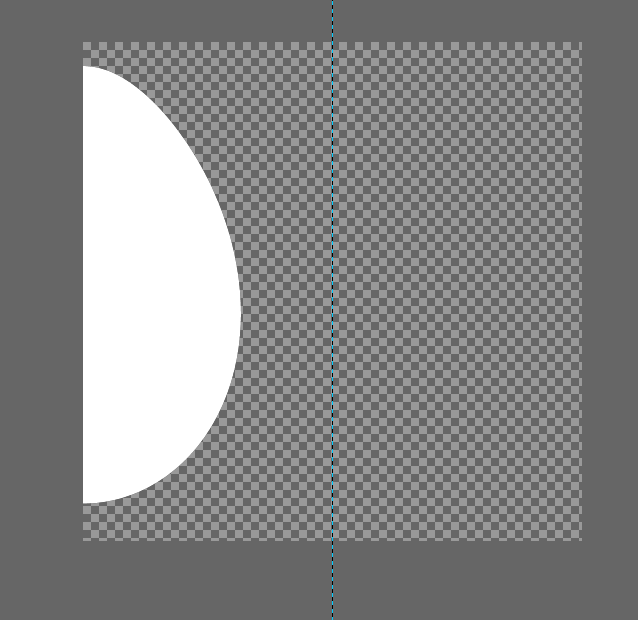
3. Go to the Filters menu and select, Distorts/Apply Lens. let the "Lens refraction index" as is. Click on the Background color and select the lower bottom lever. Slide it to the left to create a Transparency on the egg surrounding area. That will create the Oval shape for the egg.
Image
Image

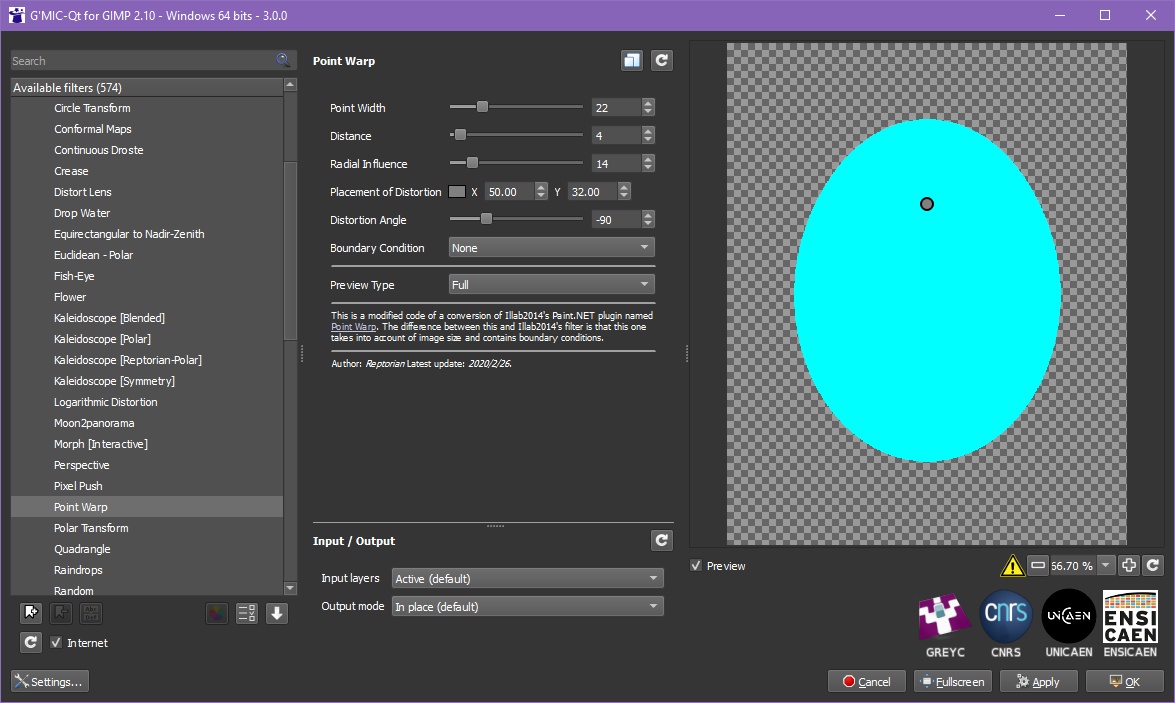
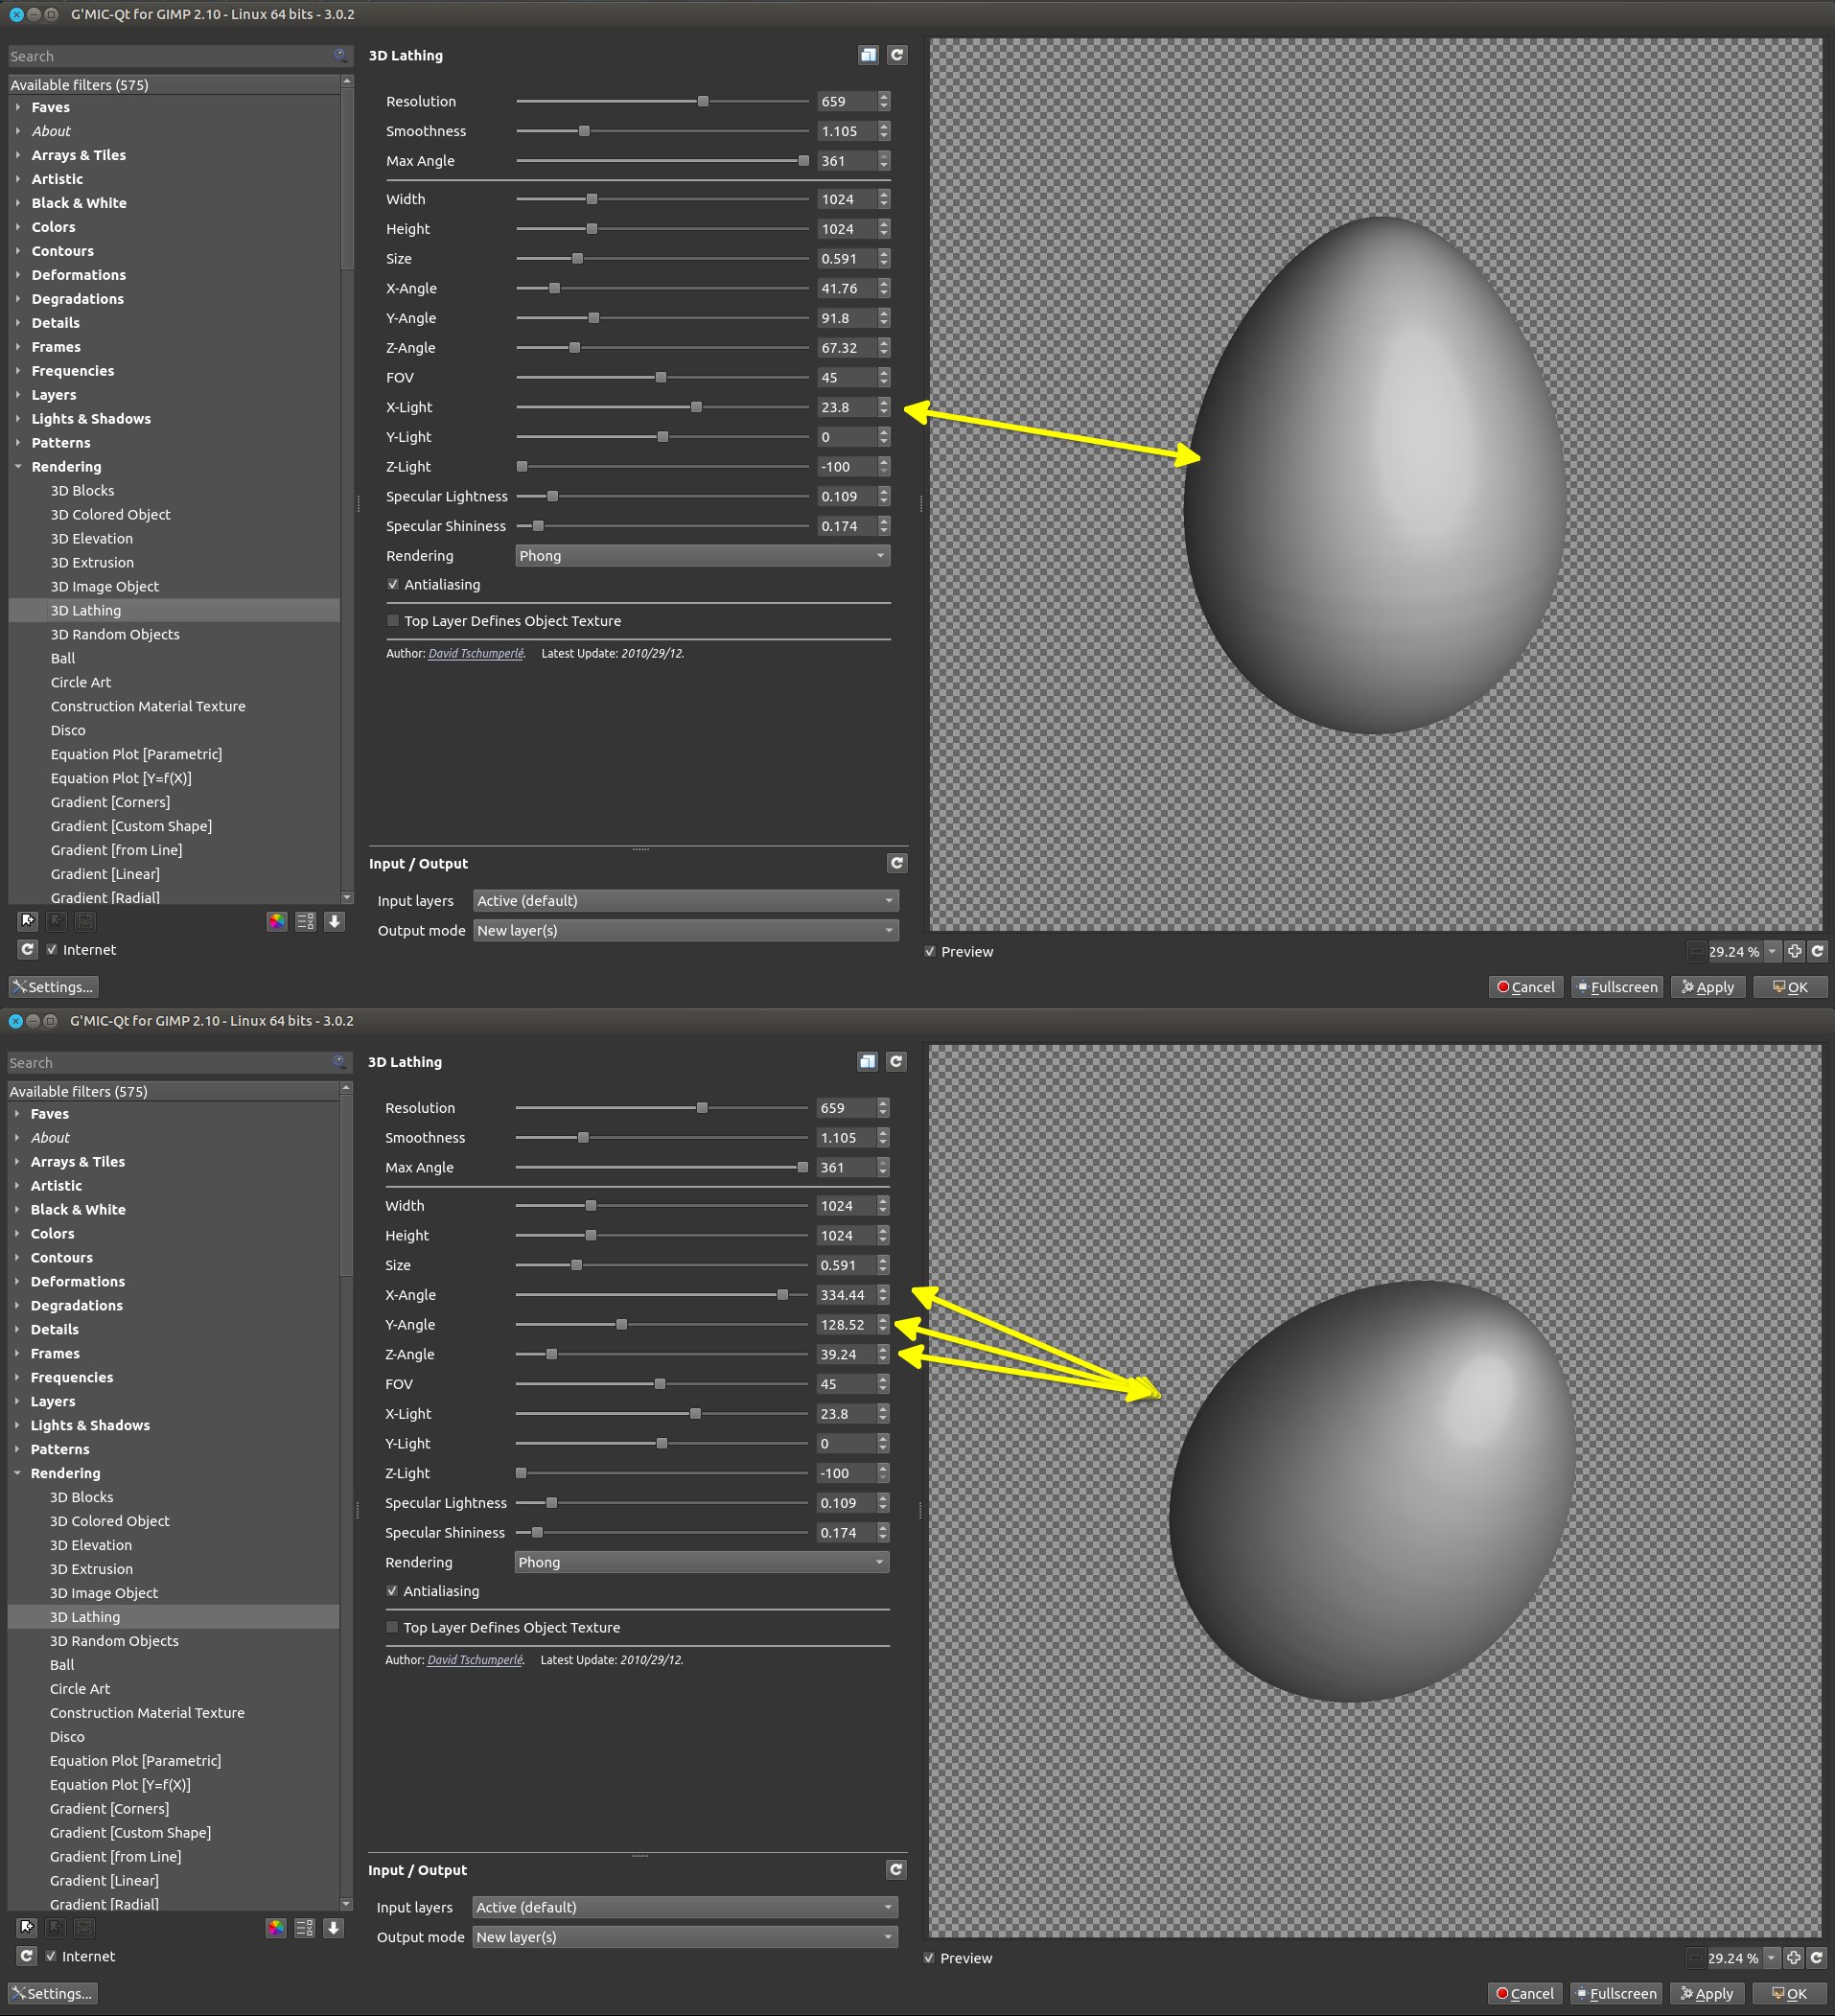
4. Make the layer like the image size (Layer to Image Size) and select G'MIC. With G'MIC we can make the shape even better, so go to, Deformation/Point Warp and set the setting as shown. Click ok. Apply G'MIC again.
Image

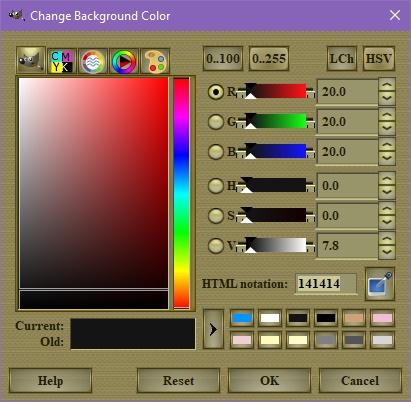
5. Now for the last two parts; Right click the egg layer and make a selection (Alpha to selection). Since we already have the Foreground color with the blue or whatever color you picked, leave it as is and change the Background to - #141414.
Image

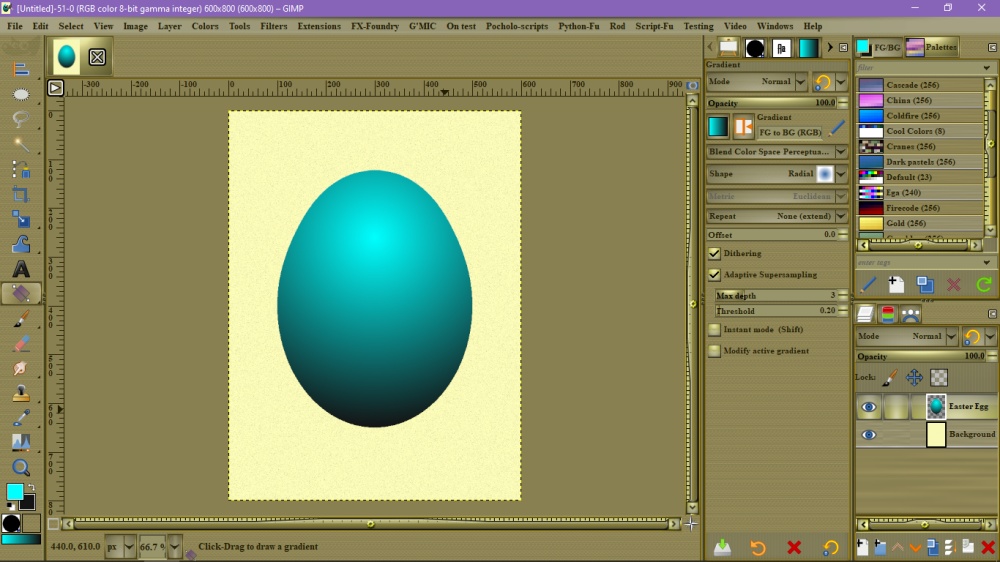
6. And lastly, take the gradient tool also known by Blend tool, Shape-Radial, and trace a gradient from top to bottom as I showed you in the image.
Image

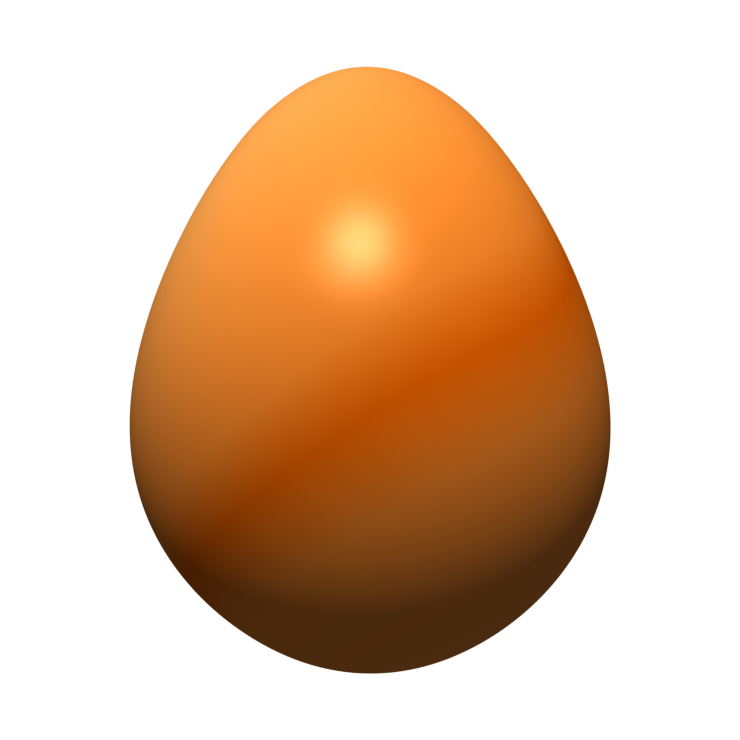
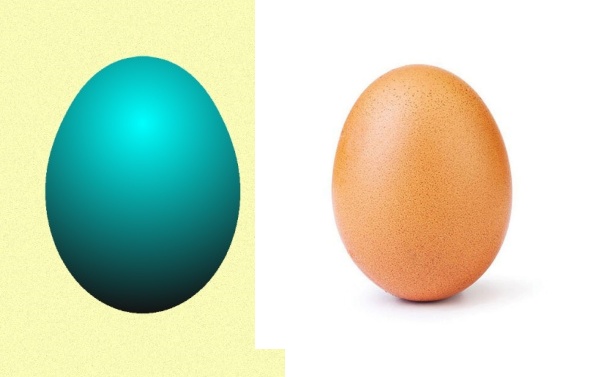
7. There's your Eater egg :hehe
Image

You can adorn you egg with whatever patterns you like.
Ps This is a flat composition, you can create a drop shadow to make it look better.

Please rate me how I presented the tut. I will like to create more written tutorial in the long run. Thank you! :)

Author:  nelo [ Tue Mar 15, 2022 1:47 pm ]
Post subject:  Re: How to create and simple Easter egg using GIMP and G'MIC

Nice tutorial, pocholo.
Maybe for GIMP beginners you could add how to make the background colour transparent here:
Quote:
3. Go to the Filters menu and select, Distorts/Apply Lens. let the "Lens refraction index" as is and change the background to Transparent. That will create the Oval shape for the egg


Also if I want to have a decorated egg ... decoration should be done before any deformation.
But then the stuff about the gradient doesn't work, does it? (As you colour over the decoration)
Maybe some effects in Lights and Shadows > Light Effects might be good there?

Author:  Pocholo [ Tue Mar 15, 2022 2:02 pm ]
Post subject:  Re: How to create and simple Easter egg using GIMP and G'MIC

Thank you for the tips, Nelo! :bigthup

Author:  PixLab [ Wed Mar 16, 2022 1:14 am ]
Post subject:  Re: How to create and simple Easter egg using GIMP and G'MIC

Pocholo wrote:
In this tut I will show you how to create an egg for Easter using GIMP and G'MIC sources.

Please rate me how I presented the tut. I will like to create more written tutorial in the long run. Thank you! :)


OK, you asked for it, I'll try to bear with you :hehe , but I do need to tell things to give my humble opinion.

I found your tutorial more complex that it should be IMHO
Also, the first thing I noticed, is that your egg does not have an oblong side (an asymmetric tapered ovoid) AKA Oval, thus your shape does not look like an egg.
I also would like to point out that you do not need any plug-in to drop an egg in GIMP as GIMP has it all already (I like a lot G'MIC, though, on that note I want to let you know that G'MIC has a full egg shaped filter, with many fine tuning sliders).

In the end I open my mouth... but how I do it?
I'll try to explain, using only 2 filters in GIMP to make an egg with its typical oval.

1) create a squared transparent image

2) depending what you want there are many ways to start, I'll speak about just 2 ways as they are extremely simple:
first way
- Filters / Render / Sphere designer...
- then Rotate transform tool, put the shadow at the bottom.
or
second way
- Put a color or a gradient or whatever picture, pattern and so on the layer.
- then Filters / Map / Map object...

Attachment:
2 ways to start.jpg
2 ways to start.jpg [ 151.01 KiB | Viewed 3753 times ]


3) then for which either way you did start above, just do
Filters / Distorts / Curve Bend...
Done ;)

Attachment:
2 ways to start last step.jpg
2 ways to start last step.jpg [ 271.52 KiB | Viewed 3753 times ]


Result:
Image

Now with G'MIC, did I said that I like G'MIC very much? and because you spoke about it :bigthup
What's very interesting with G'MIC it's we can have as many different "angle of view" of the egg as we want, and a fine tuning of the egg shape as well.

1) Transparent image,
then Filters / G'MIC / Testing / samj / Rendering / Egg Oeuf Rosillo (or just type "egg" in the G'MIC search box, it's faster :mrgreen: )

Attachment:
Screenshot at 2022-03-16 11-35-06.png
Screenshot at 2022-03-16 11-35-06.png [ 265.33 KiB | Viewed 3753 times ]


then Image / Guides / New guide (by percent)... >> 50% Vertical
then Rectangle select tool / Select the left side (it will snap to the guide in the middle) then hit Delete key
then move the half right egg on the left border (it should snap on the left edge), then right click on it in the layer stack and select "Layer to image size"
You should finish like the image below (the egg's half right side glued to the left image's side)
Image

2) Egg in 3D
- Filters / G'MIC / Rendering / 3D Lathing (play with the different x,y,z angle and light),
Suggestion: resolution will slow the processing => so add more resolution JUST BEFORE clicking OK/Apply, not while playing with different angle ;)

Image

3) Use this rendering as a map
- New Layer (right click on it in the layers stack then >> Composite mode / Clip to backdrop
- Gradient on it / pattern, colors, whatsoever
- Layer Mode: Soft Ligh, HSL Color, whatever you like
Done.

Result:
Image

Author:  Pocholo [ Wed Mar 16, 2022 11:59 am ]
Post subject:  Re: How to create and simple Easter egg using GIMP and G'MIC

PixLab wrote:
Pocholo wrote:
In this tut I will show you how to create an egg for Easter using GIMP and G'MIC sources.

Please rate me how I presented the tut. I will like to create more written tutorial in the long run. Thank you! :)


OK, you asked for it, I'll try to bear with you :hehe , but I do need to tell things to give my humble opinion.

I found your tutorial more complex that it should be IMHO
Also, the first thing I noticed, is that your egg does not have an oblong side (an asymmetric tapered ovoid) AKA Oval, thus your shape does not look like an egg.
I also would like to point out that you do not need any plug-in to drop an egg in GIMP as GIMP has it all already (I like a lot G'MIC, though, on that note I want to let you know that G'MIC has a full egg shaped filter, with many fine tuning sliders).

In the end I open my mouth... but how I do it?
I'll try to explain, using only 2 filters in GIMP to make an egg with its typical oval.

1) create a squared transparent image

2) depending what you want there are many ways to start, I'll speak about just 2 ways as they are extremely simple:
first way
- Filters / Render / Sphere designer...
- then Rotate transform tool, put the shadow at the bottom.
or
second way
- Put a color or a gradient or whatever picture, pattern and so on the layer.
- then Filters / Map / Map object...

Attachment:
2 ways to start.jpg


3) then for which either way you did start above, just do
Filters / Distorts / Curve Bend...
Done ;)

Attachment:
2 ways to start last step.jpg


Result:
[ Image ]

Now with G'MIC, did I said that I like G'MIC very much? and because you spoke about it :bigthup
What's very interesting with G'MIC it's we can have as many different "angle of view" of the egg as we want, and a fine tuning of the egg shape as well.

1) Transparent image,
then Filters / G'MIC / Testing / samj / Rendering / Egg Oeuf Rosillo (or just type "egg" in the G'MIC search box, it's faster :mrgreen: )

Attachment:
Screenshot at 2022-03-16 11-35-06.png


then Image / Guides / New guide (by percent)... >> 50% Vertical
then Rectangle select tool / Select the left side (it will snap to the guide in the middle) then hit Delete key
then move the half right egg on the left border (it should snap on the left edge), then right click on it in the layer stack and select "Layer to image size"
You should finish like the image below (the egg's half right side glued to the left image's side)
[ Image ]

2) Egg in 3D
- Filters / G'MIC / Rendering / 3D Lathing (play with the different x,y,z angle and light),
Suggestion: resolution will slow the processing => so add more resolution JUST BEFORE clicking OK/Apply, not while playing with different angle ;)

[ Image ]

3) Use this rendering as a map
- New Layer (right click on it in the layers stack then >> Composite mode / Clip to backdrop
- Gradient on it / pattern, colors, whatsoever
- Layer Mode: Soft Ligh, HSL Color, whatever you like
Done.

Result:
[ Image ]


I want to say thank you for the tips and other methods to create an egg. You might be an experienced user as you're showing me those different technics, but I know most new users don't know how to work with them.
1. The first thing I want to tell you about the egg shape; not all eggs are created equal. As you see my egg Shape look more like the real egg shown in the other photo.
Image

2. Second, I try to make it simpler for new user that don't have to use so many calculation and set up
3. I guest I never new about the SamJ Egg plugin in G'MIC. That is a good help but is not exactly the shape I like as the illustration above. This shape is more like a cartoon egg shape.

**PS. This is not a contest discussion, so you don't have to explain yourself anymore. I think you should make your own post on How to's tutorials so everyone can benefit from your knowledge.

Author:  nelo [ Wed Mar 16, 2022 1:54 pm ]
Post subject:  Re: How to create and simple Easter egg using GIMP and G'MIC

I think the egg shape isn't that important. In the end it's artistic freedom.
The samj filter is nice, never saw that before. But I'm not sure if it's wise to use stuff from the testing section.
Will it persist there? Or be gone with the next update?

Author:  Pocholo [ Wed Mar 16, 2022 2:52 pm ]
Post subject:  Re: How to create and simple Easter egg using GIMP and G'MIC

nelo wrote:
I think the egg shape isn't that important. In the end it's artistic freedom.
The samj filter is nice, never saw that before. But I'm not sure if it's wise to use stuff from the testing section.
Will it persist there? Or be gone with the next update?


:bigthup Agree.

Author:  nelo [ Thu Mar 17, 2022 4:59 am ]
Post subject:  Re: How to create and simple Easter egg using GIMP and G'MIC

My result:

Author:  PixLab [ Fri Mar 18, 2022 4:32 am ]
Post subject:  Re: How to create and simple Easter egg using GIMP and G'MIC

Pocholo wrote:
I want to say thank you for the tips and other methods to create an egg. You might be an experienced user as you're showing me those different technics, but I know most new users don't know how to work with them.

Out of curiosity, what are you calling "most new users" and how do you know that?
The later is even more important as yesterday I read on another forum, that filters' developers do not have or too rare "return/opinion" on their filter, so I'm very curious on how you get that "most new users"? Do you have a number?

I could also add, if you don't teach them, they will not know.

Pocholo wrote:
3. I guest I never new about the SamJ Egg plugin in G'MIC. That is a good help but is not exactly the shape I like as the illustration above. This shape is more like a cartoon egg shape.

I did a photo of a real egg to compare shapes (see below).

Pocholo wrote:
1. The first thing I want to tell you about the egg shape; not all eggs are created equal. As you see my egg Shape look more like the real egg shown in the other photo.

I do need to say that the egg you are comparing is the wrong "real" egg...
This is an egg you've found on internet where that egg was heavily retouched by photographer Serghei Platonov, resized to fit Instagram format by Chris Godfrey => thus you don't know if it was slightly flattened on top or whatsoever during all these processes between different people...

So to do a comparison with a true REAL egg, I just went to my fridge and look at an egg... (and made a picture with my phone)
Egg taken from my fridge (bought at the wet market)
Attachment:
egg.jpg
egg.jpg [ 239.68 KiB | Viewed 3598 times ]

Now I can say that my egg shape look more like the real egg, and it was made with the wonderful the Samj's filter.

Having said that, Serghei Platonov did say it was a bird's egg, without specifying what kind of bird, and I fully agree that eggs from different birds' species will have different shapes, you are right.

Where I cannot agree, is you made a comparison with an overly post processed photo, resized by some else than the original photographer and tell "As you see my egg Shape look more like the real egg", IMVHO if you don't know how it was processed, it cannot be a "real" egg ;)

Pocholo wrote:
2. Second, I try to make it simpler for new user that don't have to use so many calculation and set up

That's an excellent thought to try to make it easier :bigthup but I'm not sure what you call "easier" with so many steps, let say it's a point of view.

You said about the filters I've used "to use so many calculation and set up", no... :cry you did not even try it, I'm a kind of :shock:
If you have tried the first starting method with default setting, just clicking OK's button => done. More simple that that you can't.
the second starting method, just select "Sphere" and check transparent background, click OK => done.
Please, where are the calculation?

Pocholo wrote:
**PS. This is not a contest discussion, so you don't have to explain yourself anymore. I think you should make your own post on How to's tutorials so everyone can benefit from your knowledge.

Have no worries, I like it, I like to exchange ideas, doing some searches, compare clues or methods, and so on...
For example I learned a lot about your "real" egg, I was not aware that 55 millions sheep liked it on Instagram :mrgreen:
I also learned who was the true photographer, who was the person who put it on Instagram, who bought the full license to print on T-shirt (thus, you will not find it anymore here) I also learned that an Indian guy pretended it was from him, and so.... that was very interesting :bigthup

Author:  PixLab [ Fri Mar 18, 2022 8:52 am ]
Post subject:  Re: How to create and simple Easter egg using GIMP and G'MIC

nelo wrote:
I think the egg shape isn't that important. In the end it's artistic freedom.

I can't agree more, you are right.

nelo wrote:
The samj filter is nice, never saw that before. But I'm not sure if it's wise to use stuff from the testing section.
Will it persist there? Or be gone with the next update?


And if it's gone why not to use it while it's there?

Anyway, it's years that this filter is in the Testing, last update was from 2016. Oh it's still there in 2022.
Like many filters in this group they are there for years and accessible after each update.

You might not know this: In the "normal" group, some filters can disappeared as well after an update >> like the one called "Watercolor" which was in the "Artistic" group https://discuss.pixls.us/t/watercolor-effect/26229

Even GIMP removes things, for example when you updated GIMP from 2.8 to 2.10 you did lose "Maximum RGB" (it's still there but it's hidden and can be accessed only with "/" (search function) and was definitively removed in GIMP 2.99.10 >> Thanks a lot to @afre from G'MIC to have made one, which is still in the Testing group BTW but works like a charm!

Now you are not sure if it's wise to use "stuff" from the Testing group.
IMHO and seeing all those filters for so many years in the "Testing" and not having a look at them is IMHO a lack of curiosity...

But we still don't get a real answer to that question: "is it wise to use them?"
Why not to ask the G'MIC team about this group?
>> https://discuss.pixls.us/t/testing-section/29891 ...
In the end, it's us which are not wise to NOT try these filters as well as not giving enough feedback to the developers to allow them to make their filters even better that they already are or allow them to fine tune their code with feedback.

Author:  teapot [ Fri Mar 18, 2022 10:14 pm ]
Post subject:  Re: How to create and simple Easter egg using GIMP and G'MIC

Thanks for the tips all :bigthup My go to method was map object and curve bend but nice to hear of alternatives and more about gmic :tyspin

Below I used curve bend on a chocolate environment map from here
viewtopic.php?f=12&t=9677&p=129556#p129556
Then tweaked the shape to be closer to PixLab's photographed egg shape with the universal transform tool and bump mapped the grid pattern.

Attachment:
chocegg.jpg
chocegg.jpg [ 157.82 KiB | Viewed 3610 times ]

Author:  Erisian [ Sat Mar 19, 2022 7:30 am ]
Post subject:  Re: How to create and simple Easter egg using GIMP and G'MIC

@Pixlab - I have never in my life seen an egg this shape. Maybe some exotic creatures lay them like this but I have never known an Easter egg like it.

Image

Pocholo's is a far more realistic shape.

Author:  Pocholo [ Sat Mar 19, 2022 10:33 am ]
Post subject:  Re: How to create and simple Easter egg using GIMP and G'MIC

Thank you Erisian! Yes me either, I guest it was the last egg the bird pooped and it was deformed :hehe :rofl

Author:  PixLab [ Sun Mar 20, 2022 11:56 am ]
Post subject:  Re: How to create and simple Easter egg using GIMP and G'MIC

Erisian wrote:
@Pixlab - I have never in my life seen an egg this shape.

Images in the differents links below might hurt you, please click with care
https://www.google.com/search?q=easter+ ... SbehG5cI5M
https://www.google.com/imgres?imgurl=ht ... AdAAAAABAZ
https://www.google.com/search?q=easter+ ... ent=ubuntu

The kid in the video below, is showing how to draw an egg in GIMP, he's a kid > give a like, you might learn something.
https://www.youtube.com/watch?v=iLh50oWq4UE

You did not read well my first post (or you did not read it at all...), did you?
Anyway it is not a tuto, I am talking about a technique, and show the tools I used for a quick egg, and made it on the fly for screenshots. So yes, when I did use the "Curve bend", I did not do it with care is the least I can say, thus that egg.

But why did you not picked up the second egg in that post?

Erisian wrote:
Maybe some exotic creatures lay them like this but I have never known an Easter egg like it.

Just to let you know: The thing with Easter eggs is, it's a "tradition", they are not laid by "exotic" creatures nor garden gnome. If you see some draw or paint on an egg laid by birds, it's because a human paint it, chocolate eggs are made by human not laid by bird, though.

More seriously: Your comment only shows that you did not even tried the filter.
Because if you had even barely tried that filter, you would have understood(maybe) or at least you would have seen that you can put more control points (or less) to have a shaped egg the way you want from the very first click on that horizontal line in the middle of the filter "Curve bend."
You did not even read the post before you, where @teapot did write that s/he used these very same filters for the chocolate egg (and also did things his/her own way) .

In the end I ask myself if you have even read the topic at all, that's sad.

Pocholo wrote:
Thank you Erisian! Yes me either, I guest it was the last egg the bird pooped and it was deformed :hehe :rofl

Birds don't poop eggs, they lay eggs...

all joking aside you did not tried the Curve bend? Did you? Or like you said, there are "so many calculation and set up"?

Author:  PixLab [ Sun Mar 20, 2022 12:13 pm ]
Post subject:  Re: How to create and simple Easter egg using GIMP and G'MIC

@teapot, as usual you put a lot of attention to details, nice ribbon and grass and chocolate writing, beautiful Easter egg :clap
Thanks for the link to the chocolate emap (Custom font comes to my mind ;) )

Author:  PixLab [ Sun Mar 20, 2022 10:41 pm ]
Post subject:  Re: How to create and simple Easter egg using GIMP and G'MIC

teapot wrote:
Below I used curve bend on a chocolate environment map from here
viewtopic.php?f=12&t=9677&p=129556#p129556
Then tweaked the shape to be closer to PixLab's photographed egg shape with the universal transform tool and bump mapped the grid pattern.

Attachment:
The attachment chocegg.jpg is no longer available

teapot, that's a clever idea, I gave it a try and I got some fun :bigthup

Attachment:
screenshot_20220321-110249.png
screenshot_20220321-110249.png [ 93.17 KiB | Viewed 3513 times ]

Attachment:
screenshot_20220321-111643.png
screenshot_20220321-111643.png [ 225.45 KiB | Viewed 3513 times ]

Author:  teapot [ Mon Mar 21, 2022 8:05 pm ]
Post subject:  Re: How to create and simple Easter egg using GIMP and G'MIC

PixLab, Nice smooth bump mapping, it looks very chocolatey :bigthup

Author:  PixLab [ Thu Mar 24, 2022 1:35 pm ]
Post subject:  Re: How to create and simple Easter egg using GIMP and G'MIC

Thank you teapot :tyspin

Page 1 of 1 All times are UTC - 5 hours [ DST ]
Powered by phpBB © 2000, 2002, 2005, 2007 phpBB Group
http://www.phpbb.com/