When you are working with .gif images you need to know about semi-transparency and antialiasing and how they behave in .gif images. GIF format is the main file format for making animations for the present and success at making transparent gif and animated images that look good depends upon knowing about semi-transparent pixels, antialiasing, and semi-flattening.
GIF files can not handle semi-transparency therefore those pixels need to be completely filled with color.
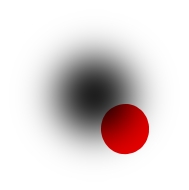
This picture is a demo of semi-transparency. I put the red dot to demonstrate the shading. That shadow is not fading from black to gray. Every pixel has gradations of black that get less and less as the shadow gets lighter and lighter. Imagine teeny dots of black in each pixel becoming less and less dense. GIF images can't handle that. The pixel has to be made opaque by adding background color behind those dots. The process of adding the background color is called, semi-flattening.
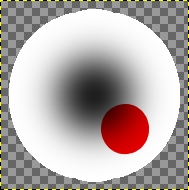
This is what it looks like in GIMP after it's been semi-flattened.
When you create text or draw you get something called antialiasing. That is the addition of semitransparent pixels around the image. It gives a smooth look to the image. If you don't semi-flatten it, .gif image format deletes those antialiased pixels and you get a rough, not so nice finish.
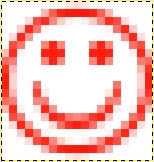
These two smilies demonstrate that. The one on the left is semi-flattened, the one on the right isn't and looks rough - the bigger the image, the rougher it looks. It's pretty apparent that you need to semi-flatten .gif images.

This is the red smiley zoomed and you can see the lighter pixels around it. That is the antialiasing.
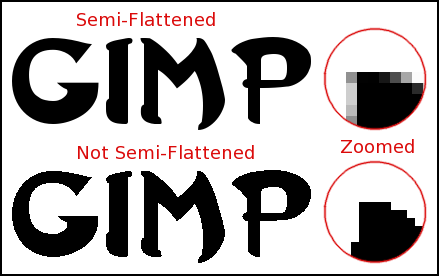
Here is a text example.
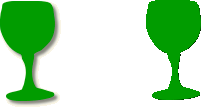
The two goblets in this picture started out with identical drop shadows. The one on the left was semi-flattened, the one on the right wasn't. As you can see, the gif format ate the antialiased pixels and the semi-transparent parts of the drop shadow. All that's left of the drop shadow are a few black pixels on the right and bottom of the goblet.
You can see what happened to the drop shadow on these hearts.
 How to semi-flatten your image.
 You can get fencepost's Settings with Semi-Flatten script
here. Right-click and download it and save it in your /.gimp-2.6/scripts folder. It will save you a lot of time.
You can also access semi-flatten and do the layers one at a time by Layer > Transparency > Semi-Flatten.
This is an image of the Settings with Semi-Flatten script dialog. Make the color the color of the background you will be showing your image on.
You will find it in Filters > Animation > Settings with Semi-Flatten.

You can do it manually by going to Layer > Transparency > Semi-Flatten
or to Filters > Web > Semi-Flatten.
PNG images don't need semi-flattening and will look nice because they can handle semi-transparency. PNG animations are starting to be showing up on the web now but are few and far between so far.
Optimizing the Difference Optimize the difference after semi-flattening.
If you have a large animated image with many layers, you may want to cut down on bandwidth size by optimizing the difference. Before semi-flattening, save your image as a GIMP .xcf file so if you need to edit it again you will have a complete copy. After optimizing the difference you may not be able to edit it effectively. Press Ctrl + D, close the .xcf file and you will have a copy of it. Always work on copies; preserve your original file.
After you have semi-flattened the layers, go to Filters/Animation/Optimize (Difference). Wait until it is finished. The layers should have (combine) in them after the speed rate.
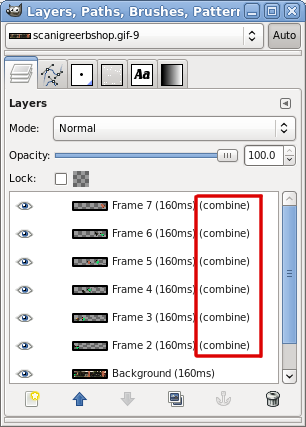
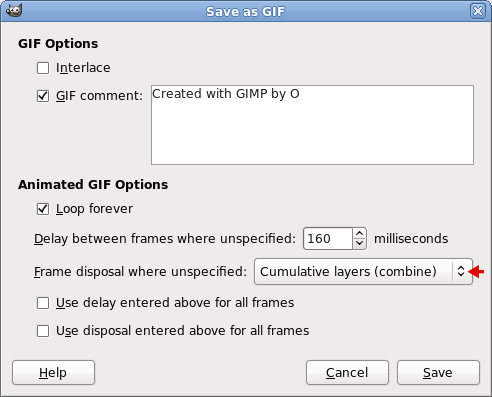
Then Save As an animation. When it comes to frame disposal, click the down arrow by frame disposal and choose Cumulative layers (Combine)
Optimizing the difference removes repeated areas of the file. If you have a picture behind the animation layers, it will only be visible in the first layer of an optimized, combined animation.


 tool with the threshold set at 30 and click a white area. All of the white will be selected. With the selection in place, Select > To Path.


