Many thanks for a really great tutorial.
I got a little lost on step 7.
Quote:
Step 7.
Right click on your background layer in the layers dialog and select Add Alpha Channel. Now duplicate it two times and rename the top one “Light”, the middle one “Dark” and the bottom one “Pattern”. Use the Select by Color tool again and on the top layer select the darker areas and hit your delete key. Now click on the middle layer and select the light areas, then hit the delete key. Now go to Filters>Blur>
Gaussian Blur and blur it at about 5. Repeat for the top layer then go to Select>None and your layers should now look like this.
I assumed that we should be applying the Gaussian Blur to the remaining non-transparent areas of both respective layers (middle and top), as it doesn't make any sense (to me) to blur the transparent parts of these two layers - although I am still unsure.
Also the sand texture link took me to a page with two sand textures, one finer and one coarser. I used the coarser non tile-able one. For the installation of the bevel script, I was worried about installing python over a working gimp/python Windows 7 set-up, so I just hunted down the script separately from
http://registry.gimp.org/taxonomy/term/122 and put that in my gimp user plug-ins folder.
I used a different font, as I wanted to check out how the overall effect would look with proper-case. had to adjust the bevel depth from 10 to 2 in step 13 to compensate for the thinner font.
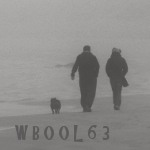
Finally, I noticed that merging down layers caused me to lose the nice effects of the layer "grain merge" and "hard light" modes, so instead I "copied visible" and pasted back in as a new layer, hiding/deleting the old layers. wbool63's example in post 23 of this thread
http://gimpchat.com/viewtopic.php?f=23&t=4269&start=20#p53136 seemed to suffer from this (to my eye he gets a softer, lighter effect), although strangely the original tut does not appear to - the hard light is still there and the yellow is much paler and grainier, which is the effect I was after as well.
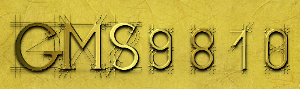
For what it's worth, this is what I ended up with:


 The visual I just got after reading your post was of you slamming down the mouse, emitting some sort of loud sound like a cross between a growl and a scream and storming out of the room, vowing to never do a Drac tutorial again.