Carlos Diniz wrote:
The seconds pass, but despite this I remain still.
well done Carlos
 The most importants are minutes not hours!
| GIMP Chat http://gimpchat.com/ |
|
| draw a clock ( beginners) http://gimpchat.com/viewtopic.php?f=23&t=10534 |
Page 2 of 3 |
| Author: | MareroQ [ Tue Jun 17, 2014 11:26 am ] |
| Post subject: | Re: draw a clock ( beginners) |
Count only moments. Minute by minute does not pass. Hour after hour does not pass. This clock is conjured up for you - optimists or pessimists ? Is not it beautiful ? |
|
| Author: | Marcello [ Tue Jun 17, 2014 11:38 am ] |
| Post subject: | Re: draw a clock ( beginners) |
Carlos Diniz wrote: The seconds pass, but despite this I remain still. well done Carlos The most importants are minutes not hours!
|
|
| Author: | Ella [ Wed Jun 18, 2014 4:58 am ] |
| Post subject: | Re: draw a clock ( beginners) |
Gino and Carlos very nice outcomes, and beautiful words too! A few days already I’ve been working on a clock. The hands I rotated manual, so a lot of work. The outcome isn’t what I like, the little hand distorts. I know what I did wrong.  My question, how must I do the settings “Multi-Replicate” to rotate the hands several times the whole clock round? 
|
|
| Author: | Issabella [ Wed Jun 18, 2014 5:22 am ] |
| Post subject: | Re: draw a clock ( beginners) |
Carlos, I like your clock a lot, it seems to be real. Ella Louise your outcome is very nice. I'd like to know how to do that.   MareroQ, you are right, "count only moments" |
|
| Author: | Ella [ Wed Jun 18, 2014 9:11 am ] |
| Post subject: | Re: draw a clock ( beginners) |
Issabella wrote: Ella Louise your outcome is very nice. I'd like to know how to do that. First I made the hands on 2 different transparent layers. The big one moves faster than the little one. I copied the layer and for the big hand rotated by 30° the layer with the small hand by 2.5°. Then merged down the 2 layers. Copy the original layers then rotate by 60° and 5° and so on. I’ve made a background too so every merged down layer must have a background, I think As I said a lot of work. If you download my creation and open it in Gimp you probably can see how I did it. 144 layers Of course it’s a GIF animation. I think there must be a much more easy way to do it, but I don’t know how. Because of that my question about the settings of "Multi-Replicate". |
|
| Author: | molly [ Wed Jun 18, 2014 9:33 am ] |
| Post subject: | Re: draw a clock ( beginners) |
Carlos Diniz wrote: The seconds pass, but despite this I remain still. Very nice Carlos |
|
| Author: | Carlos Diniz [ Thu Jun 19, 2014 8:15 am ] | |||
| Post subject: | Re: draw a clock ( beginners) | |||
Ella Louise wrote: Gino and Carlos very nice outcomes, and beautiful words too! A few days already I’ve been working on a clock. The hands I rotated manual, so a lot of work. The outcome isn’t what I like, the little hand distorts. I know what I did wrong. [ Image ] My question, how must I do the settings “Multi-Replicate” to rotate the hands several times the whole clock round? [ Image ] Ella Louise, to use the script "multi-replicate" I did so: 1. New image 400x400 2. Guides at 200x200 (I always use the "CrossHair_Guides_by_noclayto.scm" script. 3. Starting from the exact center I draw an arrow (or whatever you want) with the help of plug-in "arakne-path-shape-creator6.py". to use the script "multi-replicate" I did so: 4. Layer> Layer autocrop 5. Then I use the 'Multi-replicate "script. to use the script "multi-replicate" I did so: 6 Finally, for each layer has a duration of 1 second: Image> Filters> Animation> Animation Settings> replace and duration of 1000ms. I hope I have helped you. I wish someone would teach me how to put the images within the text immediately after the item to which it refers. I find it odd that when I insert the images they appear in reverse order of insertion.
|
||||
| Author: | Ella [ Thu Jun 19, 2014 11:35 am ] |
| Post subject: | Re: draw a clock ( beginners) |
Thanks for the explanation, Carlos. The shapes creator doesn’t look the same. 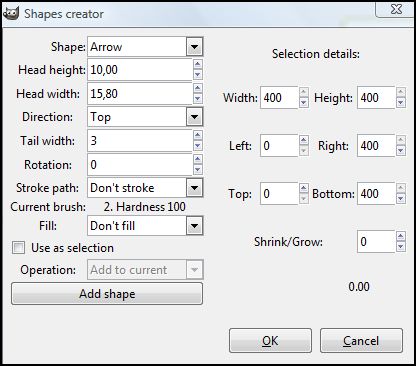 And when I try the Multi-replicate settings the center of the arrow doesn’t stay in the center. I think I’m doing something wrong |
|
| Author: | Carlos Diniz [ Fri Jun 20, 2014 7:05 am ] |
| Post subject: | Re: draw a clock ( beginners) |
Ella Louise, sorry. You have every reason the script I used to draw the arrow was "ArrowsCreator-0.2.py". It can be found in Image >> Extensions> Plugins-Python> Tools> ArrowsCreator. Regarding the use of "multi-replicate" script there is nothing wrong with your use. The empty at the center is due to a slight vacuum in the first layer. When you autocrop layer it may appear. Look carefully the arrow I created. It starts right at one end of the layer. Try to fill the empty or use a device like a little cover when finished image. You can use "overlay background" to paste the little cover in 60 layers. I am at your disposal for any clarification. |
|
| Author: | Ella [ Fri Jun 20, 2014 4:41 pm ] |
| Post subject: | Re: draw a clock ( beginners) |
Carlos you’re very kind. Finally I finished my clock, I did it all manual. But I can't upload it here. In the toolbar by image this is what I see  No extensions, plugins python, tools, ArrowsCreator |
|
| Author: | Carlos Diniz [ Sat Jun 21, 2014 8:50 am ] | ||
| Post subject: | Re: draw a clock ( beginners) | ||
You need to install the plug-in arrows creator. After installing, restart Gimp. Extensions> Plugins-Python> Tools> ArrowsCreator.
|
|||
| Author: | molly [ Sat Jun 21, 2014 9:08 am ] |
| Post subject: | Re: draw a clock ( beginners) |
Thank you Carlos, I forgot I had this plug-in. Works great. |
|
| Author: | Ella [ Sat Jun 21, 2014 11:14 am ] |
| Post subject: | Re: draw a clock ( beginners) |
After installing the file in the plugin folder this message appears. What to do? |
|
| Author: | molly [ Sat Jun 21, 2014 12:26 pm ] | ||
| Post subject: | Re: draw a clock ( beginners) | ||
Did you place this file in your plug-ins, it has to be the .py file
|
|||
| Author: | Ella [ Sat Jun 21, 2014 2:20 pm ] |
| Post subject: | Re: draw a clock ( beginners) |
Thanks for your patience and advice Carlos and Molly, it finally works 
|
|
| Author: | Ella [ Sun Jun 22, 2014 11:38 am ] |
| Post subject: | Re: draw a clock ( beginners) |
 Using the Multi-Replicate option, the bottom of the arrow doesn’t stay in the center. In my opinion, rotating manual is a much accurate way, however it takes a lot more time. But for now I can’t stand anymore clocks  |
|
| Author: | Carlos Diniz [ Mon Jun 23, 2014 6:56 am ] |
| Post subject: | Re: draw a clock ( beginners) |
Ella Louise, in my opinion, it is worth learning to use "multi-replicate" even if we lost a lot of time initially. It will be very useful in future. Your watch is perfect. |
|
| Author: | Ella [ Mon Jun 23, 2014 9:34 am ] |
| Post subject: | Re: draw a clock ( beginners) |
I still became the same outcome with the arrows than the one I posted before. So I had to cheat a little bit But I totally agree with you, Carlos. The more you know about the possibilities of Gimp the more creative you can be. The circles and buttons of the simple stopwatch I designed, were made by techniques I’ve learned from other tutorials. I’m always willing to improve and very grateful for any help and comments of other GC members. |
|
| Author: | Carlos Diniz [ Tue Jun 24, 2014 8:29 am ] |
| Post subject: | Re: draw a clock ( beginners) |
Ella Louise, you wrote: "Using the Multi-Replicate option, the bottom of the arrow doesn’t stay in the center." Take a look at the settings I used when applying "multi-replicate." Maybe you forgot to uncheck the option "Autocrop layers copies." This happened to me also and I could not make the arrow stay in the center. |
|
| Author: | Ella [ Tue Jun 24, 2014 11:20 am ] |
| Post subject: | Re: draw a clock ( beginners) |
Carlos, I tried it again and now it works, the bottom of the arrow stays in the center. Probably you were right about forgetting to uncheck the "Autocrop layers copies". Thanks for the help. Carlos Diniz wrote: I wish someone would teach me how to put the images within the text immediately after the item to which it refers. I find it odd that when I insert the images they appear in reverse order of insertion. Do you mean here on the forum? I always click Post Reply and upload the images there, not in attachments. You can place them in any order you like. Maybe I didn’t quite understood what you meant I’m just a newbie |
|
| Page 2 of 3 | All times are UTC - 5 hours [ DST ] |
| Powered by phpBB © 2000, 2002, 2005, 2007 phpBB Group http://www.phpbb.com/ |
|