It is currently Tue Apr 23, 2024 7:48 pm


All times are UTC - 5 hours [ DST ]


Post new topic Reply to topic  [ 7 posts ] 
Author Message
 Post subject: Rainbow Smoke Wallpaper
PostPosted: Fri Apr 18, 2014 1:33 pm  (#1) 
Offline
GimpChat Member
User avatar

Joined: Aug 30, 2012
Posts: 2174
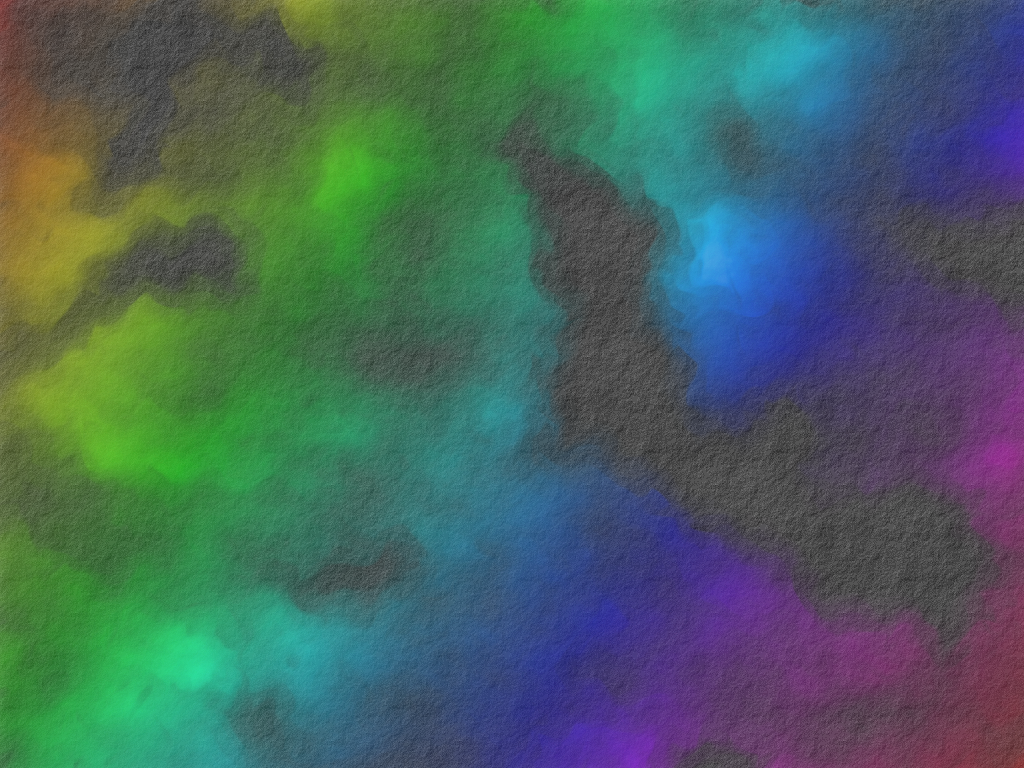
Following on from a discussion in this thread, have come up with this method of creating a smoke filled wallpaper.

You will need G'mic installed to complete this tutorial all other plugins or gradients should be part of gimp by default.

This is what we are hoping to achieve, due to the randomness of the cloud filter your image might not be exactly the same.
Image

1. Open gimp and go File>New and set Width to 1024px and Height to 768px and click OK. Fill Background layer with Black #000000.

2. Go Layer>New Layer and change layer name to "Smoke" and check the box Transparency and click OK.

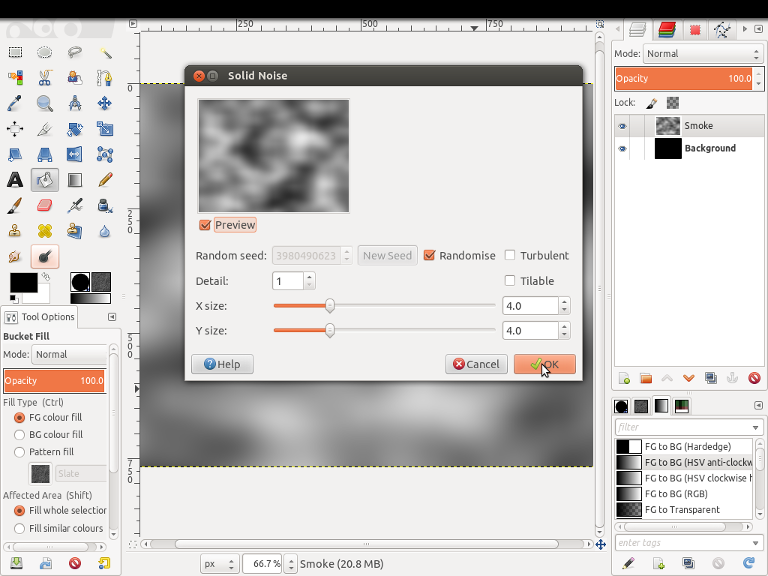
3. Go Filters>Render>Clouds>Solid Noise and run with the settings shown below.
Image

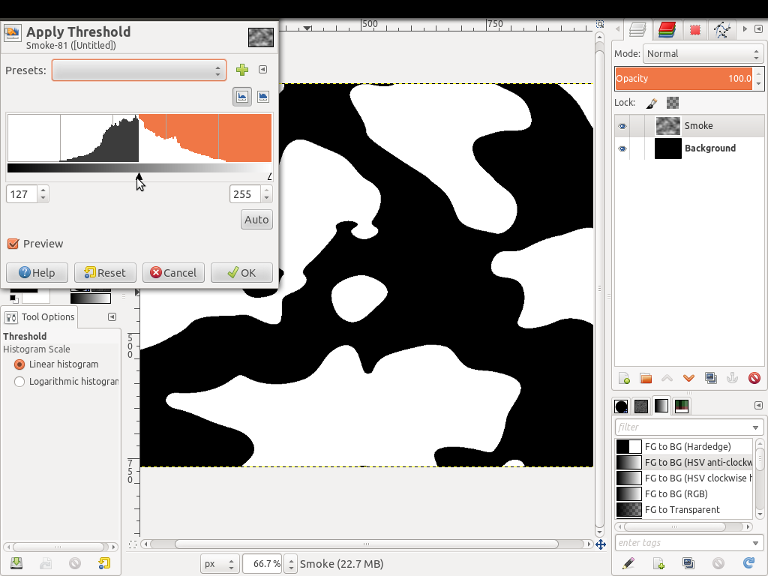
4. Go Colours>Threshold, the amount of white will be the amount of smoke generated, you can increase or decrease the amount of white by sliding the middle arrow. Once happy then click OK.
Image

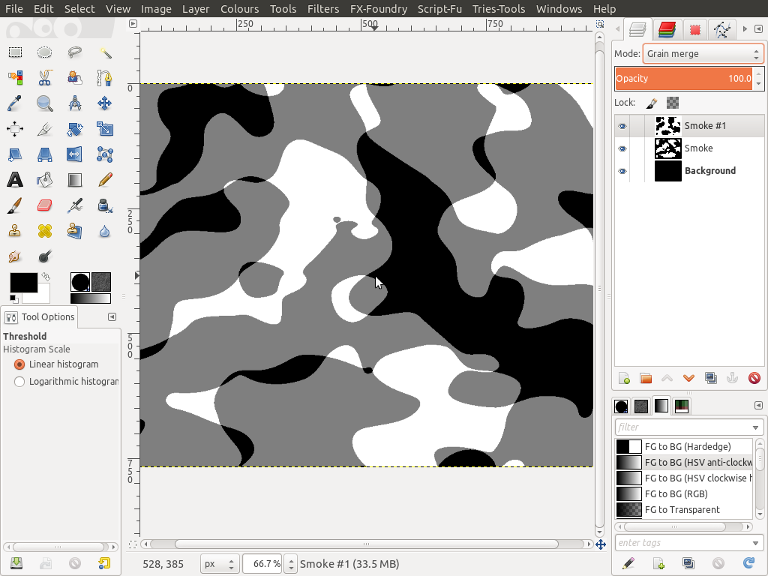
5. Next we are going to repeat steps 2 - 4 but change the layer mode of our new layer to "Grain Merge", The white will generate smoke and the grey areas will be a more transparent smoke.
Image

6. If your happy with what you have and still with your top layer selected Go Layer>Merge Down.

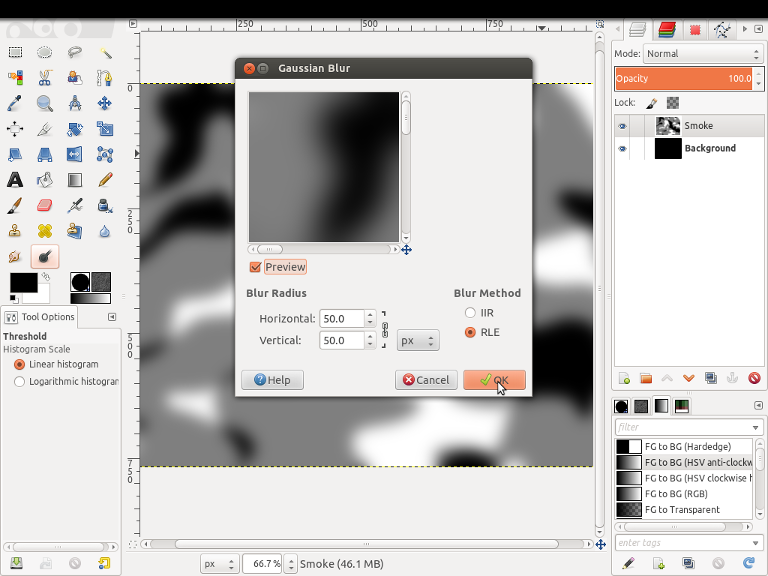
7. Go Filters>Blur>Gaussian Blur and change X & Y to 50px and click OK.
Image

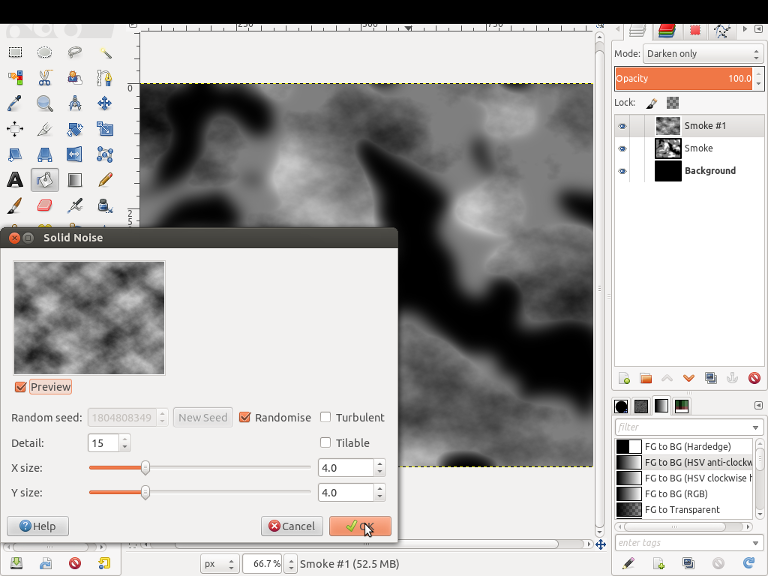
8. Go Layer>New Layer and change layer name to "Smoke" and check the box Transparency and click OK.

9. Go Filters>Render>Clouds>Solid Noise and run with the settings shown below. Finally Change Layer Mode to "Darken Only"
Image

10. Still with your top layer selected Go Layer>Merge Down, Then go Colour>Auto>Stretch Contrast.

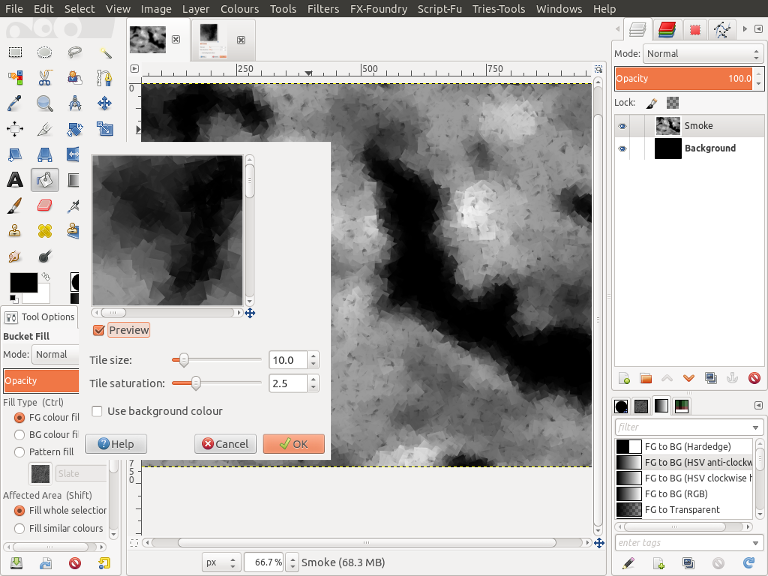
11. Go Filters>Artistic>Cubism and run filter with the settings shown below.
Image

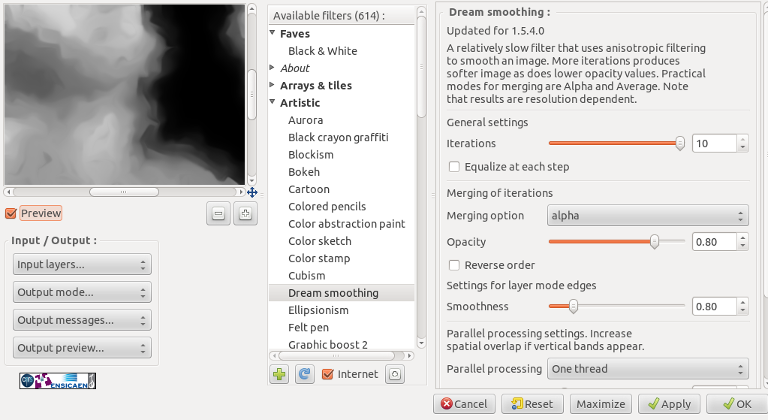
12. Go Filters>G'mic and under the filter "Artistic" select "Dream Smoothing" and run filter with the settings shown below. WARNING - Depending on size of image this filter can take a while to run.
Image

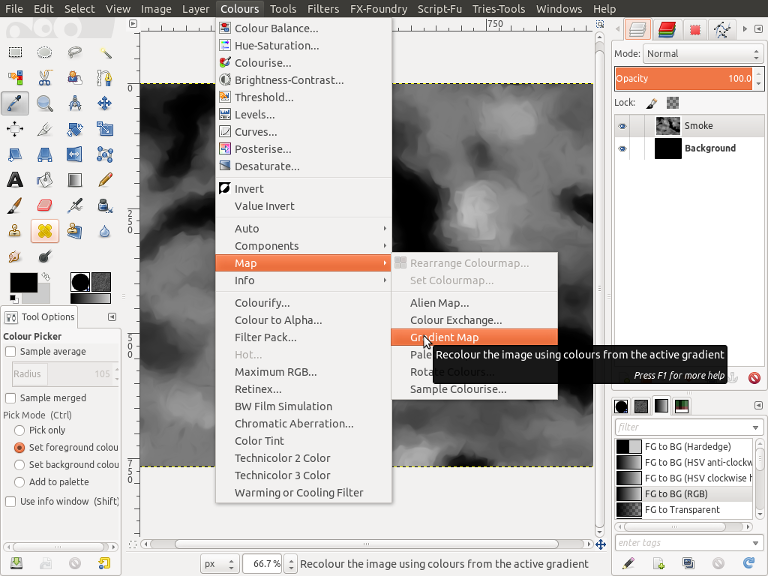
13. Our smoke is a bit to white so we are going to darken it a little. Set Background colour to #cccccc and Foreground colour to #000000, Make sure you have the gradient FG to BG (RGB) selected, Then go Colours>Map>Gradient Map.
Image

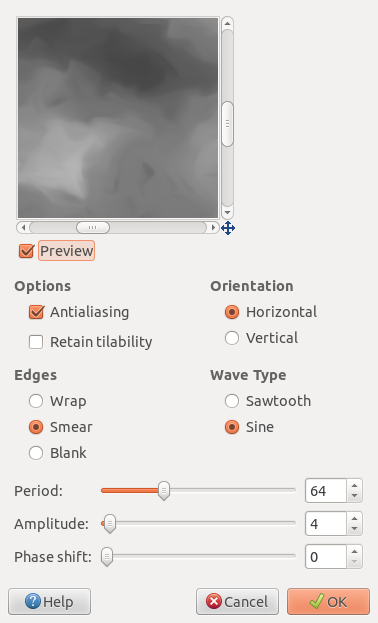
14. Now we need to start adding a more swirly look to our smoke and some texture, Go Filters>Distort>Ripple and run with the settings shown below.
Image

15. Rerun the Ripple filter but change the "Orientation" to "Vertical".

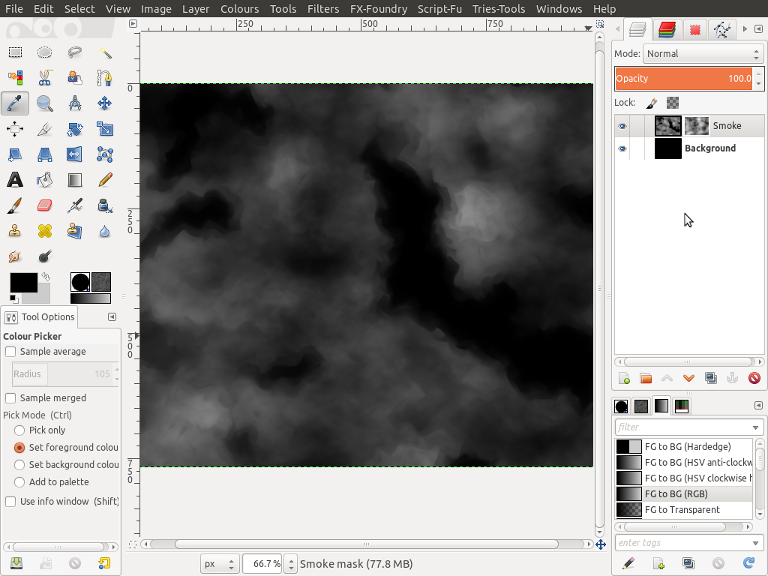
16. Now to add some texture, go Layer>Mask>Add Layer Mask, Then go Filters>Render>Clouds>Solid Noise and run with the settings used in step 9, You should be looking similar to the image below.
Image

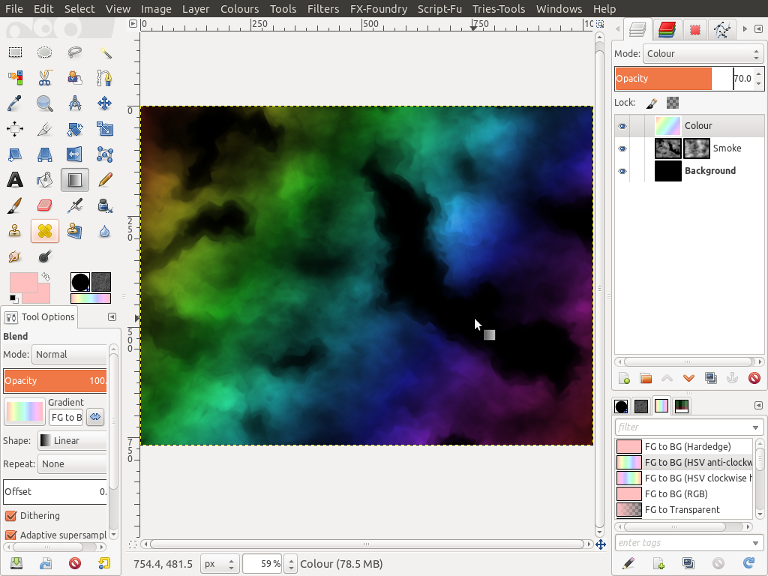
17. Now to add some colour to our smoke, Go Layer>New Layer and change layer name to "Colour" and check the box Transparency and click OK.

18. Set Foreground and Background colours to #ffbfbf and select the Blend Tool :blend, Make sure the gradient selected is "FG to BG (HSV anti-clockwise)". I'm going to create a linear gradient from top left to bottom right.

19. Finally I'm going to change the Layer Mode of our layer to "Colour" and reduce the Opacity to 50.
Image

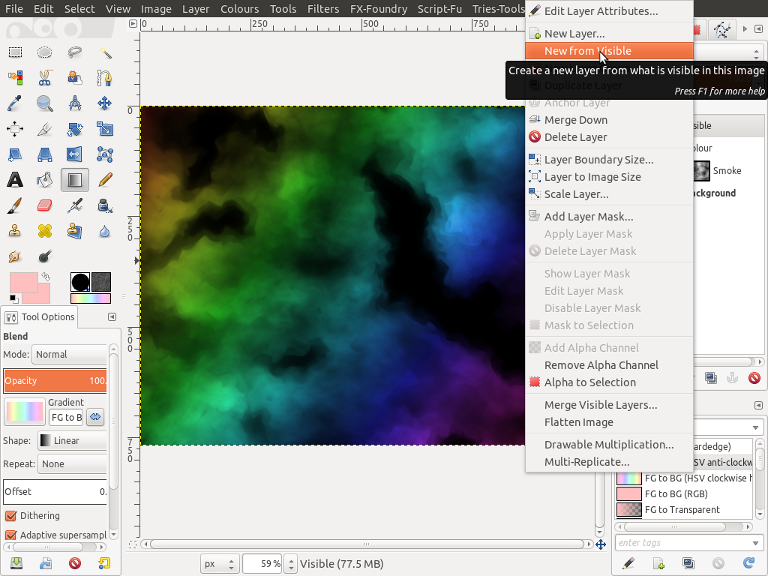
20. Right click on any of the layers in the layer dialogue and select "New From Visible", Then turn off the layers "Colour" and "Smoke".
Image

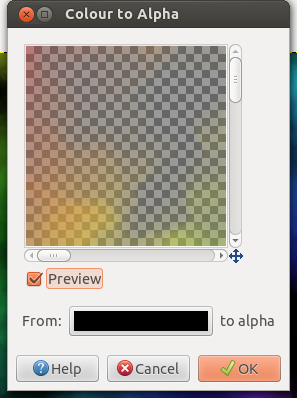
21. With the top layer selected, Go Layer>Transparency>Colour to Alpha, Change colour to black #000000 and click OK.
Image

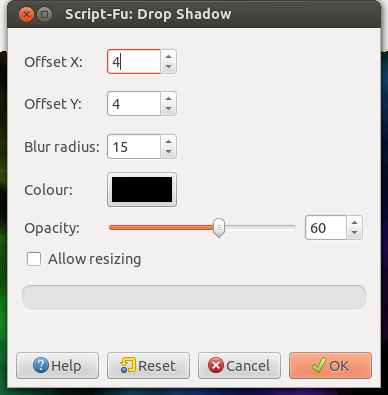
22. Still with the top layer Selected, Go Filters>Light and Shadow>Drop Shadow and run with the settings shown below.
Image

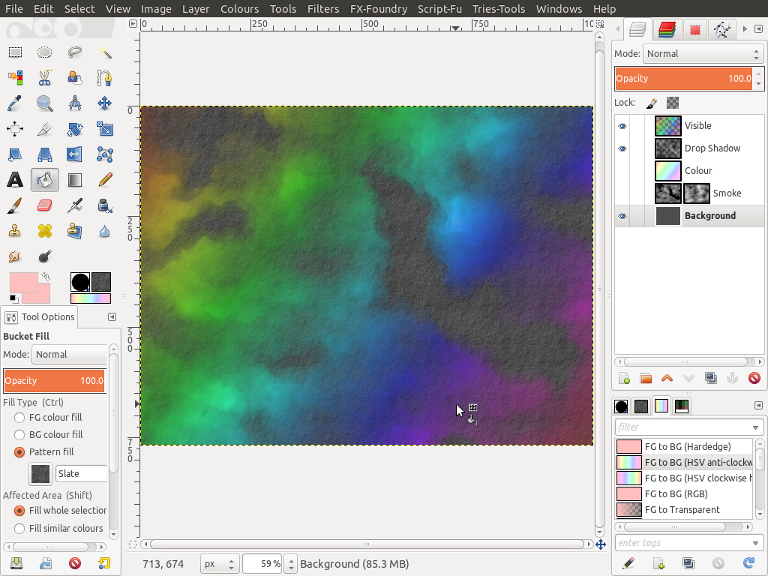
23. Finally select the bottom Layer "Background" and fill with a pattern of your choice, I'm going with the pattern Slate as it is greyish in colour and complements the smoke nicely.
Image

That's it hope you had fun and happy Gimping.

Hearty.

_________________
Image


Share on Facebook Share on Twitter Share on Orkut Share on Digg Share on MySpace Share on Delicious Share on Technorati
Top
 Post subject: Re: Rainbow Smoke Wallpaper
PostPosted: Sat Apr 19, 2014 1:13 am  (#2) 
Offline
GimpChat Member
User avatar

Joined: Aug 30, 2012
Posts: 2174
Been experimenting, Replaced steps 2 - 6 with a greyscale image that I had ran through the dream smoothing filter to enhance the grey areas. Then added a text Layer after step 7, I gave this a Gaussian blur of about 3px so as not to lose the text altogether. NOTE - I kept a copy of my original dream smoothed image and text prior to blurring, I then used these above my smoke layer and prior to step 17. I ran this layer through the Filter>Edge>Neon and repeated the map gradient step 13, Then set layer mode to Grain Merge and added a layer mask as done in step 16. Followed the rest of the tutorial but change the colours of the gradient in step 17.

Image

_________________
Image


Top
 Post subject: Re: Rainbow Smoke Wallpaper
PostPosted: Sat Apr 19, 2014 3:55 am  (#3) 
Offline
Global Moderator
User avatar

Joined: Apr 07, 2010
Posts: 14182
Very nice he4rty.


Attachments:
Rainbow Smoke Wallpaper.pdf [1.4 MiB]
Downloaded 405 times

_________________
Image
Top
 Post subject: Re: Rainbow Smoke Wallpaper
PostPosted: Sat Apr 19, 2014 9:13 am  (#4) 
Offline
GimpChat Member
User avatar

Joined: Jun 24, 2010
Posts: 504
Location: Western Vic Australia
he4rty wrote:
Been experimenting, Replaced steps 2 - 6 with a greyscale image that I had ran through the dream smoothing filter to enhance the grey areas. Then added a text Layer after step 7, I gave this a Gaussian blur of about 3px so as not to lose the text altogether. NOTE - I kept a copy of my original dream smoothed image and text prior to blurring, I then used these above my smoke layer and prior to step 17. I ran this layer through the Filter>Edge>Neon and repeated the map gradient step 13, Then set layer mode to Grain Merge and added a layer mask as done in step 16. Followed the rest of the tutorial but change the colours of the gradient in step 17.

[ Image ]

First of all , A lovely image of Ms Watson. (Eunice? Difficult to read)
I did your tut. I got lost a bit in the last stages, but seeing your finished image, I managed to get there in the end. I hoped that by using different X and Y values 4 and 2 ,that I could make the smoke path a bit more upward. Similarly , I kept the same seed for clouds, Just changed the x,y values and using different thresholds to keep the grey and white paths somewhat similar.
I don't really think it made much difference. Here is my result. In fact I think it made the boundaries of the colours too sharp. One could play around for hours and play with settings and blurs but I could not be bothered.
Image

Personally, I feel that the previous steps are more suggestive of rainbow smoke.
Image
Thank you for the tut

_________________
Image


Top
 Post subject: Re: Rainbow Smoke Wallpaper
PostPosted: Sat Apr 19, 2014 9:20 am  (#5) 
Offline
Global Moderator
User avatar

Joined: Apr 07, 2010
Posts: 14182
nice job wooble.

_________________
Image


Top
 Post subject: Re: Rainbow Smoke Wallpaper
PostPosted: Sat Apr 19, 2014 9:32 am  (#6) 
Offline
GimpChat Member
User avatar

Joined: Aug 30, 2012
Posts: 2174
Molly - Thanks for the Pdf.
wbool - Thanks for trying out the tut, I'll admit it all very subjective but just wanted to write down the steps I'd tried already.

_________________
Image


Top
 Post subject: Re: Rainbow Smoke Wallpaper
PostPosted: Sat Apr 19, 2014 9:37 am  (#7) 
Offline
GimpChat Member
User avatar

Joined: Jun 24, 2010
Posts: 504
Location: Western Vic Australia
Thank You Molly and He4rty, I am not really convinced that it is the answer to "smoke".
A more real life example of steam was done in a MeetTheGimp episode ( a bowl of soup) where the steam was made to curl with the Iwarp filter. Mind you that was only a wisp of steam not a cloud of smoke. I think that you, He4rty, are as close to the mark as anyone else with a smoke tut.


Edit syntax error

_________________
Image


Top
Post new topic Reply to topic  [ 7 posts ] 

All times are UTC - 5 hours [ DST ]


   Similar Topics   Replies 
No new posts Attachment(s) tunnel wallpaper

3

No new posts Attachment(s) Background or Wallpaper

1

No new posts Attachment(s) GEGL marble wallpaper/background plugin

5

No new posts Attachment(s) GEGL Polygons - Simple Polygon wallpaper generator

15


* Login  


Powered by phpBB3 © phpBB Group