Gimp-GMIC Hair lock tutorial pdf post 5
A full, but more technical tutorial, lives at
G'MIC Hairlock Tutorial on the G'MIC Web site. To use this particular filter, you need a Gimp-G'MIC plugin that is at version 1.6.0.0 or better. This tutorial was composed using version 1.6.0.2; Gimp version 2.8.14. The version date on the Hair lock filter should be 2014/12/11. If earlier, refresh your filters.
0.
Premise. You wish to paint something which looks like hair: clusters (locks) of long, stringy stuff, which exhibit specular properties, such as the way light reflects off of compact disks or (to show my age) phonograph records. While the filter is nominally called "Hair lock", you can render similar long, stringy stuff, such as grass or mop-heads with it. What is in a name, afterall?
1.
The skeleton. You start with a "skeleton", which serves as a template; it sets the shape of your hair lock.
1.1. Almost any artwork will serve so long as it exhibits sharp edges and has moderate to high contrast. The idea is to draw a few master hair strands which will then set the direction of a lot of their siblings.
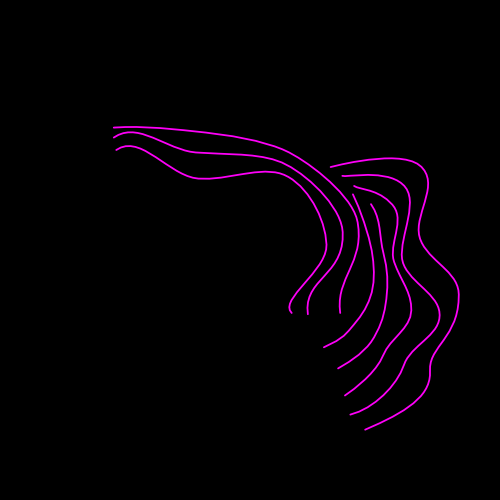
1.2. This is the skeleton which served as the front hair lock of the woman in
Hair lock test image - WASP. Use this, or fire up Gimp and quickly scribble some lines with a hard-edge brush or the Pencil tool.
1.3. Alternately, grab a photograph of a real head of hair and run it through Filters->Enhance->Unsharp Mask, using settings strong enough to make highlights and shadows (almost) indistinguishable. Then hard-edge everything with Colors -> Threshold. Choose a setting so that hair strands are visible, that is, the highlights or shadows do not block in as contiguous masses.
1.4. Behind the scenes, the hairlock filter detects edges and composes a
'smoothing geometry', something designed to blur noise-generated bits without blurring edges. But instead of applying it to the skeleton image, the hairlock filter applies it to internally generated salt-and-pepper noise, turning a lot of little dots into so many hair strands.
1.5. Almost always, a hairlock consists of a pile of plies - separate renderings - each from slightly modified skeletons. The pile of plies, each ply on its own layer, criss-crosses hair strands, which produces a more realistic effect than the unreality of perfectly aligned hair. So your average workflow will have you rendering off a skeleton, making a layer of somewhat translucent hair, then moving, rotating, or applying the Distorts->IWarp native Gimp filter to your skeleton to shift the skeleton a bit for the next ply. You then repeat this procedure two, three or four times, producing individual
plies that stack up into one hair lock. It is not uncommon to vary the parameters somewhat between runs to give the hairlock a diverse character. Particulars follow.
2.
Start the G'MIC plugin (Filters -> G'MIC).
2.1. Check to make sure your skeleton is visible in the preview window. Maybe you're on another layer?
2.2. Check that your image view is at 100% and that the preview window is also 100% or 1:1. (Preview same scale as main window). Based on anisotropic smoothing, the behaviour of the Hair lock filter is scale dependent, so unless the preview matches the scale of the active layer, the rendering it performs on the preview bitmap isn't much of a preview of its action on the active layer.
2.3. Uncheck 'Preview' - this to avoid unnesseasary rendering until you're ready.
2.4. Select 'Output mode...' as 'New Layers'. This step preserves your skeleton for repeated use.
3
Choose Rendering -> Hair locks. Here is a summary of what the sliders and controls do.
3.1
Spread. Controls number of strands of hair spreading out from the imaginary centerline of a skeletal stroke. A large number leads to a wide spread of hair extending far away from the centerline. Near zero means that just a few strands of hair render on or near the centerline.
3.2
Thickness. Thickness of the hair strand itself. A large number means fat hair; a small number means fine hair. Large numbers are good if you're working oversize and plan to reduce your image to a smaller presentation size.
3.3
Length. Length of individual hair strands. A large number makes really long hair strands. One strand could run along the entire length of a skeletal line and more. Small numbers makes short hair strands. Many such strands will trace along a skeletal line, like a series of dashes. Color variations tend to be obvious when Length is small, See item 3.5.
3.4
Color. A base color. Individual hair strands will vary around this center hue. Go for saturated; the various rendering processes tend to desaturate.
3.5
Variation. Induces slight variation of color among hair strands. However, as length increases (See 3.3) this argument becomes less effective, to non-existent with hair length strands greater than 0.25. I plan to re-engineered this for a future release.
3.6
Azimuth. Light direction. Near 0 or 360 degrees, light seems to stream in from the left. 90 degrees has light streaming down from the top. 180 degrees has light streaming in from the right. 270 degrees has it streaming up from the bottom.
3.7
Highlight. Light strength. Large numbers give rise to bright highlights and deep shadows; small numbers correspond to dim lighting.
3.8
Specular. A small number leads to hair with a very narrow shine - a greased hair look. Large numbers cause the specular band to extend along the length of the entire strand. Curiously, this makes the hair seem less shiny.
4.
Pre-render check.
4.1. Without changing any settings from the defaults, scroll the preview around until you see a portion of the skeleton in the preview window, then check the preview box on.
4.2. OK, so maybe you don't want yellow hair. Change color, thickness, spread, length and whatever else floats your boat.
4.3. On older, slower machines, scrolling around is somewhat more bearable if you check the preview button off before scrolling, then click preview on just to preview your settings.
5.
Do it.
5.1. Hit OK. Oh. Before that, you might want to click Preview off, so that the next time you start the plug-in you don't waste cycles on useless preview rendering.
6.
Post-render check.
After 15 to 30 seconds on a 1024x1024 image, you should see something like this in your main window -- less the white-type annotations, which were my settings.
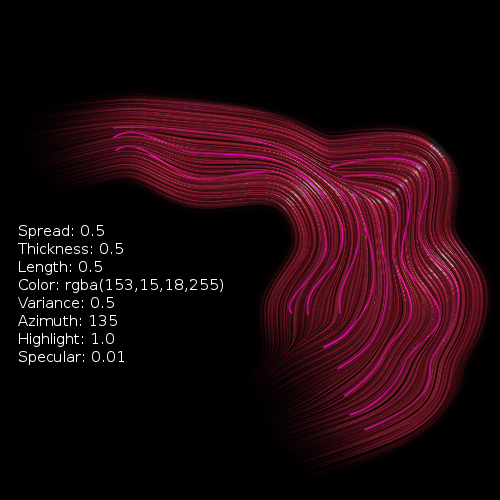
6.1. You should be looking through two active layers. The top one contains a rendering of one ply of the hair lock. It's somewhat transparent. You should be able to see your skeleton on the lower layer.
6.2. OK. It might look dim and dull to you. That's because it's semi-transparent. However, that could also look like a bug to you. So before you email me or post here about the dim-and-dull bug, I'll try and save us a couple of rounds of dialog by telling you it's a feature ("But it's a bug!" ("No, it's a feature." ("A bug!" ("A feature, and watch out. We might get hung up in some infinitely nested parentheses that only a Scheme coder can get us out of."))))
6.3. The dim-and-dull bug is a feature because there is a very good chance that you will want to render two or three or four plies (layers) of the hairlock, distoring the skeleton at each pass, and changing parameters like hair color slightly, for variation. Recall 1.5. above. The semi-transparency lets hair in lower plies be just visible through upper plies.
6.4. If just one pass floats your boat and you want to get out of here, just switch to the rendered layer and go to Colors->Curves, switch to the alpha channel curve and drag its left end somewhat to the right until the hair lock has a solid appearance.
6.5. Otherwise, vary settings, copy the skeleton layer and distort the copy and run the Hair lock filter again.
6.6. And maybe again.
6.7. And possibly again.
7.
You're done.
You've probably noticed that this is not a global effect filter - like Rodillus, one pass and you've got eye-candy. This is an illustration tool; you'll be lucky if you only throw out half your renderings, but those of you who do digital illustration know that anyway. The woman's hair-do consisted of five distinct locks of three or four plies each, something like twenty renderings - but I probably rendered closer to sixty layers all told.
That's it for now. Remember, it is called "Hair lock" but that's just a name. It renders long stringy stuff along preset pathways. What the imagery means and how you use it is up to you.
Enjoy.
Garry


 I myself have never
  .
.