CHAINED WEDDING RINGS
a GIMP tutorial by dietmar
Please notice:
This tutorial is intended for beginner level and therefore some repeating
steps will still be described again on and on

This is also the reason
why this tutorial grew quite long...
Red arrows/lines/etc. are not part of the image and are only intended to
clarify some technical issues!
I also recommend activating "View -> Snap to grid" for better selection
management.
I used GIMP 2.8.14 on Win7 64Bit for this, so I am not sure whether it will
work on older versions of GIMP.
And remember: Save often, perhaps with different filenames for the different
steps, to make reproducing or changing afterwards easier!
Here we go...
* Create a new image, 800x800px, with a black background.
FIRST RING
First, we need to create a band which will be mapped to a ring later.
* Create a new transparent layer named "Band".
* Select the "rectangle select" tool with option "expand from center".
Starting in the middle of your image (at x:400, y:400), click and drag
to create a rectangle selection which is 160px in height and covers the
whole width of your canvas.
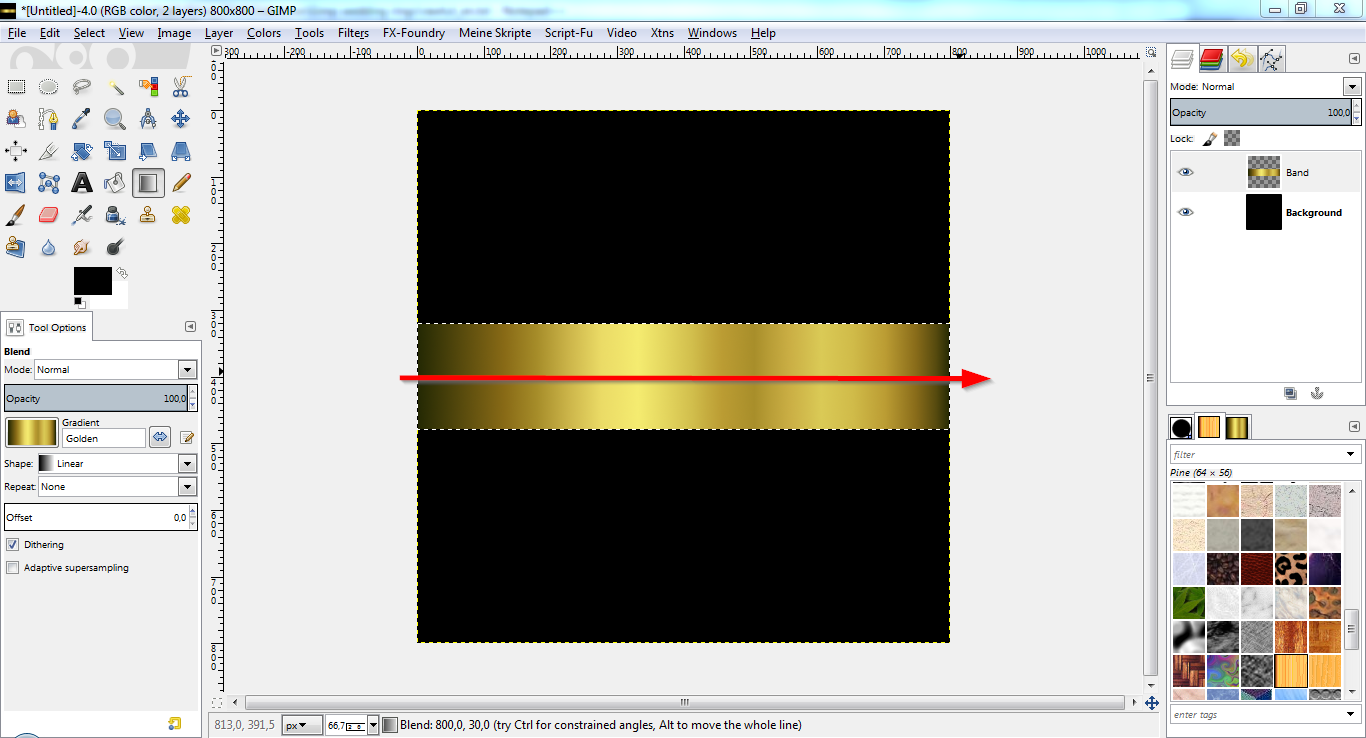
* Fill this selection with a linear gradient fill, type "Golden", by clicking
left outside of your canvas and drag to right outside of your canvas
(use CTRL to make an easy horizontal drag!).
* This is what it should look like:
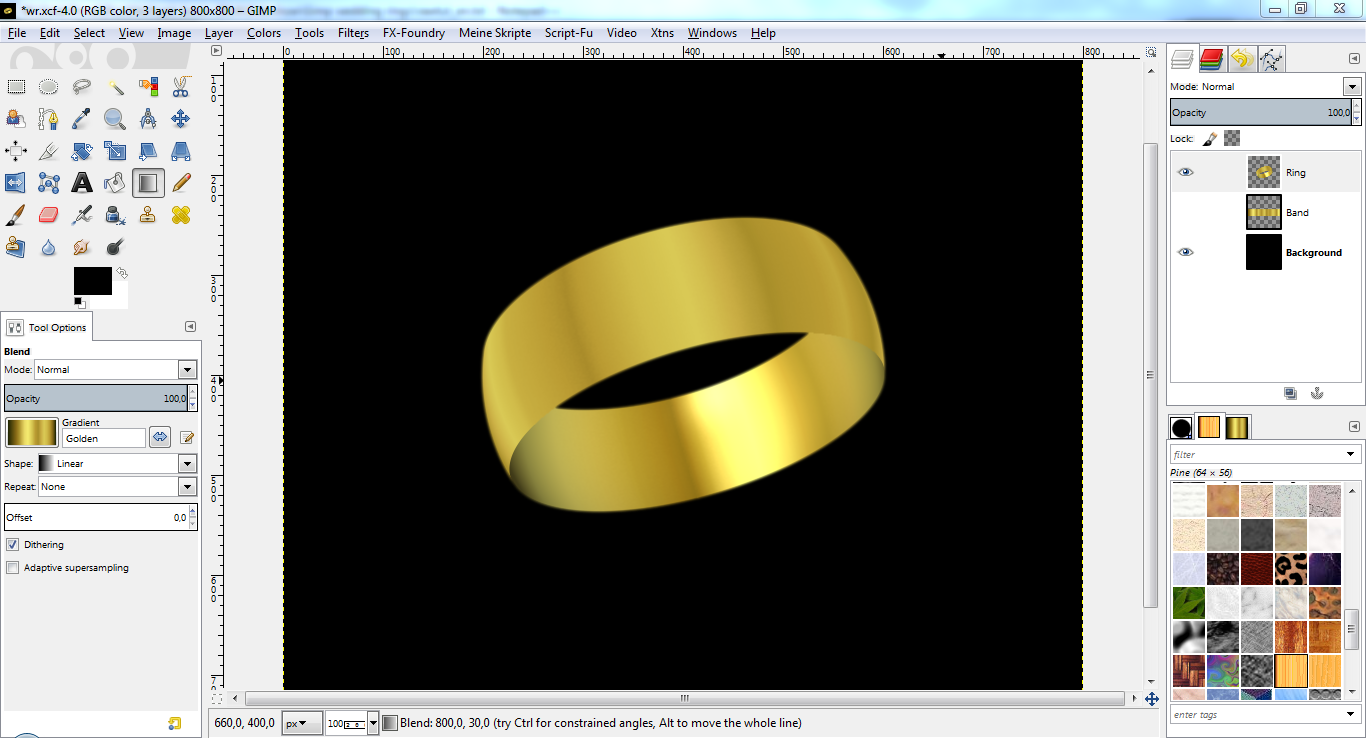
Now for the mapping.
* Select -> none.
* Colors -> Map -> Gradient map (with "Golden" gradient still active). This
"enhances" the colors.
* Filter -> Map -> Map object. "use wireframe" is not needed, but you may
activate "update preview live".
Options: Map to "sphere", "transparent background", "create new layer",
antialiasing with depth 5 (max).
Light: lightsource type: "no light".
Material: Values 0.3 / 1 / 0.5 / 0.2 / 27
Orientation: Values 0.5 / 0.5 / 0 / 15 / 0 / -25
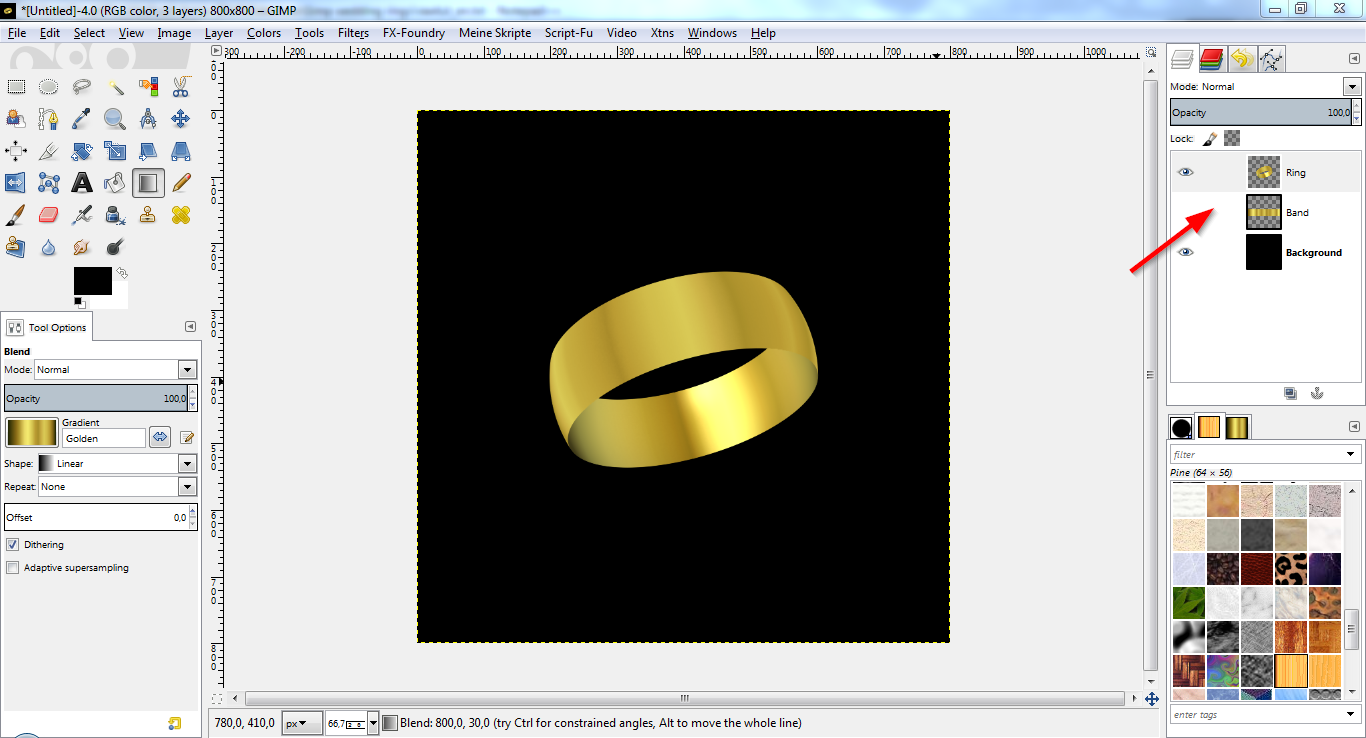
* Double click the new layer to rename it to "Ring". You may also temporarily
hide the "Band" layer by unchecking the eye icon in front of it.
* This is what it should look like:
Enhance the ring by improving the colors and soften the border of your ring.
* Colors -> Map -> Gradient map (with "Golden" gradient still active).
* Right click on the "Ring" layer -> "Alpha to selection". This creates a
selection of your ring.
* Select -> Shrink (1px).
* Select -> Invert.
* Filter -> Blur -> Gaussian Blur (radius 3x3px).
* Select -> None.
* You should see the result of the blur better when zooming into the image:
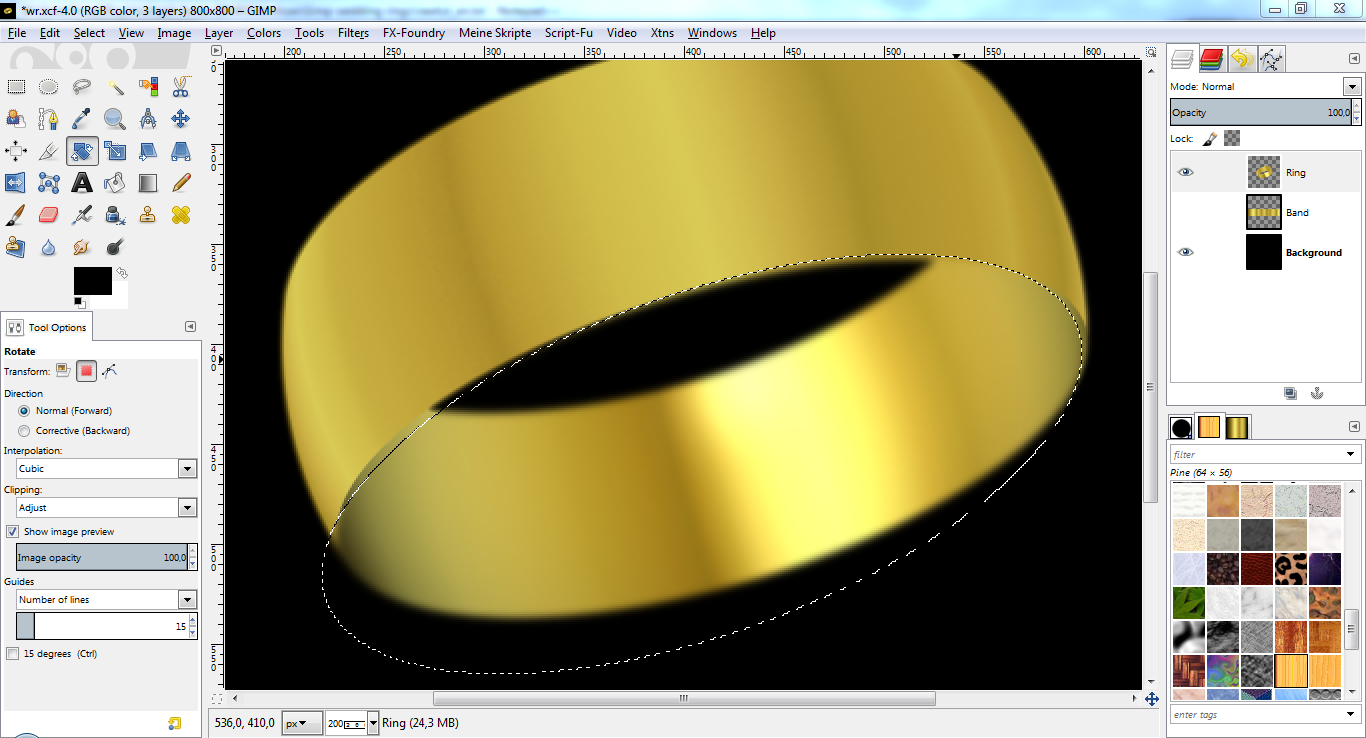
Now for a bit tricky part. We want to "enhance" the 3D perspective effect of
the ring with a little trick: Blur the back part of the ring.
There are several ways to create the selection which is blurred, this is what
I did...
* Use the ellipse select tool and create an ellipse which covers the back part
of the ring. You will have to play with it and also use the rotate tool
(transform on "selection") and the move tool (move on "selection") to
achieve this.
* My values were: rectangle 400x170px, rotate by angle -20, move in place.
* When you are done, Filter -> Blur -> Gaussian blur (5x5px).
* This is what it should look like:
Now, we soften and improve the ring border. You may not see a big "effect"
on the image after doing that, but it will be there
* Select -> None.
* Right click on "Ring" layer -> Alpha to selection
* Select -> Feather (3px).
* Select -> Invert.
* Press "Del" to delete the inverted selection.
* Select -> None.
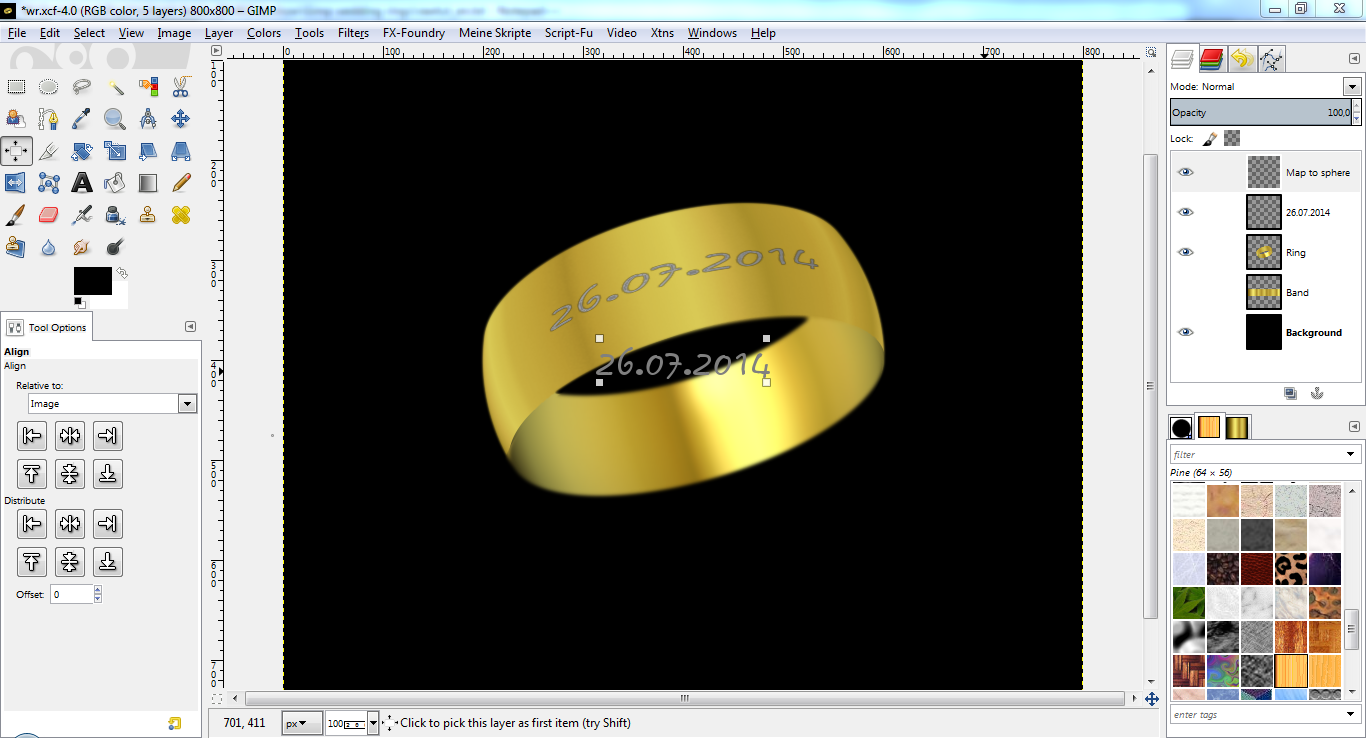
Ok, let's add text to the ring. I used the font "Cerberix" here, because it
looks nice and good especially with the effect we will add later. You can
download it here:
http://www.fontsplace.com/free/fonts/c/cerberix.ttf* Use the text tool to create the text. Values: Color #808080 (light grey),
Size 40. Type the name of the bride, just the date or anything else
* Use the align tool to center this text layer horizontally and vertically
exactly in the middle (relative to "Image").
* Right click on text layer -> To image size.
* Again, use Filter -> Map -> Map object with the same values as you did
for the last map (see above).
* This is what it should look like:
Now we enhance the text and the ring.
* Double click the new layer to rename it to "Text1".
* Filter -> Blur -> Gaussian blur (2x2px) to smooth it.
* You may also temporarily hide the original text layer by unchecking the eye
icon in front of it.
* Colors -> Map -> Gradient map (with gradient "Golden" still active).
* Select "Ring" layer.
* Right click on layer -> Alpha to selection.
* Select -> Shrink (1px).
* Select -> Invert.
* Filter -> Blur -> Gaussian blur (5x5px).
* Select -> None.
To create a bump map effect on the text layer:
* Select "Text1" layer.
* Filter -> Map -> Bump map.
Bump Map: Text1
Options: Type "linear", "compensate for darkening", "invert bumpmap".
Values: 145 / 45 / 3 / 0 / 0 / 0 / 0
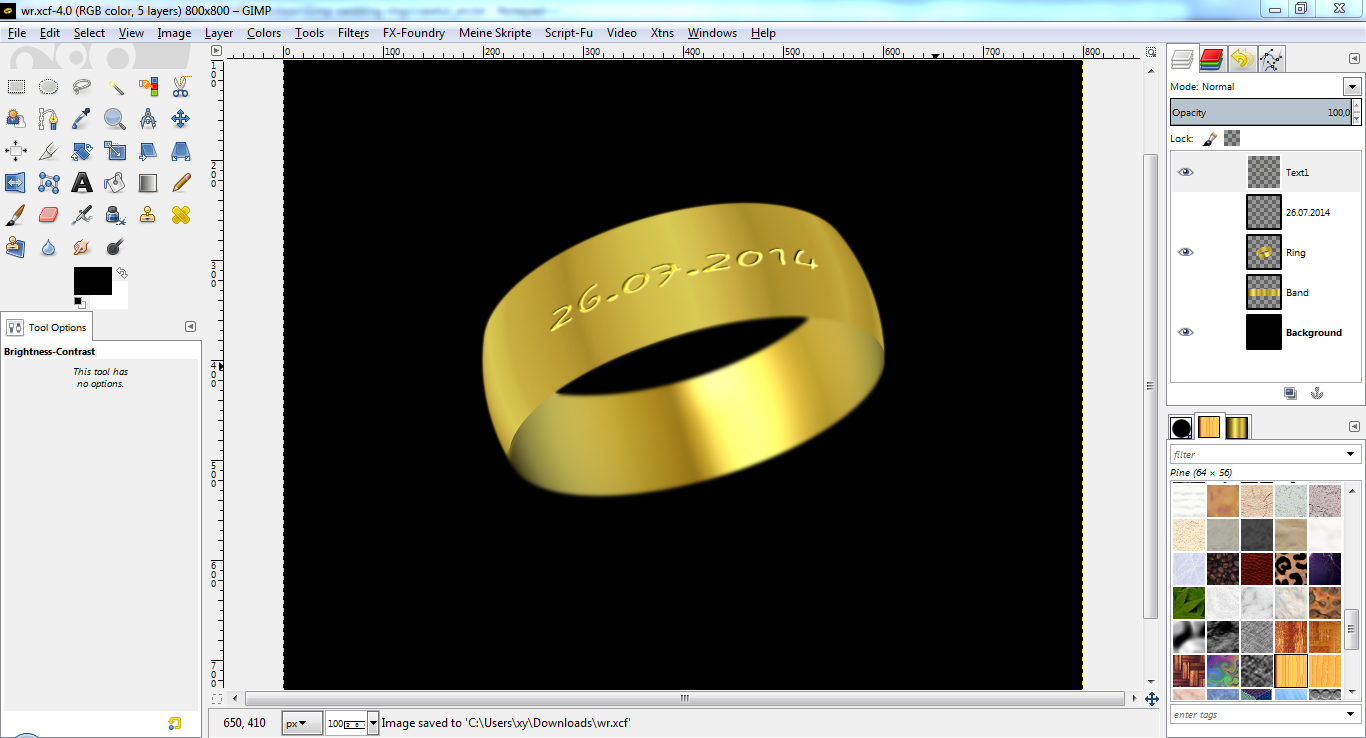
Again, some enhancement...
* Colors -> Brightness-Contrast. Set contrast to 15.
* Filter -> Enhance -> Unsharp Mask (Values 5 / 0,5 / 0)
* This is what it should look like:
We now have successfully created the first ring! Now it would be a wise
decision to save your work under a new name for later changes or whatever.
SECOND RING
There are several repeating steps from the first ring here, but remember, I
did this tutorial for beginners not being confused...
* Use the eye buttons on the layers window to hide all layers except the
background layer and the "Band" layer.
* Select the "Band" layer.
* Filter -> Map -> Map object. "use wireframe" is not needed, but you may
activate "update preview live".
Options: Map to "sphere", "transparent background", "create new layer",
antialiasing with depth 5 (max).
Light: lightsource type: "no light".
Material: Values 0.3 / 1 / 0.5 / 0.2 / 27
Orientation: Values 0.5 / 0.5 / 0 / -25 / 0 / 25
* Double click the new layer to rename it to "Ring 2". You may also temporarily
hide the "Band" layer by unchecking the eye icon in front of it.
* This is what it should look like:
Enhance the ring by improving the colors and soften the border of your ring.
* Colors -> Map -> Gradient map (with "Golden" gradient still active).
* Right click on the "Ring 2" layer -> "Alpha to selection". This creates a
selection of your ring.
* Select -> Shrink (1px).
* Select -> Invert.
* Filter -> Blur -> Gaussian Blur (radius 3x3px).
* Select -> None.
* You should see the result of the blur better when zooming into the image:
Now for a bit tricky part. We want to "enhance" the 3D perspective effect of
the ring with a little trick: Blur the back part of the ring.
There are several ways to create the selection which is blurred, this is what
I did...
* Use the ellipse select tool and create an ellipse which covers the back part
of the ring. You will have to play with it and also use the rotate tool
(transform on "selection") and the move tool (move on "selection") to
achieve this.
* My values were: rectangle 400x170px, rotate by angle 30, move in place.
* When you are done, Filter -> Blur -> Gaussian blur (5x5px).
* This is what it should look like:
Now, we soften and improve the ring border. You may not see a big "effect"
on the image after doing that, but it will be there
* Select -> None.
* Right click on "Ring 2" layer -> Alpha to selection
* Select -> Feather (3px).
* Select -> Invert.
* Press "Del" to delete the inverted selection.
* Select -> None.
If you want to create another text than on the first ring, please follow the
steps described above. Since I only wrote the wedding date and want to use it
on the second ring, I just re-use this text layer by selecting it
(IMPORTANT: Non bump-mapped text layer! Mine is called "26.07.2014") and
unhide it (again, the eye button in the layers window).
* Again, use Filter -> Map -> Map object with the same values as you did
for the last map (see above).
* This is what it should look like:

Now we enhance the text and the ring.
* Double click the new layer to rename it to "Text2".
* Filter -> Blur -> Gaussian blur (2x2px) to smooth it.
* You may also temporarily hide the original text layer by unchecking the eye
icon in front of it.
* Colors -> Map -> Gradient map (with gradient "Golden" still active).
* Select "Ring 2" layer.
* Right click on layer -> Alpha to selection.
* Select -> Shrink (1px).
* Select -> Invert.
* Filter -> Blur -> Gaussian blur (5x5px).
* Select -> None.
To create a bump map effect on the text layer:
* Select "Text2" layer.
* Filter -> Map -> Bump map.
Bump Map: Text2
Options: Type "linear", "compensate for darkening", "invert bumpmap".
Values: 145 / 45 / 3 / 0 / 0 / 0 / 0
Again, some enhancement...
* Colors -> Brightness-Contrast. Set contrast to 15.
* Filter -> Enhance -> Unsharp Mask (Values 5 / 0,5 / 0)
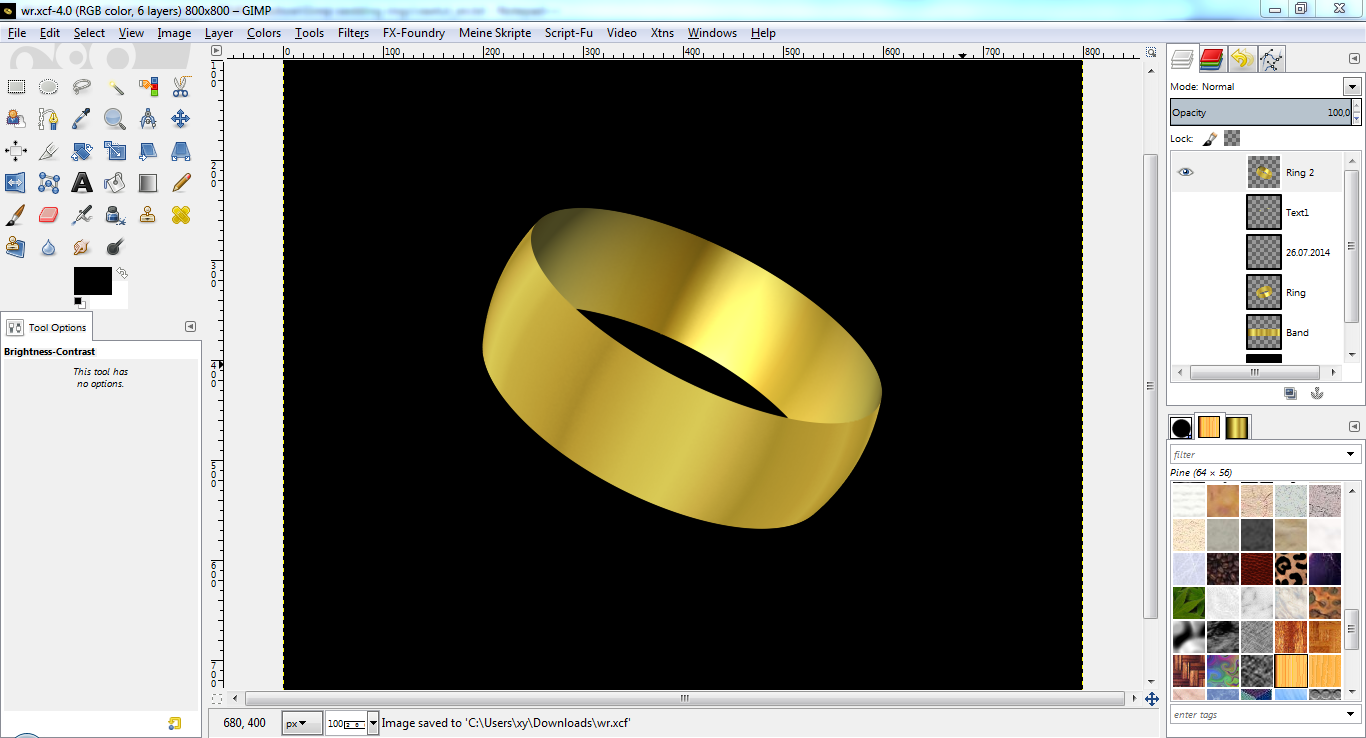
* This is what it should look like:

We now have successfully created the second ring! Now it would be a wise
decision to save your work under a new name for later changes or whatever.
CHAINING THE RINGS
Preparation:
* Delete your original, not bumpmapped text layer (here: "26.07.2014").
* Right click on Text2 layer and "merge down" to Ring 2 layer.
* Right click on Text1 layer and "merge down" to Ring layer.
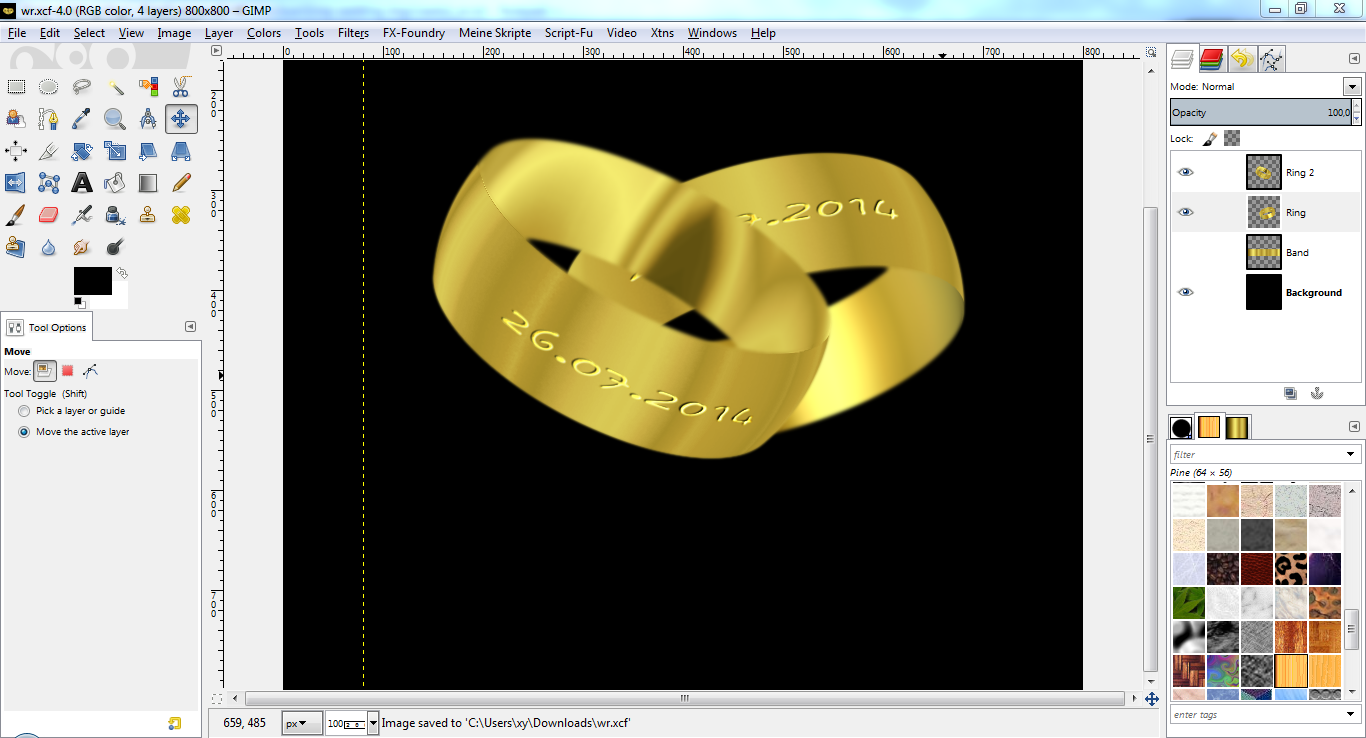
* Show both ring layers via the eye button in the layers window.
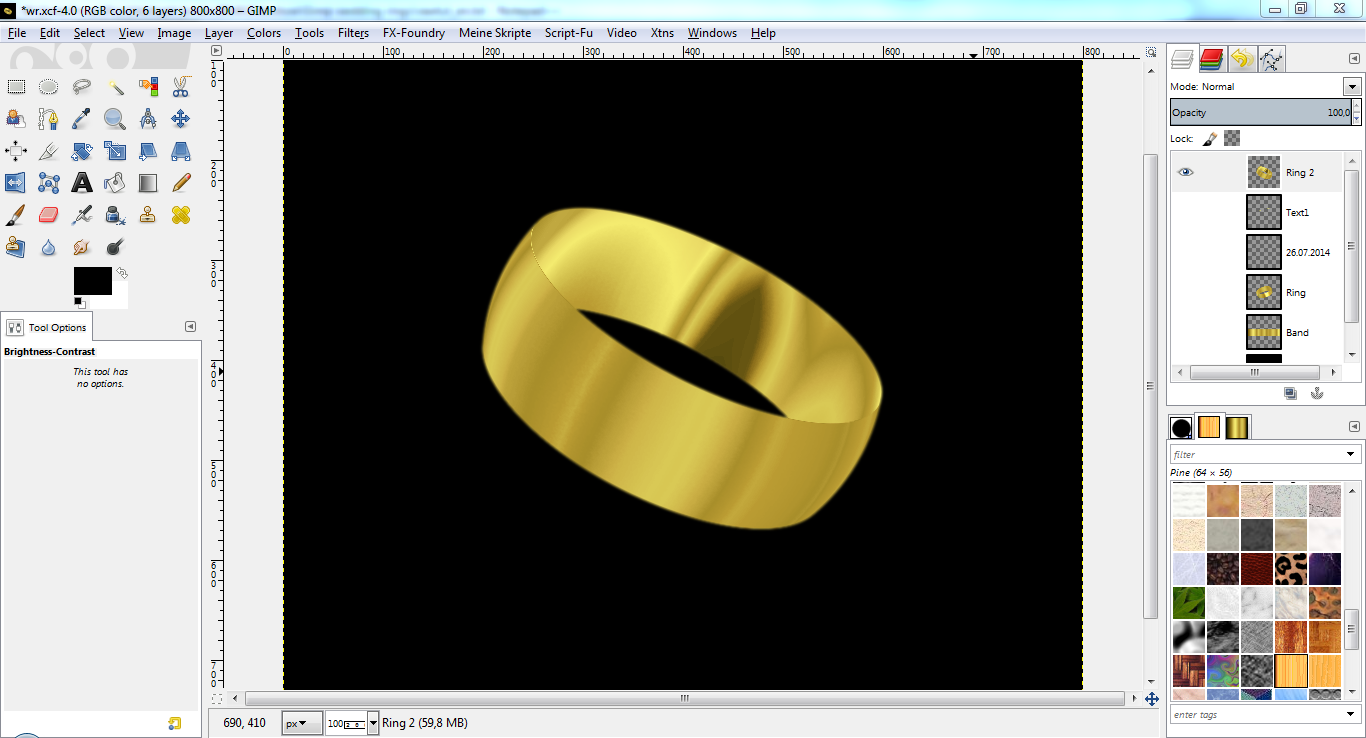
* This is what it should look like:
Now again for some tricky "try and error" part.
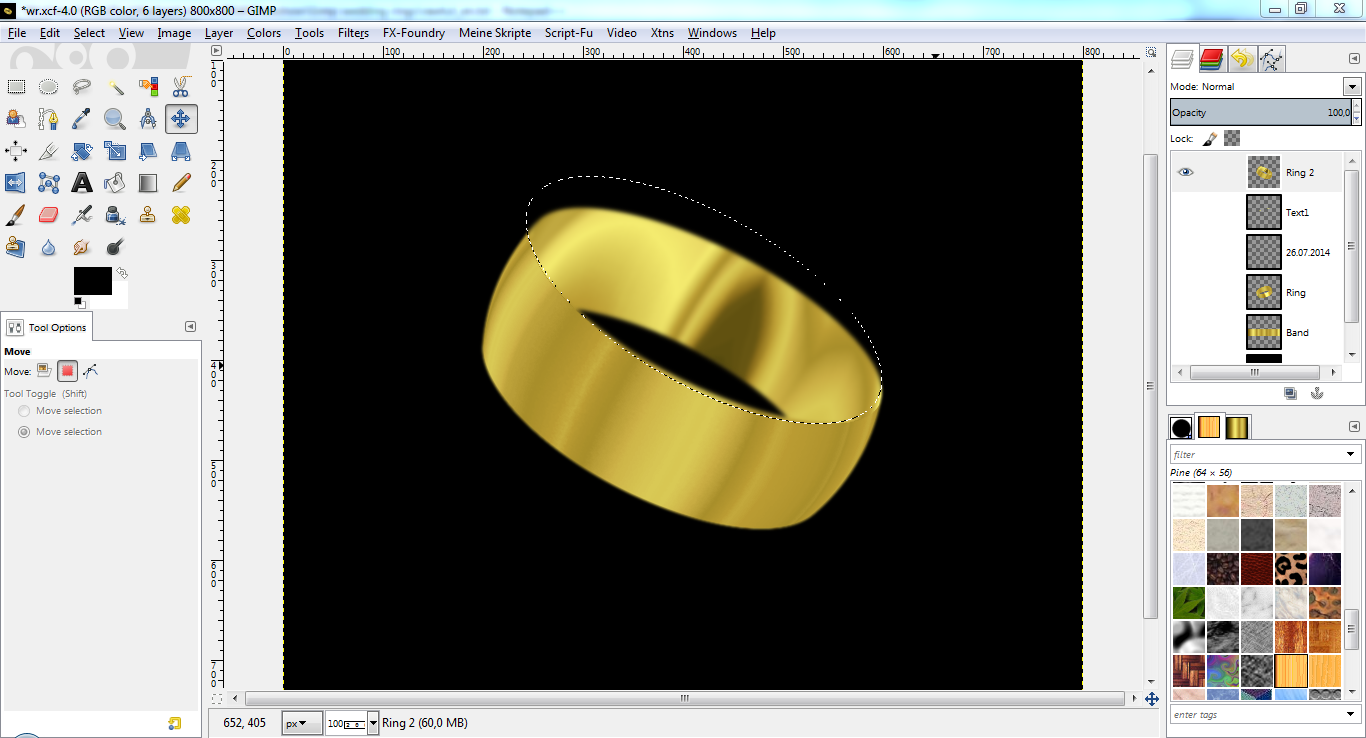
* Move Ring 2 to the left, Ring up with the move tool (Move: "active layer").
You will have to play a bit around with it. If you are lucky, you can use
the gradients of the rings to generate a nice shadow effect.
* This is what it should look like:
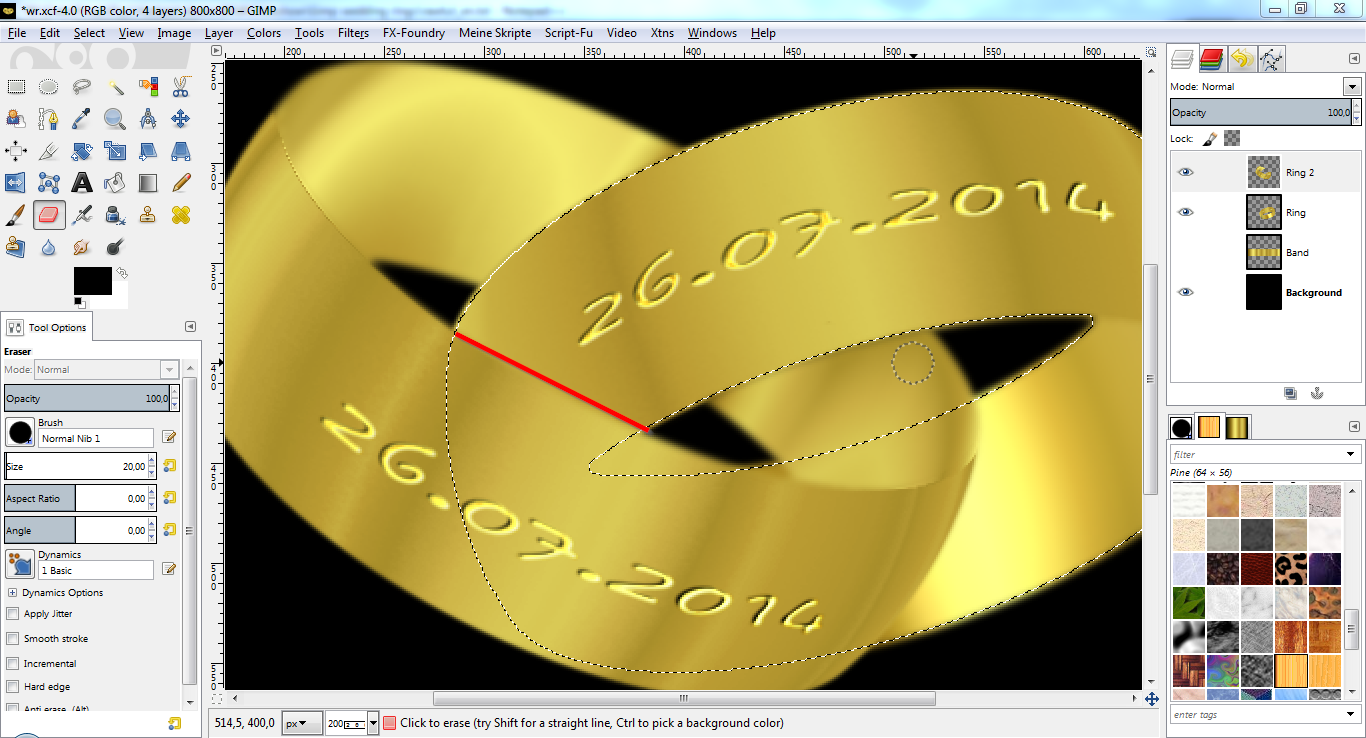
Now we have to erase the part of the image which should not be seen in the
foreground.
* Select "Ring" layer.
* Right click on "Ring" layer -> Alpha to selection.
* Select -> Shrink (1px)
* Increase the view zoom factor of your image to make erasing easier (I used
200%, but that depends of your resolution and monitor size).
* Use the eraser tool with a hard brush (I used "2. Hardness 100"), size
20px, angle 0.
* Select "Ring 2" layer.
* Keep left mouse button pressed while dragging over the part of the layer
where the font of the back ring ("Ring") should overlay the front ring
("Ring 2"). Be careful to not erase over the "wrong" part of the ring
(delete only above the red line in the picture below!).
* Select -> None.
* You may decrease the view zoom factor now to the original value.
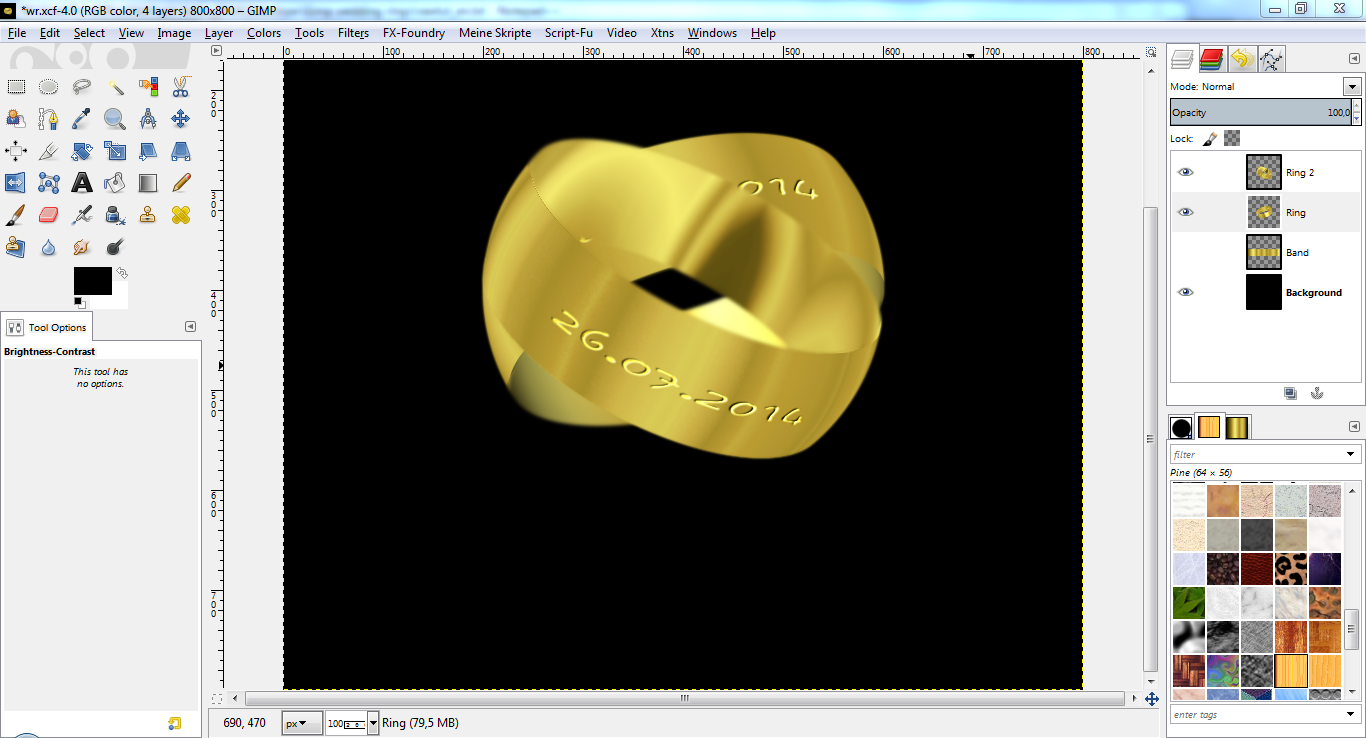
* This is what it should look like:
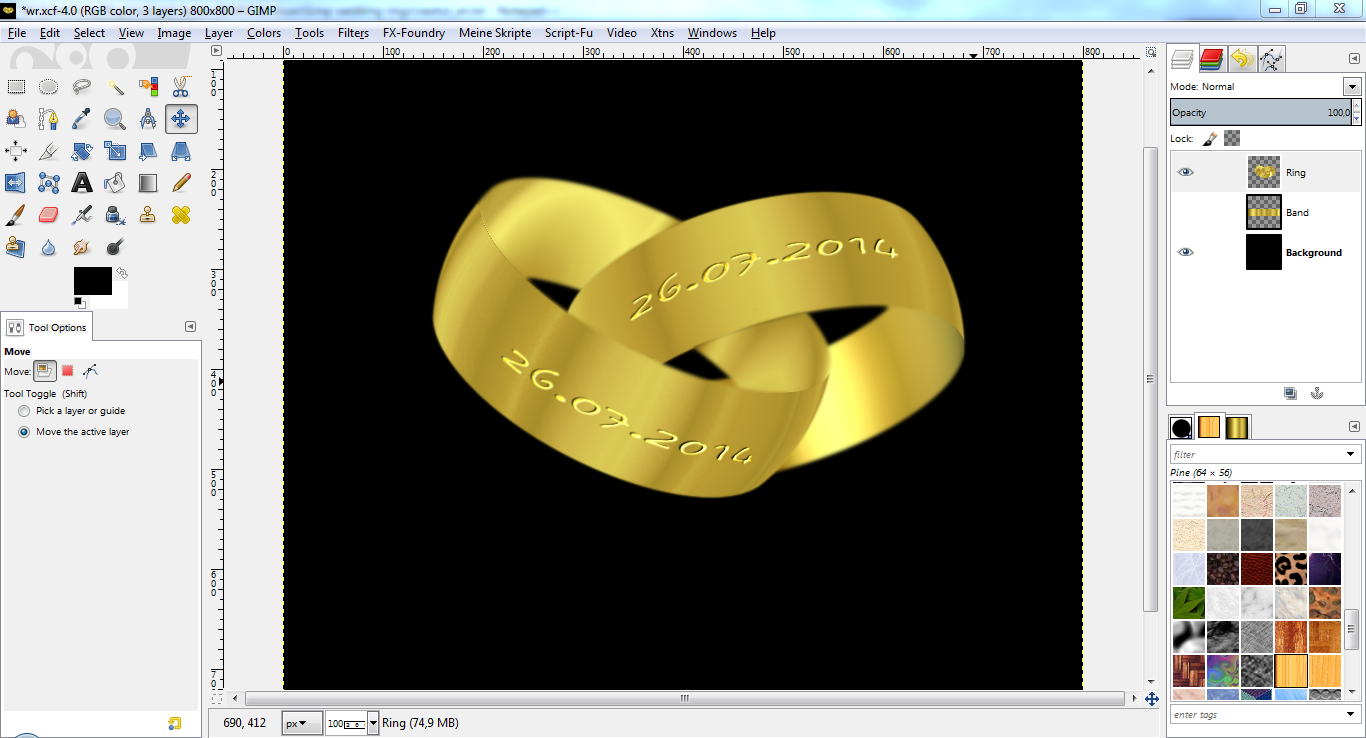
On both ring layers in the layer window, right click and select "Layer to
image size").
You have successfully completed the chaining! Now it would be a wise decision
to save your work under a new name for later changes or whatever.
CREATING THE MIRROR
Preparation:
* Select "Ring 2" layer.
* Right click on "Ring 2" layer and "Merge down" to "Ring" layer.
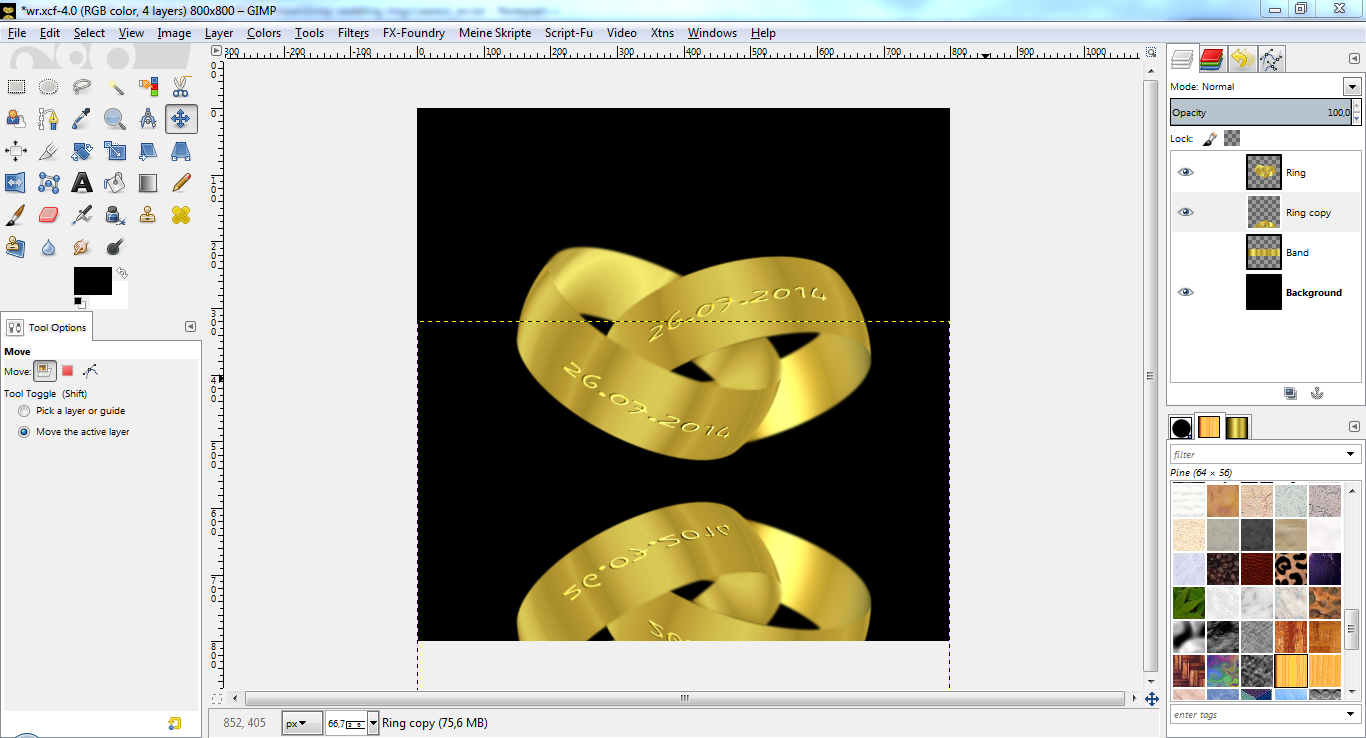
* Since we need more space on the botter part of the image for the mirror,
use the move tool ("Move the active layer") to move the "Ring" layer
slightly up. IMPORTANT: Don't move it completely to the top, because we
need some space above the rings for the stylish glittering effect later
* This is what it should look like:
Now we create the mirror part by adding a mirrored copy of the rings.
* Right click on "Ring" layer -> Layer to image size.
* Right click on "Ring" layer -> Duplicate layer.
* In the layers window, click and drag the new layer "Ring copy" UNDER the
"Ring" layer.
* Use the flip tool, type "vertical", to flip the layer (just click once into
the "Ring copy" layer on the canvas).
* Use the move tool "Move active layer" on the "Ring copy" layer to move it
down below the original "Ring" layer.
* This is what it should look like:
* Right click on "Ring copy" layer -> Layer to image size.
* Filter -> Blur -> Gaussian blur (5x5px).
To create the "fade out" effect of the mirror:
* Right click on "Ring copy" layer -> "Add Layer Mask", white.
* Be sure to select (click on) the white layer mask in the layers window!
* Select Black (#000000) as foreground color, white (#ffffff) as background
color.
* Use the gradient fill tool to fill the layer mask (i.e. the "Ring Copy"
layer) from black to white by clicking under the bottom of the layer and
dragging upwards until slightly above the mirror (as used in the beginning
of creating your band layer, use Ctrl while dragging to generate a vertical
gradient easily).
* This is what it should look like:
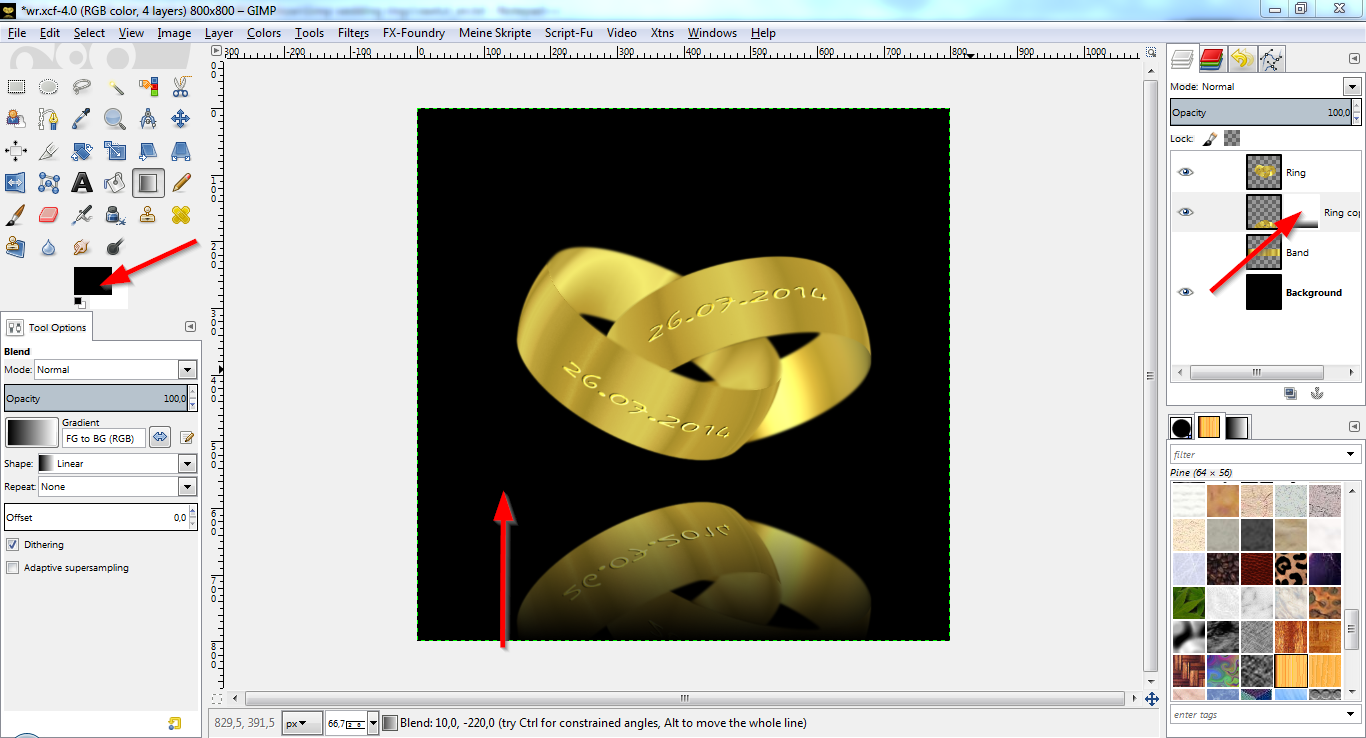
* With the layer mask still selected, do Colors -> Levels, Input Level 0.3 -
this enhances the fade out effect.
* Right click on "Ring" layer and "Merge down" to "Ring copy" layer.
* If you have not enough space on top of the rings, use the move tool to move
the layer down in the canvas. Afterwards, again do "layer to image size".
You have successfully completed the mirroring! Now it would be a wise
decision to save your work under a new name for later changes or whatever.
GLITTER EFFECT
The glitter effect is quite easy and quick to do using pre-defined glitter
brushes free for download. Personally, I used the glitter brushes available
here:
http://project-gimpbc.deviantart.com/ar ... s-63531487(If you don't know how to install them, there are tons of links when you
use the internet search engine of your choice ;-))
* Right click on the "Ring copy" layer in the layer window: "New Layer",
transparent.
* Select white (#ffffff) as foreground color.
* Use the paintbrush tool, brush "Glitter_19", size 250px, angle -10, to
apply a glitter in the upper left of the rings.
* Use the same brush, size 150px, angle -10, to apply a glitter in the
middle right of the rings.
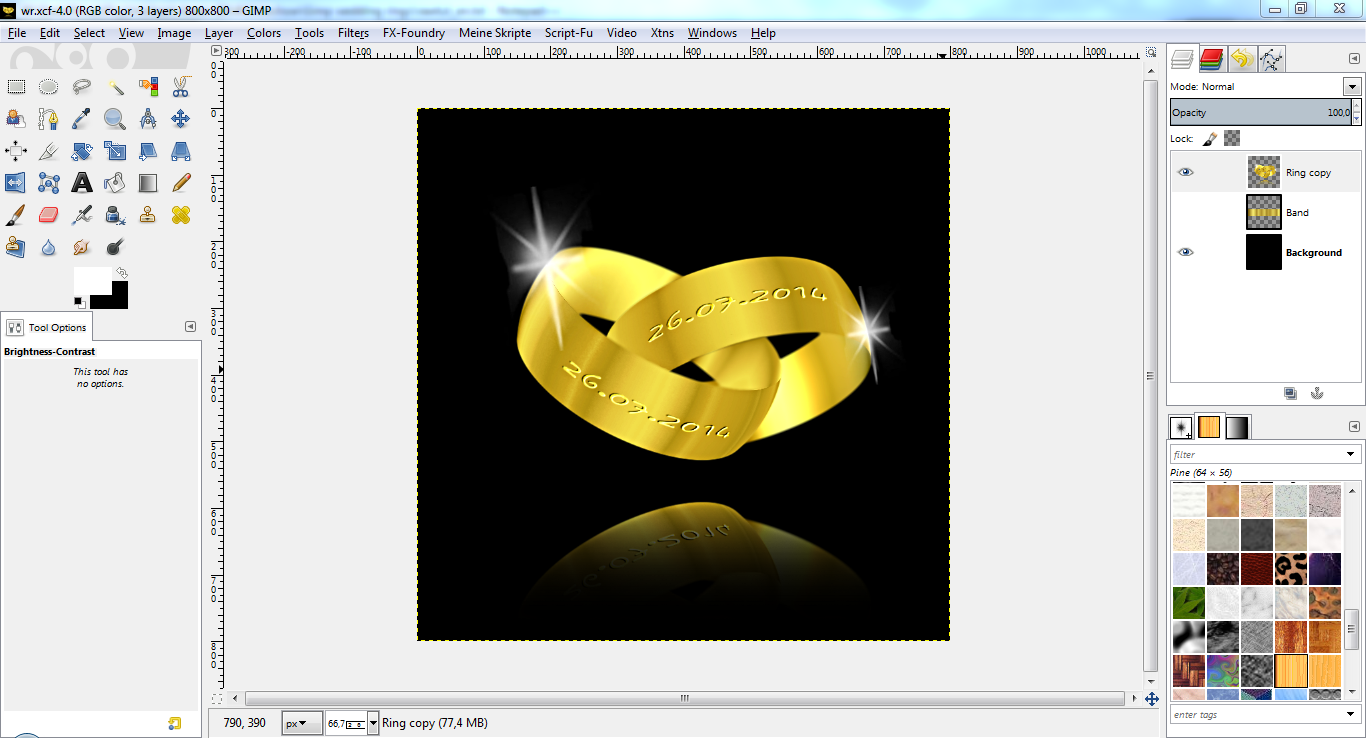
* This is what it should look like:

It's a matter of taste: If you want your glitter more in golden colors
(adapted to the rings), use Colors -> Map -> Gradient map (with gradient
"Golden" still selected) on the "Glitter" Layer. To get it smooth, apply
this gradient map THREE (3) TIMES! Personally, I prefer the silver variant
and so don't use this effect.
* Set the opacity of the glitter layer to about 90% (in the layers window).
* Right click on "Glitter" layer and "Merge down" to "Ring copy" layer.
FINAL ENHANCEMENTS
* Colors -> Brightness-Contrast -> Contrast, 20
* Filter -> Enhance -> Unsharp Mask, values 5 / 0.5 / 0
* This is what it should look like:
DONE!
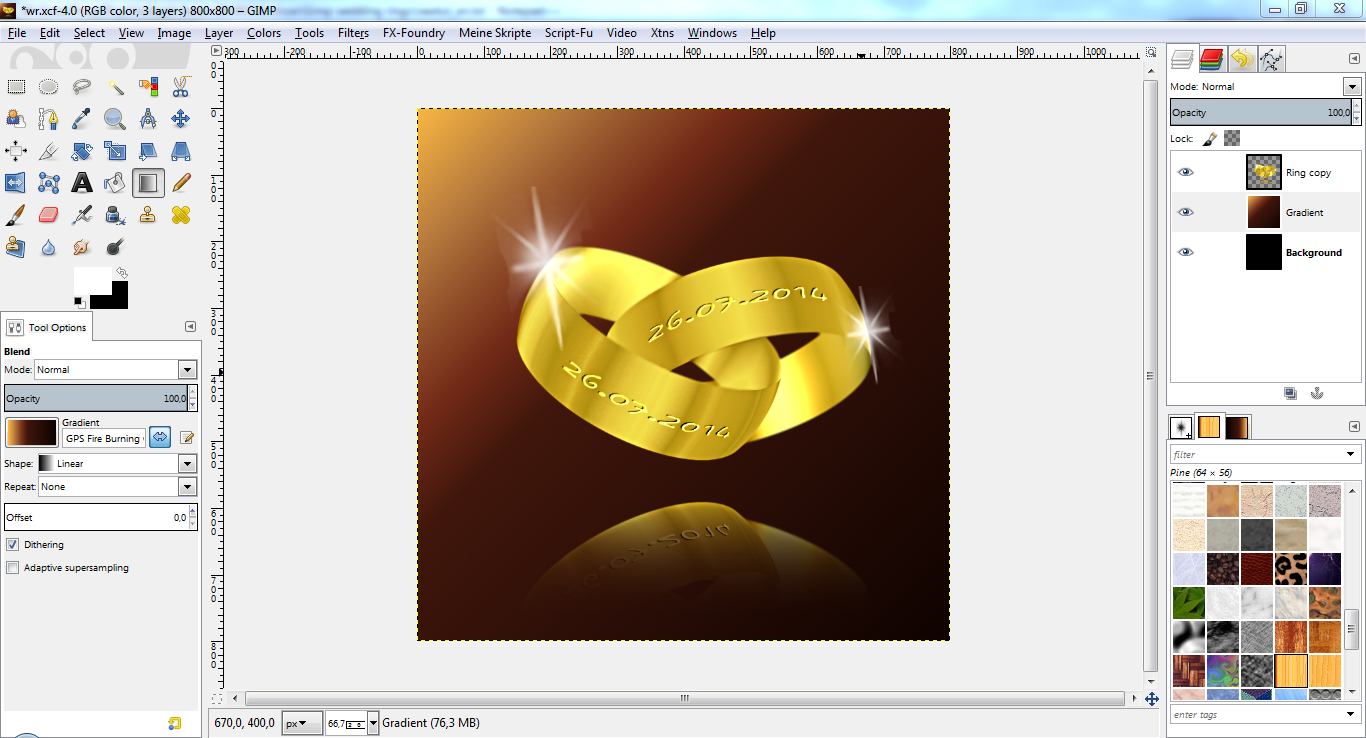
You may now safely delete the "Band" layer (or leave it hidden if you plan to
re-use it later). Further steps may include changing the background, e.g. by
adding a background layer below the "Ring copy" layer and create a gradient
fill on it, like in this picture:
Congratulations, you have successfully completed the tutorial! Now it would
be a wise decision to save your work under a new name for later changes or
whatever.
Since this is my first GIMP tutorial, please be patient with me. If you find
any errors or something I could improve, feel free to comment!
dietmar