Double Bump Mapped Text

Start with a new image 500x500px with a transparent background, or size to your specifications.
Select the Text Tool

. Make your foreground color white to make your text white. Use the Move Tool

to position your text approximately in the center of the image. A font with thick and thin areas in it seems to work best for this method. I used Greenwood RS for this tutorial, size it to your preference - 100 or greater. It is available here.
http://www.dafont.com/greenwood-rs.fontRight click the font layer and choose Layer to Image Size. Again, right click the font layer and choose Alpha to Selection. Your text will have “marching ants” around it.
Select > Grow > 2 pixels.
Ctrl + I to invert the selection.
Select > To Path.
Unselect the text (Ctrl + Shift + A).
Go to Filters > blur > Gaussian Blur and set it to 3.
Make a new layer, name it color, and fill it with a medium bright color. *See my note below about bright pink.
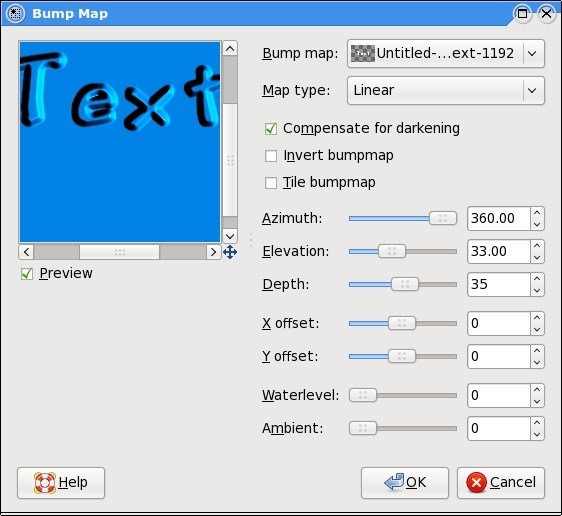
Make sure your color layer is the one selected, then go to Filters > Map > Bump map. In the drop down list at the top, choose your text layer.
Azimuth: 360
Elevation:33
Depth: 35
Remaining settings at 0
Click the little Preview box if it is not checked. In the preview window you should see your bump mapped text. If you don't see it, pan around using the preview window slider bars or use the 4-pointed arrow at the bottom right of the preview window.
In the Bump map dropdown box where it says Linear, you can try other ways, too. Each makes a slightly different looking finish.
Click OK.
With the colored layer still selected, Select > From Path. Press the Delete key on your keyboard. Deselect. Repeat the bump map one more time keeping the same settings (this brightens the text).
Play with colors and settings. A drop shadow gives it depth. Delete the Background layer and the white text layer.
* Bump mapping bright pink does not work well. Making the pink a darker shade works better but to me gives less than satisfactory results.

Using darker pink.

_________________

Download the PDF file of this tutorial. The tutorial and PDF file were revised 4/30/2013 for Gimp v2.8x