This is a re-post, with a few updates, of a tutorial that I originally posted over at
gimptalk.
Please note : this particular tutorial is probably not best for new users of Gimp (although you are always welcome to try). Although I have included screenshots and some explanations here and there, a lot of the material assumes that you have a good familiarity with Gimp already. Now on to the tutorial.

This is an example of what one can create via using this guide:
Page Turn Animation Tutorial (Without GAP)
Creating the Card Cover1.) First begin with a 400x400 new image with a transparent background.
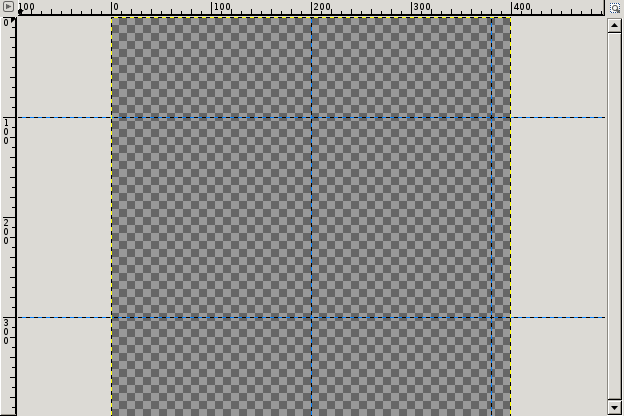
2.) From the left side of your image window ruler, drag a vertical guide line to the center of the screen (position 200).
3.)Then from your left side ruler, drag another vertical guide to position 380.
4.) From the top ruler, drag a horizontal guide to position 100 and then another horizontal guide to position 300.
4a.) You can also add guides by selecting:
Image | Guides | New Guide (for each guide you need to create)
Then in the dialog box that opens select whether you will be making a Vertical or Horizontal guide line and the position to place the guide.
Vertical guides are to be placed at position 200 and 380. Place horizontal guides at positions 100 and 300.
5.) Add a
New Transparent Layer to the image either from the New Layer button on the Layers Dialog window or by selecting:
Layer | New LayerAccept the default settings for the New Layer and click OK.
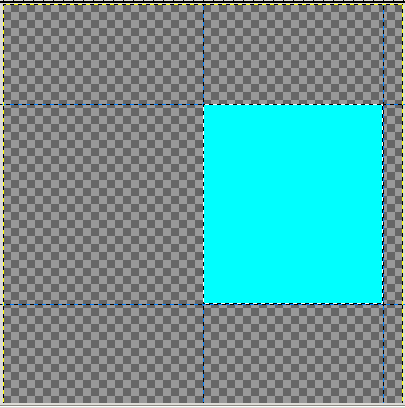
6.) Select the
Rectangle Select Tool and then starting at the intersection of the vertical guide at 200 and the top horizontal guide at 100, click and drag your selection tool down and the the right until you reach the bottom right corner, which is the intersection of vertical guide at 380 and horizontal guide at 300. The selection should snap to the bounding guidelines.
6a.) Fill that selection with the color that you will be using for your top page. In my example it will be a bluish green color:
7.) Leaving the rectangular selection active, select the
Text Tool, adjust the settings for the tool according to your preferences, click somewhere inside the image window and type some text.
I made the text : To Someone Special
8 alternate.)You can align the text by hand if you like.
8.) To get a nice centered text, select the
Align Tool8a.) Click on the Text Layer inside of the Image window. You should now see a dot in each of the four corners of the Text Layer.
8b.) In the align tool settings window for Align Relative To, click on the drop down box and set that to
Selection:
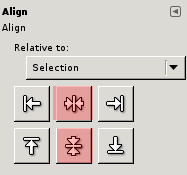
8c.) Then to
center align the text over the selected area,
click the two buttons highlighted in red as shown in the image above.
9.) Then do a
Select | None.
10.) Merge the Text layer down on to the New Layer by selecting the Text Layer in the Layers Dialog window and then right-click on it and selelct
Merge Down from the menu that opens.
Visualizing The AnimationThe animation will be 30 frames (I just arbitrarily made that value up, you can use however many frames you wish). I mentally divide the animation into four separate animations, although they will all be created from within the image.
The first animated part is the card opening from flat to a 90 degree angle with the surface of the page. In 3d view, the page would be standing straight up so that all one could see if staring straight down on it would be it's edge.
The second animated part will consist of the card opening fully from the 90 degree position. But the inside of the card will be a different color from the outside (white in the case of this example), so that additional 90 degree turn needs to be a separate layer from the first.
The third part of the animation is the card going from fully open back to the top of the card again being at a 90 degree angle from the flat part of the card. This will still use the white color.
Finally, the from the 90 degree mark to closing back up, we need to reuse the layer for the front part of the card.
First, we set up the layers11.) With the
New Layer selected in the Layers Dialog window,
rename it to Cover.
12.)
Duplicate the layer named Cover 8 times, to give a total of 9 equivalent copies of that layer.
13.) The top layer should be called
Cover copy #7. Rename that layer to:
Left Inside.
14.) Then in the Layers Dialog window, set the
Alpha Channel Lock for the “Left Inside” layer (notice the image below). Make sure you see a check mark showing that the Alpha Lock has indeed been activated.
This step is important and one that can be easily missed. If it is not done, your final result will not display correctly.
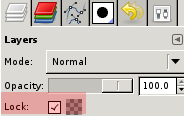
15.) Fill the Left Inside Layer with color white. (Because the Alpha Channel is set to
Lock, this will cause the already filled in bluish green rectangle with text in it to be now filled just with the color white.) The transparent area around it will remain transparent.
16.) Then
deactivate the Alpha Channel Lock by clicking on the little box beside Lock in the Layers Dialog window. Make sure that there is now no check mark in the box.
17.) Duplicate the Left Inside layer
14 additional times. The last copy will be named Left Inside copy#13 if this step was done correctly.
18.) Go back and select the layer named
Cover copy #6.
19.)
Duplicate Cover copy#6 one time.
20.)
Drag Cover copy#7 to the top of the stack of layers in the Layers Dialog window.
21.) Then
duplicate Cover copy#7 an additional 6 times. The very top layer will be named Cover copy #13 if all went well.
If you count the various layers, we have essentially 15 Cover layers and 15 Left Inside layers. It's just that we had to position them as we did to make the animation work properly.
This then gives us the 30 layers for our animation plus one Transparent Background Layer. All of the layers are set up and ready for "animating".
Setting Up The Animated Layers with Map Object22.) Go down and select the layer named Cover.
23.) With the Cover Layer selected, open the Map Object Filter by selecting:
Filters | Map | Map Object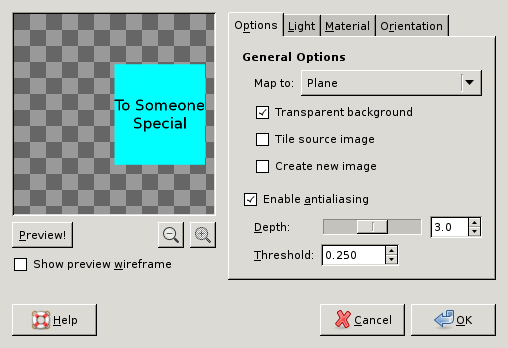
23a.) In the
Options tab, make sure you have activated the
Transparent background setting as shown above. You will not need to change anything else in the Options, Lighting (you may wish to
experiment with No Lighting rather than using default lighting), or Materials tabs for the remainder of the time for this animation.
24.) Then go to the
Orientation Tab:
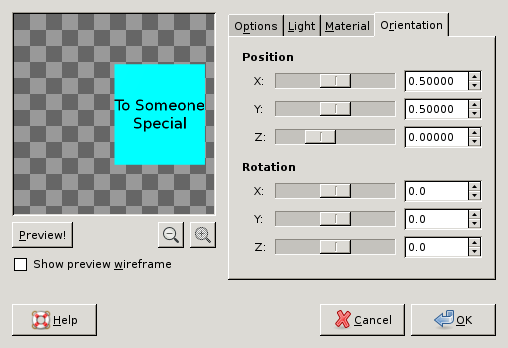 The value that you will be changing for each and every layer to create the animation will be the Y Rotation value.
25.) In the first instance you will leave the Y value at 0.
25a.)
Explanation: You will have to change the value of Y for every one of the 30 layers by an increment of -12 degrees for the first 16 frames, going from zero to -180.0 degrees, and then by increments of +12 degrees for the remaining 14 frames.
If you wonder why I am using 12 degree increments, just take the total rotation of the front cover, which goes from 0 to -180 and back to zero, which is a total 360 degree rotation, and divide by the number of frames that we are using, which is 30. That gives 12 degrees per frame.
End Explanation26.) So go ahead and click OK.
27.) In the Layers Dialog window select the next layer, which is named Cover copy.
28.) Again open the Map Object filter (Shift+Ctrl+F for reopening the most recent filter used), go to the Orientation tab and change the Y Rotation value to
-12.0 (that's minus 12.0). Then click OK.
29.) Select the next layer up, Cover copy#1, open Map Object, and set the Y rotation value to
-24.030.) Continue this process with the Map Object filter,
incrementing each layer by -12.0 degrees (-36.0, -48.0, -60.0, -72.0, -84.0, -96.0, -108.0, -120.0, -132.0, -144.0, -156.0, -168.0, and -180.0 for the rest of the first 16 layers) all the way through Inside Left copy #6, which will be a Y rotation value of -180.0.
31.) Then reverse the process for the remaining layers. So
Inside Left copy #7 will be a Y rotation value of
-168.032.) The remaining Y rotation values for each successive layer would be
-156.0, -144.0, -132.0, -120.0, -108.0, -96.0, -84.0, -72.0, -60.0, -48.0, -36.0, -24.0, and finally -12.0.
For those wondering why we don't end up back at zero, it's because we do when we go from frame 30 back to frame 1 again to start the whole animation over again.
Get Some Animation Scripts33.) First, if you do not already have them, please download the following zip file containing two scripts written by saulgoode:
Attachment:
File comment: contains anim-settings.scm and sg-combine-background.scm scripts
 anim_scripts.zip [2.61 KiB]
Downloaded 513 times
anim_scripts.zip [2.61 KiB]
Downloaded 513 times
34.) Unzip anim_scripts.zip into your Gimp scripts folder
35.) Refresh your scripts:
Filters | Script-Fu | Refresh scriptsThese scripts will add new selections to the Animations section under Filters heading in Gimp.
Once the background is set up, I will refer to these scripts.
Setting Up The Background36.) From your Layers dialog window, select the transparent
Background layer.
37.)
Shift+Click on the
eyeball icon beside the Background Layer in the Layers Dialog window to turn off the visibility of all except the Background Layer.
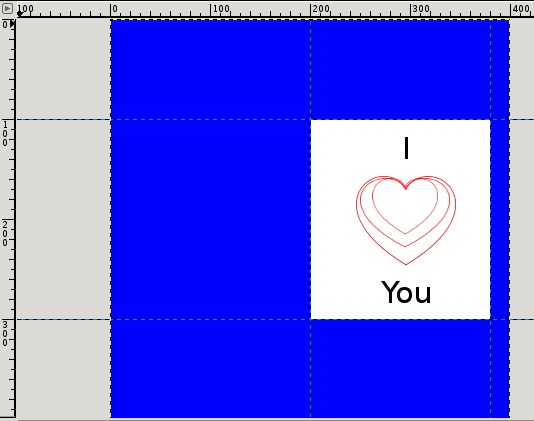
38.) Fill the background layer with the color of your choice, I'm using the color blue.
39.) Using the
Rectangular Select Tool, make the same selection as was done previously in step number 6, along the indicated guidelines mentioned above.
40.) Fill the selection with plain white color to create the bottom page of the card.
40a.) Feel free to add designs or text of your choosing for the inside of the card.
Explanation: That part of the card doesn't move in the animation, which is why we can let it be part of the background layer.
40b.) Make sure that you merge down the text and any other graphics layers that you want included in the Background Layer.
 Caution:
 Be careful when adding graphics to images that are intended to become GIF animations. You only have 256 total colors to work with. Any more than that and you will likely start seeing your animations looking less than optimal.
Finalize The Animation41.)
Shift+Click on the eyeball icon for the Background Layer in your Layers Dialog window to make all layers visible again.
42.) Select:
Filters | Animation | Combine background (that comes from the newly installed animation scripts)
Explanation: This script allows you to avoid the work of manually creating a copy of the Background Layer for each of the animation layers. Normally, if doing this manually, you would place each copy of the Background layer below each of the animation layers and then merge each animation layer on to one of the background layer copies. The script does this for you.
43.) Then
delete the Background Layer.
44.) Finally, try out your animation by selecting:
Filters | Animation | Playback44a.) The animation should play well, but we need to have it
delayed when the card is completely closed and when it is fully opened.
45.) Let's first set the delay settings for each frame. Select:
Filters | Animation | Settings45a.) You can try using the
default delay value of 100ms per frame and leave the Mode value at Keep.
46.) Once the script adds the timing delay value to each frame, you can go back to the
Layers Dialog Window and
manually edit the timing value for the
first frame and the
16th frame. I set those two frames each to
1500ms from the default 100ms setting.
46b.)
Explanation: The first frame is when the card is completely closed and the 16th frame is when it is completely open. That is the reason the delay for those two frames is adjusted. It makes it easier for the person viewing the animation to read the card. Plus a delay is a bit easier on the eyes for this animation, vs it constantly opening and closing with no delay.
47.) Go back and play your animation again. It now has a nice delay.
48.) I usually like to apply the optimize function:
Filters | Animation | Optimize (for Gif)Not everyone likes using that function/filter. It is intended to help the resulting file size be as small as possible, but it doesn't always work out that way. And sometimes the appearance of your animation is less than optimal after applying that filter. So that is something you will have to decide on.
49.) Finally save your file as an animated gif file (some_file.gif).
49a.) Remember to select
Save As Animation from the
Export dialog window that opens, otherwise Gimp will just Flatten all your layers into one layer and save it as a static Gif image rather than as a multilayered Gif animation.
Thank you for checking out this tutorial.


 I've got what I ended up with saved in XCF format,(yes the Background layer is with it, as I didn't want to loose it.) I'm at a loss as to what I'm doing wrong.