Well, as promised here are techniques I use to create spike-looking brushes like iceytina's on Deviantart.com. Due to time constraints, I'm only including a final screenshot of my output. You can figure out the rest.
- Open up a new RGB image - transparent
- Set your colors back to black and white. (If black is the forefround, more black will appear and vise versa for white)
- Now, Filters | Render | Nature | Flame
- Under Render tab, select "Custom Gradient" For now, don`t change anything else, but you can experiment later.
- Under Camera tab, adjust the zoom of the flame to fit the screen as desired (may have to adjust again after the next step)
- Click the Edit tab at the top of the window
- Under Variation, click linear
- Play with the speed, randomize and direction buttons.
I don`t understand the direction button entirely, but the middle one is the one that will be rendered. Those that are around it are variations of it. If you like one of the variations better than that middle one, click on it, and now it becomes the middle. Keep playing with the settings until you get one you like.
- Click Ok and readjust the zoom and x/y settings to fit the render where you want it to be positioned on the screen.
- You can also save your settings for later use within the flame window.
- Exit out of the Flames tool.
- Convert image to grayscale (Image | Mode | Grayscale)
- Flatten your image .... Image | Flatten Image
- Save it as a .gbr brush in your gimp brush folder.
- Save your xcf file if you want to edit it later.
- Refresh you brushes and start brushing!
Here`s a pic of my brush!
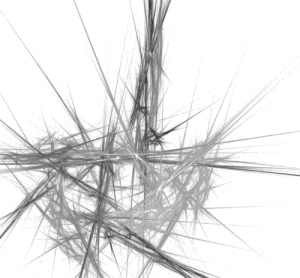
The background is actually transparent. I don`t know how it`s showing up for you, but it should be clear.
Y'all owe me for sharing this secret! I was going to keep it to myself. :w:
Art


 O!
O!

