Beginning with GIMP -- Starting Tutorial for new usersSo you have just started with GIMP, and now you are completely lost as to what to do next? There are windows and buttons everywhere and nothing makes sense? If so, this is the tutorial for you.
The idea is for you to get going with a quick run-through of setting up a vanilla install of GIMP, followed by you doing your first little image in the program. From then on you can head on to more advanced tutorials, all of which often assumes you know the basics. Whereas this tutorial is mainly aimed at complete newbies in GIMP (and to computer graphics in general), also veteran users might find a useful tidbit or two.
Installing GIMPGIMP exists for many different computing platforms, including Linux, Windows and Mac. The current stable versions are 2.6.x and this tutorial will
not be fully correct if you are using an older version than 2.6.0. Once GIMP is installed, you can see what version you have in the menu
Help->About (to find the menu see below).
GIMP downloads can be found here:
http://www.gimp.org/downloads/This tutorial will not go through the installation, follow the instructions given for each operating system.
Starting GIMP for the first time -- a quick orientation
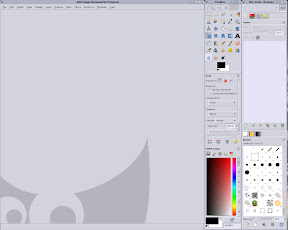
When you start GIMP for the very first time, something like this will greet you. This tutorial image is from GIMP version 2.6.1 which will be used for this tutorial. The operating system shown is Linux Debian, so the window decorations (window bars, close buttons etc) might not look familiar to WIndows/Mac users, but the program should nevertheless work the same under all systems.
Let us take a look at what we have.
 gimpsetup001_text.jpg
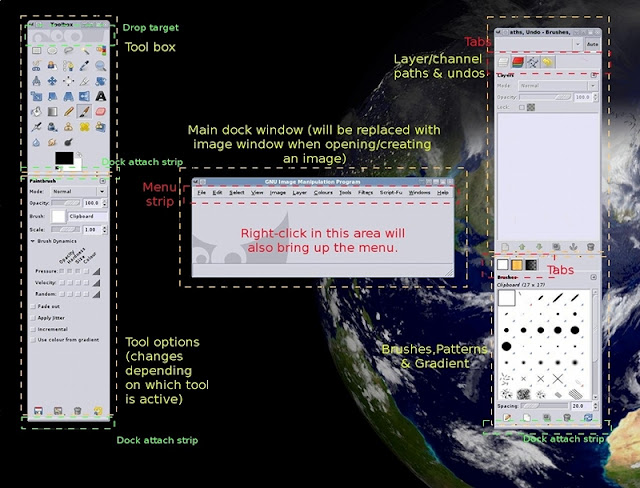
First of all it should be remembered that GIMP's interface is extremely flexible. You can add and remove windows from it as you like. The areas marked in green as
Dock attach strip are places where different windows can attach and merge with each other (we will try this below). The default setup is pretty reasonable, but we will tweak it a bit later to be even more convenient.
To the top left you have the
Tool box. This contains the most commonly used functions of the program, quite literally the artist's box of utilities. These tools are in fact so often used that almost all of them also have default keyboard shortcuts for even faster access. You are wise to learn most of these by heart if you want to be effective.
Attached to the bottom of the tool box is the
Tool options dock. This shows the settings for each tool and thus changes depending on which tool is currently active. In the image we see the tool options for the
paintbrush tool.
To the far right we have a dock that contains several things in one. What we see at the moment is the empty
Layer listwindow. As we start creating a new image, this list will start to fill with layers. We will explain the use of layers a little later.
You also see that there are a bunch of tabs in the upper part of this window, clicking these will bring forth other functionality. All these are useful, but we will not delve into them too much in this tutorial.
Below the layer list, another dock is attached, containing the list of brushes usable by GIMP. Brushes are, quite like their real-world counterpart, things you use to mark down things on the canvas. They can be used to emulate actual paint brushes, but also be used as "stamps" for creating nice effects, as well as be animated.
There are two more tabs in this dock, these show lists of patterns and gradients respectively (click them to see). Patterns create seamless mosaics of structure (you could for example use a pattern to paint a checker board). Gradients produce transitions between colours in various ways. All brushes, patterns and gradients can be modified and customized by the user.
In the center you find the main dock window (Formally this is actually called the
Empty Image window). This is the main work area. It starts out small, but it will resize to hold your image when you create or load one. It also is also here you find the menu. To close GIMP you can either close this window or close the tool box (or use the menu
File->Quit).
The tool box gimpsetup002.jpg
We will not explain all the options for each tool, but you should at least know which one is which and roughly what it is for. For a much more detailed description of the tools, refer to the gimp manual's entry on the toolbox
[here]. Some of the default keyboard shortcuts are given as well.
The top of the tool box contains a
Drop target area, you can drop images from other places on your harddrive to open them in GIMP.
 gimpsetup003.jpg
(
Rectangle select, Elliptical select, Freehand select (lasso), Magic wand select, colour select, intelligent scissors)
The first row of the toolbox solely deals solely with selecting various parts of your image in clever ways. Think of a selection as if you were placing a paper with a hole in it over your image. You can then only paint on that part of your image which is visible in the hole. By shaping the hole cleverly you can create all sorts of effects, and also not have to worry you will mess up other parts of your image.
The art of selecting is crucial for many tasks in GIMP, and many of GIMP's functions only works on selections. They are also the way to easily paint forms like squares, circles and polygons. We will try a few later.
A VERY common newbie problem is that you have create a selection somewhere and forgot about it -- you will then not be able to paint outside it at all and it looks like the paint tools does not work. The menu option
Select->All or
Select->None will solve that for you. These two are so useful that you are wise to learn their keyboard shortcuts:
Shift+A and
Shift+Ctrl+A.
By holding Shift or Ctrl down, you can also add/remove from an existing selection. Use Esc to abandon a selection in progress, and Return to quickly finish it.
Rectangle select tool (R ): Creates a square selection. When using this, you get the chance to pull handles to adjust it. Press Return or click inside it to finalize the selection.
Elliptical region select tool (E): Circular selection.
Freehand select tool (F): Despite the name this is actually a combination of a freehand- and polygon-select tool, first seen in version 2.6. Free-hand selection is done by holding the mouse button and dragging. If you instead click the mouse you will get to place nodes linked by straight lines. You can combine the two modes as you like as well as adjust the polygon nodes after you made them. Tie the ends together or press Return to finalize the selection. A very, very useful tool.
Continuous region select (Magic wand) (Z): Selects connected areas. Click and drag to include more areas.
Colour select (Shift + O ): Selects areas of similar colour. Click and drag to include a wider range of colours.
Select Shape from image (Intelligent scissors) (I): Selects along an edge. Can be very useful to select and cut out parts of an image, the results can be a bit unpredictable though.
 gimpsetup004.jpg
(
foreground select, path tool, colour picker, zoom, measurer, move tool)
Foreground select tool: An advanced algorithm intended primarily for cutting out items and people from photos. Rather involved and not for newbies. Refer to the manual for how to use this.
Path tool (B ): Creates "paths", mathematical objects possible to be perfectly adjusted and modified to any shape and form. The paths can be saved and also converted to selections, making this the most advanced but also most involved way to create a selection.
Colour picker (O): Picks colour from the image and makes it your active colour. This tool is often not accessed directly -- holding Ctrl when using a paint tool will temporarily switch to the colour picker. By default the picker only selects from the current layer, an often useful option for this tool is to set "Sample Merged", which means you pick the colour you "see", not just what is on the current layer (once you understand layers, that will make sense).
Zoom tool: This tool is very useful, so much so that it should mostly be used by keyboard shortcut. The default keys are + and -, we will learn how to change that and other keys later.
Measure tool: Measure pixel distances and angles on the canvas.
Move tool (M): Move layers and selections around. To avoid newbie frustration during this tutorial, it is recommended that you set this tool's option to "Move active layer".
 gimpsetup005.jpg
(
Align tool, Crop tool, Rotate, Rescale, Shear, Perspective)
Align tool: This is used for aligning or distributing layers relative to each other. Most useful for text, but can be used whenever things need to be distributed and placed neatly.
Crop tool (Shift + C): Used for cutting away unneeded parts of an image. Primarily a photo manipulation tool.
Rotate (Shift + R): Rotate a selected area or layer.
Scale (Shift + T): Scale a selected area or layer.
Shear (Shift + S): Skew a selected area or layer.
Perspective (Shift + P ): Works as if you took a 2D-part of your image and "tipped" it down into the image.
 gimpsetup006.jpg
(
flip tool, Text tool, bucket fill, Gradient fill, Pencil tool, Paint brush)
Flip tool (Shift + F): Flips your selection from one side to the other.
Text tool (T): This allows you to place text in your image, using any fonts available to GIMP.
Bucket fill (Shift + B ): Fill parts of the image with a colour or pattern. It can be used to replace particular colours or parts of the image.
Gradient fill (L): Fill parts of the image with a gradient.
Pencil tool (N): This is the first of the
Brush paint tools, that is, tools that use brushes to paint on the canvas. The pencil creates "pixellated", jagged lines, that is, lines that are not smoothed. It is best used for create very small images where each pixel matters, like icons and smileys and similar.
Paint brush (P): This tool emulates a real paint brush by smoothing the edges of brush strokes to create smooth, "realistic" lines. This means that cannot place individual pixels as precisely as you can with the Pencil tool, but the result looks much nicer for larger works. This is the primary tool for digital painters.
 gimpsetup007.jpg
(Eraser, airbrush, ink tool, clone tool, Healing tool, Perspective clone)
Eraser tool (Shift + E)[/size]: This, as expected, erases the colour from an image/layer. What it really does is "paint with transparency". Since GIMP has an Undo function (Ctrl+Z), this tool is less used to correct mistakes than a real-life eraser and just as often used to adjust minor details or as a paint tool in its own right.
Airbrush (A): This emulates an airbrush or paintbrush to create the a more fuzzy "sprayed" effect than the paintbrush does.
Ink tool (K): Emulates a fountain pen or steel nib; useful for comics, calligraphy and other situations when dynamic lines are important.
Clone tool (C ): Allows to clone parts of an image (also from another layer or a completely different image) to where you want it. Ctrl-click sets the point which should be cloned, from there on, painting will cause that part of the image to appear (also different brushes can be used to apply it). Very useful for adding structure and for realistically modifying photos.
Healing tool (H): Specialized tool for removing small blemishes in photographs.
Perspective clone : Advanced tool for cloning parts of an image into a plane different to the screen. Could for example be used to clone a face-on image of a window onto a wall seen from below.
 gimpsetup008.jpg
(Blur/sharpen tool, smudge, burn/dodge tool)
Blur tool (V): Used to soften or sharpen coloured edges and blend colours together.
Smudge tool (S): Mimics the effect of putting a finger in paint and pulling it away. A powerful tool for painting with faster effects than the blur tool, but dangerous for a newbie if not used with care since the image easily can be smeared and look messy.
Dodge/burn (Shift + D): Selectively darken or brighten the area you paint.
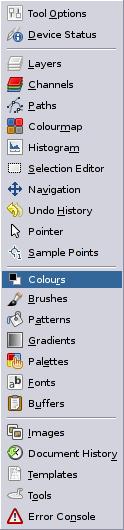
Customizing the interfaceOne thing the default setup might not have is an easy way to select colour. If yours do, you don't have to do this next step, but it's useful to know how to do it anyway. See that little arrow in a square to the right and just below the toolbox? That is the tab menu and all docks have them. Click it. From the small menu choose "Add a tab". The following menu appears:
 gimpsetup009.jpg
Select
Colour from the menu.
 gimpsetup010.jpg
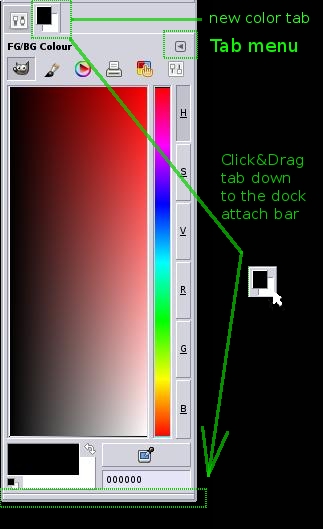
A new tab appears next to the tool options tab, containing the colour chooser. We don't want to have to click back and forth between this tab and the tool options though, so let's attach it as a separate dock below instead. As seen in the image, click and drag the tab down to the bottom of the dock and drop it on the horizontal bar. The two attaches, with the colour picker below the tool options, like seen in the next image:
 gimpsetup011.jpg
If you should "miss", the colour selector will appear in a separate window instead. If so, just click and drag from the area where the tabs would have been (next to the tab menu arrow), in the same way as before.
Here is an animated GIF showing the basics of GIMPs drag&drop interface (courtesy of Saulgoode).
You can combine windows and docks in any way you want. For now, read on though, we will do some more of this further down.
Adjusting GIMP's preferencesBefore actually getting down to using the program (don't worry, it will come!), let's quickly check some basic things in GIMP's preferences to make things more useful. We will only do some basic things here, look in gimp's manual on preferences for more detailed info:
http://docs.gimp.org/en/gimp-pimping.ht ... efs-dialog.You access the Preferences through the menu
Edit->Preferences.
 gimpsetup012.jpg
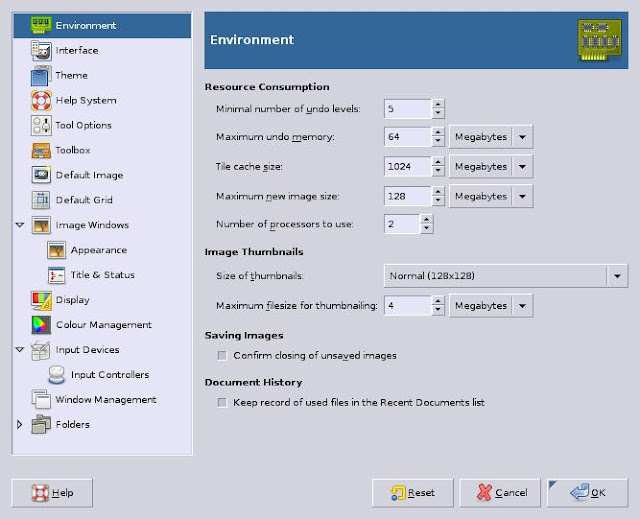
The
Environment setup regulates many performance hogs of GIMP. The "Tile Cache" is especially important, but what you set it to depends on how much RAM memory your computer has and how many programs you run next to GIMP. If you set it higher, GIMP will be able to work larger images without slowdown, but will hog more resources. The defaults are probably good to start with, but if GIMP is behaving sluggishly on your system, this is a good place to start
looking.
 gimpsetup013.jpg
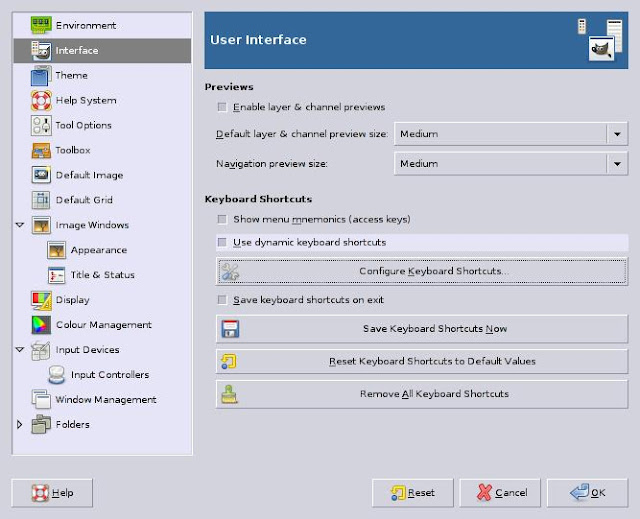
In the
Interface menu, you can customize how gimp behaves. You want to activate "Use Dynamic keyboard shortcuts". This allows you to quickly assign keyboard shortcuts to any menu item, simply by highlightening them in the menu and pressing the key(s) you want. Very useful. Also the "Save keyboard shortcuts on exit" is useful.
Click the button "
Configure Keyboard Shortcuts..."
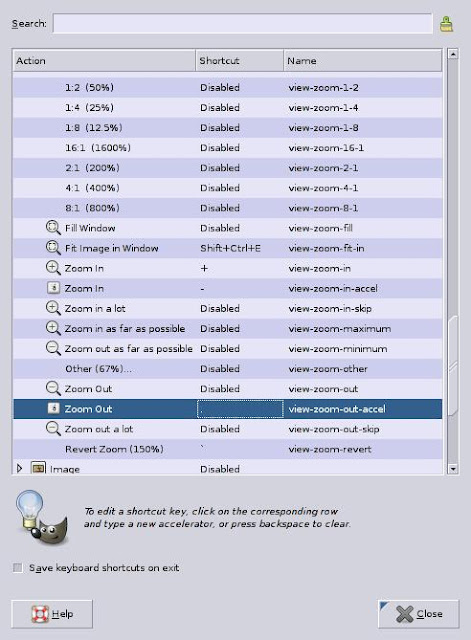 gimpsetup014.jpg
Let's, as an example, change the default keys for zooming in/out. It's nice to have these two buttons next to each other on the keyboard. Go down into the "View" menu and find the "Zoom in" and Zoom out" entries. Click on them and assign the key "-" to Zoom in and "." to Zoom out. There you go. Leave the menu and press "Save Keyboard Shortcuts Now" to make sure it is remembered. There are many useful keyboard shortcuts you will want to assign. You can find a list of all default shortcuts
[here].
 gimpsetup060.jpg
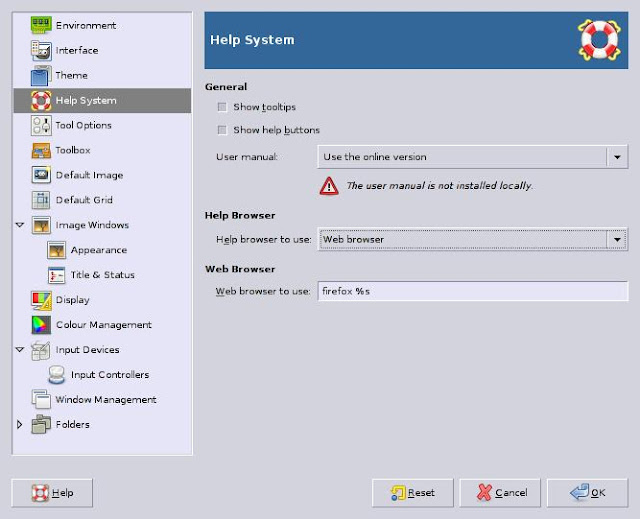
The
Help System sets up GIMP's online help. The help files are distributed separately from the main program since they are quite large. You should be able to find them from the same sites distributing your GIMP version, otherwise they can be found from <!-- m -->
http://www.gimp.org<!-- m -->. If you have it installed locally, GIMP will tell you. If not and you have internet access, you can use the online help instead by setting this up either with using GIMP's own browser or a browser of your choice. Press the
F1 key to access the help system, or
Shift+F1 keys to get a question mark you can click on things to get help on them.
Important Note: As of writing (Oct 2008), some users have reported GIMP crashing when trying to use the Help system under Windows GIMP. Crashing means you can loose your work. So be careful with this feature, and if you have trouble, stay away from it until it has been fixed. 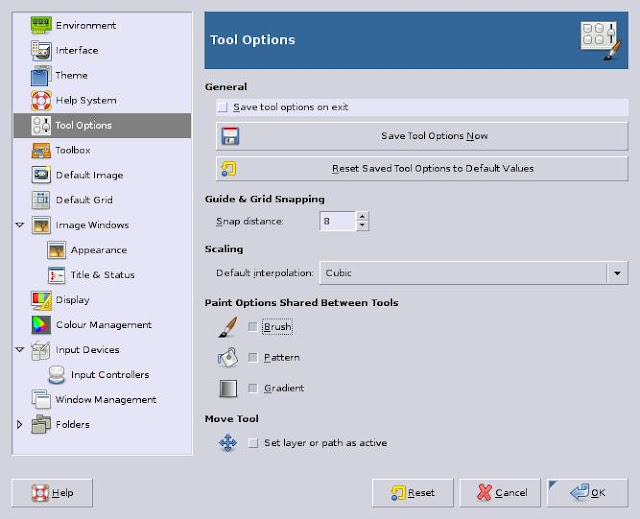 gimpsetup015.jpg
The main thing to check in the
Tool Options section is if you want the tool options to be saved upon exiting GIMP. This allows for keeping the last setup you worked with, good when continuing on an image after a break. But there are also advantages to starting "fresh" every time, it's up to you.
 gimpsetup019.jpg
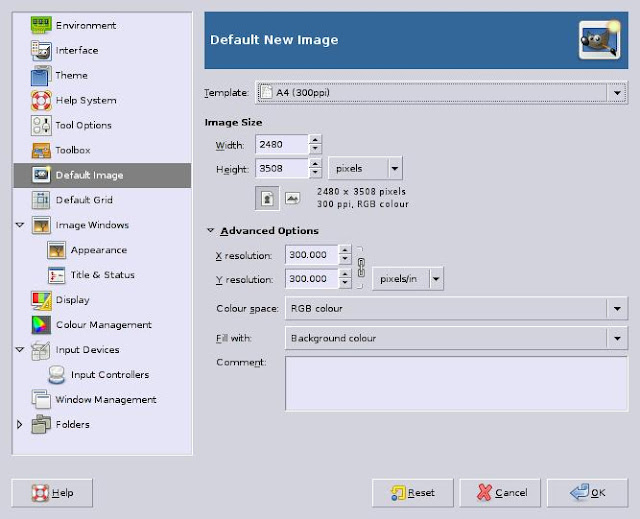
The
Default Image setup is merely a convenience thing, it gives you a default setup when starting a new image, you can change it any way you want later anyway.
 gimpsetup020.jpg
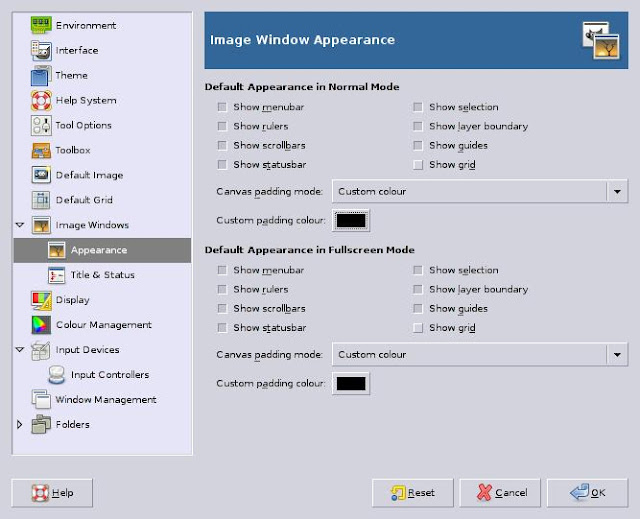
Image Windows: Appearance: GIMP works either in "Normal" mode or in "Fullscreen" mode. Fullscreen is activated by pressing
F11 on your keyboard and only shows the image without the interface. It is useful for painters who don't want to be disturbed by the user interface, or for multiple-screen users (if you use two screens, the fullscreen canvas only takes up one screen and the interface can remain on the other). Apart from the many ways to customize the Appearance of each mode, you might also want to change the "Padding colour". This is the colour of the area appearing around your image (the area you cannot paint on). Many prefer a darker colour, but it's a very personal thing.
 gimpsetup021.jpgColour management
: If you don't know what this is and don't have a properly configured monitor profile you should probably turn this off until you find you need it.
 gimpsetup022.jpg
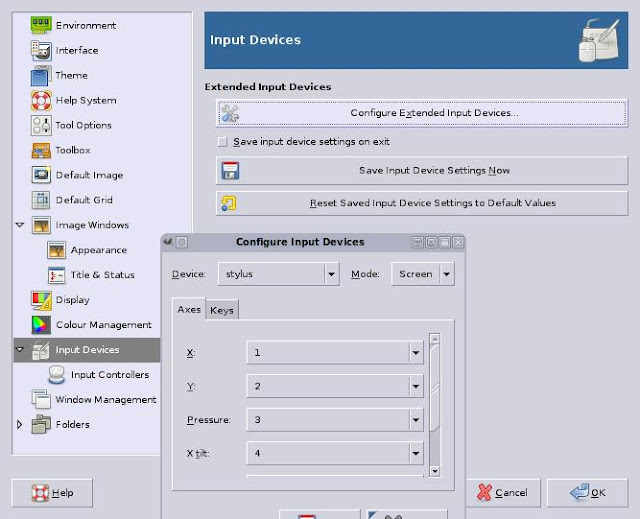
The
Input devices setup controls the eventual extra hardware you have, especially graphics tablets. Troubleshooting and setting up tablets with GIMP is described in
[this] tutorial.
 gimpsetup023.jpg
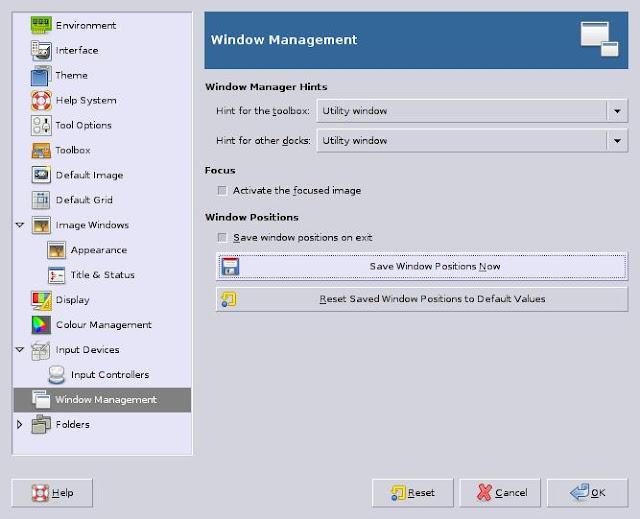
In the
Windows Management setup, set the "Save window positions on exit". This will allow you to define it once and for all and have the windows appear in those places every time you start GIMP.
Below are some examples of GIMP window setups: gimpsetup024.jpg
The main dock window was expanded to fill the empty area. Tool docks are on the left and the rest on the right. This is a rather popular setup.
 gimpsetup025.jpg
 Here all of the interface has been collected on one side of the image window. This has the advantage of having things in the same place, it is also very useful if you have a wide screen or dual monitors (in the later case the interface could go on the second monitor).
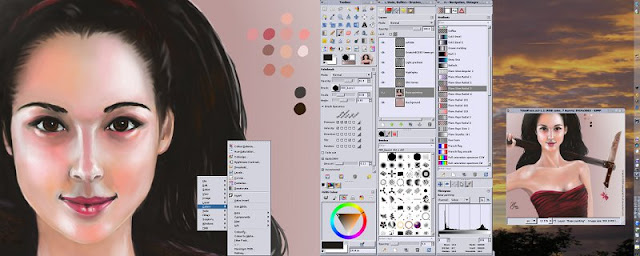
Example of my own heavily customized interface to show the flexibility. This setup is set up specifically for digital painting and sports three separate dock windows with several tabs visible. It allows for rapid access to all common features, but takes up a lot of screen area, which is why dual monitors is necessary for this setup. It is not recommended for the beginner.
 gimpsetup026.jpg
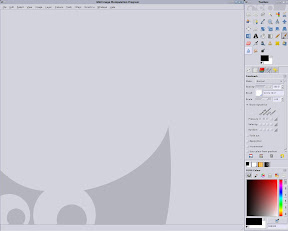
This setup gives maximum area for the image while making away with one of the dock windows completely. All the functions in the other window were moved into tabs. This reduces visibility a bit, but the gained screen area is usually worth it, especially if you have a smaller screen.
We will use this setup for the sake of this tutorial. Try to replicate it if you want to follow the tutorial easily. You can always customize it more to your liking later.
After adjusting the interface, return to the Preferences->Windows Management and choose to save the positions of all windows so they will come back up the same way when restarting GIMP.
Adding new things to GIMP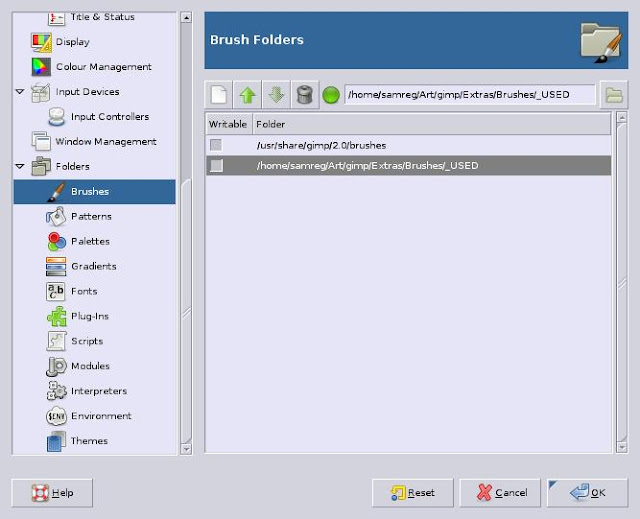 gimpsetup027.jpg
This is a very common problem for Newbies. GIMP comes with only a very limited selection of brushes, patterns etc out of the box. How to add more?
This is the last entry in the preferences dialogue:
Folders. This is
where GIMP looks for stuff it can use.
Let's, as an example, add a new brush to GIMP.
Go to the brush folder setup. The first line lists the location of GIMP's default brushes. You could put your own brushes in there too, but it's much cleaner to do it in your own directory -- if nothing else because they will not be affected no matter what future GIMP installers do to the default directory.
Press the "New" button to add a new, custom folder for your downloaded brushes. Use the file browser to navigate to a suitable place on your hard drive (Windows users would probably use "My documents" or something) and create a new folder there, named, say, "GIMP-brushes". You should now have two entries in the brush folder list -- your default brush folder (if you remove this you will loose your default brushes) and a new folder of your own choice.
For GIMP to recognize new folders, you need to shut down and restart it. Do so now. It is also a good time to check that the windows still pop back up the same way you want. (You
only need to restart GIMP when adding new folders by the way, you don't need to do it when adding new brushes to those folders in the future).
Go to your web browser and download a brush for testing. You can get whichever GIMP-compatible brush you want, as an example you can get my Rake-tool brush (go to the page and click Download):
http://griatch-art.deviantart.com/art/G ... s-77541538Save the .zip file to your new "GIMP-brushes" folder and unzip it using whatever archiver program you have (Windows users can use Winzip). The file contains several brushes (GIMP brushes have file names ending in gbr or gih).
 gimpsetup028.jpg
Back in GIMP, click the little "reload" button at the bottom-right of the brush editor. The new brushes are loaded! They appear a bit down in the list, but they are there. We will not use this brush in this tutorial, but at least you have it in case you want to experiment with it in the future.
You can add other resources to GIMP, like Patterns, Gradients and similar in the same way.
Make your first GIMP image!Ok, so finally we are ready to start actually
doing things in GIMP! We will create a simple little drawing that anyone can do with minimal effort. This is not intended to show off the full power of the system, but only to give you a chance to try out some useful tools for yourself under a controlled environment.
One of the most useful keyboard shortcuts you'll ever find in GIMP is the all-powerful Undo,
Ctrl+Z, (also reachable from the menu
Edit->Undo). This cancels your last change. Press again to negate also the change before that. How long you can go back depends on your memory and setup.
Ctrl+Y (
Edit->Redo) will get your changes back again. With Undo and Redo you can step back and forth in your history of changes as you wish. Keep these commands handy at all times, you will not regret it.
 gimpsetup029.jpg
Use the menu
File->New to get the above dialogue. Create a 800x600 pixel image. A large empty white canvas should pop into existance in your main dock window.
 gimpsetup030.jpg
Choose a hard and round brush from your brush list (we will not be using the brush we downloaded above in this tutorial).
 gimpsetup031.jpg
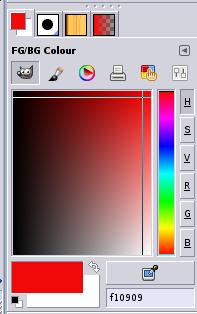
Go to the colour selector and pick a bright red colour. Play around a bit so you see how you select colours you want. There are also several types of colour selectors using different ways to represent the same thing. Different people prefer different things.
 gimpsetup032.jpg
Choose the
paintbrush tool. You use the left mouse button to draw on the canvas using the selected red colour. Use
Ctrl + Z (or menu
Edit->Undo) if you want to take back your changes.
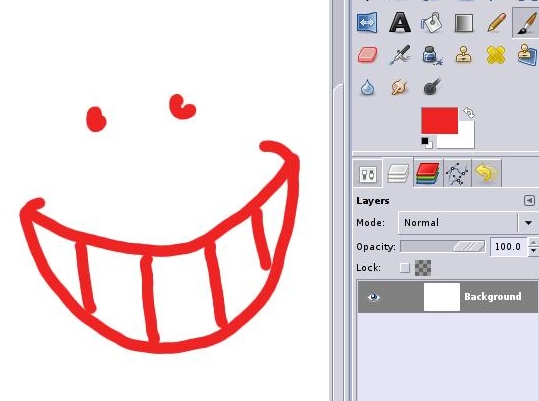
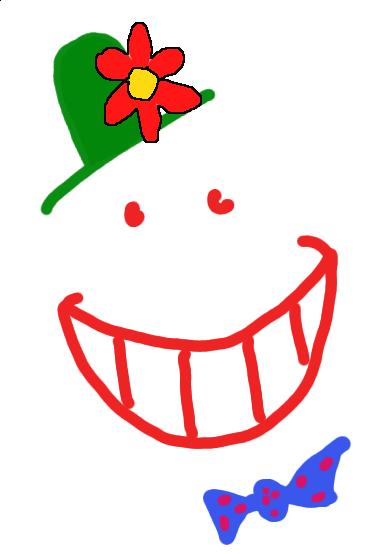
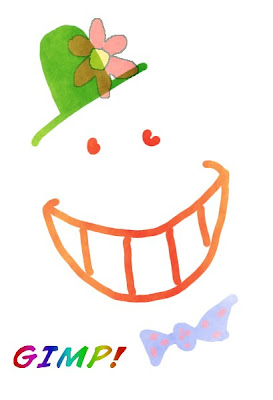
Draw a smiley face, use my example as a template. Place it off on the right side of the canvas and make sure there's plenty of space above and below it (we will add to it later in the tutorial). This is a simple image anyone should be able to complete with a little trying.
Look at the Layer list and you shall find there is now a
layer in it, called "Background". This particular layer was filled with
white (this was defined in the "Advanced" part of the New image dialogue that we didn't bother changing). We have drawn our smiley face on that layer. We could continue to work on this layer as much as we wanted, but let's add a new layer, for training.
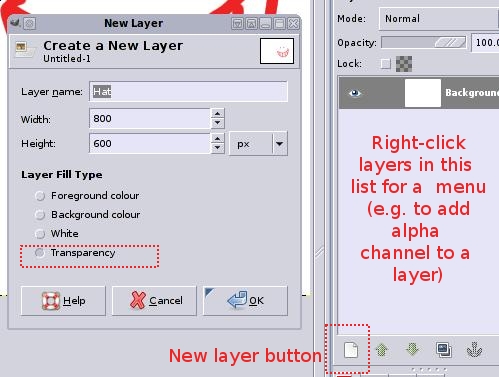
Click the "New layer" icon at the bottom of the Layer list (it's marked in the image below).
 gimpsetup033.jpg
A dialogue pops up. We will add a hat to the man, so let's name the layer "Hat". Make sure its Layer fill type is set to "Transparency".
Note: In the image above there is a mention of the layer menu you get by right-clicking layers. We will not be using that in this tutorial, but you should know it's there because it allows you do many useful operations on your layer(s), such as merging them or allowing them to become transparent ("add alpha channel"). Almost all docks in GIMP have hidden right-click menus like this by the way, check it out for yourself).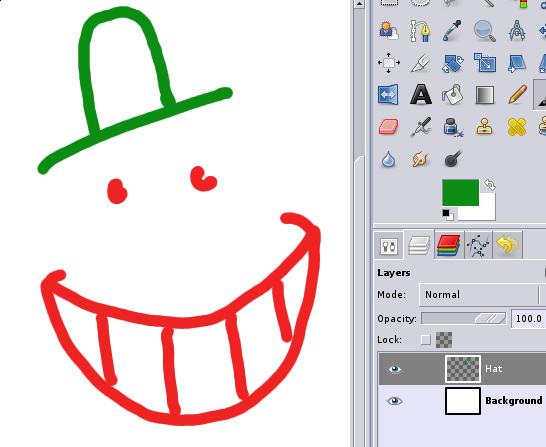 gimpsetup034.jpg
Your new layer appears above the old one in the layer list.
Make sure your new layer is selected. Pick a green colour and use the Paintbrush tool to make a simple hat. Make sure it is not filled, we will try another tool to do that next.
Transparent layers work as if you were placing a plastic transparency over your image -- you can see underlying layers through it, but you cannot affect layers below. Try for example to erase some of the red smile from this layer, and you'll see you cannot. This is very useful for separating work and also many other things.
 gimpsetup035.jpg
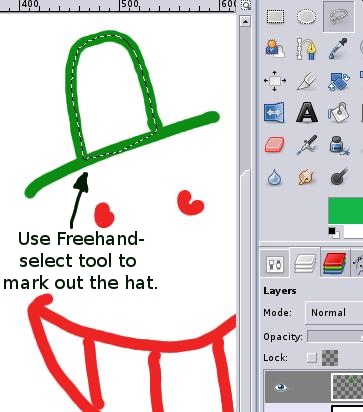
Next we will try out our first selection. Make sure your "Hat" layer is selected and go to the
Freehand select tool (also known as the "lasso"). Use the lasso to mark out the inner "hole" of the hat. Stay inside the green.
Note that if you cheat and just use one of the region-select tools to select the white area inside the hat, you will likely get problems with the inner edge of the hat (this shows quite clearly in the final result). So do try to do this step with the lasso, for this tutorial at least. It's good practice.  gimpsetup036.jpg
Switch to the
bucket fill tool. Check out its tool options and make sure it is set to "Fill whole selection". This will make sure our bucket fill will only affect that area we just selected.
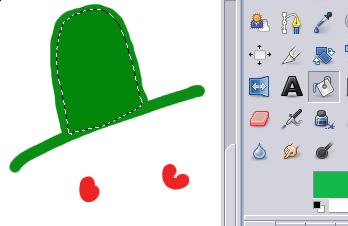 gimpsetup037.jpg
With the same green as before selected, click with the bucket-fill tool inside the selection. It fills with green.
Now get rid of the selection by the menu Selection->None (or Ctrl+Shift+A).
 gimpsetup038.jpg
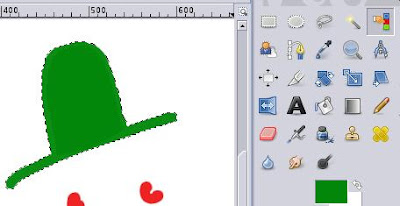
Next, let's use the
Colour select tool. This tool selects similar colours. Click on your green hat with this tool and the entire hat should be selected.
We want to rotate the hat a bit, it's not really positioned where we want it (no it really isn't, promise!).
 gimpsetup039.jpg
Select the
Rotate tool and click with it inside the selected hat. You will get to rotate it. It should be easy to figure out. Just remember that if your windows manager does not behave right, the rotate window could end up behind your image if you click in the image again. If so, just bring it forth again, it is not gone. Rotate the hat a bit, don't overdo it. Press "Rotate" or Return to finish the operation and actually rotate the hat.
 gimpsetup040.jpg
After the rotation is complete, take a look at your layer list. A new layer has appeared! This is a "Floating selection layer".It contains only your rotated hat and is a temporary thing; you cannot select any other layer while this layer is there.
Select the
Move tool (make sure the Move tool's Option is set to "Move active layer"). Move the hat around a bit to try it out and place it better. Next find the little Anchor at the bottom of the Layer dialogue. Pressing this will merge the floating layer back into the Hat layer and everything will be working normally again.
(Advanced note: Using any selection-type tool with the floating selection will have it act as a move tool when over the hat while clicking the tool outside the hat will directly anchor it down. This is a faster way to work.)
 gimpsetup041.jpg
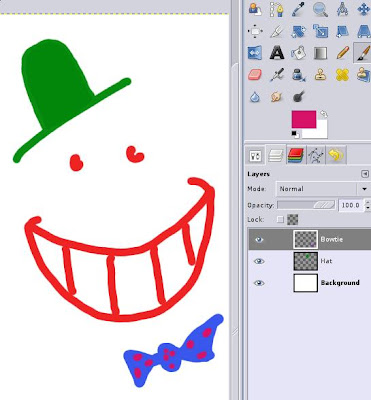
Create a new transparent layer named "Bowtie" and paint a simple blue bow tie on it. Put some red dots on it too, for good measure. You should know how to do these steps by now!
 gimpsetup043.jpg
Notice that the image canvas is a lot bigger than the area we actually use for the smiling guy? Let's cut it down to size. Select the
Crop tool and cut away the non-used white areas of the image. You will find that you get handles that allows you to adjust the crop. Click in the selection or press Return to finish and actually crop it. Cropping is very useful for images of all types.
 gimpsetup044.jpg
Let's add one last thing to our smiley -- a flower in his hat. Use the "bowtie" layer for this (you can rename it to "bowtie+flower" layer if you are feeling picky) -- it's just a yellow blob surrounded by red blobs, very easy to do with the paintbrush and the same brush which we have used all the time.
Use the
Magic wand to select the red flower petals. Before we used a selection to fill it with green. Now we want to
use the lines of the selection itself instead (we are only scraping on the surface of uses for selections, of course).
Choose a black colour from the colour selector.
Go to the menu
Edit->Stroke Selection.
 gimpsetup044.jpg
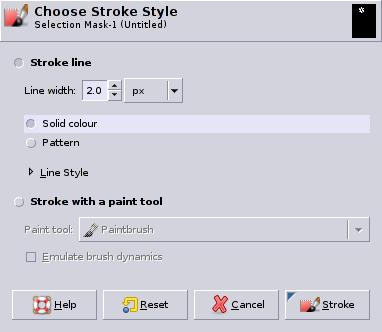
You will end up in the
Stroke style dialogue. This function allows you to trace the lines of your selection with colour, in this case black. Select
Solid colour and a line width of 2.0. Press
Stroke to finish, and then use the menu
Selection->None to get rid of the selection.
 gimpsetup046.jpg
Hey Presto! We just stroked the outline of that flower with black, and that without actually tracing it by hand -- the selection tools did all the work.
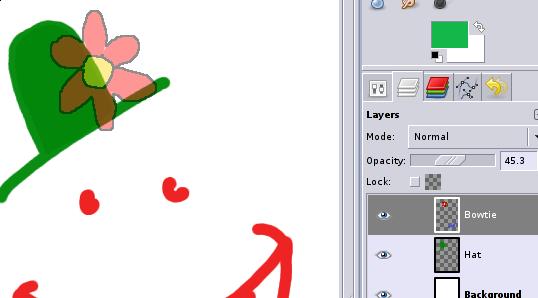 gimpsetup047.jpg
Have your your "Bowtie" layer selected. Notice the little "Opacity" slider above it? Why not play with that slider a bit? This changes how much of the layer's colour actually is shown -- it changes the transparency if you will. Play around and see how the hat shines through the flower, as if you had a glass plate above it. Note that also the bow tie becomes less visible since it's located on the same layer as the flower (but there's only white behind the bow tie so it's not so apparent). Set the opacity value of the "Bowtie" layer to around 50%.
 gimpsetup048.jpg
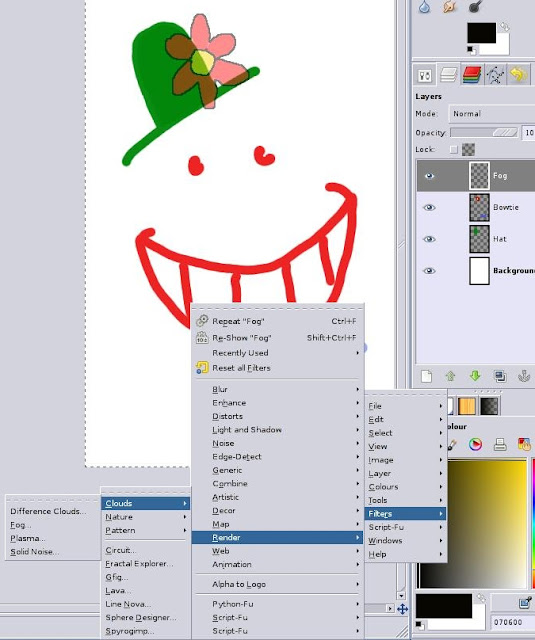
Now, let's try to use a
Filter with our image. Filters are semi-automatic functions that change a layer, part of a layer or the entire image in some way (how depends on the filter). GIMP comes with a wide selection of Filters, but more can be added as well.
Stay on the "Bowtie" layer Go to the menu
Filters->Render->Clouds->Fog.... This will open the controls for a filter function, in this case a function that creates a new layer filled with "Fog".
Note: If you didn't install GIMP with Python support, GIMP does not have the Fog filter (Linux users usually have this from the onset, Windows users can check out the package mentioned above, Mac users have to install it normally). If you find this to be the case, do the following instead:
- Create a new transparent layer at the top of the layer list, named "Clouds". Make sure it is your active layer.
- Use the menu Filter->Render->Clouds->Plasma... (instead of the Fog function).
- Accept the default settings in the Plasma requester.
- You will end up with a similar effect as seen in the tutorial, except it's a rainbow-coloured "fog" and it will hide all of the image.
- Lower the opacity of your "Clouds" layer so you can see the smiley clearly through it.
- Skip the next section and then continue as normal from there.
 gimpsetup049.jpg Skip this section if you do not have the Fog filter (e.g. on some Windows installs)
Name the layer to create "Clouds" (this is the default) and choose a yellowish colour. Keep the rest as it is, you can experiment more with the settings on your own later.
 gimpsetup050.jpg
Some "Fog" was added (If you used the "plasma" filter instead, this fog will be multi-coloured, that's as it should be. The following will work the same even though it will not look exactly the same). You should have a new layer named "Clouds" in your layer list. You can play with its opacity to have more or less of the fog to show.
... Now, have you noticed the alluring "Mode" button just above the Opacity slider in your layer list? This controls the
Layer mode. Layer modes affect how the layer is applied to those under it. For example, the
"Multiply" mode multiply the colour values of each pixel together, whereas the "Addition" adds them together. Play around a bit! If you want details on what the layer modes do, you can find it in the gimp manual
[here].
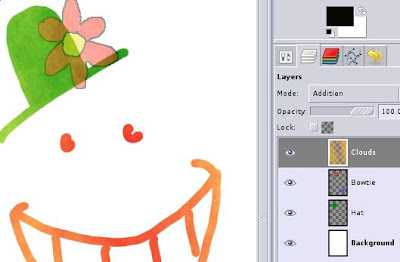 gimpsetup051.jpg
By using the "Addition" mode, the white background is not affected (this is due to white already being "maximum" colour, so adding to it will still remain white). Only the lines of the mouth will get a nice shading to it. You can surely find other cool combinations, but let's go with that for now.
 gimpsetup052.jpg
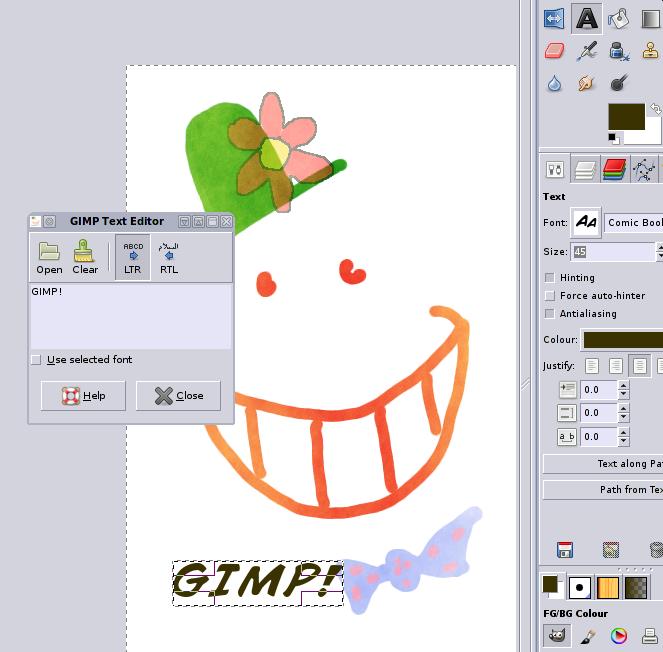
 Let's try to round this up by adding some text. Choose a black colour. Use the
Text tool (duh) and click in your image (you can do this on the "Bowtie" layer if you want, the text tool will create a new layer anyway so it doesn't matter).
Write "GIMP!" in the text editor, then close it. Here I've used a font called "Comic Sans" which was downloaded off the web. Use any of the standard fonts if you want, or add new fonts to GIMP in the same way as you added brushes above.
 gimpsetup053.jpg
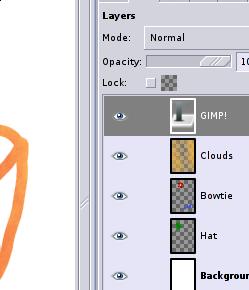
You will find a new layer has been added to your image. This is a special type of layer, a
Text layer. Text layer means that you can use the text tool to re-write the text in this layer in a normal way using the keyboard -- as opposed to an image layer were you would have to use the eraser tool to delete the text.
 gimpsetup055.jpg
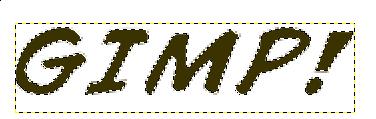
Go to the text layer and select the text with any of the techniques you have learned up to now. The Colour-select or Magic wand tool work well for this.
(Bonus hint: There is an extra way to select that is very suitable for text layers. Right-click the text layer in the layer menu and a menu will appear. Choose "Alpha to selection" and your text will be selected.)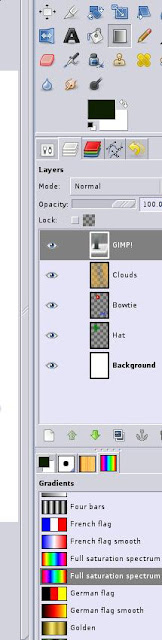 gimpsetup054.jpg
 Select the
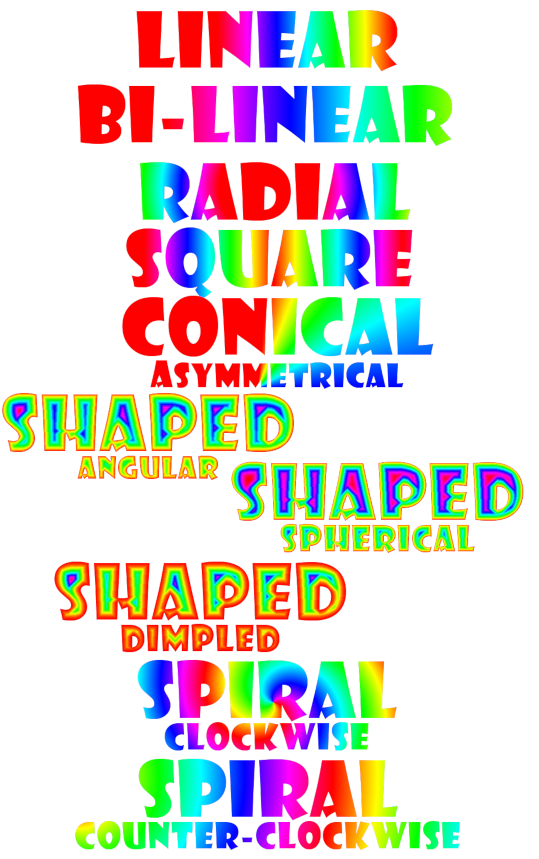
Gradient Fill tool (it was described among the other tools earlier). Find the tab containing the gradients and scroll down the list to the rainbow-looking "Full saturation spectrum".
Making sure you have the Text layer active, and the gradient fill tool selected, click and drag horizontally from left to right over the text you just selected, then release.
 gimpsetup056.jpg
Some nice text-colouring appeared! Do
Selection->None to get rid of the selection and admire your handy work. Note that after you filled the text the Text layer has been converted to a normal Image layer. This means that you can no longer edit it with the text editor, GIMP only sees the text as any image. This is unavoidable whenever you perform any graphical operation in a text layer.
We are done! Now for the last important step -- saving this effort, and doing so in a clever way. In this tutorial we only do it at this point, but when working on a real project you should take for habit to save often, just to be on the safe side.
Press
Ctrl+S or use the menu
File->Save. The following dialogue will appear:
 gimpsetup058.jpg
Save your image by locating a place on your harddrive, then enter a file name ending in .xcf, e.g.
gimpsetup.xcf.
Always save your work as an .xcf image. This can not be emphasized enough. XCF is GIMP's native file format and will retain your layer structure and settings (all except the undo info) so you can continue working on it at a later stage. Formats like .jpg and .png will not save this info, so you will have big trouble if you ever wanted to change that flower without modifying the hat, for example.
However, few other programs besides GIMP understand .xcf. Browsers don't, for example. So what do you do if you want to show your masterpiece on the web or send it to the printers? The answer is simple -- export your image.
Select
File->Save a Copy. Pick a new file name, this time with the extension .jpg. Using
Save a Copy is better than using
Save As since you will still be working on your .xcf image when done exporting (and using
File->Save will thus continue to save to the .xcf).
Save As switches your current work session to the new image name (so
File->Save will save to the .jpg file from then on, which is probably not what you want). So keep exporting with
Save a Copy unless you know what you are doing.
Other suitable formats for internet use are PNG or GIF. Read GIMPtalk's
FAQ for help on image formats.
 gimpsetup059.jpg
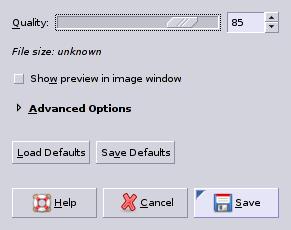
 This is the requester you get when saving as .jpg (also called JPEG). You will get asked if you want to "flatten" the image. This means all layer info will be lost. It's ok since we have our .xcf safely stored away. Accept.
 gimpsetup059.jpg
Select a jpg quality. 85% is a pretty good balance between quality and file size, but for using your work for stock images and the like, 90% or more could be needed (
Note: choosing jpg at a lower quality is good for making files small and easily uploadable to the web. But if you want high quality, don't save as a 100% jpg image. A PNG image is higher quality and takes much less space than an jpg at 100%.). Save and you now have a copy of your image you can easily share with everyone ...
... Like I'm doing right now!
To finish the tutorial, reply to this post with your own smileys! Welcome to the world of digital art!
(If you don't know how to make images available on the web, see
[here]. You need to supply a thumbnail if you want me to be able to add you to the "hall of fame" at the bottom of this post).
Where to go from hereObviously one can only scrape the surface of a complex application like GIMP with a first tutorial like this. Depending on what you want to do with it, different things become important for you to know. But hopefully you now have something to start from.
Further reading: Essential GIMP TutorialsGIMP Chat's Tutorial IndexThe GIMP user manual (in many different languages)GIMP Help Glossary.. and of course, once you hit a snag,
GIMP Chat's help forums are just a click away.
Offsite ResourcesGIMPtalk's Official tutorialsGIMPtalk's User tutorialsDeviantArt GIMP brushesSetting up GIMP for digital paintingCreating a simple Animated GIF (animation)GAP for GIF (animation)GAP-very simple tutorial (animation)Griatch


