Setting up GIMP for Artistic Work
This tutorial will tell you how to configure GIMP to be more intuitive for artistic work and finishes with you creating a nice little artistic painting. It has been rewritten extensively to also take advantage of the new features of GIMP2.4.x and higher. This tutorial don't assume much previous knowledge of GIMP, but it's not for those using the program for the
very first time. You at least need to know where things are. If you are new, you should start with the
[Beginning GIMP] tutorial so you have the basics. That tutorial will also tell you how to adjust GIMP's interface to best suit you. You want to be able to focus as little as possible on GIMP, and as much as possible on your art after all.
This tutorial is divided into several parts, as follows:
1) Setting up keyboard shortcuts in GIMP for easing artistic use This little section gives you some hints on setting up your work environment to ease artistic use.
2a) Setting up the artistic tools -- some useful brushes. This section helps you create some basic but extremely useful default brushes you'll often want to fall back on. It also explains what advantages these brushes offer over brushes you modify with the brush scaling feature of GIMP2.4. These are what we will use in part 4.
2b) Setting up keyboard shortcuts for brushes Here we configure GIMP to allow you to modify the size and other features of your brushes with a keystroke.
3) Setting up the artistic tools -- about the tools themselves. This section details the various paint tools of GIMP and gives some advice on what tool settings you could start out with. Obviously it is up to your personal style and experience what you will prefer to use for your own work.
4) Starting out with artistic use of GIMP. In this last section we make practical use of our new setup by learning how to paint with the powerful airbrush tool. This section is very useful for anyone starting out doing art on the computer, especially if you are using a mouse. By doing a series of small exercises you should gradually get used to the tools and finally you end up doing a simple and fun drawing project to create a dead tree. Many have tried this over the years and had a lot of fun with it, so don't be shy to post your result!
This tutorial is especially suitable for you who is drawing with a mouse, and doing the exercises herein will hopefully help you getting better at drawing free-hand with the mouse (there are hints for tablet artists as well though). This is unfortunately not something you can just learn a "trick" for, you have to train it like any form of art. I have worked with the mouse in this tutorial to show that you don't require a drawing tablet to achieve nice hand-drawn effects. I use GIMP under Linux Debian but the windows choices etc should work the same under Windows and Mac. The images where taken using GIMP2.2.13, but even though things might look a little different in later versions of GIMP, the methodology is the same and you should still be able to find your way without any trouble. 1) Setting up keyboard shortcuts in GIMP for easing artistic useA critical thing in GIMP art making is learning to use the keyboard shortcuts. GIMP is very powerful in this regard -- it's easy to assign any keyboard combination to any common function you use.
Make sure you have
Preferences->User Interface->Use dynamic shortcuts selected, then you can just highlight any menu option and press the key you want to use for it. Don't be afraid that you're overwriting some default shortcuts -- a guideline is that if you don't know that shortcut
now you won't be missing it later either (and if you do you can just assign a new shortcut). You can find a list of all GIMP's default shortcuts in this
|list| on gimpusers.com.
The idea when setting up keyboard shortcuts is that you don't want to have to move your "painting hand" away from the drawing more than absolutely necessary. Most default ones are ok already, but if you change anyone, go for shortcuts you can press with only one hand (no three-finger combinations across the keyboard).
You also don't want to click on more icons and buttons than you want to -- your cursor should stay on the canvas as much as possible. So if you don't know the shortcuts for the basic tools, you'd better learn them now. You'll be glad you did. Very useful shortcuts for this tutorial are (by default)
a for the Airbrush and
Shift+E for the eraser. You'll also be helped a lot by knowing
Ctrl + left-click for picking an existing colour from the canvas (this means you don't have to go to the palette). I also recommend learning or even changing the default shortcuts for the Zoom in/out so you know where they are and are placed next to each other. Other critical shortcuts are
Ctrl+a and
Ctrl+Shift+A for selecting/unselecting all (very useful if you suddenly don't seem to get any results when painting, this often is because of a mistaken selection somewhere), and
Page Up/down to switch between layers. There are many more, but that's up to you and depends on your personal preference.
For more details on specific tools useful for digital painting, continue on to the next sections.
2a) Setting up the painter's tools: Some useful brushesA
parametric brush is a brush that is described by a mathematical formula, not an image (also called a "vector brush" in some places). They are created using GIMP's inbuilt brush editor. What we want to do is to create a bunch of useful defaults then set them up so we can rescale them on the fly, using a keyboard shortcut.
If you have GIMP2.4 or later, there are two ways to rescale a parametric brush using the keyboard. The first thing is to change the "Parametric brush size" (which changes the brush itself) and the second is to change the "brush scale", which is a slider in the tool options and rescales any brush to a multple of its original size.
We will set up our parametric brushes to use the first method, as there are two main advantages to it:
- As you rescale the parametric brush you will see it change its size directly in the brush list. This is more intuitive and you will easily see which size you have selected. You do not see this with the brush scale feature.
- The parametric brush resize is unique to each brush whereas the brush scale is only unique to each tool. This means that you can change the size of a parametric brush, leave it and come back to find it still having the same size regardless of if you resized other parametric brushes. In the case of brush scaling, when you change the scale of one brush you change the scale of them all. So if you e.g. scale down a huge brush with the Scale feature and then flip to a brush that started out smaller from the beginning, you might find that you can't even see it anymore.
However, the major disadvantage of parametric brushes is that they can only take simple geometric forms (circles, squares etc), so for more complex brushes, brush scale is the only viable option ... But for most digital painting simple geometric shapes are actually often more than enough. Despite having hundreds of brushes in my brush folders, the simple round hard brush is still the one I use the most. A range of parametric brushes are great to have for any artistic use, just like regular painters always need to have some basic brushes lying around no matter how advanced they are.
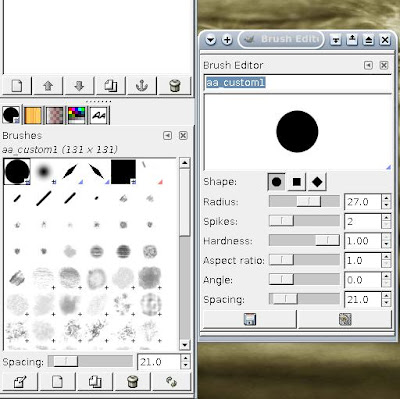
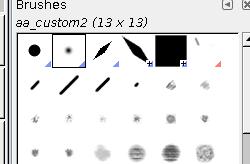
You cannot make the existing default brushes rescalable, you have to create new ones in the brush editor. So first choose to create a new round brush with the Brush editor. Make one with maximum hardness. The actual value of the "Radius" is not so important here -- this you will be able to adjust with a keyboard shortcut. This brush is by far my most often used brush, and coupled with changes in opacity and using various tools it can be used for practically any effect if you only have a little patience.
The brush list is ordered alphabetically. The brushes you create now will likely be your standard brushes in the future, so save them with names starting with aa, so you know it will end up at the top of the list. I saved this first one as "aa_custom1" (if you have many brush sets loaded, you might have to use something like "000_custom1" instead to make sure you end up at the top of the list).
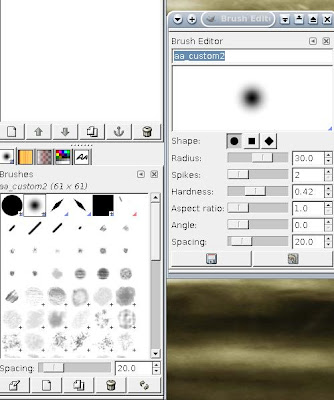
Next create a fuzzy brush by decreasing the hardness value. This is an excellent brush for applying all sorts of effects like smoke and fog. It can also be used very effectively with airbrush or the smudge tool to create perfect colour blends. Save this as aa_custom2, and it will end up next to your first brush.
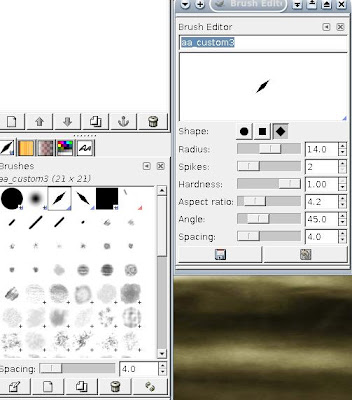
It can be useful to have a "caligraphic brush" of variable size. Generally the ink tool is better for actual calligraphic work (since 2.4.x the Ink tool can also be resized by keyboard control if it's set up in the preferences). This brush is useful for situations where you need to draw a sharp oblique angle, something which can be hard to do even with a small round brush. I actually have two such brushes, angled differently (angled 45 and 135 degrees respectively). Name them appropriately. You want to have a shorter spacing for this brush, to create a continuous line.

Finally, a square brush. This is very powerful for creating technical forms and structures, like houses, bulkheads and anything that should have a 90 degree edge or corner. Once again, the size (radius) doesn't matter, since the brush will be adaptable. Name it a good name, like "aa_custom5".
2b) Configuring the keyboard shortcuts for brushes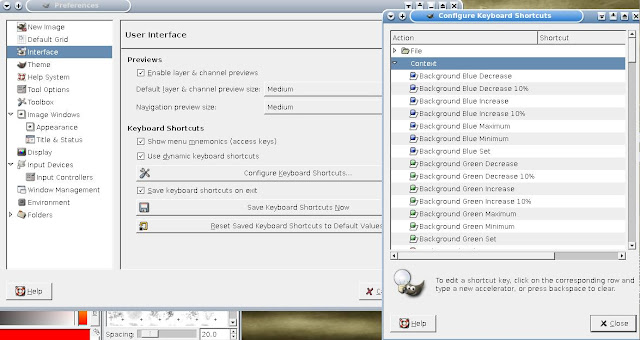
Now to set up GIMP to be able to adjust the brushes quickly. Go into the
preferences->Interface->Configure Keyboard shortcuts and choose the "Context" sub-list. This is the context-sensitive setup, which is rather unused in GIMP's default setup.
We begin by setting it so we can change the size of our Parametric brushes.
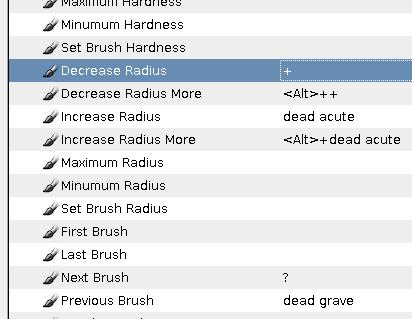
There are a lot of interesting settings you might want to add keyboard shortcuts to in this menu, but the ones we're interested in for now are the Decrease/Add radius settings.
Assign keys to these by just clicking the entry and then the key-combination you like. My choices are probably not what you'd want to use, since I have it set up for operation with the keys on my tablet. You want to assign keys to all the entries I show in this image. The increase/decrease radius changes the radius of the (user-created) brush by a very small amount, allowing for detailed adjustments. The "Increase/decrease Radius more" steps up in faster steps, which is also very useful sometimes. Finally, if you want precise control, you should use Increase/decrease Radius Relative instead. This adjust radius by percentage instead of fixed step. It is slower to change for small radii, but allows you to precisely tune your radius. Pick keys you think you can reach and use easily with
one hand -- that is, the hand you're not holding your mouse in (That is why my Alt++ combination is not suitable for you -- you'll need two hands to put that combo in on the keyboard -- unless you have a tablet with programmable buttons of course).
As mentioned, only parametric brushes can use the Increase/Decrease radius shortcuts, because such brushes are so simple of shape. If you have GIMP2.4 or later, other brushes need to be rescaled with the Brush Scale feature. Go to
Increase/Decrease Brush scale and assign shortcuts to them.
Another convenient thing is the "Next Brush" / "Previous Brush" entries, that allows you to flip back and forth in your brush list without actually moving your pointer over there to click on it. This command and the brush resize commands are, next to the zoom, probably the commands you'll use the most during freehand artistic work (is for me anyway), and you'll be hitting those buttons all the time. So make sure you pick keyboard shortcuts that suit you.
Extra hint for GIMP2.4 and later: Newer versions of GIMP has keyboard shortcut entries in the 'Tools' section called "Increase/Decrease Value 1, 2" and so on. If you look at e.g. the tool options for the paintbrush you will see that the first slider is the "Opacity" one. Assigning a shortcut to "Increase Value 1" will change the opacity slider, or indeed any slider that happens to be first in the tool options of the tool you have selected. In the case of the paintbrush, "Increase Value 2" affects the brush scaling. This allows you to create very generic shortcuts, usable anywhere. Another useful shortcut is "Next Object 1,2.."etc. The first such "object" in the Paintbrush tool options is the selector of the currently selected brush. So using "Next Object 1" will flip through brushes, or any of the similar things that appear first. Worth experimenting with. (Thanks to Oion9 for pointing this out)
For drawing tablet users with command buttons and/or touch strip on the tablet: The buttons on the tablet usually work the same as "Ctrl", "Space", and "Alt" buttons on the keyboard (you can configure this separately for the tablet though). Assign these in clever ways to make GIMP do clever things when pressing those buttons (The "zoom" functions are neat to have directly on the tablet for example). If you have a touch strip too, assigning the strip to various button combinations can allow you to change brush sizes, brush types, zoom and even adjust RGB values without having to move your pen off the canvas. 
To make sure you can easily see the changing brushes, make sure "show brush outline" is selected in Preferences->Image windows. Also activate the crosshair ("Show paint tool cursor"). The reason for this is because if the brush resizes to becomes very small you might loose sight of it if you don't have the crosshair activated.
Remember to save your settings.
Try it out! Choose one of your self-made brushes and resize it up and down. Step through them with your new shortcut.
This setup will help you when using all common drawing tools that use brushes.
3) Setting up the artistic tools -- about the tools themselvesThe primary tools I use for digital painting are
airbrush, paintbrush, ink pen, eraser and
smudge. Other tools are used as well, but mostly in a supportive fashion, to add some particular effect or minor tweak. Below I will list each tool and what their main uses are. Note that I concentrate on the digital painting aspect here, these tools have many other uses for other types of art.
It is important that you have set up GIMP so that you will see the tool options for each tool as soon as you choose them (i.e. you should not have to double-click to get the options). Without this you will be working blindly.
For tablet users: The "Pressure sensitivity" section of each tool describes the result of pressing the pen down harder on the tablet. For normal use, all boxes are usable (Color is kinda specialized though since it translates the pressure into a position in your currently selected gradient so you might want to wait with that one). It's worth experimenting with (but we won't see any use for this in this tutorial.) The more boxes you have checked, the more involved the respective tool becomes and the more effects you can achieve (since it probably better emulates the real thing) -- but it'll possibly also become harder to handle. Temporarily flipping on/off especially opacity and/or hardness is often useful when wanting to create varying effects. 3a) Airbrush (default key "a")This is the tool we will concentrate on in the last section, so if you are only interested in getting started with the painting tutorial, just can just read through this and skip over the other tools.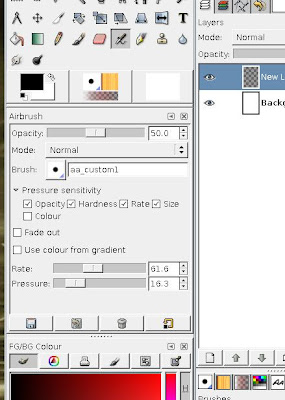
The real-world airbrush is a pen-looking device that holds colour in a little cup and pushes it as an aerosol through its nozzle by use of a stream of air from a compressor. The effect is in some ways similar to that you get from a spraycan, but a professional airbrush allows minute control of spray size and flow rate by tilting and turning a knob on the top of the pen. A notable master of the airbrush is
HR Giger.
While most think the airbrush should only create "fuzzy" shapes, this really comes down to how small the spray is and how much flow goes through it; it is capable of needle sharp lines if required.
In GIMP, the amount of colour flowing through the (virtual) device is controlled by the Rate and Pressure sliders at the bottom of the tool options. Choose some decent Rate and Pressure, use my values if you want. This is much a matter of testing out things. Go with my settings if you like. Note the 50% opacity set for the tool. This is a very useful setting and personally I never use the airbrush with any higher opacity than this (rather I'd go even lower, actually). Using the paintbrush with a fuzzy brush (like the one we created in the previous section) is a sure way to make the outcome really fuzzy.
The airbrush tool is excellent for colour blends of all sorts, but by varying the rate and pressure it can be used for essentially the same things as the paintbrush.
Paintbrush (default key ''p")Everyone has probably used a paintbrush at some point in the real world. It's one of the most flexible paint tools available and capable of creating any effect. Most classical art is done with different forms of paintbrushes.
In GIMP, the paintbrush behaves like a simpler form of airbrush and tends to put down more opaque colours. It is different from the Pen tool (which we will otherwise not cover here) in that it smoothes the edges of its strokes so they look even (antialiasing). If you ever want to do smooth transitions, it extremely useful to use the tool with a low opacity (50-70%).
The brush tool is powerful for creating structure and details in images, as well as in covering large areas in colour. Constantly changing brush type and size is often needed.
Ink pen (default key 'k')Whereas most think of caligraphic pens as the classical feather quill, the modern artistic ink pen is generally a metal nub which attaches to a generic wooden shaft. These nubs are cheap to buy and their shape and size vary greatly, from flat and wide to narrow to curved depending on what style of line is needed. They are dipped in ink and the ink will fill a hollow on the top of the nub, travelling down to the tip along a split in the nub tip.
GIMP's ink pen tool is in many ways far superior to the original since the control over nub and ink flow is so much more precise and problems like ink spill does not exist. The "Shape" in the tool options control the shape of the nub tip and how it is angled towards the paper. You can also set this to various shapes. The various sliders are of interest since they "dynamically" changes the angle, tilt and size of the tip, just like on a real pen. For a mouse user this is of interest, but rather unwieldly to change on the fly (In GIMP2.4 you can however assign keyboard shortcuts to all sliders from the
Preferences->Interface->Configure Keyboard Shortcuts->Tools menu if you are really serious about inking).
For tablet users: Setting the sliders will affect how sensitive the pen is to the input from the tablet. If you happen to have a tablet with tilt sensitity, such as the Wacom Intuos 3, the pen will also detect that and react pretty much like a real ink pen would.The ink tool is excellent for creating outlines of any type, as well as creating sketches and shapes or even text (although most find that hard to do with a mouse). The varying shape and size of the lines give a dynamic feel that is often used for example in comic books. I'd say it is most often used with a 100% opacity, to create clear, crisp lines (as always this depends though).
Eraser (default key Shift+E)The eraser is another tool everyone has used in real life. In GIMP its main functionality is however not to erase immediate mistakes (that is what the Undo function is for), but as a paint tool in its own right. The eraser creates negative spaces by removing and thinning existing colour and whereas it can of course be used for corrections it can also be used to create interesting effects. A common use is to "thin" a very strong colour to make it stand out less. For such operations it is often important to use the tool with a low opacity (30-50%) for more flexibility. The only time the opacity should be at 100% is usually when one really wants to delete something completely.
Smudge tool (default key "s")The real-world equivalent of the Smudge tool is to put a finger in wet paint and pull it out over the paper. This is an exceptionally useful but also extremely dangerous tool because whereas it can create wonderful blends and effects it can also ruin carefully designed images by making them look, well, smudgy.
The smudge tool should generally not be used at 100% opacity, this will literally just smear paint all over without much control (unless that's the effect you want, of course). The lower the opacity, the more subtle the effect will be but the more you have to click and drag to move the colour anywhere.
Almost never is the smudge tool used on its own. Its primary use is to blend fields of colour together in a subtle way. With low enough opacity, a rotating motion can be used to do this (too high, and a whirlpool is created instead).
Supplementary tools These tools are also of interest, but are mostly used briefly and for specific things
Clone tool / Perspective Clone tool The foremost use of this tool is to apply texture to the image by use of a source image somewhere in the layer stack. Most often it should not be evident a texture has been applied; Applying with a low opacity and on an "Overlay" mode layer will often create subtle effects.
Blur tool For large images this tool is of rather limited use since its effects are rather hard to detect. It applies a blurring under the brush, allowing things to look smoother. Generally the smudge tool is much more efficient for this, but if you want a perfectly even blur it might be useful (or you might just select the edge and run a blur filter on it ...)
Dodge/Burn tool This applies the dodge or burn operation under the brush. It can be used for shadows and highlights if you want to enhance specific features on a small area. Generally applying shadows on a separate layer (which could be set to burn for example) can be more efficient though since it allows more flexible modifications.
Pen tool This works like the paintbrush except it does not use antialias which means the lines you draw will be pixellated. Useful for certain types of sprite images or icons, but not if you want to emulate real painting.
Fill tool Most often used to fill the canvas with a certain colour, it is also often used by artists working in more "blocky" or "comic" styles to fill blocks of selections with a homogenous color.
Gradient tool In many ways this works the same way as the Fill tool except it fills with a gradient rather than a solid colour. You can select the gradient from a list or make one of your own in GIMP's gradient editor. A nice example use for this is to create beams of light or nice blue skies.
4) Starting out with artistic use of GIMP using the airbrush tool and adjustable brushes
Now let's use these tools and brushes we just set up and learned about to do something practical. The next few exercises should hopefully get you more acquanted with the airbrush tool and how it can be used for artistic work. It takes some practice to use the mouse (or tablet, for that matter) to draw on the computer.
Choose the airbrush tool by pressing the right key on your keyboard. ("a" by default).
Best is if you open the image above in a separate window/tab so you can see the details of each airbrush stroke while reading below. Then try to repeat and practice each step as much as you can. Your hand on the mouse will quickly become steadier, you'll see.
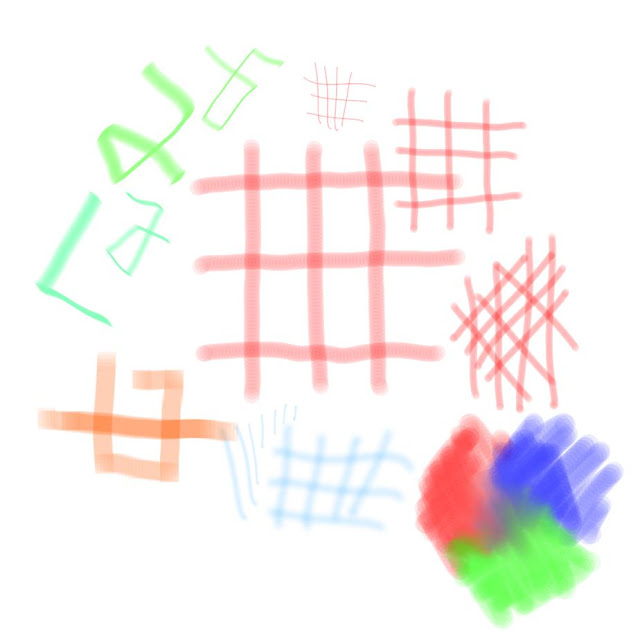
Begin by picking a red tone and the hard-edged brush. Do straight lines vertically and horizontally, in a grid pattern. Try to make as straight lines as you can. Depending on how steady a hand you have, it can be hard to do this with a mouse, but moving it upwards is often easier than going horizontally. Notice how the colours will grow darker in the intersections -- you have colour scaling even without picking a new colour from the palette! Scale down the size of the brush by pressing the keyboard shortcuts you chose before and try it again. Notice how fine and sharp the lines look, despite using the airbrush tool. Try to make the lines as straight as possible, not crooked as I did. ;-)
Observe: Of course you could also use the Shift-click/Shift-drag combo to create straight lines. But the point of this exercise is NOT to teach you how to draw straight lines per se -- but to help you get steadier with the mouse (and learn the peculiarities of the airbrush doing so). Learning to master your mouse to draw straight lines "freehand" is an important step towards eventually handling more complex shapes and curves. Freehand drawing skills helps both when doing selections and gives that loose natural look you need for "artistic" style work as we will do last in this tutorial. When you feel comfortable drawing horizontal and vertical lines with the mouse, try drawing them to an angle. Still try to make each as straight as you can. Note how you can overlap the lines several times and the colour will only become richer and richer. Try to work with a lower opacity set in the Airbrush tool if you want, so you can see the effects.
Next pick a blue colour and the "fuzzy brush". Do the same with this brush, to get a feel for what it can do. Once again, notice how the smallest resized brush in blue still appears rather sharp to the eye.
The "Calligraphy brushes" I tested in two tones of green in the image. They are special in that they change size depending on in which direction you draw them. They work well for creating sharp angles and, they can be used to create fuzzy effects, something which the Ink tool cannot do. Try to do some scribbles in green as I have done to get a feel for them.
Finally, the square brush. I used orange for this. Try to create sharp angles and corners with it. Resize and play around.
Finally, try to mix three colours with the airbrush. Pick a clean red and scribble with a large brush. Note how the colour changes and that you don't have to choose any new colour in order to get a lighter red -- just avoid painting over certain areas more than once or twice to retain a lighter tone. Do the same with Blue and Green and make them overlap here and there to see it shine through. (Admittedly I also smudged the center together in my image, to mix even more). The important point here is noticing the amount of different shades you are getting while only choosing three colours from the palette and essentially using but one single tool being pulled back and forth over the same area over and over.

Now try to use the resizing during drawing. Draw a line, resize, draw the next line. Try to do it faster and faster until you have the feeling in your hand.
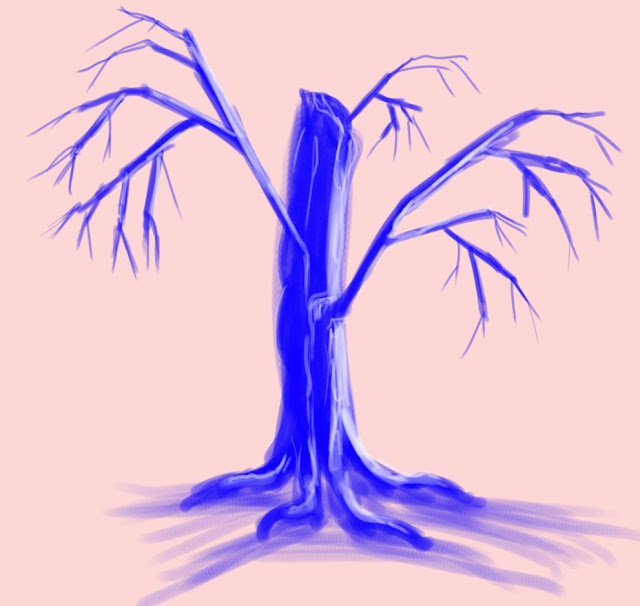
Finally we'll try some rough sketch with the airbrush tool, using 3 colours only. We will create a dead tree. This is just a sketch, so don't go about deleting or undoing anything you draw, even if it looks odd. Just play with sweeping the airbrush in straight lines, using whatever lines you happen to put down.
Pick a faint pink and fill the background with that using the fill tool.
Then take the hard brush we created and size it up a fair bit. Choose a bright blue colour. Only use that one color from now on, don't pick any other shades of blue -- let the airbrush handle shading for you.
Sweep out vertical lines, just as before, just draw more lines in the center than at the edges, so it'll become darker. Resize the brush and pull out some other straight lines for the branches. Resize the brush as you get further and further out on the branch to make smaller and smaller twigs.
With a rather small brush, make some parts of the trunk sharper, along the edges for example.
Finally, pick a white colour (the 3rd colour we'll use) and with small strokes you apply white at strategic places to bring out parts of the trunk and branches. Copy my lines if you want, but remember this is just a sketch, so don't worry about details. You can use this as a base to create detail later if you want -- but that's another tutorial.
Using the mouse to draw takes practice, but that practice is as much a matter of having a steady hand than anything else. Doing simple things as just drawing straight lines over and over will quickly improve your skills. Curved lines is much more difficult, but can be done too, even though this is where a drawing tablet really starts to shine. Note that you can do a lot with straight lines though, essentially a curve is nothing more than a lot of straight lines if you just use the zoom tool enough ... The tree you should actually be able to do with just straight lines (this is why I picked that example).
Try to make the dead tree for yourself, and show your results!
-----
Was this tutorial too easy for you? Or do you feel you've mastered the airbrush by now?
There is now a second tutorial covering more advanced airbrushing techniques, you can find it
here.
Other Art tutorials by me (few of them at least): Forest background,
Drawing Cyborgs,
Penciling characters,
Adding light and mood,
Paint a futuristic city,
Draw an eye in 5 minutes (video)Full list of GIMP art tutorials by me-----
.
Griatch
EDIT: To show an example of what can be done developing such a simple sketch, I added some more to it (very quick thing, mind you):
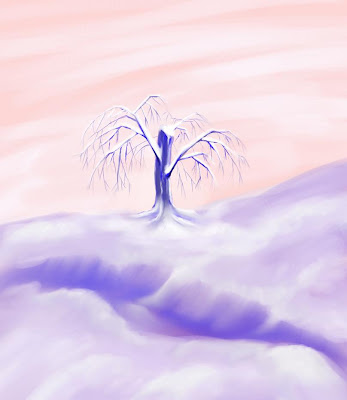


 for posting this, Griatch!