It is currently Fri Apr 26, 2024 11:42 am


All times are UTC - 5 hours [ DST ]


Post new topic Reply to topic  [ 24 posts ]  Go to page 1, 2  Next
Author Message
 Post subject: Metal Wurx - Part II
PostPosted: Thu Feb 23, 2012 1:33 pm  (#1) 
Offline
GimpChat Member
User avatar

Joined: Aug 24, 2011
Posts: 1785
Location: Dallas, TX
Perforated Metal


Each type of perforated metal obviously requires a different pattern, so I made quite a few of them for you to use. You will need to download the Metal Patterns zip file included here which contains the patterns we will be using not only for this segment, but for future Metal Wurx tutorials as well. The zip file is formatted with 7zip so if you don’t have 7zip you will need to download it here…
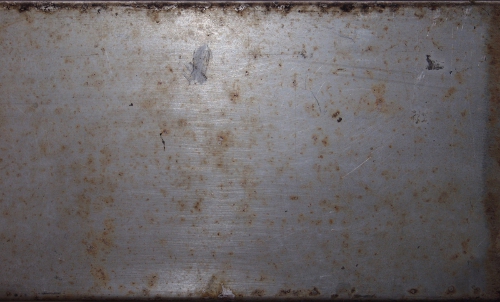
http://www.7-zip.org/

You will also need a metal image like this one, available at CG Textures.com. You will find the link below.

Image

http://www.cgtextures.com/texview.php?i ... cjh055d732

To make some of the examples you will see here, you need to download the "scale-pattern" script which is also included below. Un-zip it and place the .scm file in your "user" scripts folder and refresh your scripts.

Step 1.
First we will start by installing the patterns provided in the Metal Patterns zip file mentioned above. Once you have downloaded the zip file, place all the patterns in your “user” patterns folder, select the Bucket Tool, and refresh your patterns.

Step 2.
Go to File>New and open a new 1000 x 1000 pixel image at 300 ppi. Right click on your background layer in the layers dialog, and select Add Alpha Channel. Now right click on it again and create a new transparent layer and name it “pattern”. Since the Bucket tool is already selected, go tick the little circles for “Pattern fill” and “Fill whole selection” in the tool dialog. Click on the small sample pattern image, and find the new PM_1 pattern. With the transparent layer active, click anywhere on your image and fill the image with the pattern.

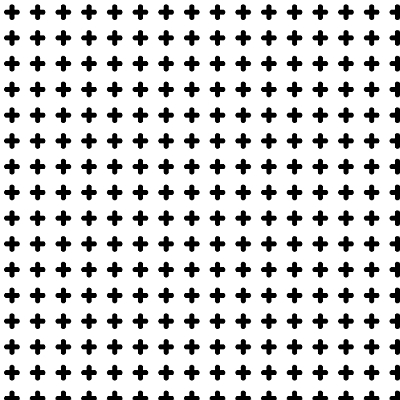
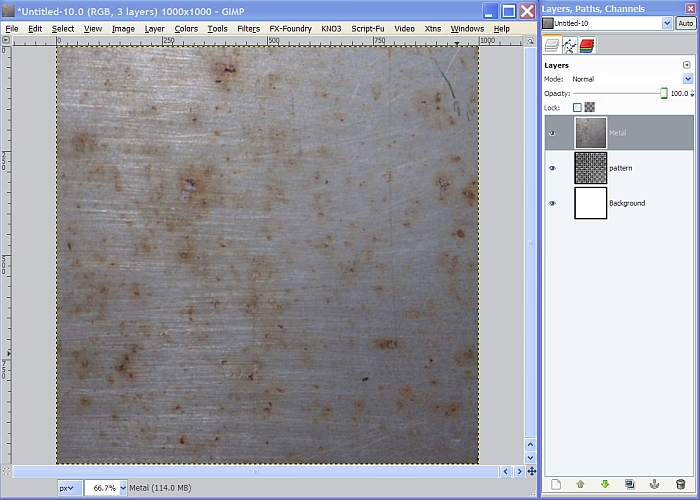
Your image should look like this.

Image

Step 3.
Select the eraser tool and carefully go around the outside edges of the perforations pattern layer and erase the outside row only, all the way around to create a border effect. Now erase the middle two horizontal rows.

Image

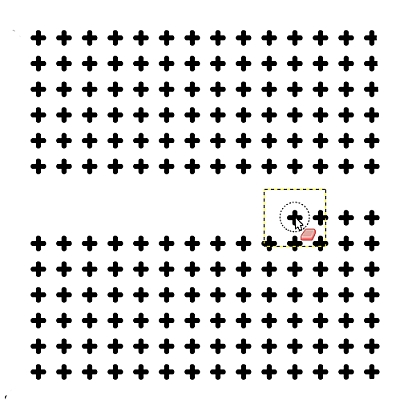
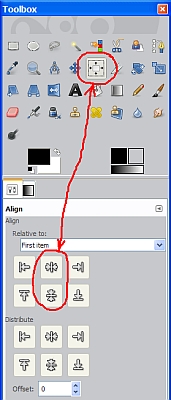
Now it’s not quite so plain looking but we still need to center it. Right click on the pattern layer and select Alpha to Selection. Go to Layer>Crop to Selection then go to Select>None. Now select the Alignment tool and click anywhere on your image to activate the tool. You should see four little squares appear at the corners of your image indicating that the tool is active and the layer is selected. Next, click on the middle top two controls, “Align center of target” and “Align middle of target”, to position the pattern layer exactly in the center.

Image

Go to Layer>Layer to Image Size and your layer is now centered and resized back to 1000 x 1000 again.

Step 4.
Use the link above to go to the CG Textures website, download the metal image and save it to your desktop. Now go to File>Open as layers and navigate to wherever just saved the image, and open it in Gimp. You can also just drag the image over to your image window and Gimp will “drop” the image into your window. Once you have the image open, right click on it, in the layers dialog, and select Add Alpha Channel. Change your view setting to about 25% so you can see what to do next. We need to scale this image but we also want of get rid of the rusted edges and large blemishes. Go to Layer>Scale layer and set the mode to percent and both values to 200. We can still see the big blotch at the top so select the move tool, making sure the circle in front of “Move Active Layer” is ticked in the tool dialog. Move your metal layer up just enough to hide the blotch, then go to Layer>Layer to Image Size.

Your image and layers should now look something like this.

Image

Step 5.
In the layers dialog, tick the eye in front of the pattern layer to turn off the visibility. Now right click on the pattern layer and select Alpha to Selection. Now go back to the top metal image layer and select it to make it the active layer, hit the delete button, then go to Select>None. This will effectively “cut out” the perforation pattern on your metal image layer and since the background layer is the only other visible layer, what you will actually see is the “white” layer behind your metal layer showing through the “perforations”. We’re not done with the pattern layer so don’t delete it.
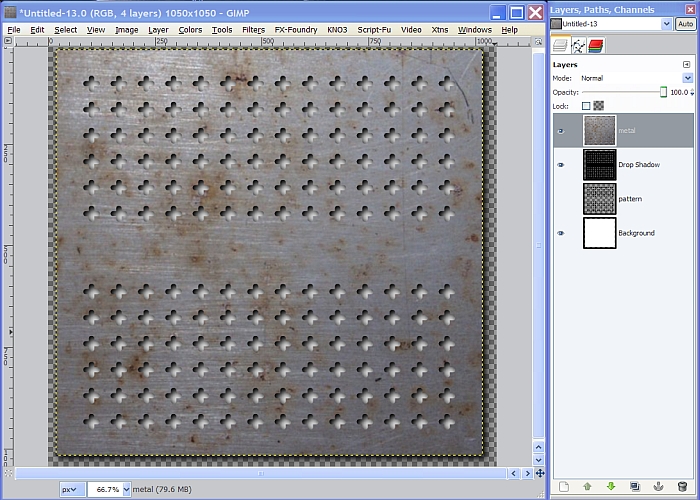
Image

Step 6.
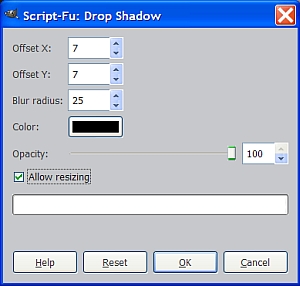
It’s time to add some depth to our image so to do that we need to go to Filters>Light and Shadow>Drop Shadow and enter the following settings.

Image

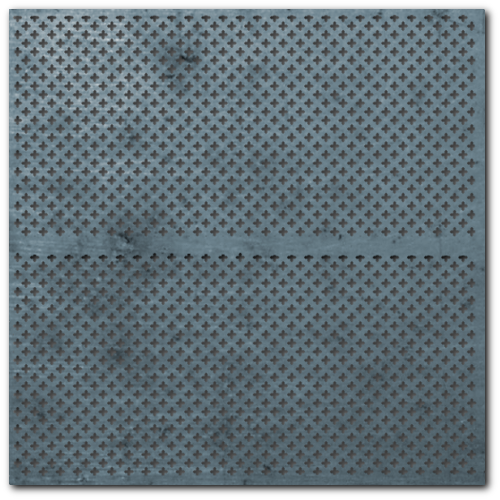
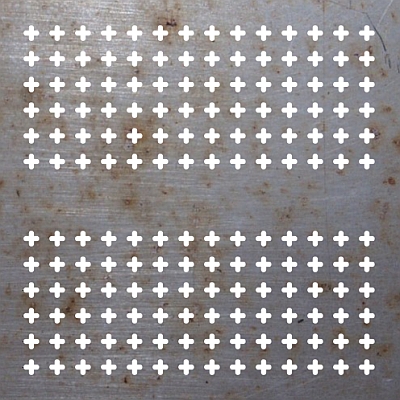
Your image should now look similar to this.

Image

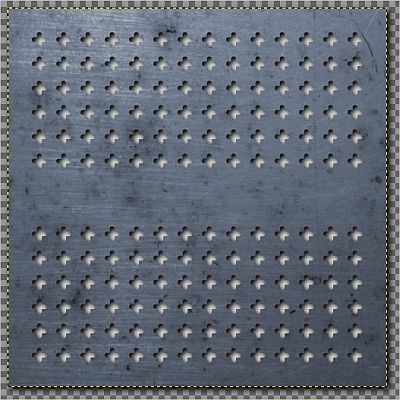
Our image is starting to take on a more realistic appearance but we’re not quite finished. It still looks a little “plain” so let’s add some bluish tint.

Step 7.
Go to Colors>colorize and enter the settings shown in the screenshot below.

Image

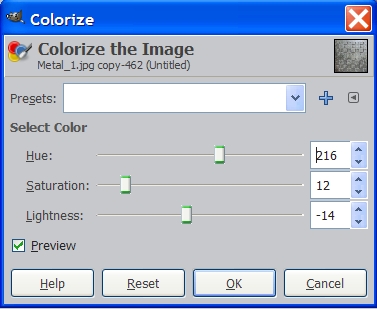
You can make it any color you want, or you can skip the last step. I just happen to like blue.

Image


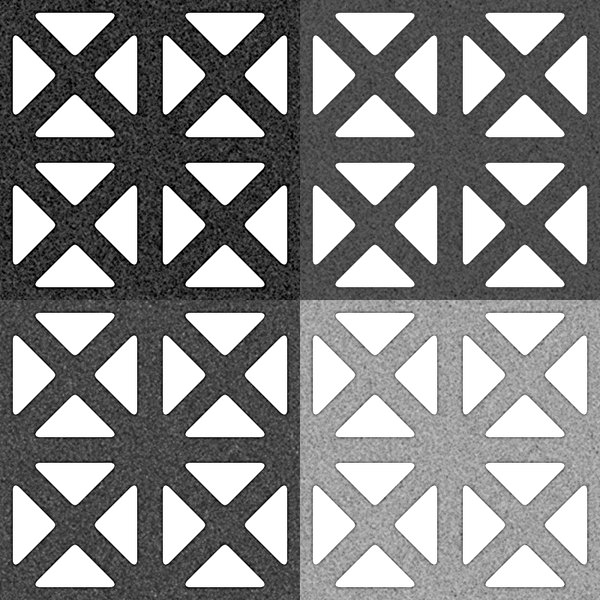
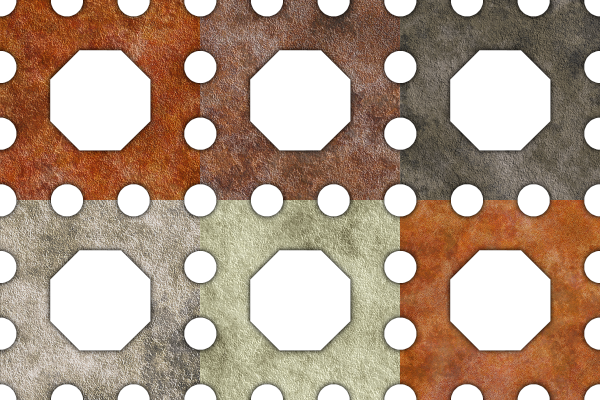
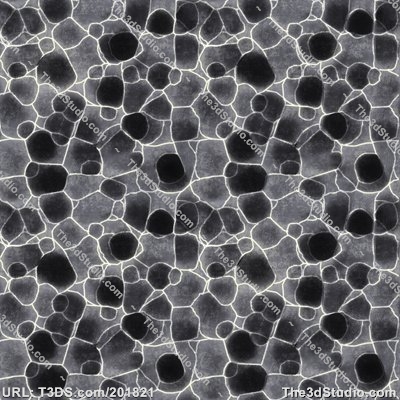
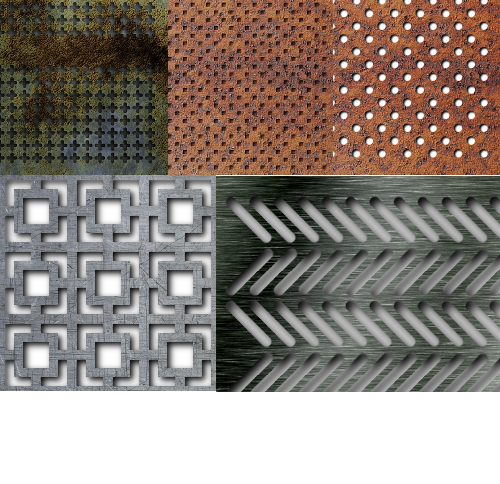
Remember, you can use any of the patterns I have included in the patterns zip file to make different kinds of perforations. Some are straight lines of shapes like this one and some are arranged in an offset or diagonal pattern.

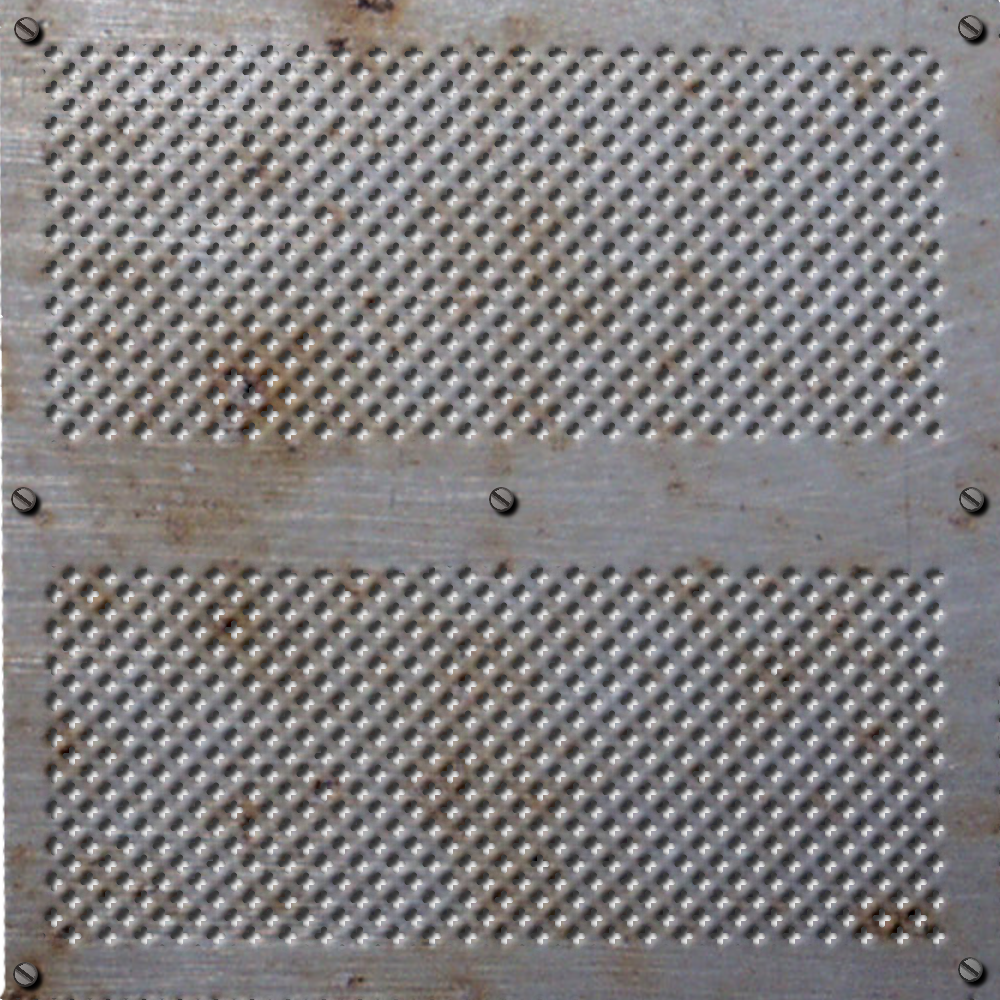
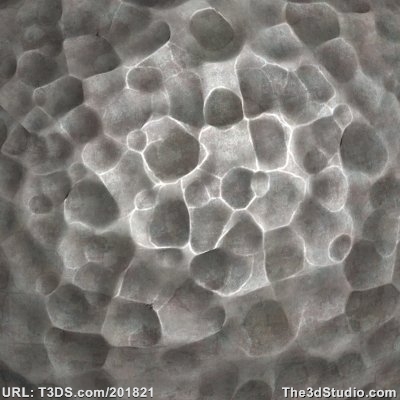
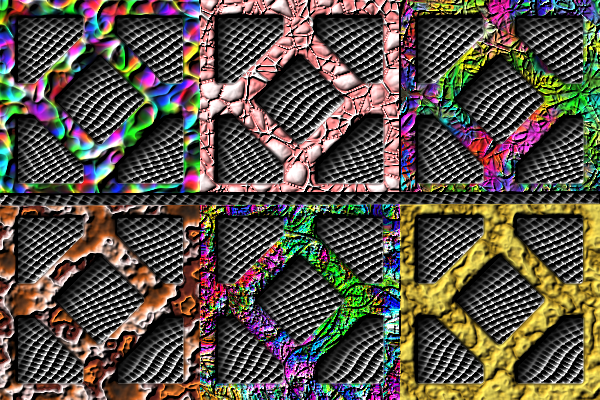
You might want to add some dirt, rust or corrosion, or maybe even a little bump mapping to change the look like in the examples below.

Image

Several of those steps are covered in my previous tutorial Metal Wurx Part I so you may want to go back and review it here…

viewtopic.php?f=23&t=3750

Before we go on to Metal Wurx Part III, I want to cover one other method for perforated metal. Let’s create a different look.

Step 8.
Turn off the visibility of all layers and turn on the visibility for the metal layer. Select the metal layer to make it the active layer. Duplicate the metal layer and check the little box near the top of the layers dialog that says “Lock” to lock the alpha channel. Change the FG color to Gray (808080) and drag the gray color over to your image to make the duplicated metal layer gray. Now go back and uncheck that little box to unlock the alpha channel. Duplicate the gray layer one time and name it “blur”. Go to Filters>Blur>
Gaussian Blur and set both values to about 10 and click OK. Turn off the visibility on the blur layer.
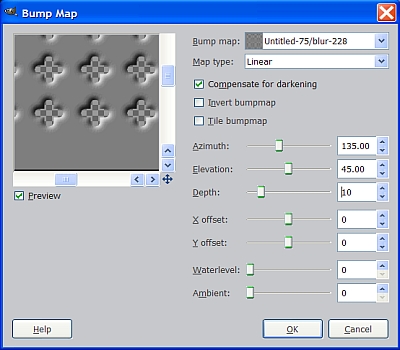
Step 9.
Click on the other gray layer under the blur layer and rename it “bump”. Go to Filters>Map>Bump Map and set the depth to 10 and leave everything else at default.

Image

Step 10.
Move the metal layer above the bump layer and set the metal layer mode to Grain Merge. Now turn on the visibility of the drop shadow layer. Our metal now has that die-cut or punch-press look.

Image

The reason we use the plain gray layer is that when you use the Bump Map filter, it will pick up everything in the image and make it look 3D so all the rust, blemishes or anything else will be amplified and perhaps detract from the image.

You can delete the pattern layer and the white background layer now that our image is finished. Right click anywhere in the layers dialog and select “Merge Visible Layers” and save your image as a PNG so it can be use later for making other creations in metal.

The next tutorial in this series, Metal Wurx III, will show you a few ways to make treadplates.


I hope you enjoyed this tutorial.


Attachments:
Metal Patterns.7z [642.26 KiB]
Downloaded 759 times
scale_pattern.7z [1.35 KiB]
Downloaded 528 times

_________________
Image


Last edited by Draconian on Fri Feb 24, 2012 8:30 am, edited 5 times in total.
Share on Facebook Share on Twitter Share on Orkut Share on Digg Share on MySpace Share on Delicious Share on Technorati
Top
 Post subject: Re: Metal Wurx - Part II
PostPosted: Thu Feb 23, 2012 7:52 pm  (#2) 
Offline
GimpChat Member

Joined: Mar 29, 2011
Posts: 346
Location: Wisconsin
Another good tutorial. :bigthup

I did notice that it jumps from step 4 to step 10 - you might want to adjust the step numbers.

_________________
Image


Top
 Post subject: Re: Metal Wurx - Part II
PostPosted: Thu Feb 23, 2012 9:15 pm  (#3) 
Offline
GimpChat Member
User avatar

Joined: Sep 24, 2010
Posts: 12518
Really cool and realistic looking punch results Drac. :)

_________________
Lyle

Psalm 109:8

Image


Top
 Post subject: Re: Metal Wurx - Part II
PostPosted: Fri Feb 24, 2012 12:33 am  (#4) 
Offline
GimpChat Member
User avatar

Joined: May 16, 2010
Posts: 14709
Location: USA
Very, very nice results! :)

_________________
Image
Edmund Burke nailed it when he said, "The only thing necessary for the triumph of evil is for good men to do nothing."


Top
 Post subject: Re: Metal Wurx - Part II
PostPosted: Fri Feb 24, 2012 6:00 am  (#5) 
Offline
GimpChat Member
User avatar

Joined: Aug 24, 2011
Posts: 1785
Location: Dallas, TX
Thank you to everyone. With so many edits I didn't realize I messed up the numbers, easy fix.

_________________
Image


Top
 Post subject: Re: Metal Wurx - Part II
PostPosted: Fri Feb 24, 2012 7:29 am  (#6) 
Offline
Global Moderator
User avatar

Joined: Apr 07, 2010
Posts: 14182
Drac, I am stuck at the end of step 5, and in your scrn shot it shows a bump layer and when I got to filters > drop shadow, it only puts a shadow around the outside of the image, You also have the resizing ticked, should that be?

_________________
Image


Top
 Post subject: Re: Metal Wurx - Part II
PostPosted: Fri Feb 24, 2012 8:13 am  (#7) 
Offline
GimpChat Member
User avatar

Joined: Aug 24, 2011
Posts: 1785
Location: Dallas, TX
molly wrote:
Drac, I am stuck at the end of step 5, and in your scrn shot it shows a bump layer and when I got to filters > drop shadow, it only puts a shadow around the outside of the image, You also have the resizing ticked, should that be?


Molly, I'm not sure where you are on this. If you added the alpha channel in step 4 you should have a metal layer with holes in it. Turn off the white background layer to make sure.

I worked on this at different times so I might have been playing around with the bump map and grabbed the wrong screen shot. I'll check it out further and get back to you. You should not have any problem with the drop shadow if your metal layer has the alpha channel and the selection from the pattern layer has been deleted from it.

_________________
Image


Top
 Post subject: Re: Metal Wurx - Part II
PostPosted: Fri Feb 24, 2012 8:20 am  (#8) 
Offline
Global Moderator
User avatar

Joined: Apr 07, 2010
Posts: 14182
yes, I got to that part but when I do the shadow, it just puts a shadow around the outside. In yours, it shows you have a bump layer, in mine it just has the shadow layer without the depth as you would get in a bump layer. I haven't gone past step 5 for this reason. Also, since in the instrucs it shows to have the pattern layer turned off I was working with the metal layer turned on while doing the shadow.

Image

_________________
Image


Top
 Post subject: Re: Metal Wurx - Part II
PostPosted: Fri Feb 24, 2012 8:35 am  (#9) 
Offline
GimpChat Member
User avatar

Joined: Aug 24, 2011
Posts: 1785
Location: Dallas, TX
molly wrote:
yes, I got to that part but when I do the shadow, it just puts a shadow around the outside. In yours, it shows you have a bump layer, in mine it just has the shadow layer without the depth as you would get in a bump layer. I haven't gone past step 5 for this reason. Also, since in the instrucs it shows to have the pattern layer turned off I was working with the metal layer turned on while doing the shadow.


I replaced the screenshot. There is no bump layer.

When you turn off all the layers except the metal layer, do you see the alpha channel behind the perforated metal layer like this?


Attachments:
alpha.jpg
alpha.jpg [ 115.53 KiB | Viewed 11449 times ]

_________________
Image
Top
 Post subject: Re: Metal Wurx - Part II
PostPosted: Fri Feb 24, 2012 8:39 am  (#10) 
Offline
Global Moderator
User avatar

Joined: Apr 07, 2010
Posts: 14182
Yes I do but when I do the shadow, it fills the holes in with black. I will go back and start over, I left a scrn of how mine turned out. thanks Drac.
I think I should have used the larger pattern.

_________________
Image


Top
 Post subject: Re: Metal Wurx - Part II
PostPosted: Fri Feb 24, 2012 9:47 am  (#11) 
Offline
Global Moderator
User avatar

Joined: Apr 07, 2010
Posts: 14182
Ok, I started from scratch again. Everything turned out well.I reduced the numbers in the drop shadow to 4 instead of seven which left me some white still in the holes.
I added some of my home made screws and gave them a bit of bevel and shadow. very nice tute Drac. :clap

Image

_________________
Image


Top
 Post subject: Re: Metal Wurx - Part II
PostPosted: Fri Feb 24, 2012 12:41 pm  (#12) 
Offline
GimpChat Member
User avatar

Joined: Aug 24, 2011
Posts: 1785
Location: Dallas, TX
Thanks Molly. It looks like you may have started with a different size canvas and that will definitely change the drop shadow settings. You didn't have more than one metal layer do you?

_________________
Image


Top
 Post subject: Re: Metal Wurx - Part II
PostPosted: Fri Feb 24, 2012 12:57 pm  (#13) 
Offline
Global Moderator
User avatar

Joined: Apr 07, 2010
Posts: 14182
nope, started with a 1000x1000 layer, had one metal layer, anyway, I was thinking all along that if I changed the drop shadows settings it would make a difference, OR maybe I could have used a large pattern, dunno, anyway, I am happy with it now.

_________________
Image


Top
 Post subject: Re: Metal Wurx - Part II
PostPosted: Fri Feb 24, 2012 6:15 pm  (#14) 
Offline
GimpChat Member

Joined: Mar 29, 2011
Posts: 346
Location: Wisconsin
A sampler of a perforated metal pattern.
I was going for a gray hammered finish look.

Image

No drop shadow or bump map effects. I'll apply those, if needed, when I use the pattern and I know where the light sources are.

_________________
Image


Top
 Post subject: Re: Metal Wurx - Part II
PostPosted: Fri Feb 24, 2012 6:21 pm  (#15) 
Offline
GimpChat Member
User avatar

Joined: Mar 02, 2011
Posts: 1850
Location: Michigan
Those look nice, I like the bottom left one the most, but that's just color preference

_________________
Image
I'm back I think


Top
 Post subject: Re: Metal Wurx - Part II
PostPosted: Fri Feb 24, 2012 9:50 pm  (#16) 
Offline
GimpChat Member

Joined: Mar 29, 2011
Posts: 346
Location: Wisconsin
Another perforated pattern with a variety of textures. :)

Image

_________________
Image


Top
 Post subject: Re: Metal Wurx - Part II
PostPosted: Sat Feb 25, 2012 7:13 am  (#17) 
Offline
GimpChat Member
User avatar

Joined: Aug 24, 2011
Posts: 1785
Location: Dallas, TX
bkh1914 wrote:
A sampler of a perforated metal pattern.
I was going for a gray hammered finish look.

Image

No drop shadow or bump map effects. I'll apply those, if needed, when I use the pattern and I know where the light sources are.


Those look really good bkh. Kind of a galvanized effect. I've been playing around with trying to get a hot dipped galvanized effect but have not been successful in getting it to look realistic. I saw a sample of hammered metal that I have also been trying to replicate and can't seem to find the right combination. Maybe some colaboration is in order. Heres what I mean.

I found these samples at 3D Studios and it looks like they started with this...

Image

and ended up with this...

Image

I really wanted to include it in this Metal Wurx series but so far no success. Maybe someone here can approximate it.

_________________
Image


Top
 Post subject: Re: Metal Wurx - Part II
PostPosted: Sat Feb 25, 2012 8:35 am  (#18) 
Offline
GimpChat Member

Joined: Mar 29, 2011
Posts: 346
Location: Wisconsin
The hammered finish was done with RGB noise: 0.1 on 50% white; scaled 2x; duplicated 3 times and the copies shifted around; merged together in Darken Only mode.

Have you looked at the Felimage noise generator: http://fimg-gmplugins.sourceforge.net/index.php
I hope someone compiles this for 64-bit windows.

Also the standard Oilify filter (Filters>Artistic>Oilify...) can produce interesting results when you use different mask sizes and combine them in Grain Extract mode.

Meanwhile, the elves in the paint shop were on a roll last night. :hehe

Image

_________________
Image


Top
 Post subject: Re: Metal Wurx - Part II
PostPosted: Sat Feb 25, 2012 8:53 am  (#19) 
Offline
Global Moderator
User avatar

Joined: Apr 07, 2010
Posts: 14182
They are very pretty, I can't make up me mind which one I like best...I guess all the above.
Made a bump map and a bump bump map out it and created a 3-D image and used RobADots pattern for background

Image


Image


Image

_________________
Image


Top
 Post subject: Re: Metal Wurx - Part II
PostPosted: Sat Feb 25, 2012 10:10 am  (#20) 
Offline
GimpChat Member
User avatar

Joined: Aug 24, 2011
Posts: 1785
Location: Dallas, TX
You better tell those elves to stop smoking that stuff. :rofl

I did come up with a close approximation of the galvanized finish.

1. Filters>Render>Clouds>Solid Noise with everything to max settings.

2. Filters>GMIC>Contours>Segmentation wiht the Edge Threshold at 3.

3. Repeat step 2.

4. Select by Color the darkest areas and then Colors>Curves and moved the center of the curve about 1/2 a square. Did this twice to even out the dark grays.

5. Filters>Blur>Gaussian Blur at 1, then blurred it again at 1.

Here's what I got. I can't figure out how to get the refractions or striations like hot dipped galvanized similar to the second pic below.

I installed the Felimage noise generator but don't know where it shows up so I can try it.


Attachments:
galvanized.jpg
galvanized.jpg [ 149.25 KiB | Viewed 3365 times ]
250PX-~1.JPG
250PX-~1.JPG [ 11.65 KiB | Viewed 3365 times ]

_________________
Image
Top
Post new topic Reply to topic  [ 24 posts ]  Go to page 1, 2  Next

All times are UTC - 5 hours [ DST ]


   Similar Topics   Replies 
No new posts Attachment(s) Make people metal with GEGL

27

No new posts Coin Tutorial Part 2

3

No new posts The other part of our Universe! Spacescape2.py

5

No new posts Attachment(s) GEGL Motion Noise plugin to create wood and metal textures

20

No new posts Attachment(s) New Guide to FontSlab Part 5: Repeats and Reversals

1


* Login  


Powered by phpBB3 © phpBB Group