Metal Mesh & Expanded Metal
I’m going to share with you how to make your own mesh and expanded metal. If you have been following along in this series you should already have the Patterns included with
Metal Wurx - Part I. If you don’t have these patterns yet, you can download them here…..
viewtopic.php?f=23&t=3750Install the patterns in your Gimp “user” patterns folder and refresh your patterns in Gimp before continuing. We’ll start by making some hex metal mesh.
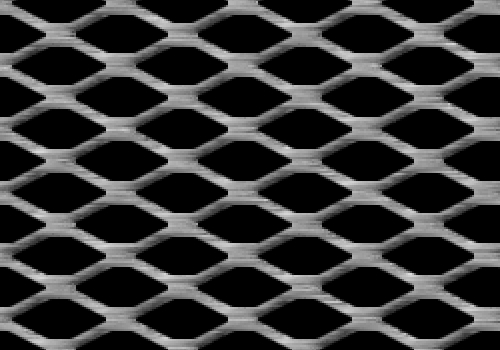
Metal MeshStep 1.
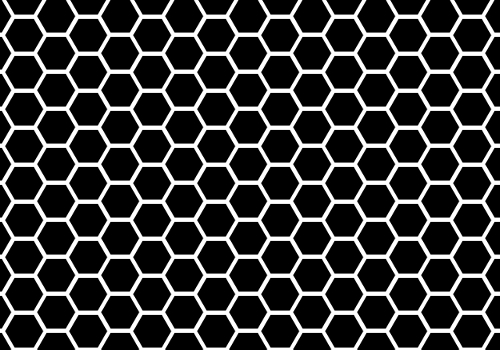
Open a new image 800x600 and create a new transparent layer above it named Pattern. Select the Bucket Fill tool and in the tool options, tick the little circles where it says “Pattern fill” and “Fill whole selection”. Select the Hex Block pattern from the Metal Patterns you downloaded, and fill the transparent layer with the hex pattern.
Step 2.
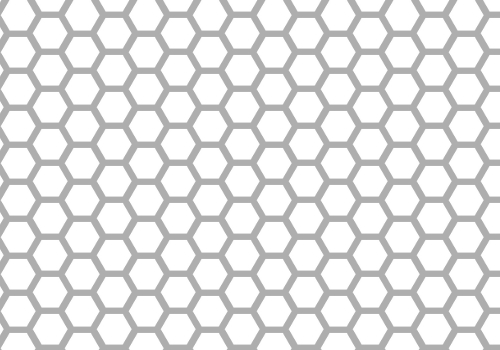
Create another transparent layer above the Pattern layer and name it Mesh. We want to shrink our hex blocks just a little to increase the space in between, because that space is what we will use to make our mesh. Right click on the Mesh Pattern layer in the layers dialog box and select Alpha to Selection. You should see the marching ants around the hex pattern. Go to Select>Shrink and enter 1 pixel then click OK. Go to Select>Invert then select the new transparent layer we just named Mesh, and set your Foreground color to a light gray (CACACA). Drag your gray foreground color over to your image to fill the selection with the gray color, then go to Select>None to turn off the selection. Now we can delete the pattern layer since we now have a gray mesh pattern.
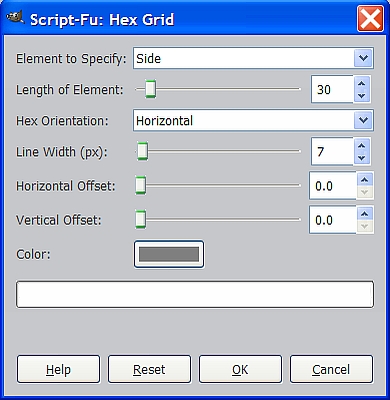
Note: There is a simpler way to create this type of mesh instead of using the pattern provided. You can also go to Filters>Render>Pattern>Hex grid to create a hex pattern by using the following settings, then go to Step three. Same results either way.
Step 3.
Now we need to give our pattern some shape to make it look 3 dimensional. Duplicate the mesh layer and name the duplicated layer “blur”. Go to Filters>Blur>Gaussian Blur and use the default value of 5 for both settings. It is very critical to use these settings for this size image. If your image is larger, you may need to increase the settings a bit to get the same results. Once you have your blur layer completed, tick the eye in front of the blur layer in the layers dialog to turn off that layer’s visibility.
Step 4.
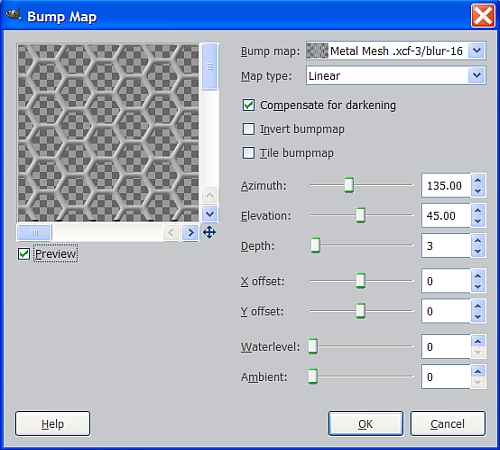
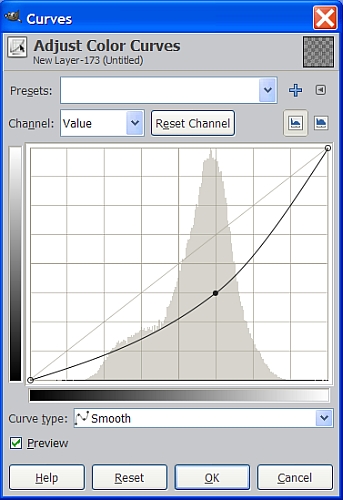
Select the Mesh layer to make it the active layer, then Go to Filters>Map>Bump Map and enter the values in the screenshot below. Make sure the blur layer is the layer selected for the bump map at the top of the dialog box. If you want your mesh to be flatter looking like flat metal, use Spherical as the Map Type.
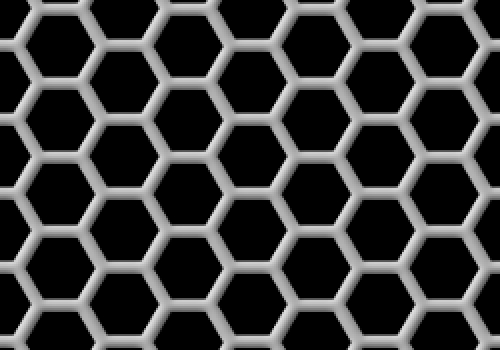
Fill your background layer with black so you can see your mesh a little better.
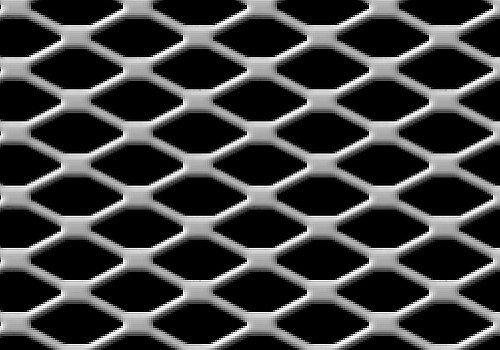
Your mesh should now have some shape like this.
From here we add our finish, rust or corrosion, color or whatever you like.
Step 5.
I will cover this more in another
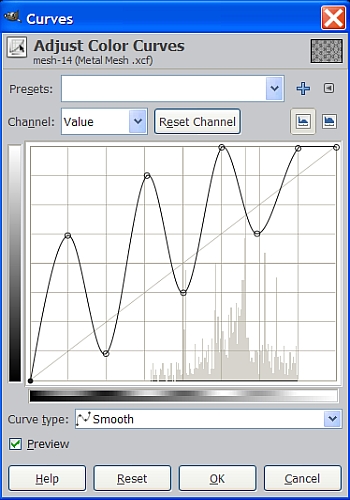
Metal Wurx segment, but I want to go ahead and show you how simple it is to make this mesh look like it’s made out of chrome. Go to Colors>Curves and using your mouse, click on the points in the curves dialog or drag it by clicking on the line and holding down your mouse button as you move it to shape your curve until it looks like this.
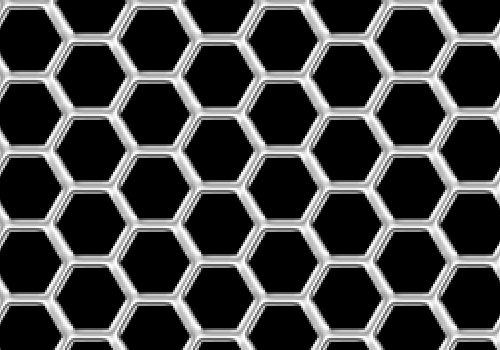
If you did everything right, you should now have a nice chrome mesh you can use for anything you like. Be sure to save it as a .png image so there is no background.
Pretty simple, huh? Now you can make some expanded metal in much the same way.
Expanded MetalStep 1.
Open a new image, create the transparent layer and fill it with the expanded metal pattern included with the
Metal Wurx – Part I tutorial. I saved you some time by using a basic diamond pattern and adding small rectangles at all the intersections to create the expanded metal pattern. I won’t bother with a pic just yet.
Step 2.
Go to the top of the layers dialog and check the little box that says Lock. When you place your mouse cursor over the box it will say Lock alpha channel. Set your FG color to CACACA again and drag your color over to your image to fill the pattern with the gray color. Now go back and uncheck the box to unlock the alpha channel
Step 3.
Fill the background with black again to make it easier to see, then repeat Steps 3 & 4 in the Mesh tutorial above, blurring and bump mapping just like we did before, to give our expanded metal some shape. You can then add rust, colorize it, or make it chrome again. Here's what it should look like after the bump mapping.
Making these two metals were pretty simple, so let’s try something a little different now.
Step 4.
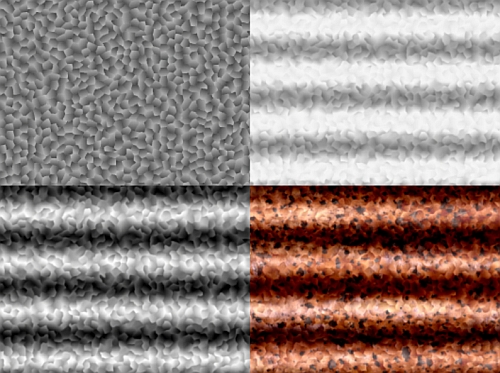
Lock the alpha channel again and go to Filters>Noise>RGB Noise and uncheck the box that says Independent noise and check the box that says Correlated. Set the values to .25 and click OK.
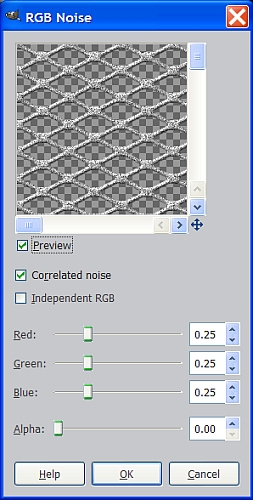
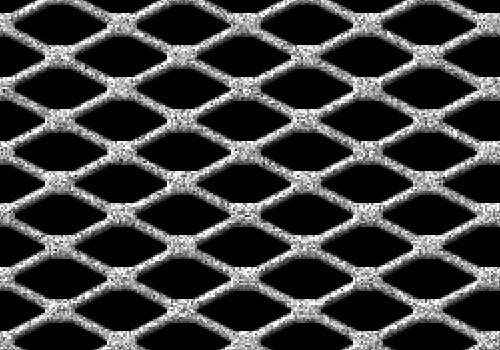
Your image should be full of gray dots in varying shades similar to this.
Step 5.
Unlock the alpha channel, then go to Filters>Blur>Motion blur and use the Linear setting, set the Length to 20, and the Angle to 0.
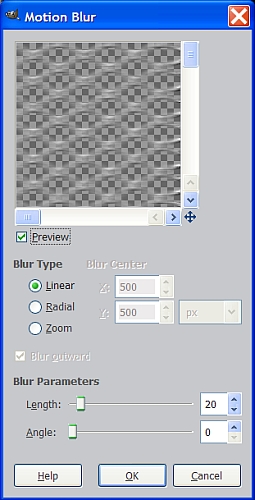
When you are finished entering these settings, click OK and it will produce something like the image below resembling a brushed metal effect.
Step 6.
Go to Colors>Curves and adjust the curve setting so that it looks like the screenshot below to make our metal a little bit darker.
Step 7.
Create a new transparent layer above your expanded metal layer, name it Gradient and set the layer mode to Overlay. Right click on the metal layer in the layers dialog and select Alpha to Selection. Now go back and reselect the transparent (gradient) layer to make it the active layer again. Select the Flare Glow Angular gradient and drag across your image horizontally while holding down the Control key to make it perfectly straight.
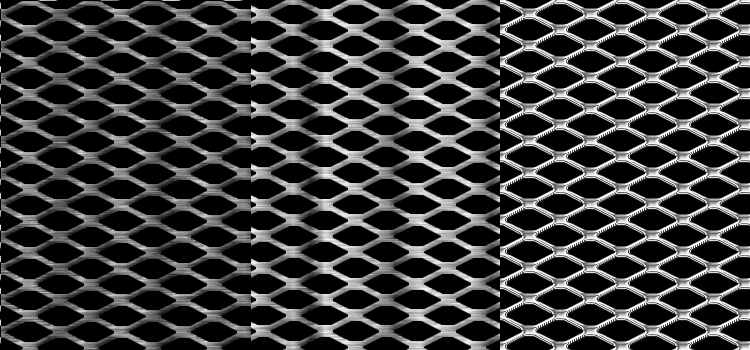
If you did everything correctly, the gradient is applied only to the selection area of the expanded metal layer. Go to Select>None to turn off the selection and you have some expanded metal with a brushed metal look and some nice highlights like in the center image below.
To make it even more dramatic, try changing the gradient layer mode to Grain Merge or tone it down by simply adjusting the opacity of the gradient layer, or adjust the curves for chrome like the one on the right in the image below.
There you have it. Two more different types of metal to add to your arsenal.
I hope you enjoyed this tutorial.
Metal Wurx – Part V is next up in this series, and will show you how to make different kinds of galvanized metals and corrugated roofing like these.