Galvanized Metal
The
Metal Wurx series has begun to grow with a few added segments for what is now a total of twelve, so this will be a departure from the original plan for only six segments. I recently learned how to get a much better galvanized metal effect than 90% of those splotchy looking ones you find all over the internet. There may be a few I have not seen that are better but for now this is one my preferred methods. You may also want to investigate another excellent method for making galvanized metal with a free program called “Felimage” that can be found here… (Thank you bkh1914 for the link to this cool program)
http://fimg-gmplugins.sourceforge.net/index.phpWe will also use a couple of scripts to complete this tutorial. One is Mosaic which can be found under Filters>Distorts>Mosaic and the other is the Multifill script which is part of the Flatting.scm script courtesy of Rob Antonishen, which can be found here…
viewtopic.php?f=11&t=3776Just scroll down a bit and download the script and place it in your Gimp “user” scripts folder. You will also need the G’MIC plug-in if you don’t already have it installed. You can also find G’MIC at the Plug-in Registry, or you can download the correct one for your operating system here….
http://gmic.sourceforge.net/ I always want to know how to do things from scratch so this is my attempt at creating that galvanized metal look with gimp.
Step 1.
Open a new image 640x480 pixels.
Step 2.
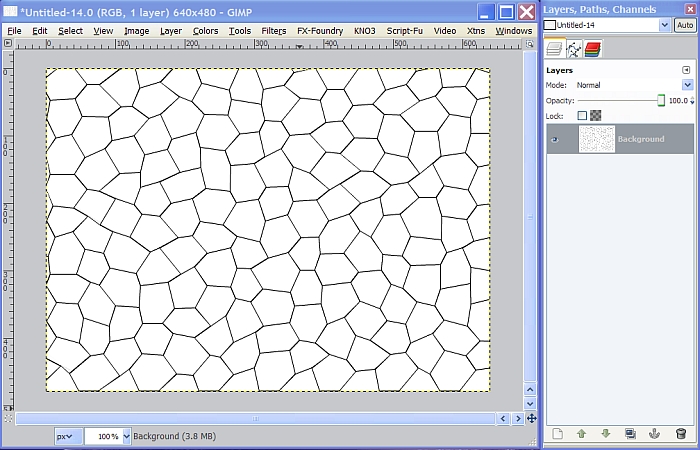
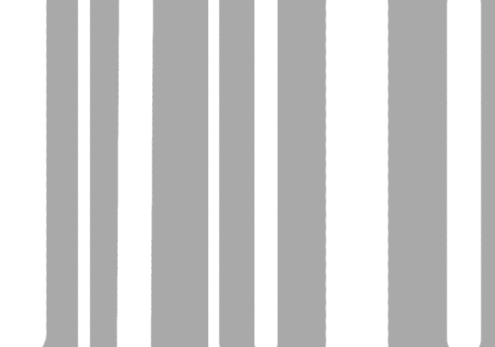
Go to Filters>Distorts>Mosaic and enter the settings in the screenshot below.
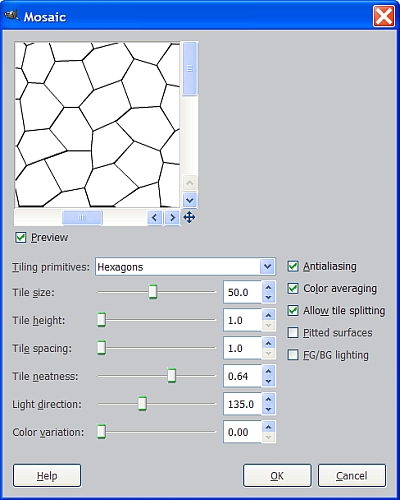
You should get a pattern that looks like this.
Step 3.
Go to Filters>Flatting>MultiFill and enter the following settings. Set the Fill Type to Gradient with Random Direction and use a gray color for the Flag Color setting like CACACA.
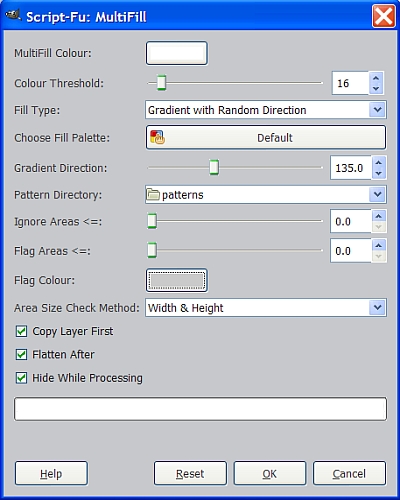
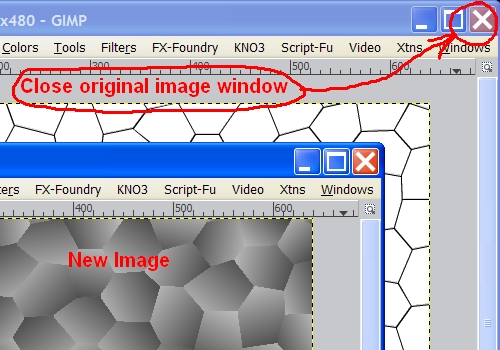
When you have all the settings entered and the color set, click OK. This filter works on every separate segment so it will take a few minutes to complete. Larger images or smaller tile size in the Mosaic filter, will take considerably longer to complete and is just another reason for using a small image size here. When it has finished, it will render in a new image window. Just hit the big X in the top right hand corner of the original image window containing the mosaic pattern to delete it.
If you increase your view to about 400% you will be able to see that the edges of each segment are pretty jagged. The resolution of the default 640x480 image is 72 pixels so we get this rough edge. To avoid this, use a much higher resolution when you open your image to begin with. For now, let's do this.
Step 3.
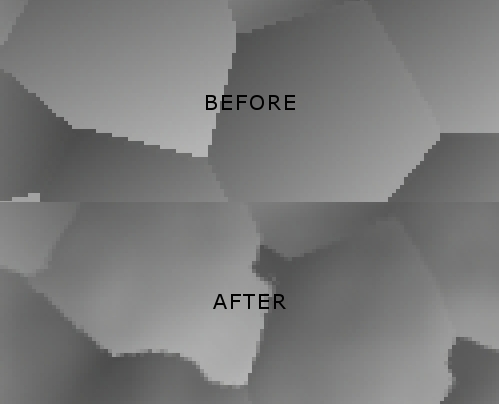
Go to Filters>GMIC>Deformations>Water and set the Amplitude to 10 and the Smoothness to about 1.5.
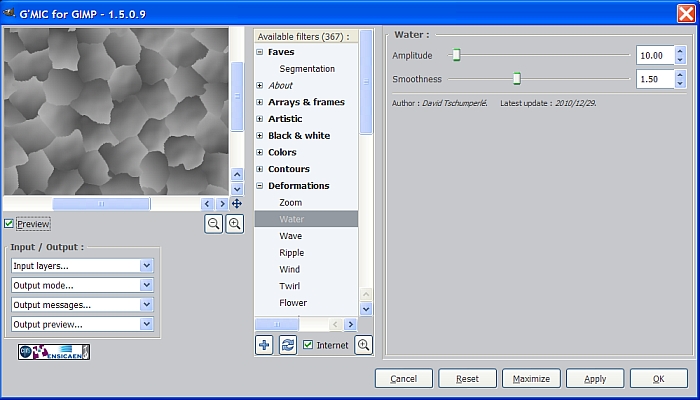
This will do a couple of things for us. Not only will it smooth out the edges a bit but it
will also give us a more irregular shape to each segment which adds to the realism of our galvanized effect.
Step 4.
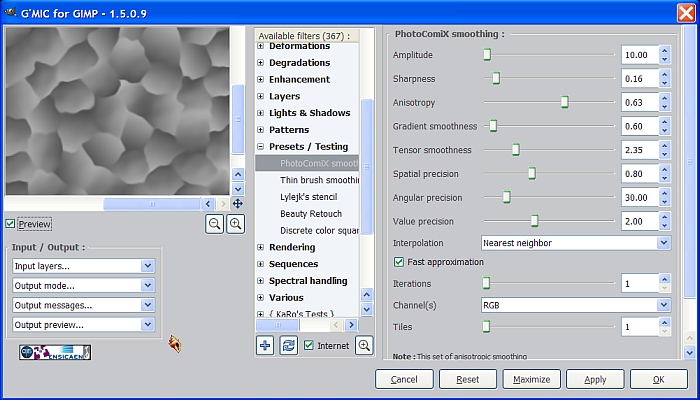
To add even more edge smoothing, we go to Filters>GMIC>Presets/Testing>Photocomix Smoothing and enter these settings.
After applying this filter, we need to clean up just a few minor imperfections in our pattern. If you will look closely at the results of the smoothing operation, you will see these small areas created when we ran the GMIC/Deformations/Water filter.

Step 5.
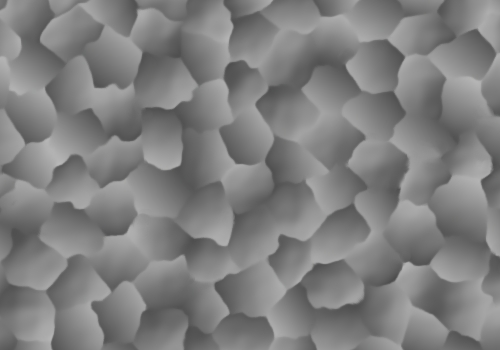
Select the Smudge tool and carefully smudge around these areas to reshape them and take out the odd shaped areas you don’t like. There should only be a few of these and take you only a minute or two. If you mess anything up, make use of the Edit>Undo function and try again. I use the Edit>Undo function a lot while experimenting so trust me, it will never get worn out.
Step 6.
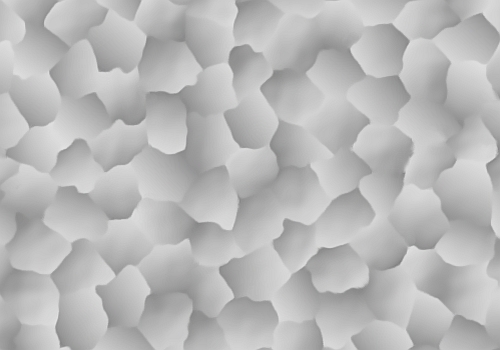
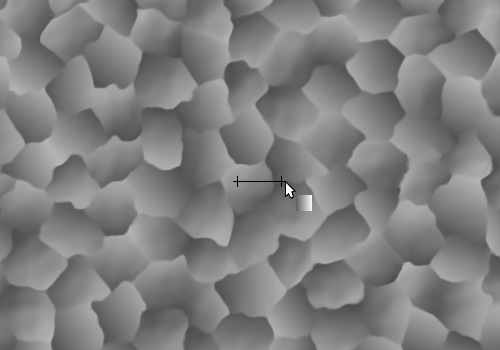
Once you have the imperfections corrected, you should have a pretty decent looking galvanized metal pattern.
This looks more like old, weathered metal as it is dark looking. To make it brighter, just go to Colors>Curves and adjust the center of the curve up and to the left a bit like so.
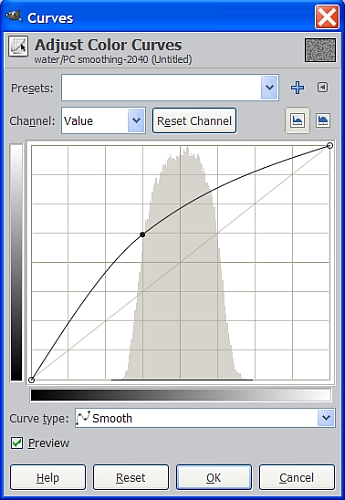
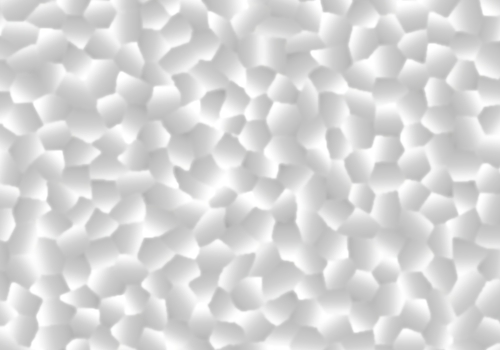
Once you have your curve adjusted to your liking, click OK and your image should look something like this.
If you want a bright and shiny, hot dipped galvanized look, like brand new metal, adjust your curves like so.
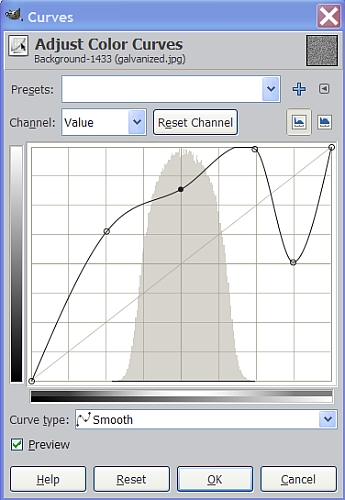
You should get something similar to this.
Want it to look like that corrugated metal they use for barn roofs? No problem.
Step 7.
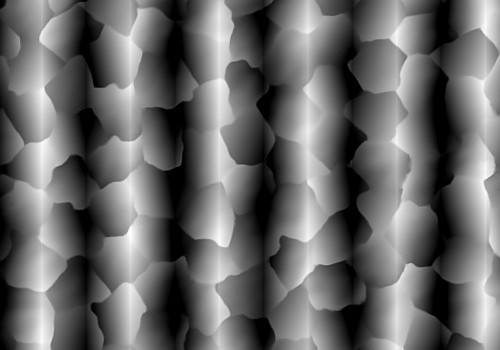
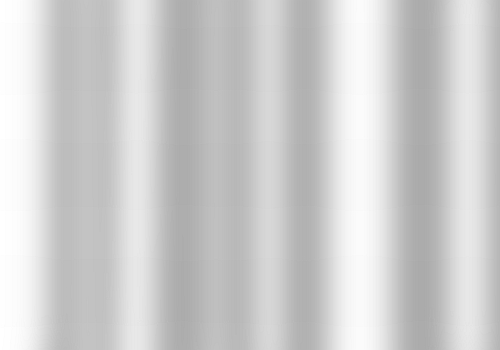
Create whichever kind of galvanized metal you like, using the appropriate methods and curves above, (the darker ones seem to look better to me) then create a new transparent layer above your galvanized metal layer, and name this layer gradient. Set the layer Mode to Grain Merge. Now, select the Blend tool and in the tool options dialog, select Foreground to Background for the gradient, the Shape to Bi-Linear and the Repeat to Triangular Wave.
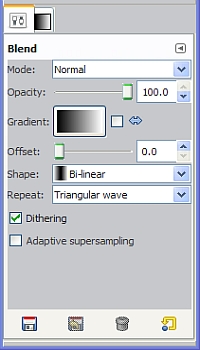
Drag from the middle of your image a short distance to the right or left as shown in the image below to create your gradient.
It should look something like this.
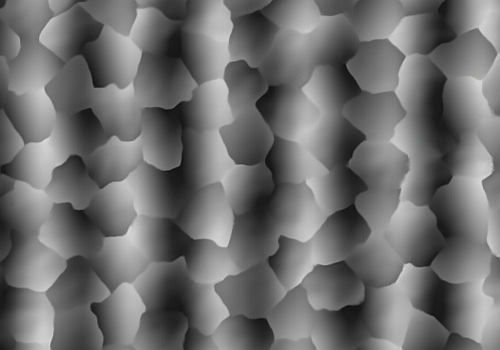
Go to Filters>Blur>Gaussian Blur and set the values to about 25 and click OK. Repeat the Gaussian Blur one more time, then lower the layer Opacity to about 70% and you have your galvanized roofing metal!
This particular image would look more realistic if our pattern cell size were smaller in ratio to the image size, but I just wanted to show you some other options with the one we have here.
Our image now looks like this.
Step 8.
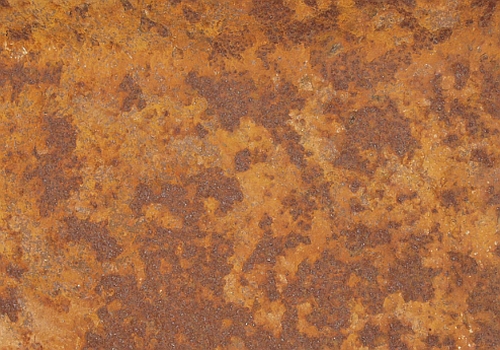
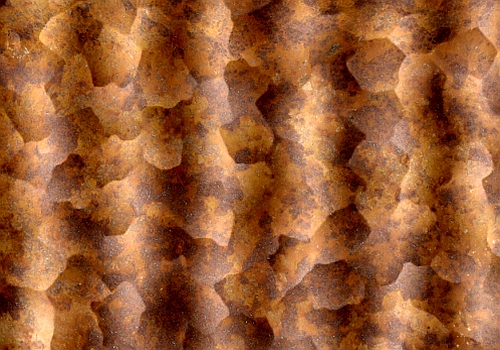
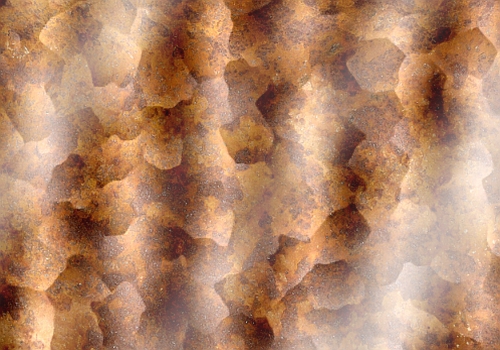
Let’s take it one more step and add that old worn out rusted look and some lighting effects. Go to Filters>Open as Layers and navigate to your favorite rusted metal image. I’m using one From CG Textures.com.
http://www.cgtextures.com/texview.php?i ... hcq3hagbm6This image was scaled about 40%. If you use this image or have to resize the one you use, then right click on it in the layers dialog and select Layer to Image Size after it is resized.
Set the layer Mode of the rust image layer to Grain Merge and the result will be something like this.
Another option is to Bump Map the rust layer with a depth of 3 to 5, using the rust layer itself as the map for a little more texture.
Step 9.
Let’s add a bit of lighting effects to our image by creating a custom highlight. Either delete or turn off the visibility to any other layers except the rust layer, the gradient layer and the galvanized layer. Right click in the layers dialog and select Merge Visible Layers. Create a new transparent layer above and fill it with a light gray color. Any color will do as this is just a temporary layer to make it easier to see how to do the next step.
Step 10.
Create another transparent layer above the gray layer and name it Highlights. Select the paintbrush tool and click the little arrow next to your FG/BG colors to reverse them and make white the FG color. Using different sizes of a circle brush from the tool dialog, make several vertical strokes of vaying widths. This is where the gray layer helps you to see the path that your brushstrokes will make so you can line it up and make your brush strokes perfectly vertical . Try to get something similar to this.
Step 11.
Now go to Filters>Blur>Gaussian Blur and set both values to 50 and click OK.
We want our stripes to be at an angle but if we rotate our layer now it will be too small and not cover the corners of our image so we need to make it a little bigger.
Step 12.
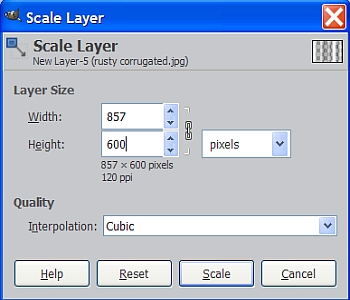
Go to Layer>Scale Layer and make sure the scale type is set to Pixels and set the Width to 857 and the Height to 600, then click on the Scale button at the bottom of the tool dialog.
You can also accomplish the same thing by using the Scale tool and clicking on your image to activate the tool before entering your settings.
Step 13.
Now select the Rotate tool and click on your image to activate the tool. Set the angle to 35 degrees and click the Rotate button at the bottom of the tool dialog.
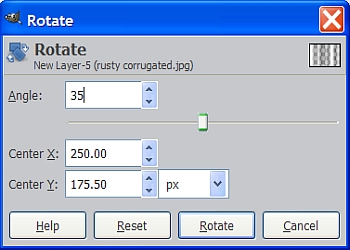
When you have finished scaling and rotating your highlights layer, Right click on it in the layers dialog and select Layer to Image Size.
Your highlights should now form a soft, diagonal glow effect like this.
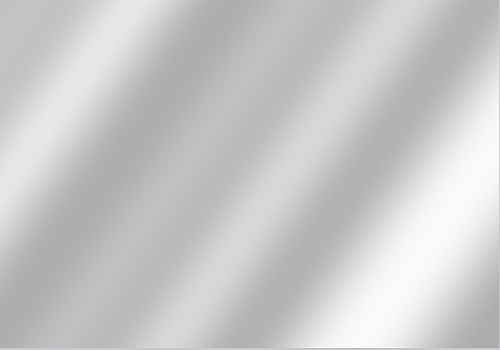
Set the layer Opacity to about 70% then turn off or delete the gray layer and your rusty corrugated roof metal takes on a whole new look.
Now you know how to make simple custom highlights and have a couple of different methods for using for galvanized metal patterns.
The galvanized metal pattern also works well when making 3D objects.
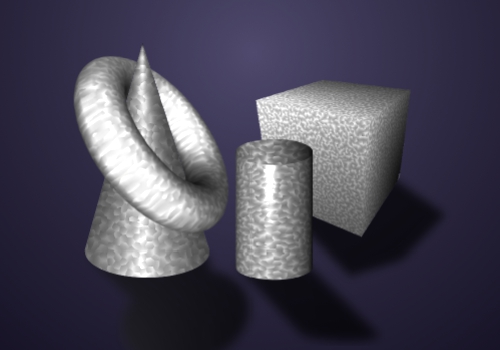
I’m sure you can find several tutorials available on the internet which will show you how to make 3D objects with Gimp if you don’t already know how.
I hope you enjoyed this tutorial.
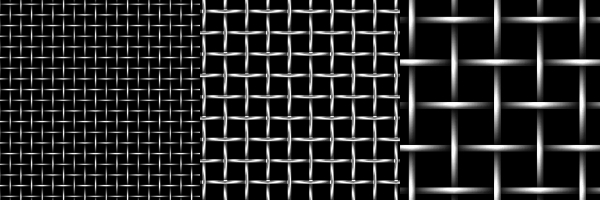
Metal Wurx – Part V will be coming soon and will show you how to make an interwoven metal pattern from scratch for making metal screens with highlights or (you guessed it) chrome.