It is currently Thu Apr 25, 2024 1:57 am


All times are UTC - 5 hours [ DST ]


Post new topic Reply to topic  [ 35 posts ]  Go to page 1, 2  Next
Author Message
 Post subject: How to Make a Hex Bolt Head - Metal Wurx - Part VIII
PostPosted: Sat Mar 17, 2012 3:01 am  (#1) 
Offline
GimpChat Member
User avatar

Joined: Aug 24, 2011
Posts: 1785
Location: Dallas, TX
I wanted to include a few segments in our Metal Wurx series to cover some simple techniques for making bolts, rivets, screws and other items for fastening metal parts. You can download these type items as brushes from places like Deviant Art, but if you don’t find exactly what you want, you can always make your own. You will need to download the Hex shaped brush I have included, in order to complete the first part of this tutorial. You will also need Gino D’s Drawable Multiplication script which can be downloaded from the Gimp Plug-in Registry. Here’s the link.

http://registry.gimp.org/node/22383 .

Place this script in your Gimp “user “Scripts folder and refresh your scripts before continuing this tutorial. OK, Let’s get started.
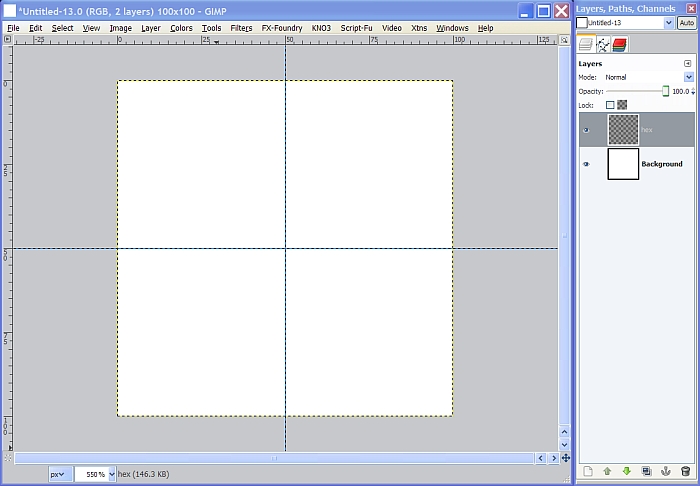
Step 1.
Open a new image 100x100 pixels but make the resolution 1200 because these will be very small, and we want to retain as much detail as possible.

Step 2.
Create a new transparent layer named Hex. Set your view setting to 800%, just for accuracy sake, and create a vertical and horizontal guide in the center of the image at 50 pixels, then Zoom out to reduce your view setting to 550%.
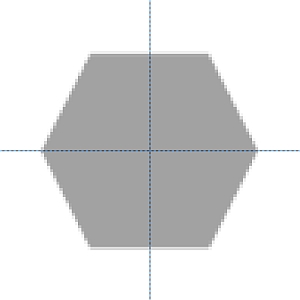
Image

Step 3.
Download the Hex brush provided and install it into your “user” folder and refresh your brushes. Select the Brush tool and select the Hex brush, then set the brush size to .70. Place your mouse cursor at the exact center of your image where the guides intersect and left click your mouse button one time to “paint” the hex shape onto your transparent layer. Tick the box at the top of your layers dialog and Lock the alpha channel. Set your Foreground color to A2A2A2, then drag the light gray color over to your image to fill the hex shape with the gray color. Unlock the alpha channel and go to step 4.
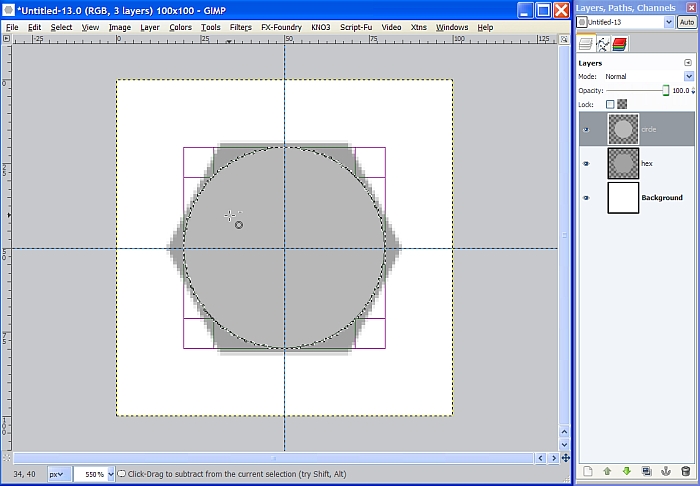
Image

Step 4.
Create a new transparent layer above the Hex layer and name it Circle. Select the Ellipse tool and tick the boxes for Expand from center and Fixed. Place your mouse cursor at the exact center where the guides intersect and make a selection that just inside the edges about 1 pixel from the outside edge of the hex shape. Change your Foreground color to B8B8B8 and drag your Foreground color over to the selection to fill it with the lighter shade of gray like this.

Image

Right click on the circle layer in the layers dialog and select Merge Down. Reset your FG/BG colors to the default black and white, and fill your background layer with black to make things easier to see for the next steps.

Step 5.
Change your view setting back to 800% then Create a new transparent layer named Bumps. Create two new horizontal guides at 30 pixels and 70 pixels. Select the Rectangle Select tool and check the two little boxes in the tool dialog, for Rounded corners, and Expand from center. The default Radius setting is 5 so let’s just use that.

Reduce the Opacity of the hex layer to about 50%, then select the Bumps layer and starting at the intersection of the middle vertical guide and the top horizontal guide at 30 pixels, make a vertical selection 4 pixels by 16 pixels so that it is positioned like in the image below

Image

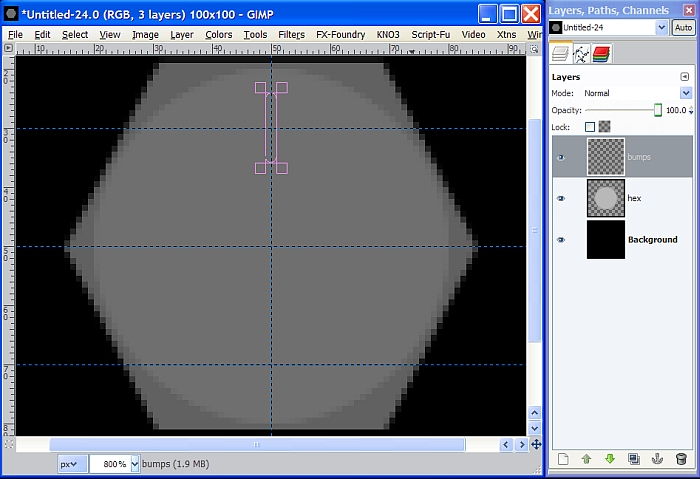
Change your Foreground color back to the B8B8B8 color and drag it over to the selection to fill it.

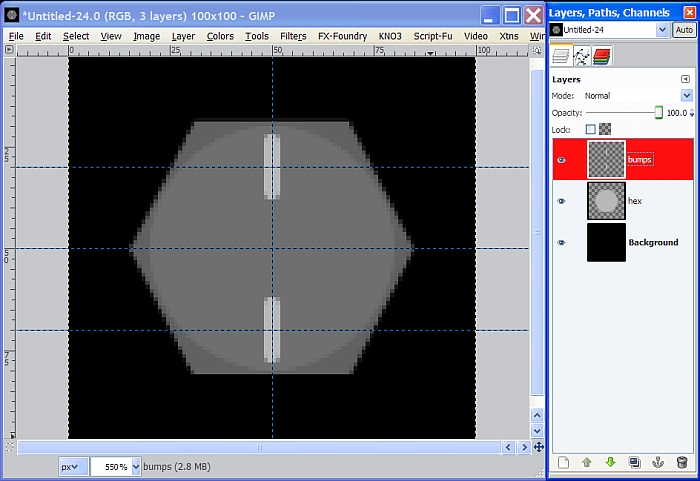
Duplicate the Bumps layer and go to Layer>Transform>Flip vertically. Right click on the duplicate layer and select Merge Down. You should now have one Bumps layer with two bumps. We will use this layer to create two more.

Image

Step 6.
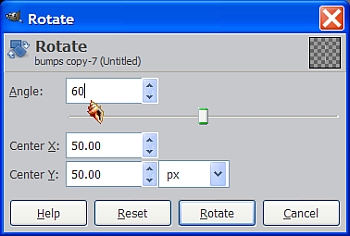
Duplicate the Bumps layer and with the duplicated layer active, go to Layers>
Transform>Arbitrary Rotation. When the rotation dialog pops up, set the angle to 60 degrees and click Rotate.

Image

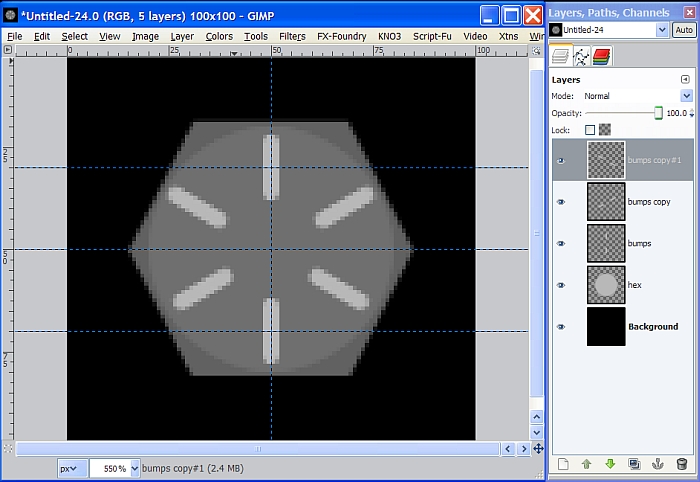
Now duplicate that layer (the one you just rotated) and on that duplicated layer, go to Layer>Transform>Flip Horizontally and you should end up with 6 bumps total and positioned like this.

Image

Step 6.
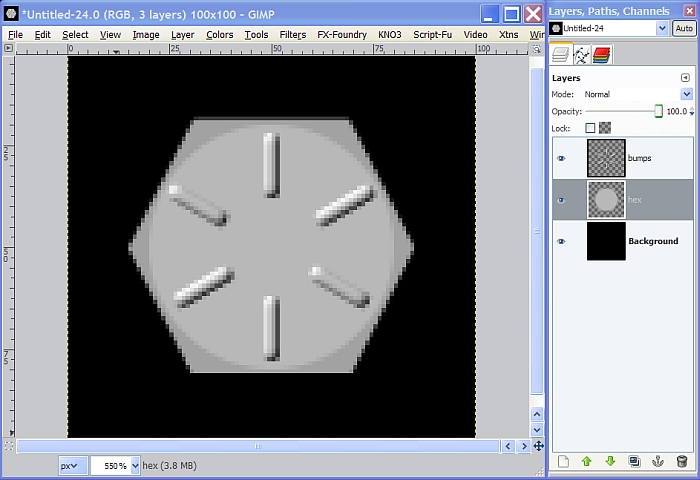
Starting with the top layer in the layer stack, Right click and select Merge Down. Do this one more time until all three bumps layers are merged into one layer. Right click on it again, and select Layer to Image Size.

Step 7.
Now we need to give our bumps some shape to make them look raised above the surface of our bolt head. The Bumps layer should still be the active layer so duplicate it one time and rename the duplicated layer to Blur. Go to Filters>Blur>Gaussian Blur and enter 2 for both settings and click OK, then turn off the visibility of the Blur layer, and select the Bumps layer to make it the active layer again.

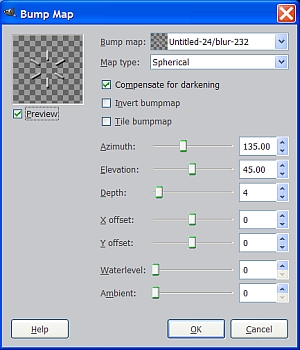
Go to Filters>Map>Bump Map and set the Map type to Spherical. Make sure the blur layer is selected at the top of the dialog as the Bump map. Set the depth to 4 and leave the rest of the settings at the default, and click OK.

Image

Now we can reset the visibility of our Hex layer back to 100% again and delete the Blur layer. We can also delete the guides so you should now have only three layers.

Image

Step 8.
Right click on the Bumps layer and merge it down with the Hex layer. Create a new transparent layer above it and name it Gradient. Set the layer Mode to Overlay. Reset your FG/BG colors back to the default black and white. Select the Blend tool and set the Gradient to FG to BG (RGB), and the shape to Linear. Either check the little box or click
on the arrows beside the gradient to reverse it.

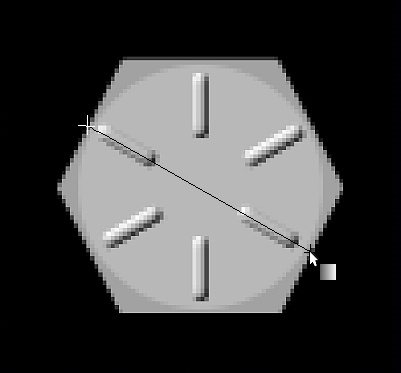
Right click on the Hex layer and select Alpha to Selection, then reselect the gradient layer to make it active again. Drag from left to right at a downward angle across the selection, and make your gradient path go straight through two of the bumps like so. It doesn’t have to be exact, we’re just using the bumps as a guide to get the angle.

Image

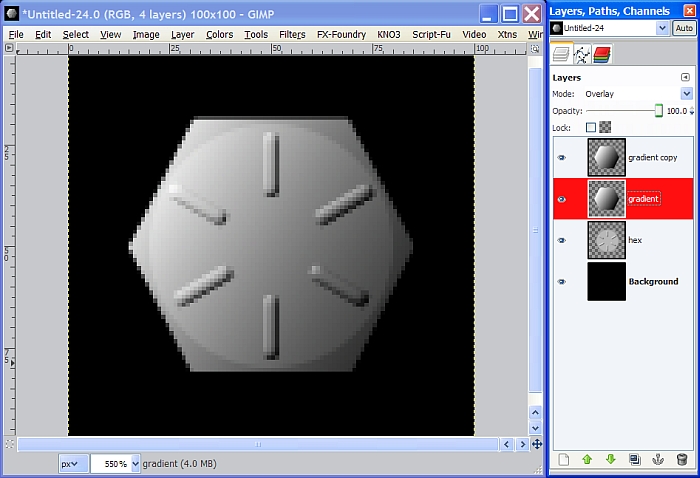
Once you have your gradient. Go to Select>None to turn off the selection, duplicate the Gradient layer and set the layer Mode of the duplicate to Multiply, then reduce the Opacity to 50%.

Image

NOTE: Another option would be to apply a layer mask to the Hex layer, Alpha to Selection, then apply the gradient (without reversing it) to the mask, but I like to use the two separate layers for more control over the intensity of the gradient.

Step 8.
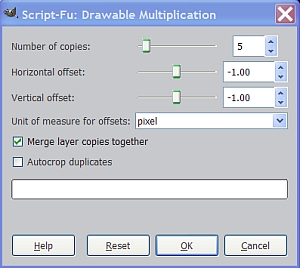
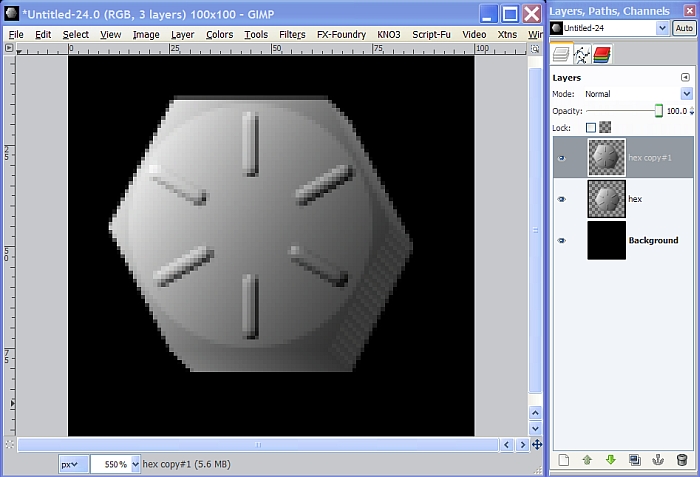
Turn off the visibility of the background layer and right click in the layers dialog to Merge Visible Layers, then turn the background layer visibility back on again. Right click on the Hex layer and select Drawable Multiplication and enter the following settings.

Image

You will now have another layer consisting of the multiplied copies made by the filter, to make the image appear to be 3D. It’s not really easy to distinguish from the rest of the image unless you are zoomed in, so let’s make a few adjustments.

Image

Step 9.
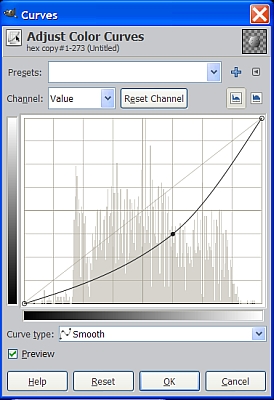
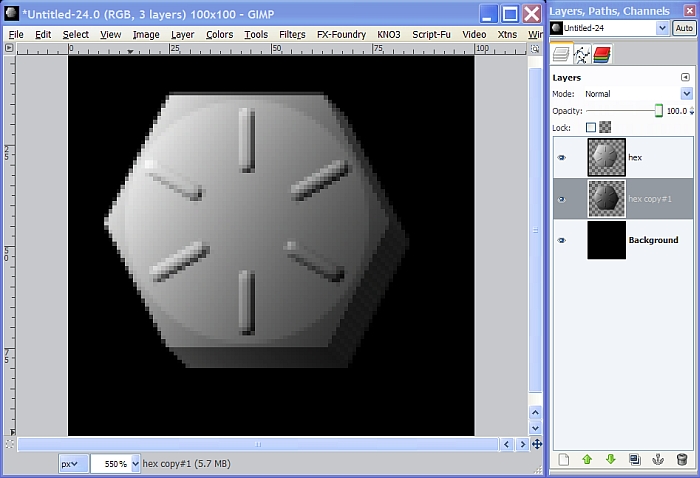
Move the Hex layer above the Hex copy layer, in the layer stack. You will notice the Hex layer is now out of position, so to correct this, select the Move tool, and make sure to tick the circle in front of Move the active layer in the tool options. Click on the image to activate the tool and use your arrow keys to move the Hex layer 6 pixels up and 6 pixels to the left, into the correct position. Now select the Hex copy layer, and go to Colors>Curves and adjust the curve downward about one square to make the “3D” portion a little darker.

Image

Here's what your image should look like after adjusting the curves.

Image

Step 10.
Right click on the Hex layer and select Merge Down. When you do this it will have the name “Hex copy” of the layer below it so rename it back to Hex. Fill your background layer with white and click on the Hex layer to make it active. Go to Filters>Light and Shadow>Drop Shadow and enter the following settings.

Image

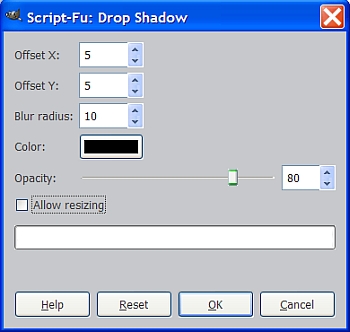
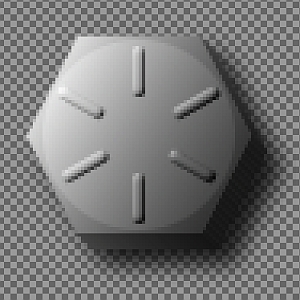
Now we have our #8 grade hex bolt head. Complete with lighting and shadow effects. Merge the Hex layer down, delete the background layer and save as a .png so you have a transparent background. This makes it easy to place as a layer on top of a metal plate layer or even better, you can save it as a .gih brush and save it in your Gimp User Brushes folder.

Image

I hope you liked this tutorial.

Metal Wurx IX will show you how to make rivets, and screw heads from scratch.


Attachments:
Hex.gbr [39.09 KiB]
Downloaded 474 times

_________________
Image
Share on Facebook Share on Twitter Share on Orkut Share on Digg Share on MySpace Share on Delicious Share on Technorati
Top
 Post subject: Re: How to Make a Hex Bolt Head - Metal Wurx - Part VIII
PostPosted: Sat Mar 17, 2012 11:09 pm  (#2) 
Offline
GimpChat Member
User avatar

Joined: Jan 20, 2012
Posts: 583
I think you need to tilt the little lines and the top piece of the bolt with the perspective tool to give it more of a complete 3d look...other than that, pretty friggen awesome drac!

_________________


"In the face of adversity, there's three things: fly, freeze or fight; We're choosing to fight..."- Guy Boucher, Tampa Bay Lighting Head Coach


Top
 Post subject: Re: How to Make a Hex Bolt Head - Metal Wurx - Part VIII
PostPosted: Sun Mar 18, 2012 4:34 am  (#3) 
Offline
GimpChat Member
User avatar

Joined: Aug 24, 2011
Posts: 1785
Location: Dallas, TX
Thanks for the compliment Zward117. If this were intented to be strictly a bolt head, perhaps some perspective would be in order, however, in the pic below you can see the intended use as a brush to simulate bolts raised above a metal surface. This image was made completely from scratch using one of the metallic gradients (24 in all) that I'll be posting in another Metal Wurx segment coming up soon.

It is supposed to simulate metal plates bolted together with the bolts made out of a similar metal. The bolts were all done on a transparent layer then I duped the metal layer, placed it above the bolts layer and set it to grain merge. I alpha selected the bolts, inverted the selection and then on the duped metal hit delete. Merged down and then applied my drop shadow to the bolt layer.

I don't think using using perspective here would work well. It would probably be too much angle to look right.


Attachments:
Bolted Metal.jpg
Bolted Metal.jpg [ 311.34 KiB | Viewed 10689 times ]

_________________
Image
Top
 Post subject: Re: How to Make a Hex Bolt Head - Metal Wurx - Part VIII
PostPosted: Sun Mar 18, 2012 1:31 pm  (#4) 
Offline
GimpChat Member
User avatar

Joined: Jan 20, 2012
Posts: 583
I see! Thats awesome cant wait for that section in the series

_________________


"In the face of adversity, there's three things: fly, freeze or fight; We're choosing to fight..."- Guy Boucher, Tampa Bay Lighting Head Coach


Top
 Post subject: Re: How to Make a Hex Bolt Head - Metal Wurx - Part VIII
PostPosted: Sun Mar 18, 2012 1:47 pm  (#5) 
Offline
Global Moderator
User avatar

Joined: Nov 16, 2011
Posts: 5128
Location: Metro Vancouver, BC
I like the tutorial, it gave me ideas for other brushes to make. I don't use the power of brushes as often as I should.

_________________
Image
Gimp 2.8.18, Linux, median user
Gimp Chat Tutorials Index
Spirit Bear (Kermode)


Top
 Post subject: Re: How to Make a Hex Bolt Head - Metal Wurx - Part VIII
PostPosted: Mon Mar 19, 2012 9:48 am  (#6) 
Offline
GimpChat Member
User avatar

Joined: Aug 24, 2011
Posts: 1785
Location: Dallas, TX
Odinbc wrote:
I like the tutorial, it gave me ideas for other brushes to make. I don't use the power of brushes as often as I should.


Thank you sir. When I get a few minutes to spare, the next segment will cover rivets and screws so you'll have a few more brushes to add to your arsenal.

_________________
Image


Top
 Post subject: Re: How to Make a Hex Bolt Head - Metal Wurx - Part VIII
PostPosted: Mon Mar 19, 2012 10:04 am  (#7) 
Offline
GimpChat Member
User avatar

Joined: Aug 24, 2011
Posts: 1785
Location: Dallas, TX
ZWard117 wrote:
I think you need to tilt the little lines and the top piece of the bolt with the perspective tool to give it more of a complete 3d look...other than that, pretty friggen awesome drac!


You did get me thinking about using the perspective tool though and for stand alone images, it does lend a bit more realism. Not sure what you meant by "tilt the little lines". The bumps or raised markings perhaps?

Anyway, check out the pic below and let me know if this is what you were thinkingl


Attachments:
chrome bolt head.jpg
chrome bolt head.jpg [ 123.67 KiB | Viewed 10653 times ]

_________________
Image
Top
 Post subject: Re: How to Make a Hex Bolt Head - Metal Wurx - Part VIII
PostPosted: Mon Mar 19, 2012 11:39 am  (#8) 
Offline
GimpChat Member
User avatar

Joined: Jan 20, 2012
Posts: 583
Yup that about sums up what I was saying. Its too bad the perspective tool causes so much pixalation though.

_________________


"In the face of adversity, there's three things: fly, freeze or fight; We're choosing to fight..."- Guy Boucher, Tampa Bay Lighting Head Coach


Top
 Post subject: Re: How to Make a Hex Bolt Head - Metal Wurx - Part VIII
PostPosted: Mon Mar 19, 2012 11:46 am  (#9) 
Offline
GimpChat Member
User avatar

Joined: Aug 24, 2011
Posts: 1785
Location: Dallas, TX
OK, I'm on roll now with this perspective thing. It's all your fault, Zward117. :hehe

How 'bout some threads to go with that? Of course it would look better if the head part had better resolution and scale in relation to the shaft. Just playing around and also decided to make it look like brass even though there is no such thing as a #8 grade brass bolt. Too soft a metal......


Attachments:
Brass bolt perspective.png
Brass bolt perspective.png [ 198.38 KiB | Viewed 10649 times ]

_________________
Image
Top
 Post subject: Re: How to Make a Hex Bolt Head - Metal Wurx - Part VIII
PostPosted: Mon Mar 19, 2012 12:52 pm  (#10) 
Offline
GimpChat Member
User avatar

Joined: Jan 20, 2012
Posts: 583
Threads kinda need to rotate down the shaft. Bolts have an auger style threading, but man that is fricken awesome!!!!

_________________


"In the face of adversity, there's three things: fly, freeze or fight; We're choosing to fight..."- Guy Boucher, Tampa Bay Lighting Head Coach


Top
 Post subject: Re: How to Make a Hex Bolt Head - Metal Wurx - Part VIII
PostPosted: Mon Mar 19, 2012 1:14 pm  (#11) 
Offline
GimpChat Member
User avatar

Joined: May 16, 2010
Posts: 14709
Location: USA
Very good likeness in my opinion.
I would go without the shadow though and let the user add it in.
This would make a really cool image hose (GIH), if the bolt head were rotated (the face), slightly each image.
Just to give the illusion of each bolt head tightened differently. :)

Great tutorial.I can't wait for more of the same!

_________________
Image
Edmund Burke nailed it when he said, "The only thing necessary for the triumph of evil is for good men to do nothing."


Top
 Post subject: Re: How to Make a Hex Bolt Head - Metal Wurx - Part VIII
PostPosted: Mon Mar 19, 2012 1:37 pm  (#12) 
Offline
GimpChat Member
User avatar

Joined: Aug 24, 2011
Posts: 1785
Location: Dallas, TX
You are absolutely right Zward117. I was in such a hurry to throw something together I never thought about it. I wish I had saved the xcf file now. It would be a piece of cake to sheer the threads a bit.

Rod-Thanks for the praise (soaking it up like a sponge)It would be pretty simple to make that rotating brush. Here's a gif for now, be back with the brush in a jfify.


Attachments:
Hex Bolt.gif
Hex Bolt.gif [ 83.47 KiB | Viewed 1852 times ]

_________________
Image
Top
 Post subject: Re: How to Make a Hex Bolt Head - Metal Wurx - Part VIII
PostPosted: Mon Mar 19, 2012 5:44 pm  (#13) 
Offline
GimpChat Member

Joined: Apr 12, 2010
Posts: 5870
hy about the pixelation after using the prospective tool you may try my trick:

just work at much bigger size of final desired size (2x or even 3x)
then finished apply a slight (from 1 to 2 px ) gaussian blur and scale down

In theory scale down degrade the image but in practice often what technically is a degradation is a improvement from a aesthetic point of view...and can be used to minimize pixelation and jagging

weird as may sound a SLIGHT gaussian (slight=i'm working now mostly at 4800x3200 and i use less then 2px G. blur ) before scaling down gave usually more clean and neat edges

Scale down may also decrease a bit the contrast but in case does too much a touch of unsharp mask (better unsharpmask2 or gmic unsharp , that may use a more natural looking dark halo for sharpen , instead then gimp UM that use mostly white halo) should solve

_________________
My 3D Gallery on Deviantart http://photocomix2.deviantart.com/
Main gallery http://www.flickriver.com/photos/photocomix-mandala/
Mandala and simmetry http://www.flickriver.com/photos/photocomix_mandala/

Image

Mrs Wilbress


Top
 Post subject: Re: How to Make a Hex Bolt Head - Metal Wurx - Part VIII
PostPosted: Tue Mar 20, 2012 4:42 am  (#14) 
Offline
GimpChat Member
User avatar

Joined: Aug 24, 2011
Posts: 1785
Location: Dallas, TX
Good advice PC.

I had already created the hex head for a brush so a lot of detail was not needed for a 100x100 pixel image. When I made the whole bolt, I was playing around with different techniques for creating threads and just grabbed the image of the hex head just to quickly make the bolt but the threads were from a 1000x1000 pixel image. That's why I has so much pixelization. That plus the perspective tool.

If I were to start from scratch, and at a higher resolution as you suggested, I'm sure the results would have been much better, but like I said, it was just a quickie.

_________________
Image


Top
 Post subject: Re: How to Make a Hex Bolt Head - Metal Wurx - Part VIII
PostPosted: Tue Mar 20, 2012 11:44 am  (#15) 
Offline
GimpChat Member
User avatar

Joined: May 16, 2010
Posts: 14709
Location: USA
Draconian wrote:
You are absolutely right Zward117. I was in such a hurry to throw something together I never thought about it. I wish I had saved the xcf file now. It would be a piece of cake to sheer the threads a bit.

Rod-Thanks for the praise (soaking it up like a sponge)It would be pretty simple to make that rotating brush. Here's a gif for now, be back with the brush in a jfify.

Remember though the lighting needs to be the same all over the face because it will change according to the users lighting requirements or additions.
Same with the perspective depth.That can be added by the user.
Just an animated brush of the bolt face is needed. :)

Thanks!

_________________
Image
Edmund Burke nailed it when he said, "The only thing necessary for the triumph of evil is for good men to do nothing."


Top
 Post subject: Re: How to Make a Hex Bolt Head - Metal Wurx - Part VIII
PostPosted: Tue Mar 20, 2012 1:26 pm  (#16) 
Offline
GimpChat Member
User avatar

Joined: Aug 24, 2011
Posts: 1785
Location: Dallas, TX
Well, I'm stuck and can't get the brush to rotate. I've tried several combinatons and just can't remember how to do it. I even referenced a couple of tutorials but could not get it to work. Here's the xcf. if someone wants to make the brush. I know I need to delete the gradient and everything, I just want to know what the settings are to get the brush to rotate.


Attachments:
Hex Bolt_gif.xcf [364.17 KiB]
Downloaded 91 times

_________________
Image
Top
 Post subject: Re: How to Make a Hex Bolt Head - Metal Wurx - Part VIII
PostPosted: Tue Mar 20, 2012 8:38 pm  (#17) 
Offline
GimpChat Member
User avatar

Joined: May 16, 2010
Posts: 14709
Location: USA
You just create a few images with the bolt rotated slightly in each.Then save as a GIH extension.
The gimp brush pipe dialog will appear when you decide to save it as GIH.

_________________
Image
Edmund Burke nailed it when he said, "The only thing necessary for the triumph of evil is for good men to do nothing."


Top
 Post subject: Re: How to Make a Hex Bolt Head - Metal Wurx - Part VIII
PostPosted: Wed Mar 21, 2012 7:23 am  (#18) 
Offline
GimpChat Member
User avatar

Joined: Aug 24, 2011
Posts: 1785
Location: Dallas, TX
Rod wrote:
You just create a few images with the bolt rotated slightly in each.Then save as a GIH extension.
The gimp brush pipe dialog will appear when you decide to save it as GIH.


Rod - Been there done that...take a look at the xcf file above. There are 24 frames of rotation but it's the settings in the gih brush dialog that I can't seem to get right. I need someone to screenshot the settings to get the brush to rotate. No matter what I put in the settings, I still can't get it to rotate when I make a brush stroke with it.

_________________
Image


Top
 Post subject: Re: How to Make a Hex Bolt Head - Metal Wurx - Part VIII
PostPosted: Wed Mar 21, 2012 9:07 am  (#19) 
Offline
Global Moderator
User avatar

Joined: Apr 07, 2010
Posts: 14182
saving an animated brush

_________________
Image


Top
 Post subject: Re: How to Make a Hex Bolt Head - Metal Wurx - Part VIII
PostPosted: Wed Mar 21, 2012 10:00 am  (#20) 
Offline
GimpChat Member
User avatar

Joined: Aug 24, 2011
Posts: 1785
Location: Dallas, TX
molly wrote:


I appreciate your help, but I already had that one bookmarked. I have 24 cells/frames and the rank only goes up to 4 so ....again.....What settings do I use to make my brush rotate?

_________________
Image


Top
Post new topic Reply to topic  [ 35 posts ]  Go to page 1, 2  Next

All times are UTC - 5 hours [ DST ]


   Similar Topics   Replies 
No new posts Attachment(s) Make people metal with GEGL

27

No new posts Attachment(s) Scripting my head into a wall - Any help would be appreciated

1

No new posts Attachment(s) Eagle head stroked with lightning brush.

10

No new posts Attachment(s) Make a brush - Make a mandala

311

No new posts The other part of our Universe! Spacescape2.py

5


* Login  


Powered by phpBB3 © phpBB Group