How to Make 3D Push Buttons
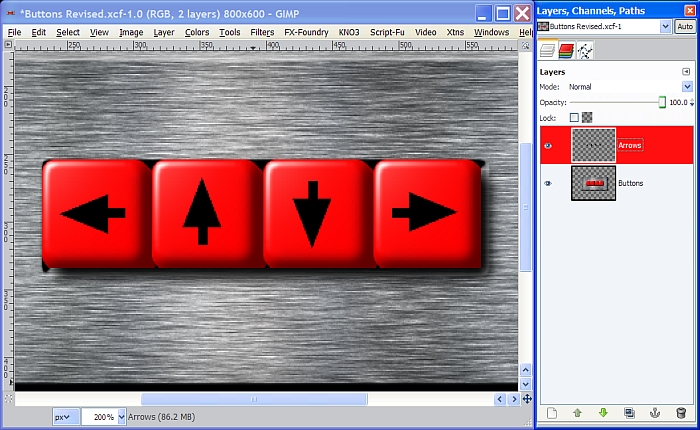
In this segment, I’m going to show you how to make a small panel with four raised push buttons for a Control Panel. You will need quite a few things in order to complete this tutorial which are listed below. Get everything installed before you begin the tutorial.
Python -
http://www.python.org/ftp/python/2.6/python-2.6.msi.
Selection Bevel script -
http://gimpscripts.com/2011/10/selection-bevelLayer Effects -
http://gimpscripts.com/2011/10/gimp-layer-effects/ (Python version)
Drawable Multiplication -
http://registry.gimp.org/node/22383Glossy Stroke script -
http://gimpscripts.com/2011/10/glossy-stroke-3d/The two images and the brush from the attached Resources zip file.
Step 1.
Open a new layer 800 x 600 pixels and set your resolution at 1200 ppi.
Step 2.
Create a new transparent layer and call it “Buttons”, then duplicate it and rename it Metal. Place a vertical guide at 400 pixels and a horizontal guide at 300 pixels using the rulers at the top and left of your image window. Zoom in to 200% if you need to.
Step 3.
Click on the Rectangle Select tool and in the tool dialog check the box for Expand from center. Place your mouse cursor in the exact center and create a selection 500 x 200. Set your FG color to C3C3C3, and drag the color over to the selection to fill it.
Step 4.
Take a minute or two and make yourself some brushed metal with Noise and Motion Blur. Adjust your Curve settings to darken it a bit, then add a new layer, apply a metallic gradient and set the layer Mode to Overlay. If you are not familiar with this process you can review my first Metal Wurx segment here
viewtopic.php?f=23&t=3750 or
Skip Steps 3 & 4, and simply go to File>Open as Layers and select a brushed metal image like the one I provided in the attached zip folder, or just copy this one.
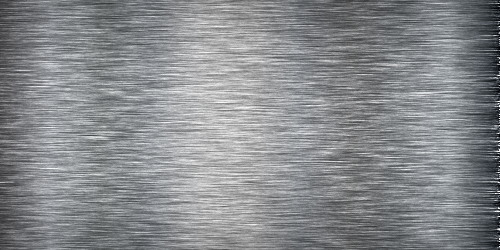
If you’re using a brushed metal image, be sure to right click to Add Alpha Channel.
Step 5.
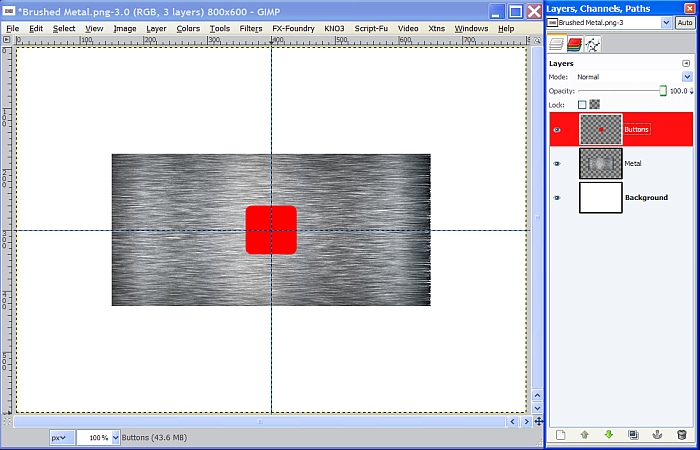
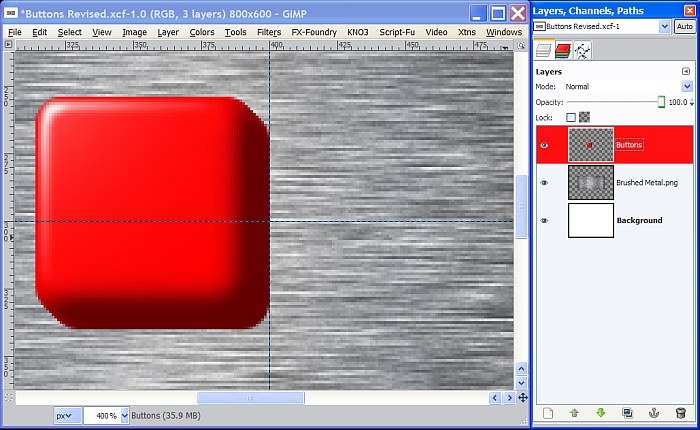
Select the Buttons layer to make it active again, and move it to the top of the layer stack. Click on the box for Rounded Corners in the Rectangle Select tool dialog and set the Radius to 10. Check the box for Fixed (Aspect ratio) as well. Change your view setting to about 200% and use the guides to make a selection 80 pixels x 80 pixels. Change the FG color to red (FF0000) and drag it over to the selection to fill it with the red color and turn off the selection.
Step 6.
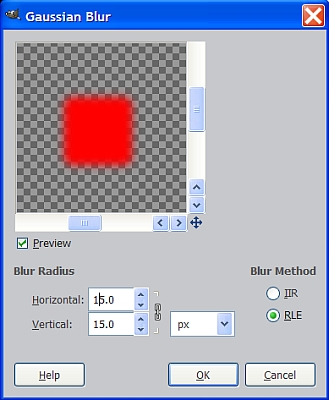
Duplicate the Button layer, then go to Filters>Blur>Gaussian Blur and use 15 for both amounts then click OK.
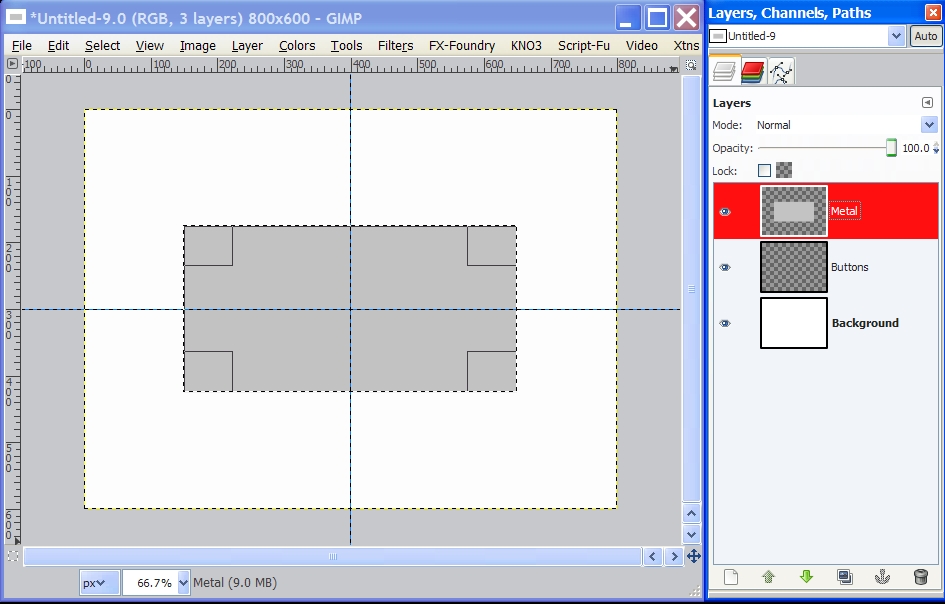
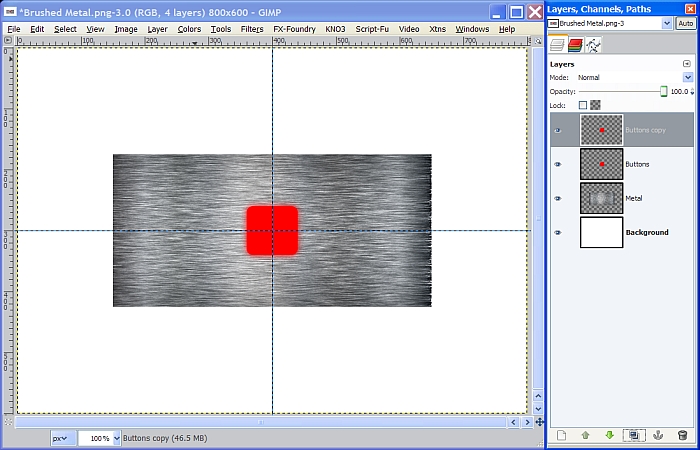
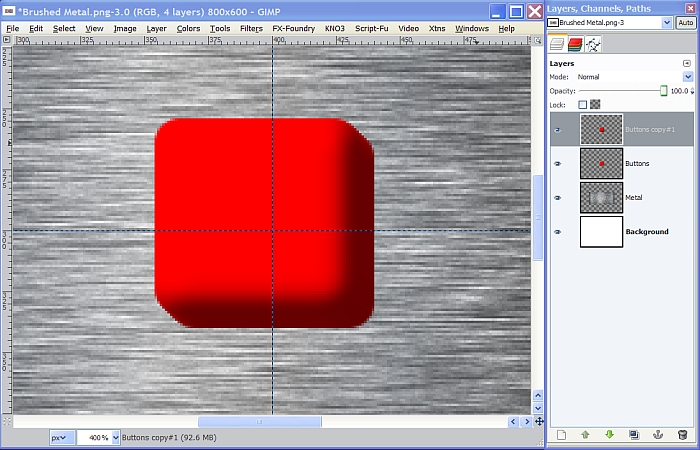
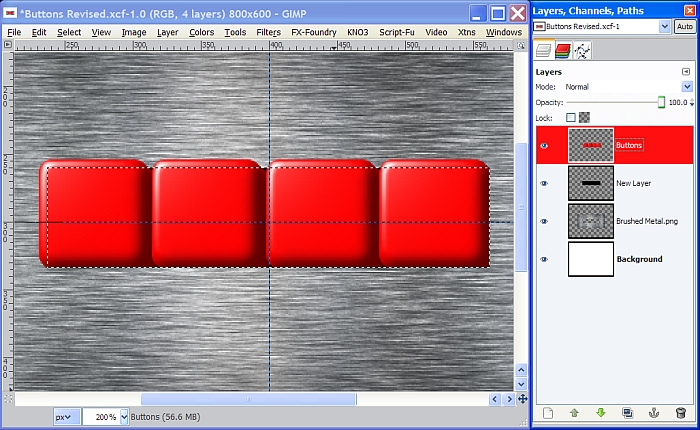
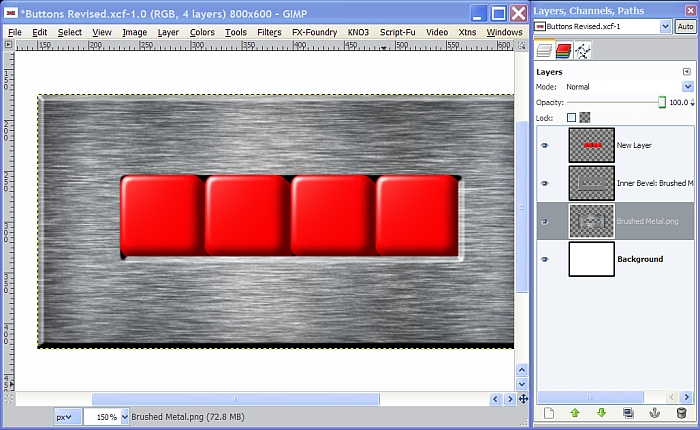
Here’s what your layers should look like so far.
Step 7.
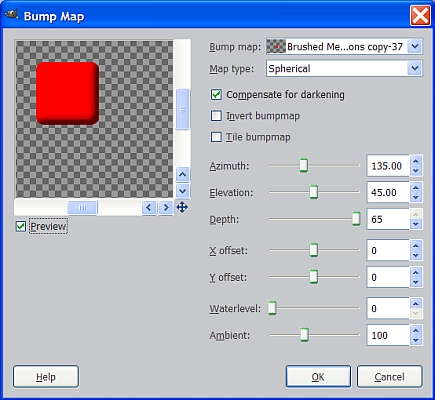
Turn off the visibility for the blurred Buttons copy layer and select the original Buttons layer to make it active again. Go to Filters>Map>Bump Map and enter these settings, then click OK.
Change your view settings to 400% and you will see some lines or distortions resulting
from the bump map process.
To fix this and smooth it out, check the little box at the top of the layers dialog (Lock) to lock the alpha channel. Now, repeat the blur process but only use 7 for the amount and click OK. When you are finished, tick the little box again unlock the alpha channel.
Step 8.
Now, delete the blurred Buttons copy layer at the top and right click on the Buttons layer to select Drawable Multiplication and use the following settings. Once you have all the settings entered, make sure you have the box checked to Merge layer copies together, then, click OK
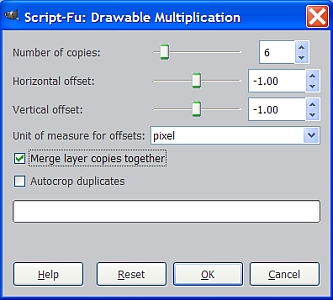
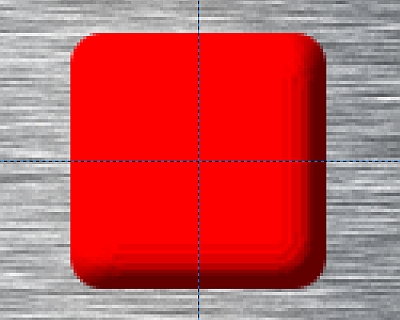
The script will generate the selected number of copies, offset each one incrementally and merge them all into one layer called Buttons copy #1. This creates the 3D effect for our button. Here is what our button looks like so far.
Right click on the Buttons copy #1 layer and select Merge Down so that we have a single Buttons layer again.
Step 9.
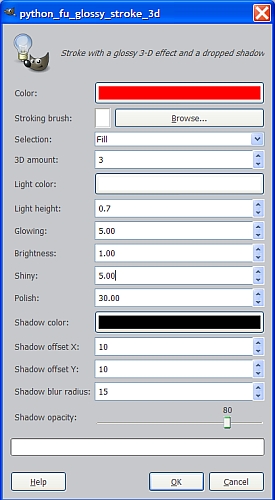
Right click on the original Buttons layer to make it active again and select Alpha to Selection. Go to Filters>Light and Shadow>Glossy Stroke 3D. When the dialog pops up the first thing we need to do is click on the band of color at the top and change the Color to FF0000 (red). Set the Selection to Fill, the 3D amount to 3 and the Light height to 0.7 then, click OK.
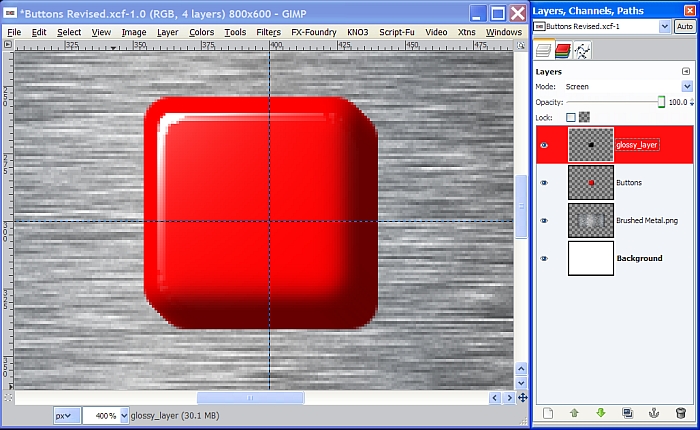
This gives our image even more depth with the lighting effects of the Glossy Stroke, but if you look over in the layers dialog, we have a lot of layers that have been added.
Turn off the selection and delete the Drop Shadow layer, the Stroke layer and both Volume layers so that the only layer leftover from the filter operation is the Glossy layer. Your image and layers should now look like this.
Step 10.
The glossy layer should still be selected and active so go to Filters>Blur>Gaussian blur and enter 3 for both settings and click OK. Select the Move tool and click on your image to activate the tool. Use the arrow buttons on your keyboard to move the Gloss layer closer to the top left corner. Hit the Up arrow button 4 times and the Left arrow button 3 times.
mg]http://www.gimpchat.com/files/1428_buttons_11.jpg[/img]
Step 11.
We need to reposition our button on the canvas so first, right click on the Gloss layer and Merge down so that we are back to a single Buttons layer again. The Move tool should still be selected but we still need to click on the image again to activate it for that layer. Now use your left arrow button on your keyboard to move the Buttons layer to the left until the far right edge is on our vertical guide like so.
Now, duplicate the Buttons layer three times.
Step 12.
Select the top layer (Buttons copy #2) and click on it in the image window to activate the Move tool for that layer and move it to the left using the left arrow button again until there is only one pixel between the two buttons at the top and bottom like this.
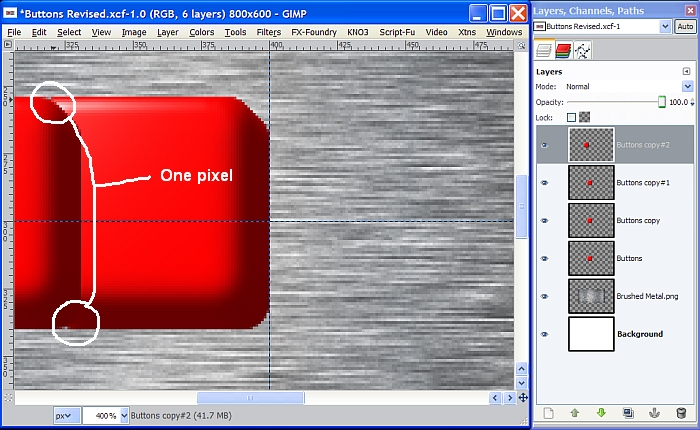
Now use the left arrow button and move it 14 more spaces for a total of 15 spaces.
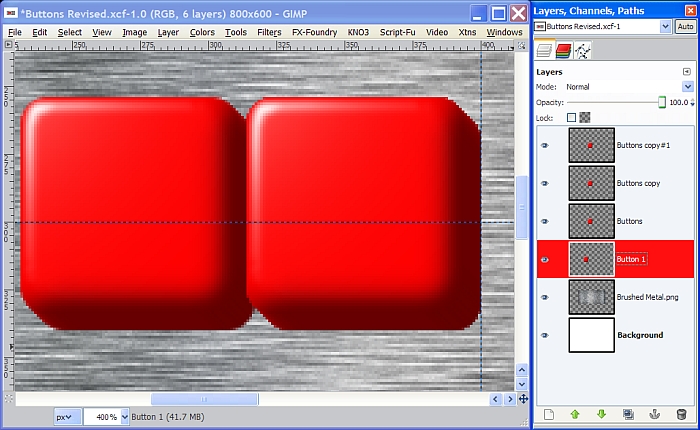
Rename this layer Button 1 and move it to the bottom of the button layers in the layer stack.
Step 13.
Rename the original Buttons layer to Button 2 and change your view setting to 200%. Repeat the procedure with the other two duplicate layers, moving and arranging in the layers stack so that you have four buttons all aligned and spaced equally and the layers renamed 1 thru 4.
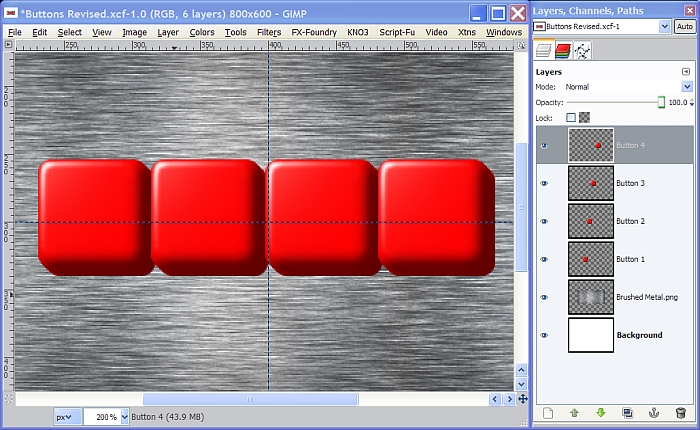
Step 14.
Turn off the visibility to the Background and Metal image layers and right click anywhere in the layers dialog to select Merge Visible Layers. When the dialog pops up, click on the Merge button. Now we are back to a single Buttons layer so rename it “Buttons” again. Now turn the visibility back on for the other two layers.
Step 15.
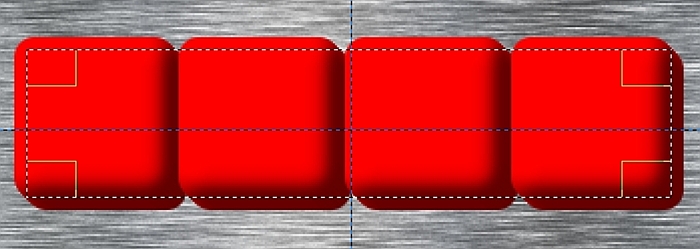
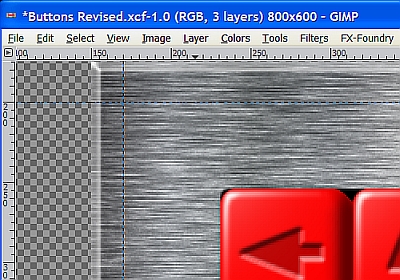
Select the Metal layer to make it active, and grab the Rectangle Select tool again. Be sure to uncheck all the boxes in the tool dialog. We’re going to make the slot that the buttons will be sitting in so make a selection until it is just above the bottom of the buttons and just inside the right side but just below the top and just inside the left. The top right and bottom left corners need to be equal distance from both edges.
Positioning this selection is easier to show than it is to explain so here’s what it should look like. Zoom in your view to check and make sure the positioning is correct. Remember the buttons will be sticking up and covering the top part while the bottom of the buttons will be sitting down inside the slot appearing to be hidden under metal panel. You’ll see what I’m talking about in just a minute.
When you are satisfied, hit the delete key to cut out the selection from the Metal layer. Look over at your layers in the layers dialog to make sure you see the slot in the metal layer or turn off the visibility of the Buttons layer temporarily if you want to see it better.
Step 16.
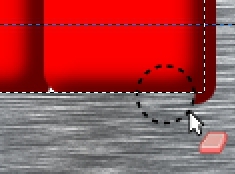
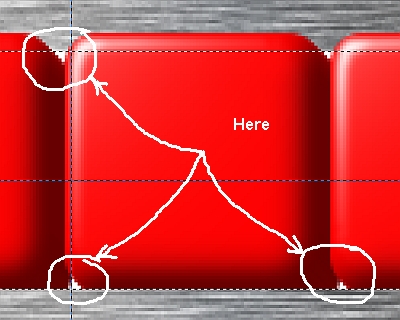
Select the Eraser tool and pick a fairly large circle brush. With the selection still active, go to Select>Invert then click on the Buttons layer to make it the active layer. Carefully erase the outside edges of the buttons, at the bottom and right hand sides of the selection only where the slot will be covering up the buttons. Be careful not to go past the bottom left or top right corners of the selection.
Change your view settings back to 400% for a moment and you will see that when we “cut out” the area from the center of the Metal layer, and erased the “hidden” parts of our buttons, we ended up with some small areas of the white background showing through the layers between the corners of our buttons. This is quick and easy to correct.
Step 17.
Create a new transparent layer below the Buttons layer, and since our selection is still active, go to Select>Invert. Now reset your FG/BG colors to the default black and white, and drag the black FG color over to the selection to fill it. This will give us a false background behind the buttons to get rid of the white areas.
Turn off the selection then, right click on the Buttons layer and Merge down the Buttons layer with the New Layer. We can also get rid of the guides now.
Step 18.
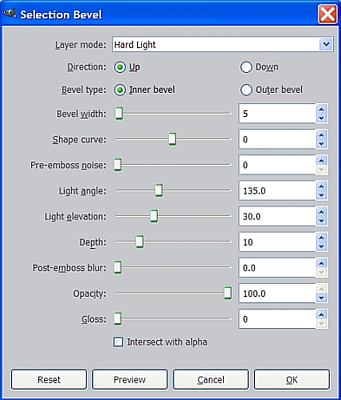
Go to View and select Zoom in to get to 150% then, right click the Metal layer in the layers dialog to choose Alpha to Selection. Go to Filters>Distorts>Bevel and enter the following settings shown below.
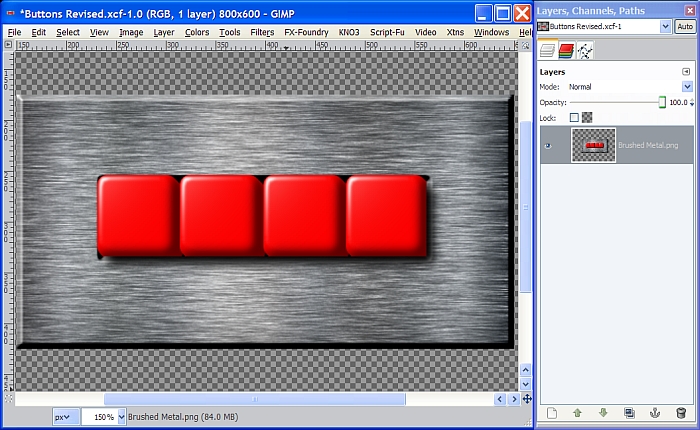
It will take a few seconds for the filter to run its course, but when it does, turn off the selection and here is what it should look like afterward.
Step 19.
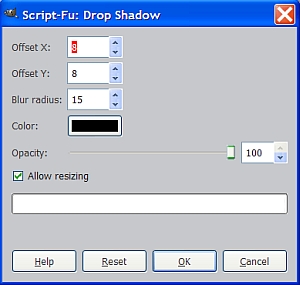
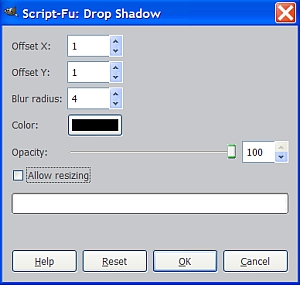
Delete the Background layer then right click on the Inner Bevel: Metal layer created by the Bevel filter, and select Merge Down. Click on the Buttons layer to make it active and go to Filters>Light and Shadow>Drop Shadow and enter the following values.
Once you have your Drop Shadow layer, right click anywhere in the layers dialog and select Merge Visible Layers then click on the Merge button in the filter dialog.
Now, that’s better. Our buttons look even more like they are raised up out of the panel, but we still need to give our buttons a purpose.
Step 20.
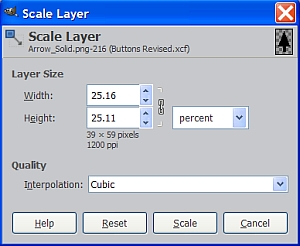
Go to File>Open as Layers and navigate to wherever you saved the “Arrow_Solid.png” image, from the Resources zip file, to open it as a new layer. It will be too large so we need to go to Layer>Scale Layer and click on the drop down box to select “percent”. Enter 25 for the amount (25%) and click on the “Scale” button. (it won’t stay at exactly 25 %)
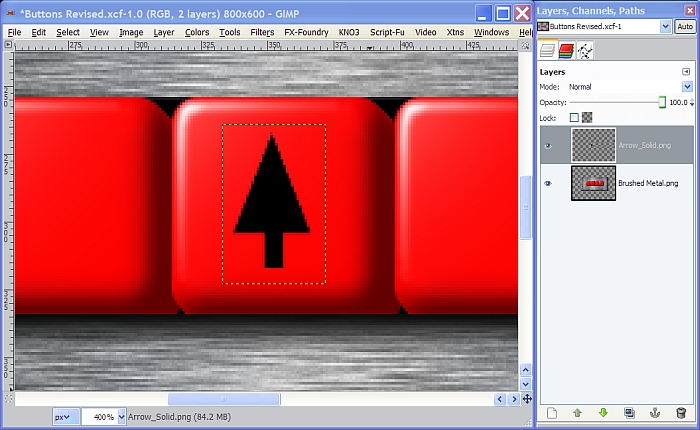
Once the Arrow image has been resized, change your view setting to 400%, select the Move tool, click on the Arrow image and position it in the center of the red part or “top face” of the second button from the left. Use the keyboard arrows to get it just right, if you need to, so that it looks like the screenshot below.
Step 21.
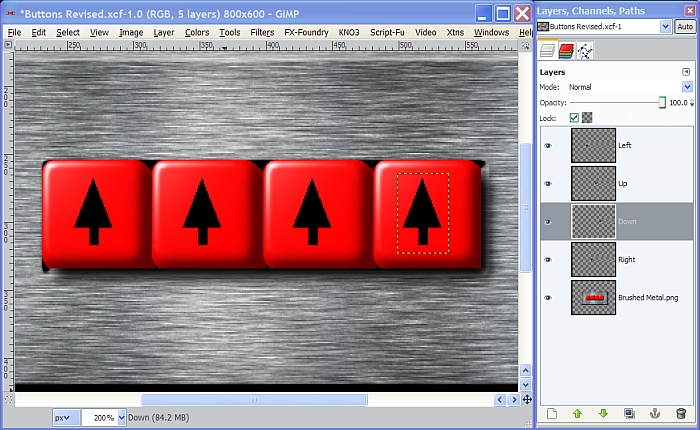
Duplicate the Arrow image layer 3 times and rename them “Left”, “UP”, “Down” and “Right”. Use the Move tool/keyboard arrows to reposition the arrows to the appropriate button then change your view setting to 200%.
Step 22.
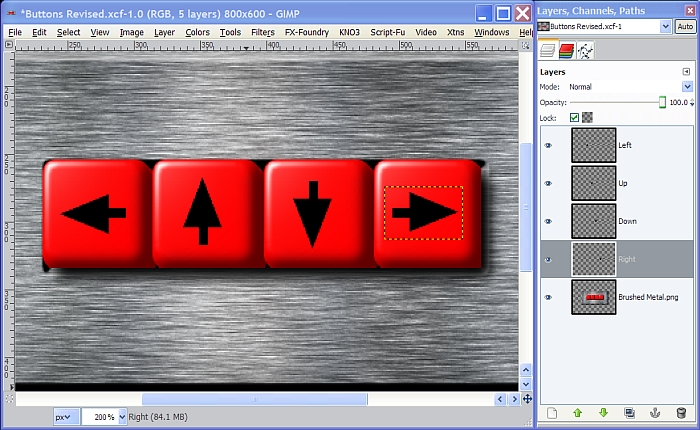
Select the top layer, “Left” and go to Layer>Transform>Rotate 90 degrees counter-clockwise. Now adjust the Down Arrow layer using Layer>Transform>Flip Vertically and the Right Arrow layer using Layer>Transform>Rotate 90 degrees clockwise, until they are all positioned correctly like so.
I guess we should have renamed our layer that still says “Brushed Metal.png” back to “Buttons” after Step 17 so there’s no confusion, so let’s go ahead and do that now.
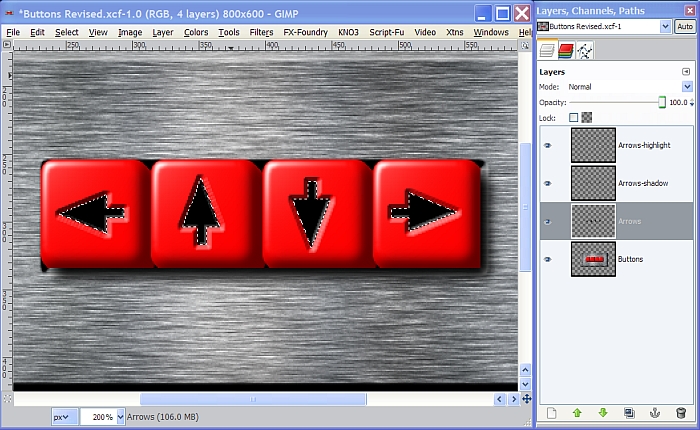
Next, turn off the visibility for the Buttons layer and right click in the layers dialog and use Merge Visible Layers again to make one layer with all four arrows. Rename this layer Arrows then, turn the visibility of the Buttons layer back on and we’re ready for the next step.
Step 23.
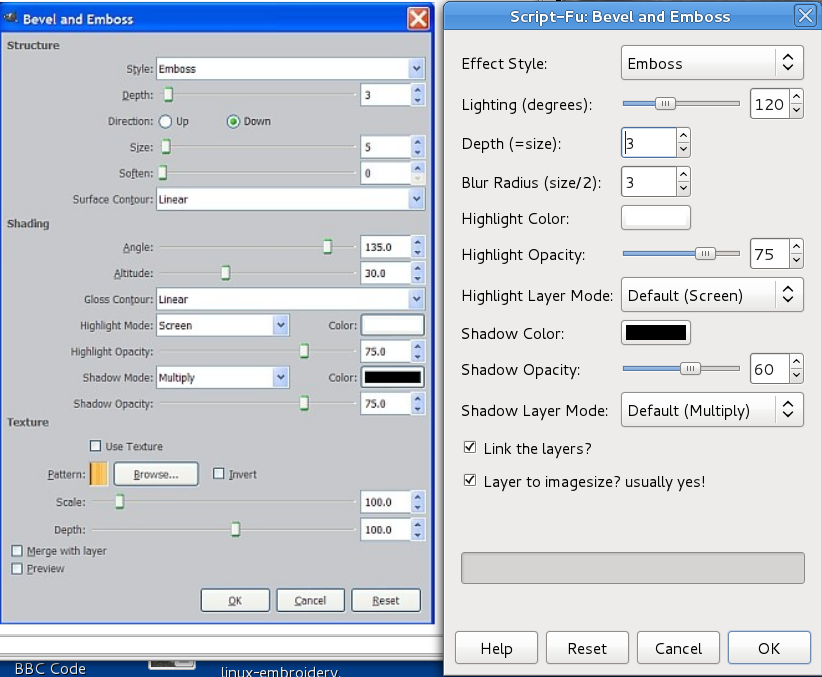
Right click on the Arrows layer and select Layer to Image Size. Now right click again and chose Alpha to Selection. Go to Layer>Layer Effects>Bevel and Emboss and enter the following settings. (This is the Python version of Layer Effects not Script-fu.)
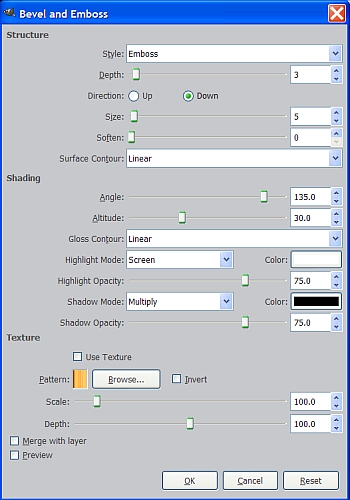
This filter will also create additional layers for the highlight and the shadow.
Turn off the selection and reduce the Opacity of the Arrows layer to around 25%.
I purposefully used the default settings of 75% in the Bevel and Emboss dialog so you could see the results. I prefer to crank them up to 100%. I also applied a Gaussian Blur using a value of 1 for both the Shadow and the Highlight layers to smooth out some of the pixelization.

Here’s another variation. In the Bevel and Emboss dialog, set the Size to 3 and the Angle to 120 degrees. Set the Opacity for the Highlight and Shadow layers to 70%. Apply the same Gaussian Blur to the Highlight layer but use a setting of 2 for blurring the Shadow layer.

You can see that by making subtle changes in the filter dialog you can adjust the final appearance of the arrows to your liking. You may even want to delete the original Arrows layer, but I much prefer a little shadow effect for the bottom portion of the arrows.
OK, we’re almost done. Our buttons look pretty good and our panel is good but there is one thing missing.
Step 24.
Right click in the layers dialog and Merge Visible Layers to get to one Buttons layer again. Duplicate the Buttons layer and turn off the visibility for the duplicate. Create a new transparent layer between the two layers and name it Bolts. Select the Brush tool and in the dialog choose the Bolt Head Spaced brush that was included in the attached zip file. Place a couple of vertical and horizontal guides near the corners of the panels. If you are at 200% view setting, place them 5 marks in each direction from the corners.
Set the brush size to about 0.7 and zoom in to 400% so you can place your bolts accurately using the guides.

Step 25.
Once you have all your bolts in place, and more than 4 if you like, right click on the bolts layer in the layers dialog and select Alpha to Selection, then Select>Invert. Select the top layer, the Buttons copy, and hit the delete key to remove everything except the areas where the bolts are. Now, set the layer mode for the Buttons copy layer to Overlay, the Opacity to 50%, and turn the visibility back on.
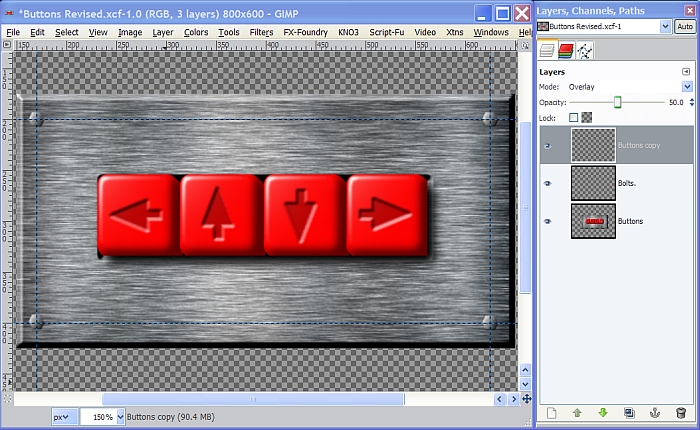
I set the view at 150% for the screenshot above. If you set it at 400% you will see that very little detail of the bolt head is going to be seen even without the Overlay, so just know that we used the other layer to get the bolt head to look more like the metal panel.
Step 26.
If you’ve made it this far you already know that this is not the shortest or easiest tutorial, but there’s only one last thing to do. First, Merge down the Buttons copy layer with the Bolts layer. Turn off the guides, and go to Filters>Light and Shadow>Drop shadow. We need very little shadow to accomplish this step since our bolts aren’t that large, and don’t stick up that much. Enter the following settings and then click OK.
Right click and select Merge Visible Layers, click the Merge button and our image is complete!
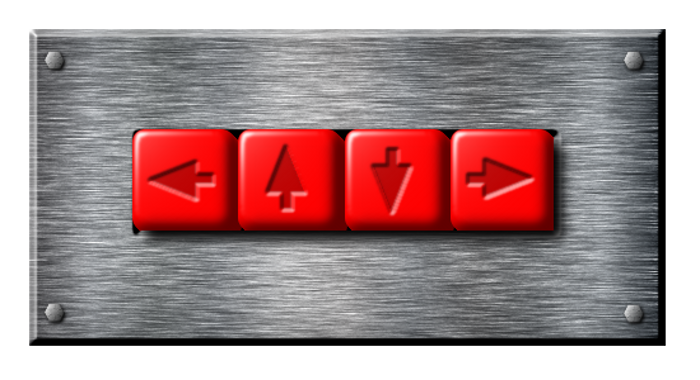
You can of course create any kind of buttons or use different colors or perhaps numbers to make a number key pad, or use any kind of metal for the panel. The steps are basically the same.
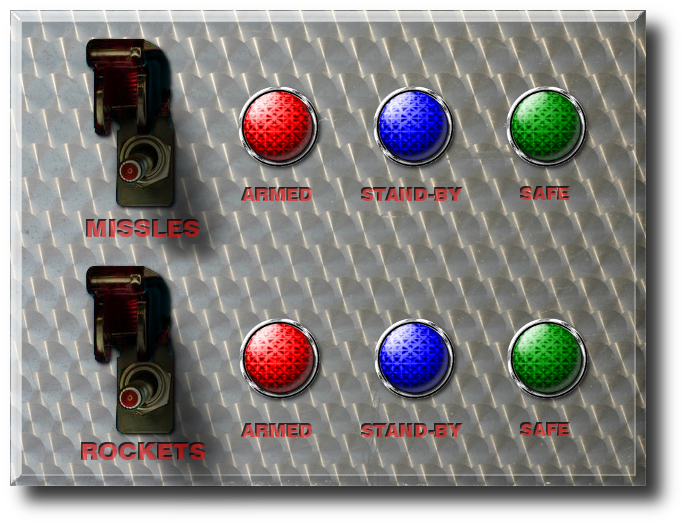
I hope you found this tutorial helpful. Next in our
Metal Wurx series is how to make some indicator lights for something like the simple control panel below. The control panel may be simple but the tutorial for the lights is not, so be warned, it’s a long one!


 That's right Drac.