Metal Wurx - Part XIX
Indicator Lights - Part A
Any control panel will have a few indicator lights to tell you the status of a certain features at a glance. These can be round or rectangular but they are usually red, green or yellow and sometimes blue or white depending on the function. I’m going to show you how to make a “jewel light” in all five colors with three different rims or bezels that you can make in Copper, Brass, Chrome or whatever metallic finish you prefer. This is a very long tutorial which probably qualifies as Advanced level due to the complexity. I have broken it down into three parts so you can take a break, save the XCF file, and come back to it later to finish it. I promise the results will be worth the effort.
You will need quite a few things in order to complete this tutorial which you will find listed below with their respective links. If you are an advanced Gimp user, you probably already have most of these installed already. I am still using Gimp version 2.6.11 for this tutorial, so there may be some differences for those of you using 2.8 or other Gimp versions.
Python Plugin-
http://www.python.org/ftp/python/2.6/python-2.6.msiPattern Scale script -
http://registry.gimp.org/node/13707Selection Bevel script -
http://gimpscripts.com/2011/10/selection-bevel/Copy-Rotate script -
http://registry.gimp.org/node/22254Voronoi Plugin -
http://www.geocities.jp/gimproject/plug ... ronoi.html.
Glossy Tiles -
http://browse.deviantart.com/?qh=§i ... s#/d4jqc5uI have attached a "Resources" folder at the bottom of this posting which includes the Voronoi pattern in both jpeg and Gimp pattern format. Also included is the Glossy Tiles pattern and all three PDF files. Download the patterns and install them in your Gimp "user" Patterns folder.
You will also need to download the metallic gradients zip file from my
Metal Wurx – Part XII tutorial which you can find here:
http://www.gimpchat.com/viewtopic.php?f ... 500#p50500. Install them to your Gimp “user” Gradients folder.
"Part A - The Bezel"Step 1.
Open a new image 300 x 300 pixels and we are going to need a very high resolution, say 1200 ppi. We want as much detail as possible because these are usually very small, when used as part of a larger image, so the image has to be scaled down resulting in degradation.
Step 2.
Increase your view to 300% so we can see what we are doing a little better. Add a vertical and horizontal guide in the center using the rulers at the top and left to help guide you in placement. Now create a new transparent layer, above your background layer, and name it “Control”. Go get the Ellipse Select tool and in the tool dialog, tick the two boxes for Expand from center and Fixed. Place your mouse cursor in the exact center of your image, using the guides, and drag out in any direction until the Size boxes in the tool dialog both say 150.
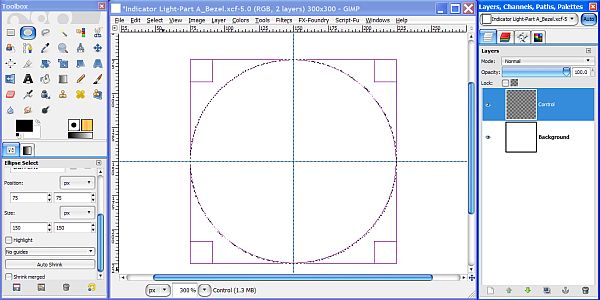
Drag your foreground color (black) over to the selection to fill it.
Step 3.
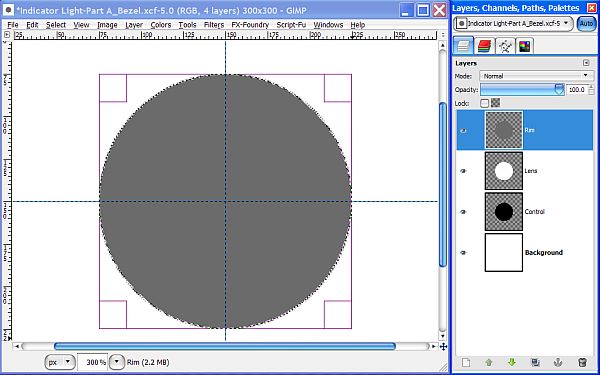
Create a new transparent layer above the Control layer and name it “Lens”. Drag your BG color (White) over to the selection to fill it with white. Now, duplicate the Lense layer and rename the duplicate layer to “Rim”. Change your FG color to a dark gray like 6B6B6B and fill the selection with the gray color by dragging it over to the selection like before. Don’t turn off the selection yet. You should now have four layers arranged like this.
Step 4.
Turn off the visibility for the Lens and the Control layers. With the Rim layer still selected, go to Select>Shrink and enter 10 or the amount and click the OK button. Hit the delete key on your keyboard to “cut out” the center area. Leave the selection active.

Step 5.
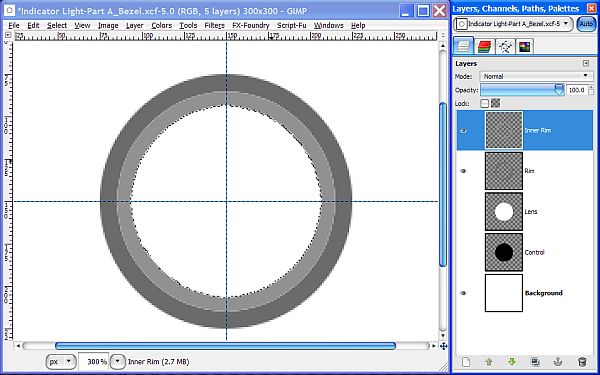
Create a new transparent layer above the Rim layer and name it “Inner Rim”. Go to Select>Grow and enter 1 pixel for the amount and click OK. Change your FG color to a lighter gray like 919191, just so we can see the difference and fill the selection. Go to Select>Shrink again but this time enter 6 for the amount and click OK. Hit the delete button again to remove the center of this layer.
Step 6.
Go to Select>Grow and enter 1 for the amount, then click OK. Now, click on the Lense layer in the Layers dialog to make it active. Go to Select>Invert and hit your delete key to remove the area outside the selection. This effectively makes the Lense layer smaller but gives us a 1 pixel overlap underneath the Inner Rim layer. I won’t bother with a screenshot but you can see the result over in the layer stack. Go to Select>None to turn off the selection.
Step 7.
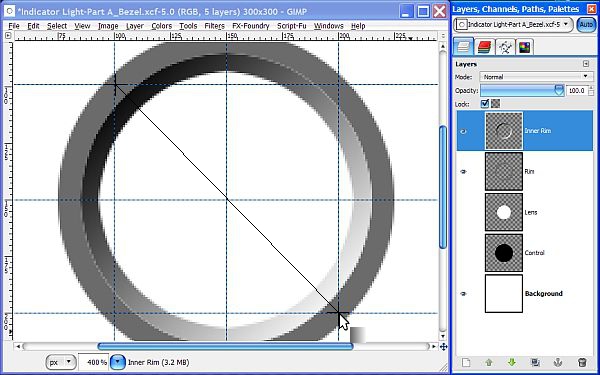
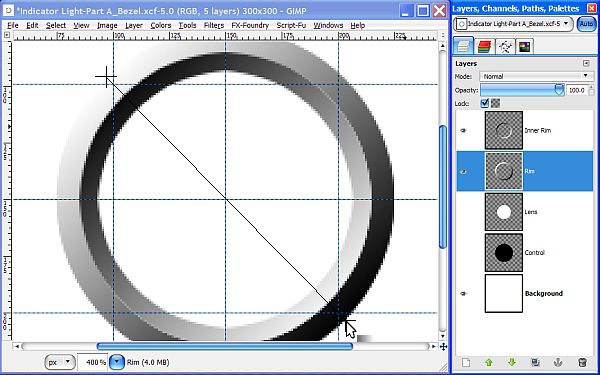
Select the Inner Rim layer to make it active, then lock the alpha channel by clicking on the little box at the top of the layers dialog that says “Lock”. Select the Blend tool and in the tool dialog, reset your FG/BG colors to the default black and white, then select the FG to BG (RGB) for the gradient.
Increase your view setting to about 400% and place two additional vertical guides at 100 and 200 pixels, then place two new horizontal guides at 100 and 200 pixels. Place your cursor at the top left guide intersection (see screenshot below) and stroke down and to the bottom right intersection at a 45 degree angle making your stroke pass through the exact center, where the main guides intersect, to apply the Gradient. Leave the alpha channel locked.
Step 8.
Now, select the Rim layer and lock the alpha channel. Reverse the Gradient in the Blend tool dialog and apply the reversed gradient in the same manner for this layer except stroke from the top left outer edge of the layer to the bottom right edge. Again, leave the alpha channel locked. This gives our Rim layers a beveled look that could also be achieved by using the Python based “Selection Bevel” script with the appropriate settings. I just wanted to show the mechanics of how this can be done manually.
This gives our Rim layers a beveled look. Now let’s give it more of a metallic look.
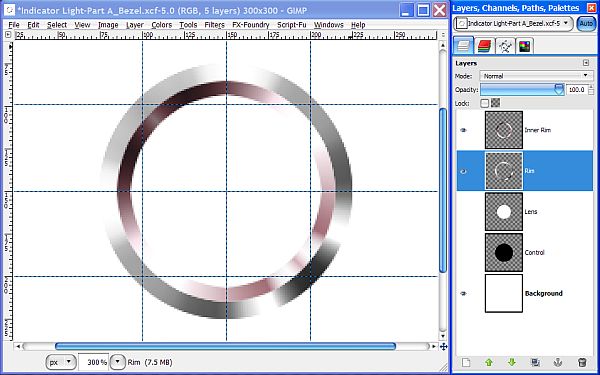
Step 9.
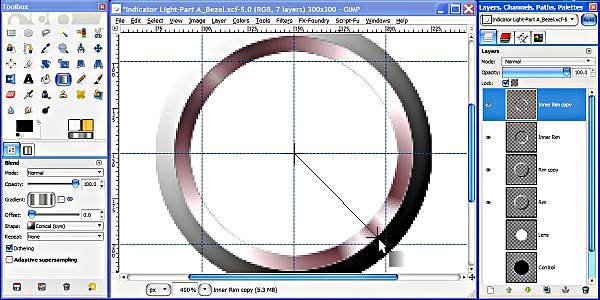
First, we need to duplicate both Rim layers so we have copies to work on. The alpha channel will automatically be locked on both layers. Select the Inner Rim Copy layer and select the Blend tool again. In the Blend tool dialog, select the Metallic 1 gradient and set the Shape to Conical (sym). The gradient was reversed in Step 8 above so uncheck the box to “un-reverse” the gradient. Place your cursor on the exact center using the guides and drag out and down at a 45 degree angle to the edge of the Inner Rim layer.
Step 10.
Change the gradient to Metallic 4 and check the box next to the Gradient to reverse it. Select the Rim copy layer to make it the active layer. Apply the gradient like we did in Step 9 above stroking in the same manner from the center, but this time to the outer edge of the Rim layer.
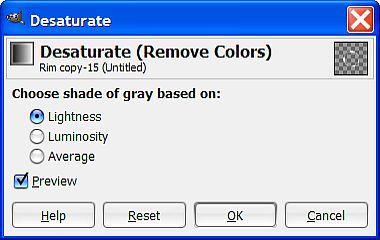
The Metallic 4 gradient has a hint of color which we want to remove so go to Colors>
Desaturate and select Lightness and click OK. Repeat the Desaturate process for the Inner Rim copy layer as well.
When you are finished with both layers, change your view setting back to 300%.
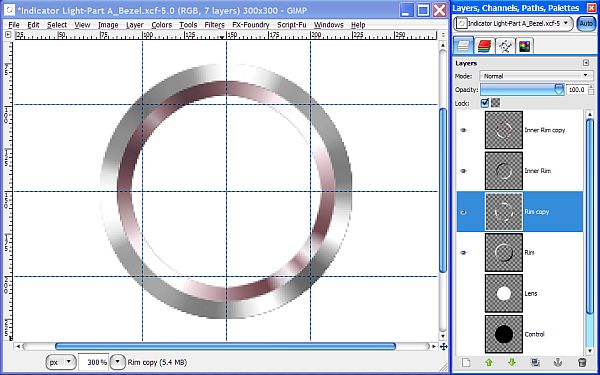
Step 11.
Unlock the alpha channel for all four Rim layers. In the layer stack, move the Inner Rim copy layer down below the Inner Rim layer. Move the Rim copy layer down below the Rim layer. Set the Layer Mode for both the Rim and Inner Rim layers to Overlay. Now right click on the Inner Rim layer and select Merge Down. Repeat the same merging process with the Rim layer so that we are back to five layers again. Rename both Rim layers so that the word “copy” is deleted.
Before we merge these two layers, I want to show you how to create other types of Rims or “Bezels” for our indicator lights so that when we are finished you will have several options to choose from.
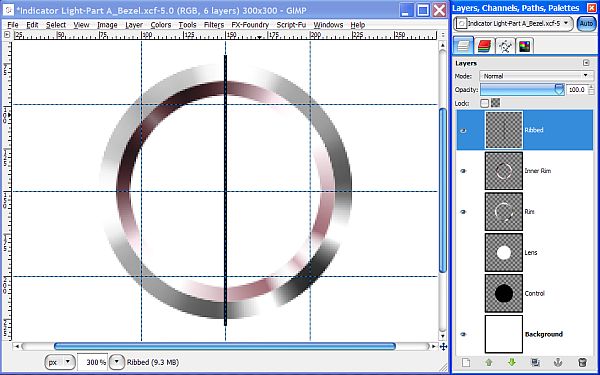
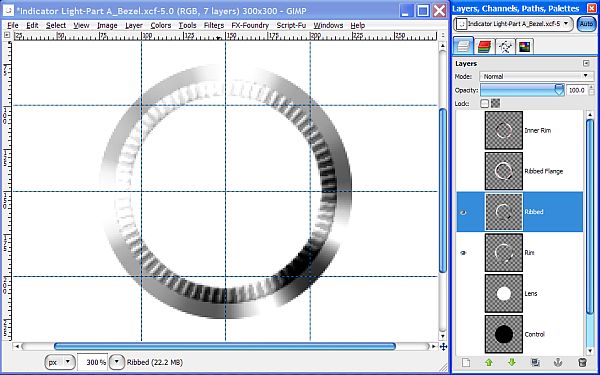
Step 12.
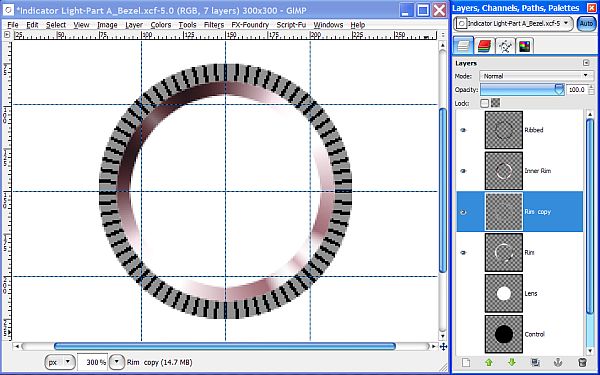
Create a new transparent layer and name it “Ribbed”. Place this layer at the top of the layer stack. Select the Pencil tool and pick the smallest Circle brush which should be the 1 pixel brush. Using the Vertical guide and the Shift key to keep it straight, draw a line from the top of the Rim layer to the bottom. Since the brush is only 1 pixel wide, you will need to draw your line on the right side of the vertical guide and a little past the outside edges of the Rim. We will get rid of the excess in just a minute.

Duplicate the Ribbed layer and select the Move tool. Click on the vertical line we made and use the left arrow button on your keyboard to move the layer 1 pixel to the left. Now right click on the Ribbed copy layer and select Merge Down.
Now we have a 2 pixel wide vertical line and centered on the vertical guide. Right click on the Ribbed layer and choose Alpha to Selection. Go to Select>Script-Fu-Copy-Rotate (one of the new scripts you installed) and enter the settings shown in the screenshot below and click OK. Since our image is 300 x 300, make sure to enter 150 for the X and Y center coordinates.

The filter will do the work for you as the name implies, copying and rotating our line at 5 degree increments until the entire image is filled.
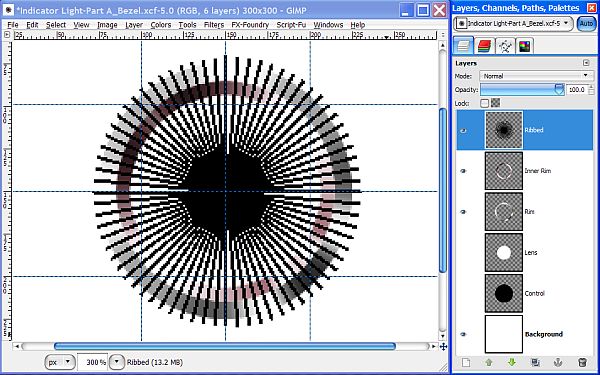
It looks a little messy right now, but we are only going to use a portion of this layer so let’s clean it up.
Step 13.
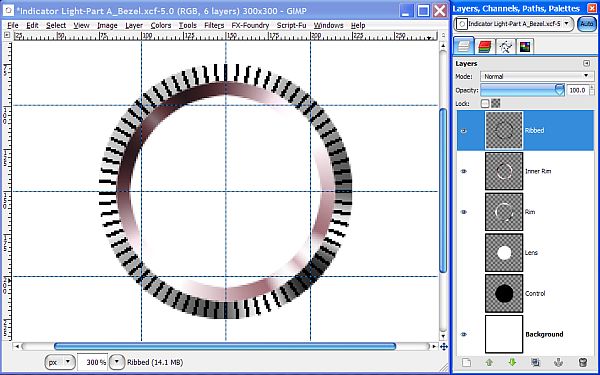
Right click on the Rim layer and select Alpha to Selection. Go to Select>Invert and then reselect the Ribbed layer and hit your delete key to remove most of the excess. Go to Select>None to turn off the selection.
You will still have a little bit remaining on the inside so Right click the Inner Rim layer and choose Alpha to Selection, reselect the Ribbed layer and hit your delete key to remove any remaining portions of the lines. Now it’s all cleaned up and we can turn off the selection (Select>None).
Step 14.
Duplicate the Rim layer and lock the alpha channel on the Rim copy layer. Set your FG color to the light gray color we used before (919191) and drag it over to your image to fill the Rim copy layer with the light gray color. When you are finished, be sure to unlock the alpha channel.
Step 15.
Right click on the Ribbed Layer and choose Alpha to Selection. Click on the Rim copy layer to make it active and hit the delete key. While the selection is still active, reselect the Ribbed layer and set the FG color to the dark gray color (6B6B6B) and fill the selection. Go to Select >None to turn off the selection.
Step 16.
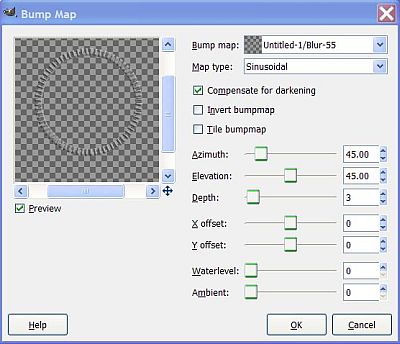
Move the Ribbed layer down in the layers stack below the Rim copy layer. Duplicate the Rim copy layer, and rename it “Blur”. Go to Filters>Blur>Gaussian Blur and use 3 for the amount and click OK. Turn off the visibility of the Blur layer and select the Rim copy layer. Go to Filters>Map>Bump Map and use the following settings making sure that the Blur layer is selected for the Bump map. Once you have entered the settings, click OK.
Your image should now look something like this.
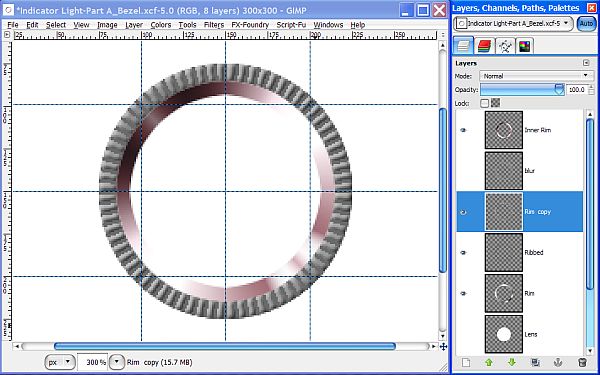
Now, right click on the Rim copy layer and select Merge Down.
Step 17.
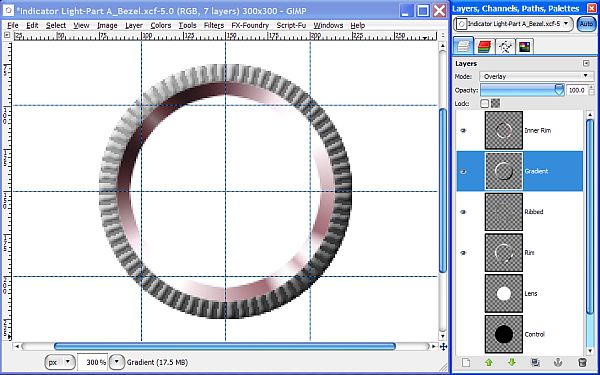
Delete the Blur layer and create a new Transparent layer above the Ribbed layer and name it Gradient. Right click on the Ribbed layer and choose Alpha to selection then reselect the Gradient layer.
Reset your FG/BG colors to the default black and white and select the Blend tool. In the tool dialog, set the Gradient to FG to BG (RGB) and set the shape back to Linear. Make sure the little box to reverse the gradientis still checked so that the white part is on the left.
Make a diagonal stroke, using the guides just like we did before from the top left edge of the selection to bottom right edge, to apply the gradient. Turn off the selection and set the layer Mode for the Gradient layer to Overlay.
Step 18.
Right click on the Gradient layer and select Merge Down to merge it with the Ribbed layer.
Duplicate the Rim layer and move the duplicate above the Ribbed layer and set the layer Mode to Grain Merge. Right click on the Rim copy layer and select Merge Down.
Step 19.
Duplicate the Rubbed layer and rename the duplicate to "Ribbed Flange". Duplicate the Inner Rim layer and move the duplicate down in the layer stack between the Inner Rim layer and the Ribbed Flange layer.
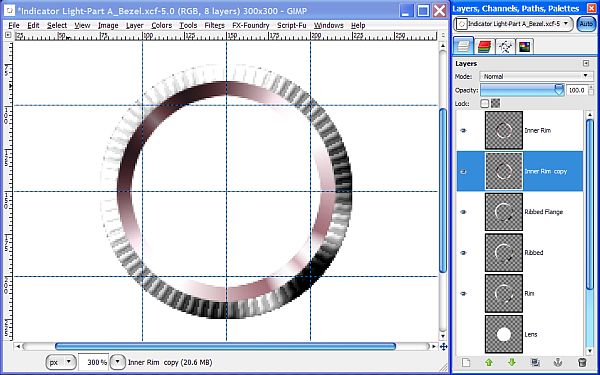
Right click on the Inner Rim layer and Merge it down with the Duplicate Inner Rim.
Now that we have this "Ribbed Flange" combination as a separate layer we can adjust our original Ribbed layer to be used by itself. Turn off the visibility of the Ribbed Flange and Inner Rim layers.
Step 20.
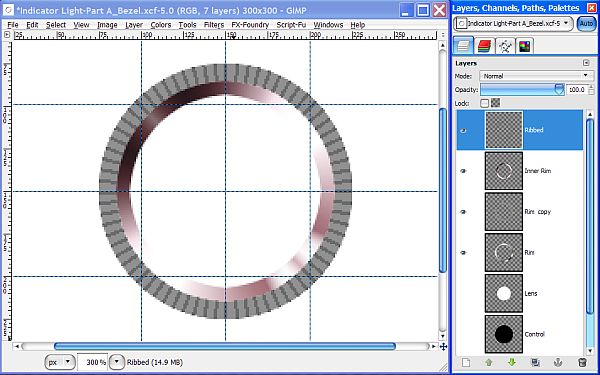
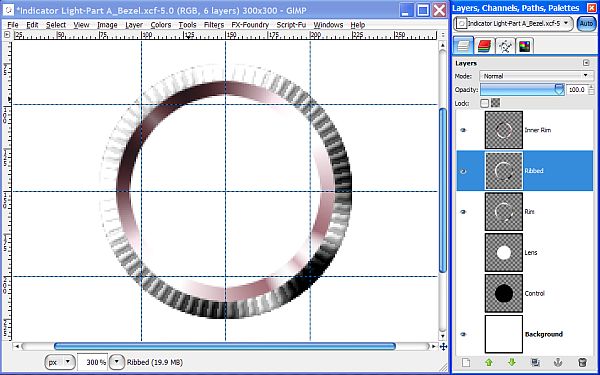
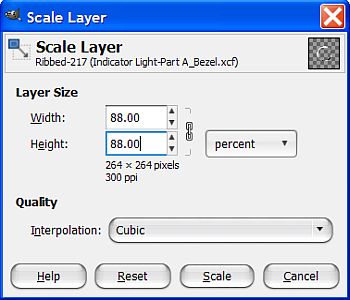
Click on the Ribbed layer to make it the active layer, then go to Layer>Scale Layer, set the Mode to Per Cent and enter 88 for both values then click on the Scale button.
Right click on the Ribbed layer and select Layer to Image Size. If you turn off the visibility of the Rim layer, you can see that the ribbed layer can now function by itself as a third bezel choice.
Step 21.
Turn the visibility of the Rim layer back on and duplicate it. Now duplicate the Ribbed layer and move it down below the original Ribbed layer. Turn off the visibility of the Ribbed layer.
Since the Ribbed copy layer is now on the inside of our Bezel, we need to make one more adjustment to correct the shadow effects. Select the Ribbed copy layer to make sure it is the active layer, then go to Layer>Transform>Flip Vertically and then repeat using Flip Horizontally. The ribbed inner portion of your image should now look like this with the shadow reversed.
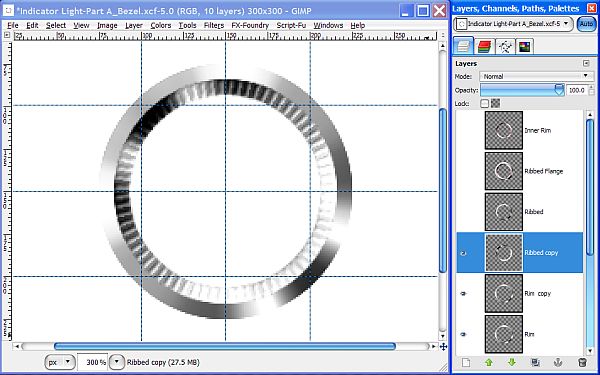
Right click on the Ribbed copy layer and select Merge Down. Rename the Rim copy layer to “Inner Ribbed”. This gives us our fourth bezel choice.
Step 22.
Now we can go back and complete our first Bezel. Turn off the visibility of the Inner Ribbed layer and turn on the visibility of the Inner Rim layer. Move the Inner rim layer down above the Rim layer, then right click on the Inner Rim layer and select Merge down.

Step 23.
From this point we can use our metallic Rim and Ribbed layers as is for a soft Chrome look, or we can make them take on any metallic color desired.
First, let’s go to View>Show guides and uncheck the box to turn off the guides, then turn off the visibility of the background layer. Turn on the visibility of all the Bezel layers, duplicate each of the bezel layers, lock the alpha channels.
Rename each of the duplicate layers changing the word “copy” to “color” at the end of each layer name. Fill each of the duplicate layers with the desired metallic color and set the layer Mode for each of the duplicate bezel layers to Overlay. I’m using a Brass color (B5A642).
Once you are finished, make sure to leave the alpha channel locked for all the colored layers in case you want to change metallic colors later on. Your colored layers should now look something like this.
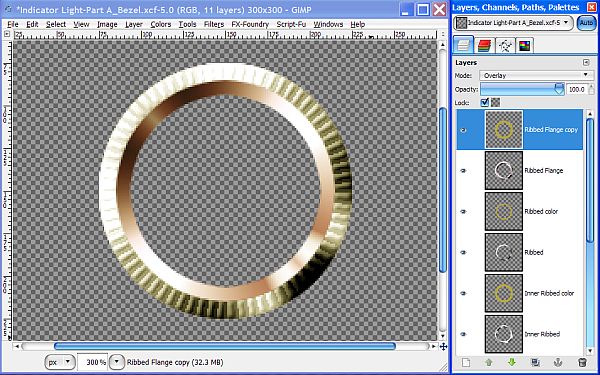
Since the Ribbed Flange layer is at the top of the layer stack, it will be the one you will see in your image window.
Note: Do not merge any layers until you have finished the entire tutorial as you may want to make different metallic colored sets of lights with different rim combinations. If you just leave the alpha channel locked on the color layers, you can change colors easily.
To save each combination, turn off all layers except the selected bezel type and it’s associated color layer above it. Save as file type ".png" making sure you uncheck the box in the save dialog where it says “Save background color”.
Here are the four options using the Brass color.
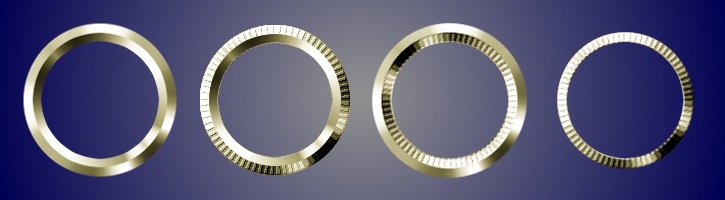
These would also serve as nice bezels for making a watch, clock or a gauge perhaps. Make sure you save the XCF file so you can pick up from where you left off if you are not going to complete the whole tutorial right now.
I hope you found this informative and perhaps useful. When you are ready, proceed to
Part B – The Lense.


 Thanks Molly. You may be the only one to hang in there long enough to finish the whole tut. If you think Part A was long, wait until you get to Part C. I'll try and get Part B uploaded sometime today.


 (Don't go off on me now, I'm just kidding around)
