Metal Wurx - Part XIX
Indicator Lights - Part B
The Lens
We made our Bezels or Rims in
Part A and now we work on how to make the Lens portion. Open gimp and load the saved XCF file from
Part A with the Rim layers and you are ready to go. Please note that this tutorial is done with Gimp 2.6.11 and the Voronoi plug-in used in this segment will only work in 32 bit Windows installations. We can only hope that the plug-in authors will update this fine tool to a 64 bit version very soon. The Voronoi pattern is available in the Resources zip folder attached to the
Part A post as a Gimp .pat file. Just use the pattern file from the resources folder in Step 4 in lieu of using the Voronoi plug-in to create it.
Step 1.
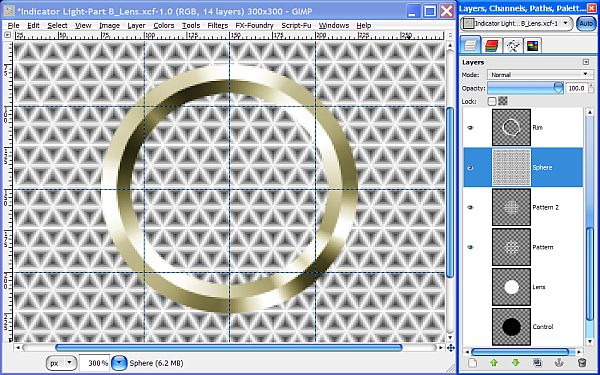
Set your View to about 300%. Turn off the visibility for the Ribbed, Ribbed Flange, and Inner Ribbed layers, as well as the colored copy layers above each of them. Now turn on the visibility of the Lens layer, duplicate it, and lock the alpha channel. Rename the Lens layer copy layer to “Pattern”.
Step 2.
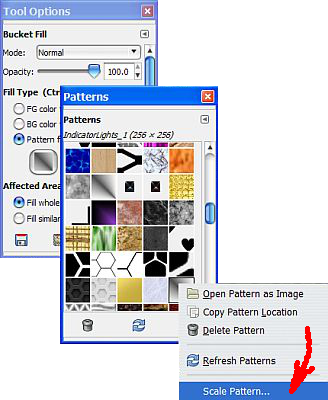
Select the Bucket Fill tool and in the tool dialog, tick the two circles for Pattern fill and Fill whole selection. Now, click on the sample pattern in the tool dialog, and navigate to the new “Glossy Tiles” pattern you installed. Now, click on the sample pattern again (now showing the Glossy Tiles pattern) and this time when the dialog opens, go all the way to the bottom and click on the little bucket icon on the right.
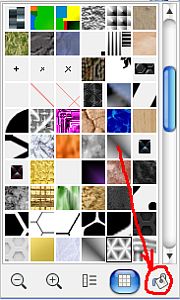
Another patterns dialog will pop up with a thin black border around the Glossy Tiles pattern indicating it is selected. Right click on it and you will get yet another dialog to pop up. Go to the bottom and select “scale pattern”. This is the new Scale Pattern script you should have installed before beginning this tutorial if you didn’t already have it.
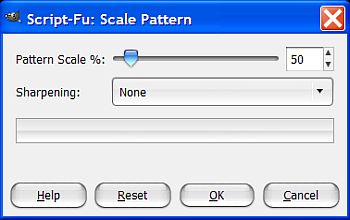
When the Scale Pattern dialog pops up, go to the bottom and select Scale Pattern. You will get another dialog where you set the Pattern Scale to 50% then click OK.
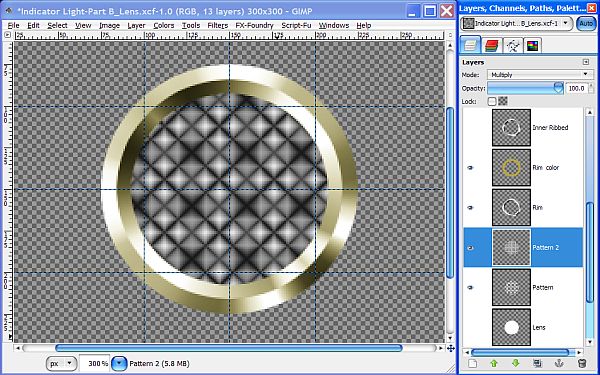
Now, click on Pattern layer in the image window to fill it with the pattern, then set the Layer Mode to Multiply and your image should look like this.

Step 3.
Duplicate the Pattern layer and name it "Pattern 2". Use the Bucket Fill tool and select the scaled Glossy tiles pattern on the clipboard and scale it again at 50%. Click on the image to fill this layer with the 25% pattern. Unlock the Alpha Channel on both Pattern layers and your image should now look like this.
Step 4.
Create a new transparent layer above the Pattern 2 layer and name it “Sphere”. (or use the Voronoi pattern file provided in the resources folder from
Part A and proceed to Step 5.) Go to Filters>Render>Pattern>Voronoi. When the dialog pops up you will see two tabs. On the Grid Generator tab, make sure to select Triangle (horizontal) for the Cell type from the drop down menu in the middle, and set the cell size to 10. Make sure the rest of the settings match the image below, but don’t click OK yet.
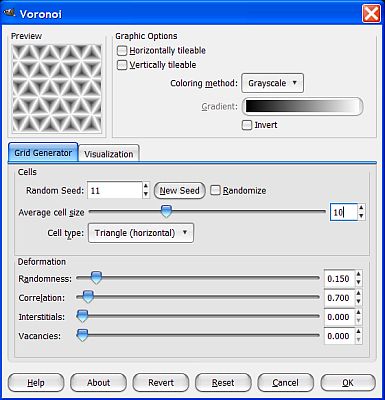
Enter these settings on the Visualization tab.
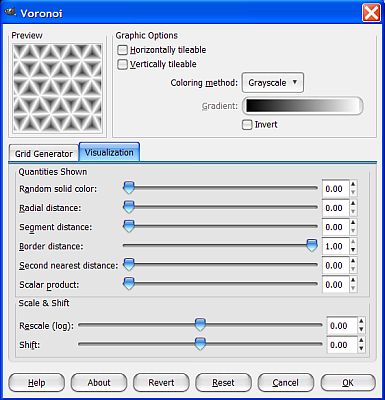
Check all the settings on both tabs then click OK to create the Voronoi pattern.
Step 5.
Now we give our Voronoi pattern layer some shape. Go to Filters>Map>Map Object and from the drop down menu in the plugin dialog where it says “Map to:” select Sphere for the shape. Be sure to check the box for Transparent background and leave everything else at the default settings, but don’t click OK yet.
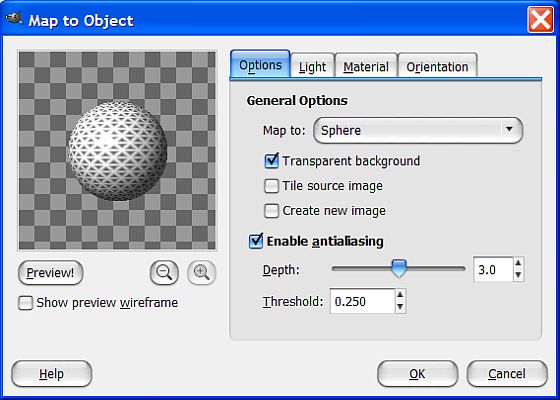
Next, click the Light tab and set the Lightsource type to Point Light and enter these settings.

When you have everything entered correctly, click OK to render the sphere.

When the filter renders the sphere, it will be too large for our purposes so we need to adjust the size. Go to Layer>Scale Layer and set the mode to Percent. Enter 80 for both values and click on the Scale button to resize the layer.
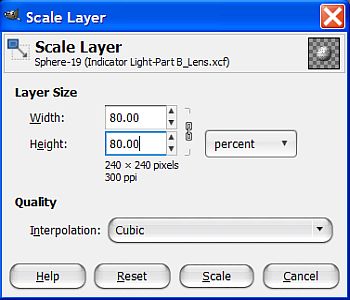
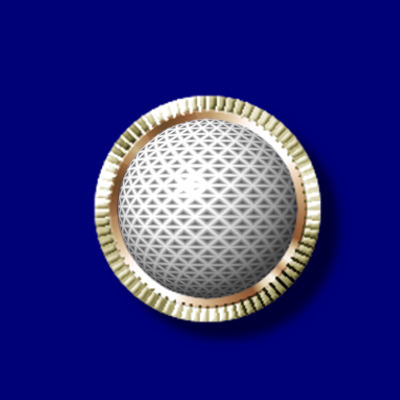
Now our Sphere is the right size.
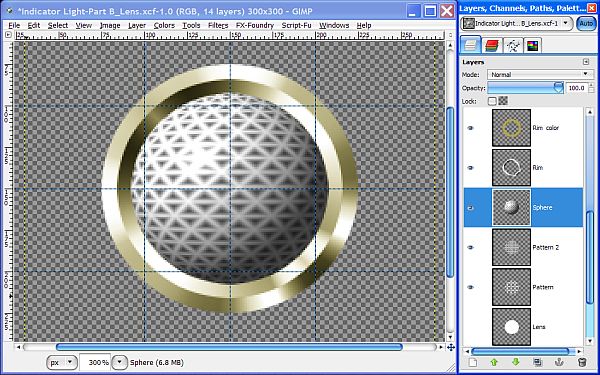
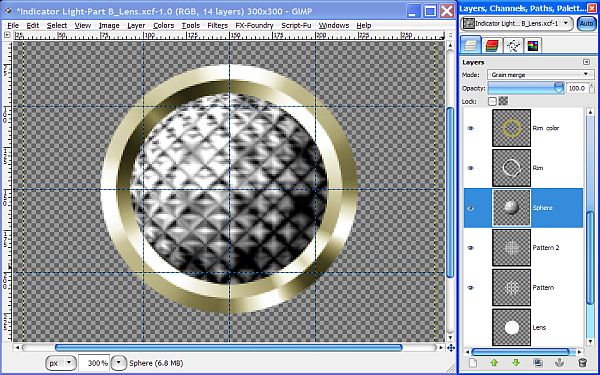
Right click on the Sphere layer and select Layer to Image Size, then set the layer Mode to Grain Merge and our faceted lens has now taken on a subtle refraction effect.
Step 6.
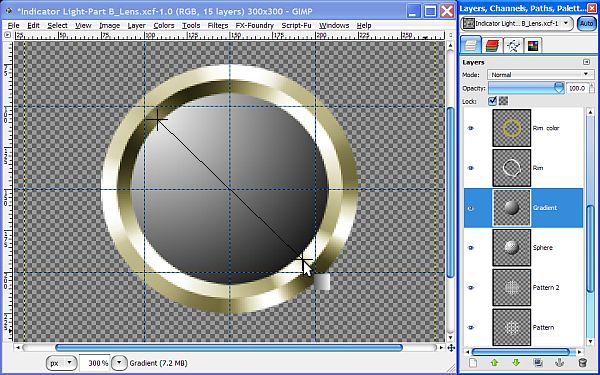
Duplicate the Sphere layer and rename the duplicate to “Gradient”. Set the layer Mode to Normal for now, and lock the Alpha Channel. Select the Blend tool and in the tool dialog set the Gradient to FG to BG (RGB), then set the shape set to Radial. Now, reverse your FG and BG colors so that white is the FG color then make a 45 degree stroke from the top left to bottom right of the Gradient layer making sure your stroke is passing thru the center.
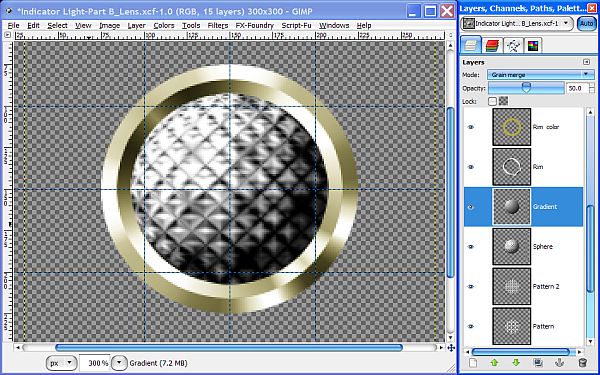
Change the layer Mode back to Grain Merge and lower the Opacity to 50%. Right click on the Gradient layer and select Layer to Image Size. Unlock the Alpha Channel for this layer and the Sphere layer. While you are at it, you may as well go back and make sure the alpha channel is unlocked on all the other layers just in case I missed any, but don’t unlock any of the color layers for the bezels. Here’s what our lens looks like so far.
Step 7.
Now we have a little more depth to our image and the lens takes on even more of a domed appearance. Next, create a new transparent layer above the Gradient layer and name it "Gloss". Click on the Ellipse Select tool and in the tool dialog, and make sure the box for Expand from center is checked and the one for Fixed is unchecked. Place your cursor about half way between the top of the lens and the horizontal guide using the vertical guide to help center it, and drag out to make a selection that is 70 pixels wide and 36 pixels high. You can watch the Size boxes near the bottom of the tool dialog to help get it just right.
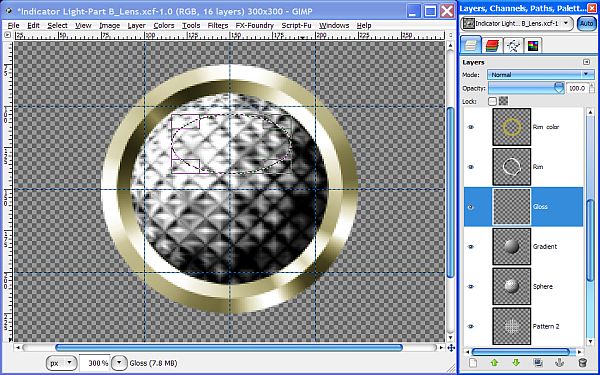
Now select the Blend tool and set the Gradient to FG to Transparent. Set the Shape to Linear and make sure White is still the FG color. Make sure the box is unchecked for reversing the gradient. Make a stroke from top to the bottom of the selection, using the control key to create a perfectly vertical stroke and apply the gradient.
Step 8.
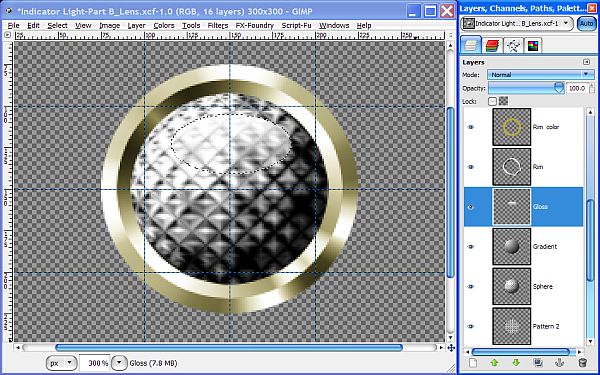
Now, turn off the selection and duplicate the Gloss layer to make it a bit brighter, then right click on the duplicate layer and select Merge Down. Go to Filters>Blur>Gaussian Blur to apply a slight blur setting of 5 then click OK.
Step 9.
Next, select the Move tool and click on the image to activate it. Hit your up arrow button about 7 or 8 times to reposition the Gloss almost at the top edge of the lens. The number of times will depend on how accurately you centered the Ellipse Select tool in Step 7. When you have it repositioned, right click on the Gloss layer in the layers dialog and select Layer to Image Size.
We now have our Gloss layer completed, but it is in the wrong position with regard to the light source as you can see in the screenshot below.

Step 10.
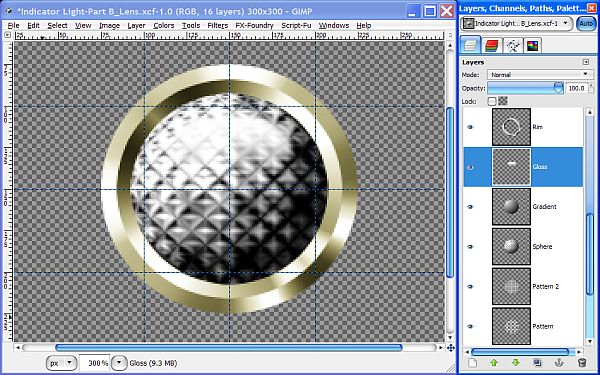
Since our light source is from the top left generated by our Sphere and Gradient layers, we need to reposition our Gloss layer to match. Select the Rotate tool and click on the image to activate the tool. When the dialog pops up, enter -45 for the angle and click the Rotate button at the bottom of the dialog. When you’re done, right click and select Layer to Image Size.

Our gloss layer now matches the lighting angle and looks more believable.
Step 11.
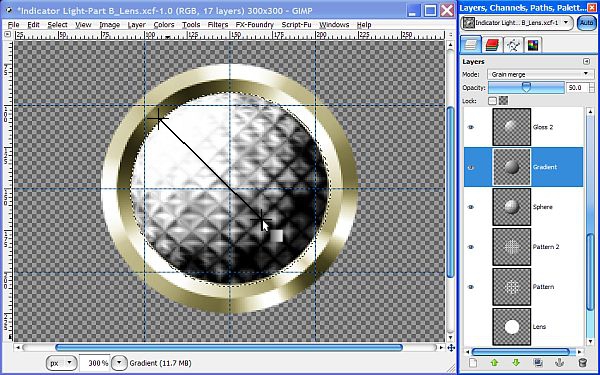
Create a new layer above the Gradient layer and name it "Gloss 2". Right click on the Gradient layer and choose Alpha to Selection. Reselect the Gloss 2 layer to make it active again and grab your Blend tool one more time. Our gradient is already set from making our Gloss layer but set the Shape to Radial. Now, make a diagonal stroke like we did for the Gradient layer, but only go past the intersection of the guides a short distance like in the screenshot below. After applying the gradient, turn off the selection (Select>
None).
Step 12.
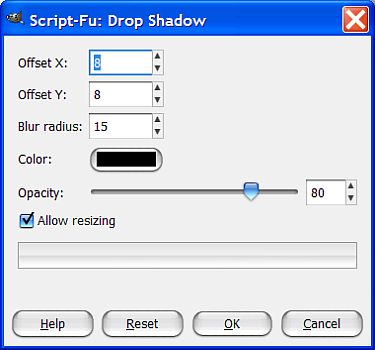
To give our lens even more of a 3D effect we need to create some shadowing. Duplicate the Gradient layer and rename it “Dummy” for now. Right click on the Dummy layer and choose Alpha to Selection. Go to Select>Shrink and enter 2 for the amount and click on the Shrink button. Now go to Select>Invert and hit your Delete key to remove the area outside the selection making our Dummy layer just a little smaller. Deselect the layer then go to Filters>Light and Shadow>Drop Shadow and enter the settings shown below.
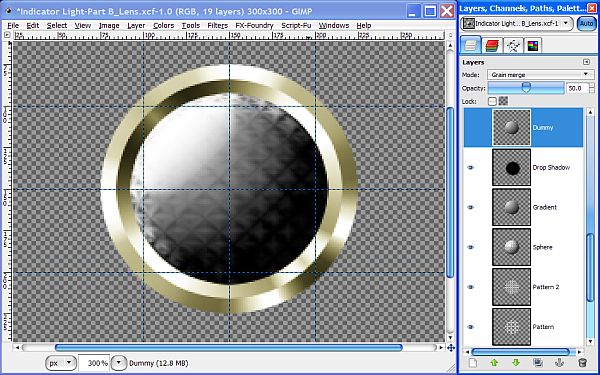
Turn off the visibility of the Dummy layer and here’s what your layers and image look like at this point with the drop shadow partially hidden by the Rim layers above.
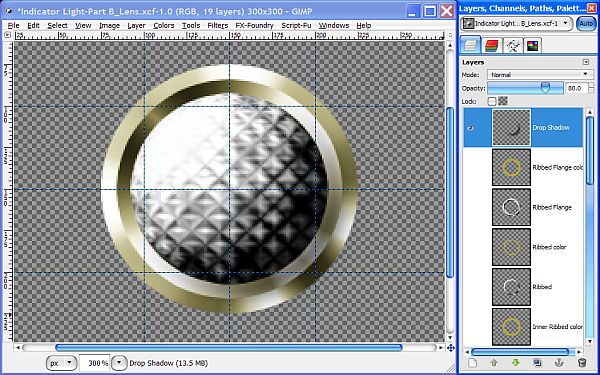
Step 13.
Move the Drop Shadow layer to the top of the layer stack so we can see what happens next. Right click on the Dummy layer and choose Alpha to Selection, then reselect the Drop Shadow layer and hit the delete key to cut out most of the shadow. Turn off the selection and right click on the Drop Shadow layer again and select Layer to Image Size and we now have a crescent shaped shadow that appears to be created by our dome shaped lens. This also gives us a slight dark edge to our lens to accentuate it, however, the inside edge of the shadow is too “hard”, so we need to soften it a bit. Go to Filters>
Blur>Gaussian Blur and use a setting of 15 for both values and click OK.
We are almost done with our Lens but we have one last layer to make.
Step 14.
Turn on the visibility for the Dummy layer and rename it to “Reflection”. Lock the Alpha Channel and drag your FG color over to the image to fill the Reflection layer with White.
When we copied the Gradient layer to make our Dummy layer in step 20 above, we also copied its properties so adjust the Opacity back to 100% and change the layer Mode back to Normal. Now we have a full white Reflection layer.
Right click and choose Alpha to Selection, then go to Select>Grow and enter 3 for the amount and click OK. We need to move the selection slightly for what we are about to do so to make this possible, click on the Ellipse Select tool and then click on the selection one time to activate the tool.
You will see a frame appear around your selection with some boxes in the corners indicating the selection is now alterable. Use the arrow buttons on your keyboard to move the selection up and to the left 8 spaces each as shown below.
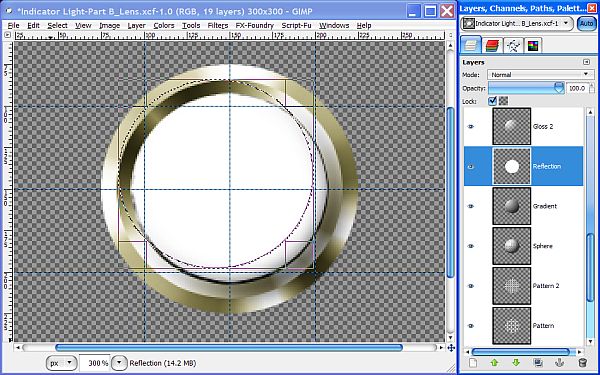
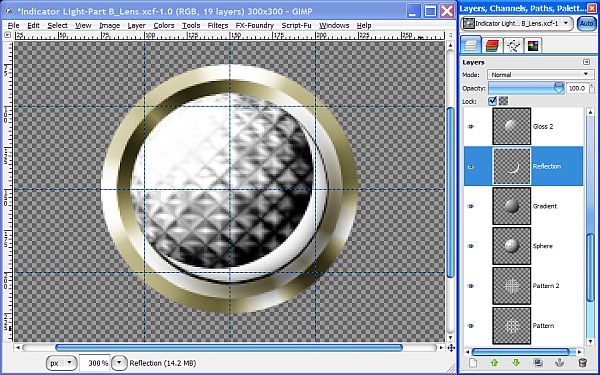
Now, hit your delete key to remove the selected area leaving only a white crescent shape, just like we did with the shadow layer, then go to Select>None to turn off the selection. Your Image and layers should now look like this.
Step 15.
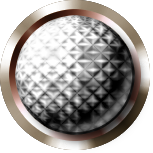
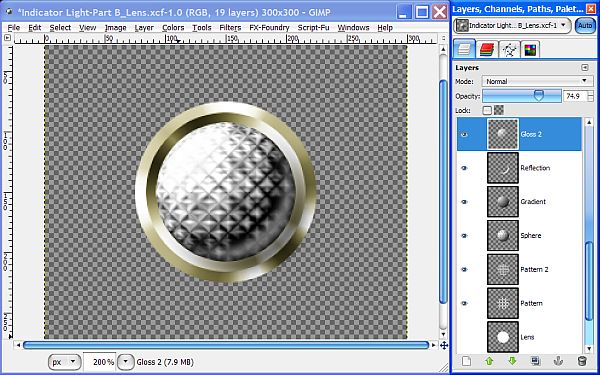
Select the Reflection layer and unlock the Alpha Channel. Next, go to Filters>Blur>Gaussian Blur and apply a blur of about 10 and click OK. Set the layer Opacity at 50% and go ahead and turn off the guides. Lower the Opacity of the Gloss layer to 50% and the Gloss 2 layer to 75% and your image should now look like this.
The architecture of the lens layer is now complete and you are probably wondering why we still have all these darn layers. The reason I have not merged them, is that we still need them to function separately.
What we are going to do in
Part 3- Colors, is create several additional layers for color and glow to be able to simulate an ON and OFF conditions for each of our completed indicator lights. This way you can create each lights color, condition, bezel type and metallic color to save them one at a time and create different sets as you go.
I hope you are enjoying this tutorial and finding it as interesting as it was for me to create. Make sure you save the XCF file so you can continue from where you left off if you are not going to finish the tutorial right now.
Whenever you are ready, proceed to
Part C.