Metal Wurx – Part XX
How to Make Metal Frames
This whole series got started when I received a PM asking me how I made my sig and that it would make a good tutorial. I saved this one until later in the series because in the last segment we will be making a Control Panel frame using most of the techniques I'm about to share.
In this segment I will show you some techniques involved in making a frame whether it is an elaborate interface frame like the one shown at the very end, or a simple rectangle shape for a sig like we will cover in this tutorial.
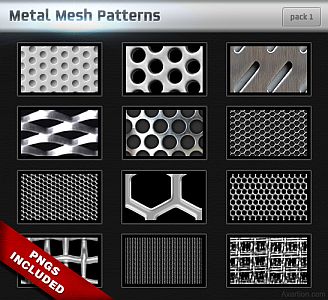
There are a several things you will need to complete this tutorial. The first is one of the Metal Mesh Patterns by Axertion you can download from Deviant Art.com.
 http://browse.deviantart.com/?qh=§i ... s#/d1s9l8c
You will need to have some sand and/or rust textures which can be downloaded at various sites on the internet or just use one you already have. Another favorite site of mine besides DA, is CG Textures.com. Find something you like and make a whole bunch of different frames. I keep an XCF file just for sigs with a lot of interchangeable layers of different patterns and textures for making different backgrounds and finishes.
If you are using GIMP version 2.6.11, you will also need the Pattern-Scale script which can be found here:
http://registry.gimp.org/node/13707OK, let’s make a really simple one using a basic rectangle like you might use for a sig.
Step 1.
Open a new image 800 x 600 and 600 ppi resolution.
Step 2.
Change your view setting to 200% - 400% for accuracy then place a vertical guide at 400 pixels and a horizontal guide at 300 pixels using the rulers at the top and left to place the guides.
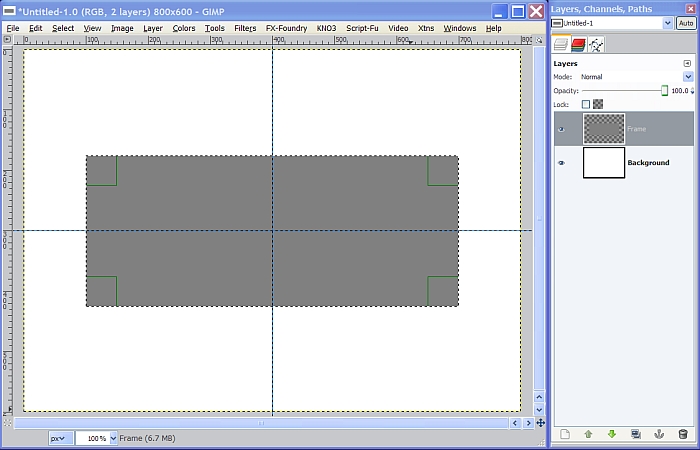
Step 3.
Change your view setting back to 100% and create a new transparent layer named Frame. Choose the Rectangle Select tool and check the box in the tool dialog for Expand from center. Make a selection about 600 wide and 250 high. Watch the two Size boxes a the bottom of the tool dialog to get it close then just enter the exact dimensions. Change your FG color to a medium gray like 808080 then drag the color over to the selection to fill it.
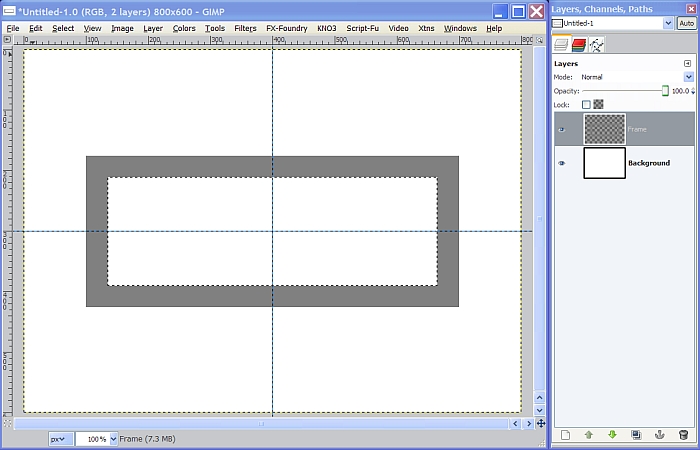
Step 4.
Go to Select>Shrink and enter 35 pixels for the amount and click OK. Now hit the delete
key to remove the selection area from the Frame layer.
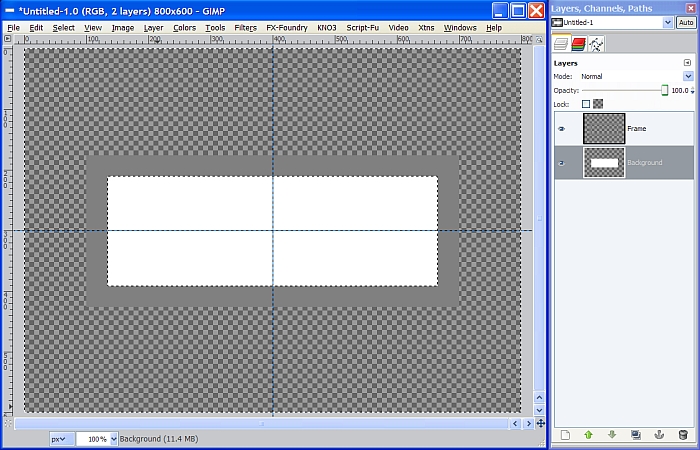
Step 5.
Go to Select>Invert then right click on the background layer and choose Add Alpha Channel. Now hit the delete key again and get rid of everything outside our selection
Step 6.
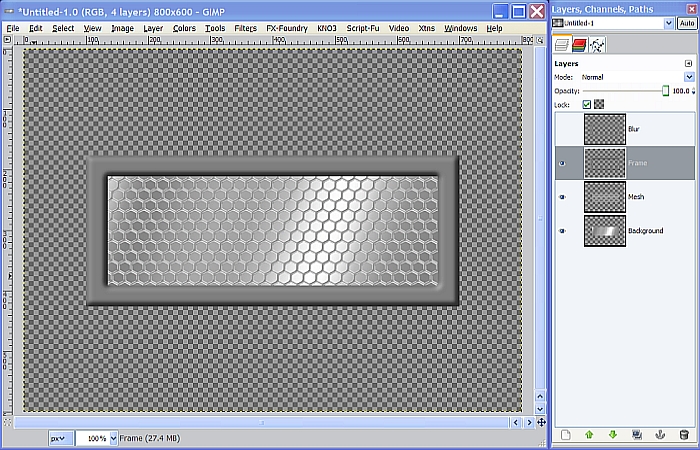
I’m going to make a background in the center of my frame using one of my metallic gradients and a chrome mesh pattern, but you can put any pattern, gradient or nothing at all for yours, so if you want, you can skip steps 6 and 7 and just do the frame.
Select the Blend tool and set the gradient to Metallic 15 and the Shape to Linear. Go to Select>Invert, then stroke diagonally from top left corner to bottom right corner of the selection to apply the gradient. If you don’t have this gradient you can download all my metallic gradients from the attached zip file here:
viewtopic.php?f=23&t=4097&p=50500#p50500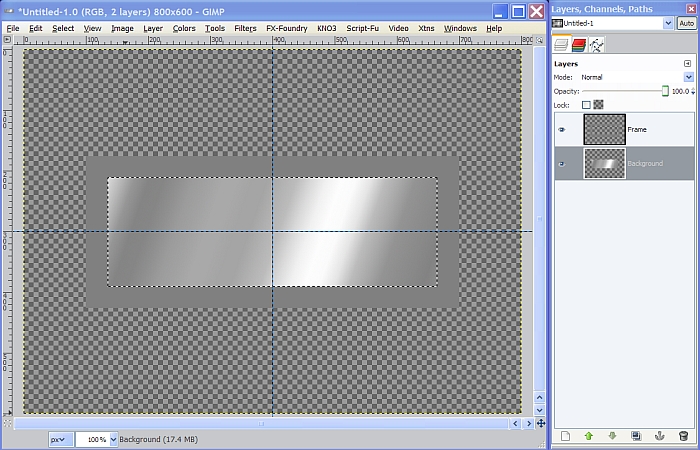
Step 7.
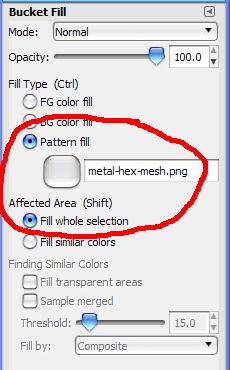
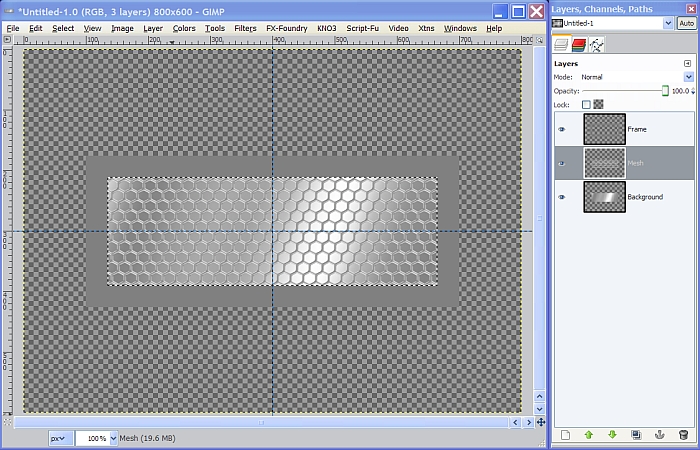
Now, create a new transparent layer above the Background layer and name it Mesh. Select the Bucket Fill tool and in the tool dialog tick the two little circles for Pattern fill and Fill whole selection.
Some patterns are too large to use as it is and sometimes need to be scaled down before using it. As I mentioned above, if you are using GIMP 2.6.11, you will need a script to do this. Download it and place it in your "user" scripts folder and refresh your scripts.
Here’s how to use the script. In the Bucket Fill tool dialog, click on the pattern sample and choose whatever mesh pattern you like. I used the Metal Hex Mesh pattern.
Now click on the pattern sample again and go to the bottom right corner of the little pop up menu and click on the little bucket icon.
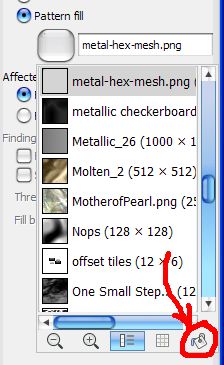
This will bring up another “Patterns” menu where you will see your selected pattern with a thin black border.
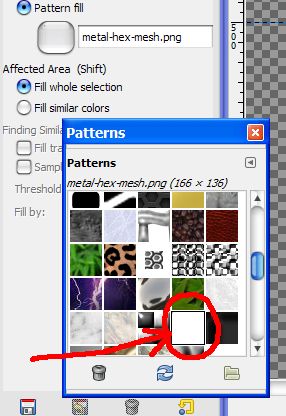
Right click on it and it will bring up another dialog where you will find “Scale Pattern” at the very bottom.
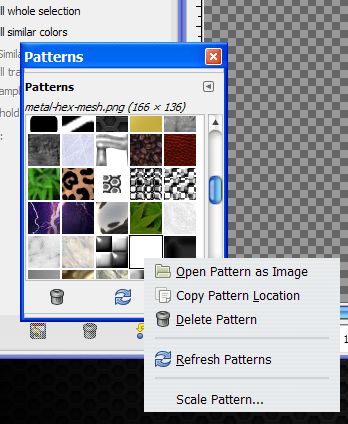
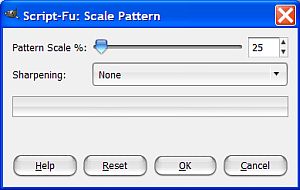
Click on “Scale Pattern” and the script dialog will pop up. Use the slider or enter the value in the box to the right to make the scale 25% then click OK. This will place the scaled pattern on the clipboard.
Now you can click on your image to fill the Mesh layer with the scaled pattern then turn off the selection. (Select>None)
Step 8.
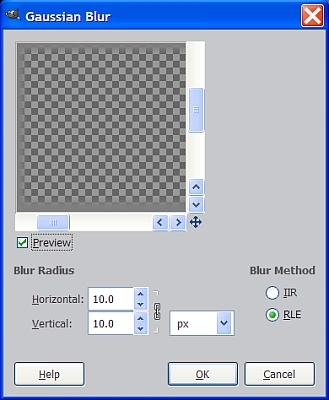
OK, back to the frame. Duplicate the Frame layer and name the duplicate Blur. Go to Filters>Blur>Gaussian Blur and enter 10 for both settings then click OK.
Turn off the visibility for the Blur layer and let’s go ahead and turn off the guides.
Step 9.
Select the Frame layer to make it active again, then go to Filters>Map>Bump Map and use the following settings.
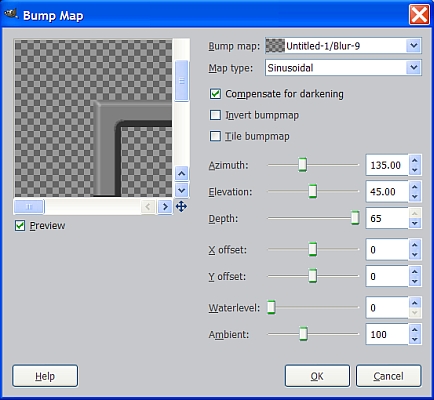
This will give us a sort of rounded bevel effect but with a little distortion due to the high bump settings. If you temporarily zoom in at about 400%, you’ll see what I’m talking about.
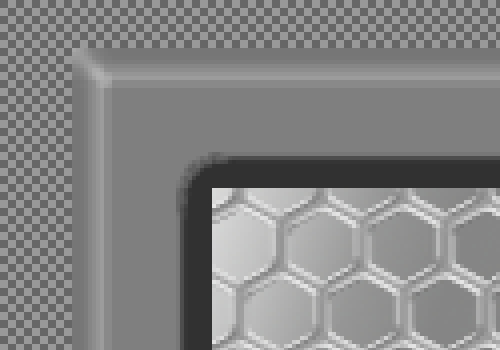
To smooth it out a bit, lock the alpha channel on the Frame layer by ticking the little box at the top of the layers dialog, and go to Filters>Blur>Gaussian Blur but this time use 7 for both settings then click OK.
Now delete the Blur layer and unlock the alpha channel.
Step 10.
Here is where we decide what we want our frame to look like.
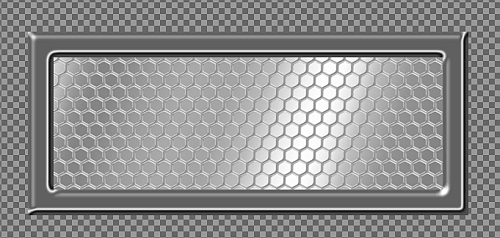
Option A - Chrome
Go to Colors>Curves and adjust your Curve settings to match the image below or use what I call the Intermediate Chrome settings. You can download all my Chrome Curves by downloading the resources zip file from my Metal Wurx – Part XIII tutorial here:
viewtopic.php?f=23&t=4150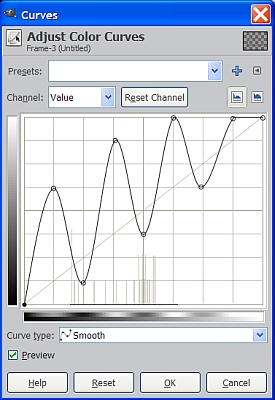
Once you have your Curve settings adjusted, click OK. Your Frame should now look similar to the screenshot below.
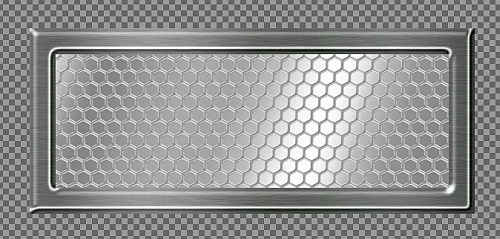
 Option B
 - Brushed chrome
Use Option A and open an image of brushed metal above the Frame layer (or make one using HSV or RGB noise and Motion Blur) and set the layer Mode to Grain Merge.
Right click on the Frame layer and choose Alpha to Selection. Go to Select>Invert, then click on the Brushed Metal layer and hit the delete key to remove the excess, then turn off the selection. (Select>None)
Right click the image layer in the layers dialog and select Layer to Image Size.
 Option C
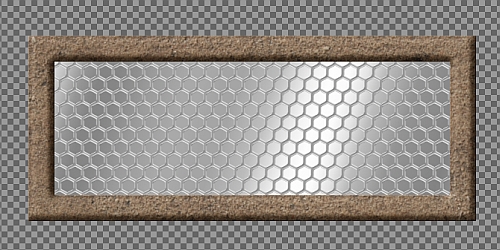
 – Rust or Corrosion Texture
Instead of making a Chrome or Brushed Metal Frame, open a good rough image like rust or sand and place it above the Frame layer. Some images are quite large and result in way too much detail so you may want to scale the image before you proceed. If you don’t want the color, go to Colors>Desaturate and remove the color by selecting one of the three methods in the dialog. I use Luminosity most of the time for this.
Add an alpha channel to the image layer and then right click on the Frame layer and choose Alpha to Selection. Go to Select>Invert, then select the Sand/Rust image layer (I used a sand texture) again to make it active and hit your delete key to remove the excess.
Set the Layer Mode of the image layer to Overlay. Select the Frame layer to make it active again and go to Filters>Map>Bump Map. Set the Map Type to Sinusoidal and use only a slight depth of about 2 and leave the rest of the settings at the default. Make sure your image layer is the one selected for the bump map.
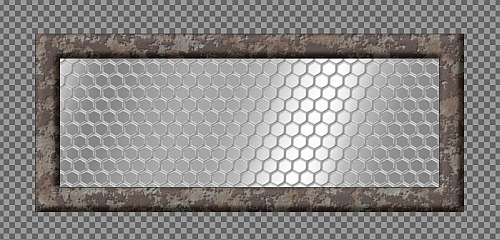
You may also want to try setting the Map type to Spherical to get a more subtle relief effect. Here’s another one using a rust image for the bump map. I also used the desaturaton step on the image layer first.
You can add a color layer set to Overlay, add rivets, bolts, additional plates or add a drop shadow or anything else you like. If you are going to use your frame for a sig on Gimp Chat, you will need to resize your image to 500 x 150 or less.
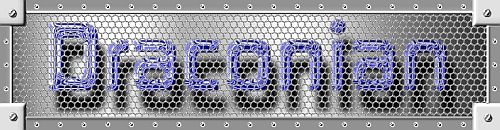
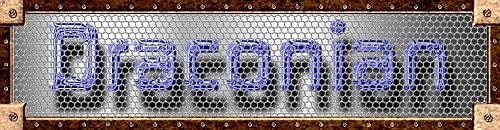
Here’s a couple of my completed sigs I use occasionally. The corners are just another layer of squares with some of the same steps applied and the text and shadow layers placed between the Mesh layer and the Background gradient layer. I also applied some blur/bump/curves and color to the text which can be placed above or below the Mesh layer for different effects. You can find all of these techniques in my other Metal Wurx tutorials.
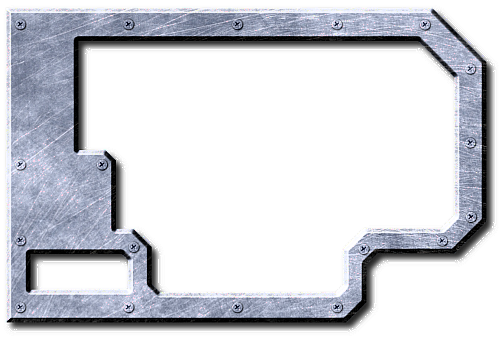
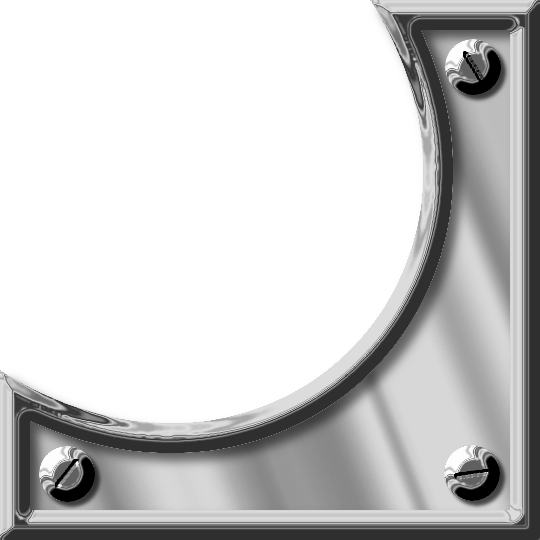
As you can see, there is really a lot you can do once you make a basic frame so save your .xcf file with all the layers intact. The same techniques can be applied for making an interface frame, just shape the frame differently and perhaps use the Python based Selection Bevel script to make your edges instead of the Blur/Bump method we used for this tutorial. Here’s the frame I made for the very last segment which will show you how to create a complex Control Panel. For this frame I used some scratched metal texture, a few screw heads and some color.
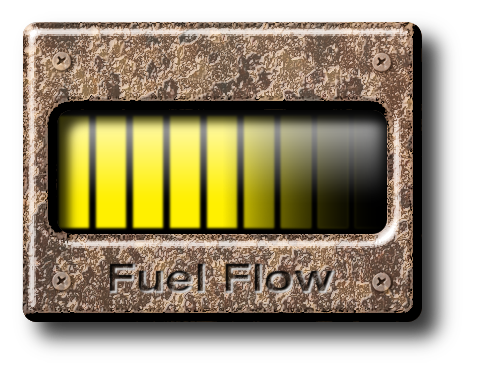
I hope you enjoyed this tutorial. Next up is yet another segment in the
Metal Wurx series where I will show you how to make this simple Flow Meter.


 Funny you should mention that.


 Dunno Drac. Anyway, your choice.