this is too much fun not to share! i hadn't made them in over a year and almost forgot about their existence but was reminded by something and my first thought was: great for making a beginner tutorial. so here it is! (now in edited version, sorry people for messing up first time!)
bohemian blob paisleys
step 1. make a new image in a suitable size (bigger than maximum brush size if you want to use it as a brush). i prefer making the paisleys on transparent background, but that's just my personal taste.
step 2. open one or more pictures with patterns and colours that you like and make three to four circle selections from them (of course you can use fewer than three or more than four, but i think you will find three to four circles in your blob looks just detailed enough). scale down the circles to brush size if needed.
step 3. pick a circle that will make your outline, copy it and use it as a brush. scale brush to suitable size, paint it once in the top centre of your image. scale down brush size a little and copy circle number two and repeat procedure. get the second circle in the centre of your first one - if you're very fussy about symmetry i suggest you paint your circles in separate layers and use guides, but i don't bother anymore. repeat the procedure with your third and fourth circles. if you painted in separate layers you can now merge all layers.
Attachment:
 circles for a blob small.png [ 172.26 KiB | Viewed 7015 times ]
step 4. now comes the fun part! open iwarp. set it to "move" with distortion radius at about 70, distortion rate about 50. from the centre of the circle, pull straight down till you get a rounded teardrop shape. repeat if you want your paisley blob longer.
Attachment:
 blobmaking1.png [ 166.15 KiB | Viewed 7015 times ]
step 5. set distortion radius to about 30, lower distortion rate to about 30 as well and again pull straight down from the centre til your blob gets a drop shape.
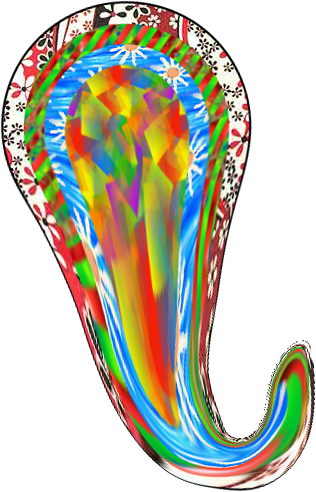
step 6. start moving the apex of the blob to the left or right to make the characteristic comma shape of a paisley unit. if you want the blob more rounded use a high distortion rate, if you want it sharper use a low distortion rate. finish off by smoothing your blob out (unless you like it a bit rough) by moving areas in or out til you get a clean contour. if you like chaos in your patterns you can always whirl the centre of your blob, or try to whirl the "tail" of it. click ok when you're finished.
Attachment:
 blobmaking3.png [ 189.19 KiB | Viewed 7015 times ]
step 7. if you want to use it as a brush, i suggest you auto crop your image. otherwise, you can just sit back and enjoy the sight of your fun, bohemian paisley blob and think of what pictures you'll use for your next one!