It is currently Thu Apr 25, 2024 7:15 pm


All times are UTC - 5 hours [ DST ]


Post new topic Reply to topic  [ 82 posts ]  Go to page 1, 2, 3, 4, 5  Next
Author Message
 Post subject: Painting a Picture in a Picture Tutorial
PostPosted: Mon Sep 10, 2012 11:33 am  (#1) 
Offline
Global Moderator
User avatar

Joined: Apr 07, 2010
Posts: 14182
I found this tutorial on a video found 
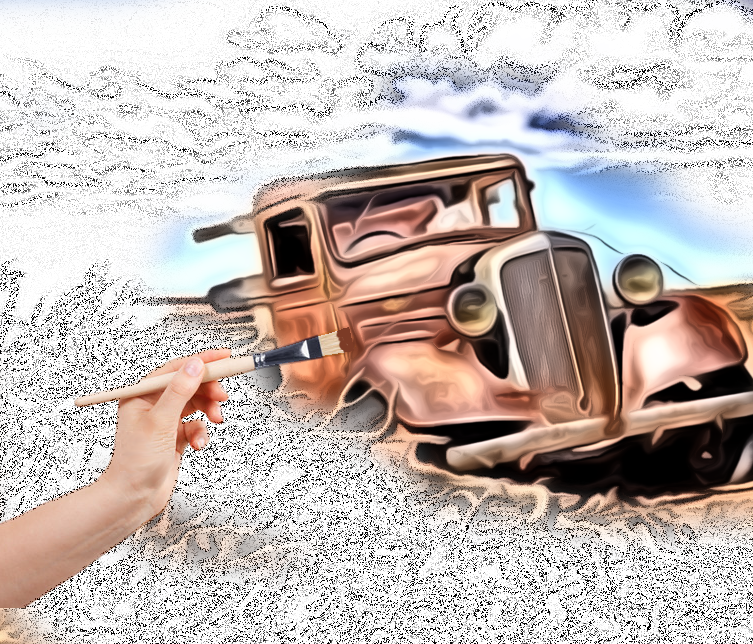
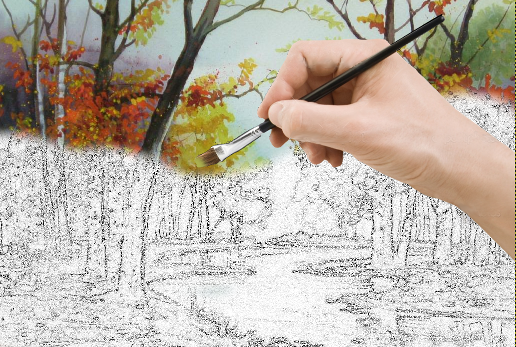
Here and I thought I would make it into a text tutorial by combining two photographs to make it seem like one is painting the other
I suggest before you start the text tutorial, you should watch this very well explained video so you can see the steps before applying them

This is what mine looks like before and after.

Image

Image

We will start with two images, one with your choice of a scene, a person or animal, anything your want. Then find a hand holding a paint brush in one of the image sites. I prefer Bing Images found Here

Open the image you picked for this tutorial. This will be your bottom layer, right click the layer and add alpha channel.

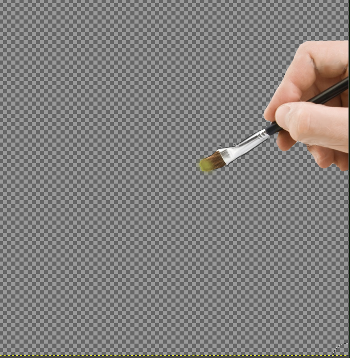
Then open as layers, (file > open as layers) your image with the hand holding the brush. This will be layer 2. Right click on your hand layer and click add alpha channel. This will make your layer transparent.
There are many ways to remove the background to make your image transparent. This is the one I used because the background was all one colour. I used the :fuzzsel (fuzzy select tool) to select the white background, once the hand is selected, click Select on the top menu bar then click grow 1 pixel then ok. Growing 1 pixel takes away the white pixels that are left behind. click delete.
Now you should have the (transparent), checker board background on your hand layer.

Image

Turn on the bottom layer with the fall scene and you can see the hand showing through from the layer above. To reposition bottom layer, select the layer and use the move tool to click on the image to drag it down to to a position you would like to see. Now right click that layer and go to layer to image size.

Now we would like to make some modifications for the scene layer, so turn off the top layer that has the hand, (the little eye to the left) and duplicate :dupe the scene layer.
Make sure the scene layer is selected and turn off (the eye) of the duplicate layer and just have the bottom layer showing, (the scene layer).

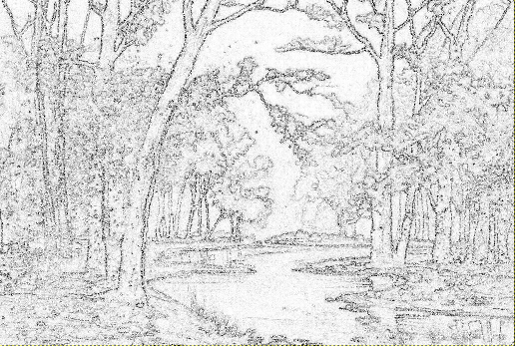
Now we will turn this layer into something that looks as if it was created with a pencil.
Go to Filters > edge detect > edge. Use default settings OK
Invert colours by going to colours menu again and click desaturate (choose default settings).

We now need to create something behind so we will make a new background layer. Click New layer :new click white OK. Move this layer to the bottom of the stack by using the small green down arrow at the bottom of the layers dialogue. This layer will make your pencil layer easier to see.
Select the layer with the black and white pencil, change opacity to 50%, change layer mode to dissolve.

Image

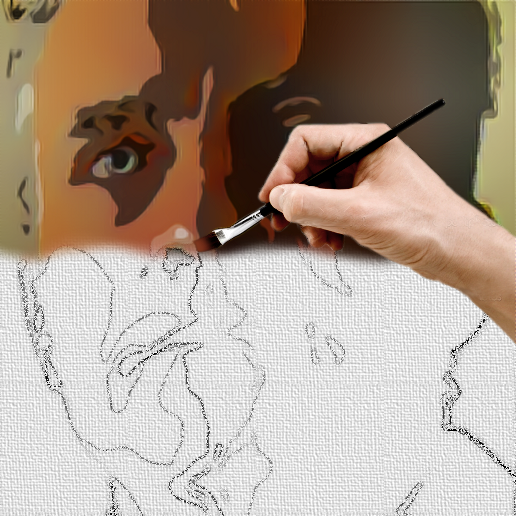
Turn on the other two layers. We are now going to erase some of the scene layer to expose the black and white pencil drawing beneath it. Make sure the layer is selected that has the coloured scene and start erasing with the erase tool and choose a large soft brush down to just below the paint brush.

Now we will add a bit of paint to the brush in the colour you are now working with. Select the layer with the hand, right click > alpha to selection so we won't paint outside the selection. Go to the color picker in the tool menu :colpick. Pick a colour where the brush is pointing, in this case it is a light green, Use the airbrush tool :airbrush and paint a few dabs on the end of the bristles to show it has paint on it.
de-select. Go to menu top bar > Select > none.

Image

We now want to increase the contrast of the arm layer by clicking that layer, go to colours menu, brightness-contrast and pull the contrast slide to the right a bit to make it a bit brighter to match your scene.
Delete the bottom white layer.

Now we are done.

If you want to combine your image layers right click on the layer and choose flatten to make a single layer. Save as png, or if you are using Gimp-2.8 or higher click File > export and mine is called Picture-in-Picture.png saved on desktop

_________________
Image


Share on Facebook Share on Twitter Share on Orkut Share on Digg Share on MySpace Share on Delicious Share on Technorati
Top
 Post subject: Re: Painting a Picture in a Picture Tutorial
PostPosted: Mon Sep 10, 2012 11:55 am  (#2) 
Offline
GimpChat Member
User avatar

Joined: Mar 23, 2012
Posts: 7309
Location: Göteborg at last!
That is fantastic Mo. Thanks for posting it.


Top
 Post subject: Re: Painting a Picture in a Picture Tutorial
PostPosted: Mon Sep 10, 2012 12:09 pm  (#3) 
Offline
GimpChat Member

Joined: Aug 05, 2011
Posts: 606
Location: limestone,ny
will have to try this when i get some time
thanks Molly
the link took me to a page not found error


Top
 Post subject: Re: Painting a Picture in a Picture Tutorial
PostPosted: Mon Sep 10, 2012 12:12 pm  (#4) 
Offline
Global Moderator
User avatar

Joined: Apr 07, 2010
Posts: 14182
Thanks guys, hope you do it. @alc, link working now.

_________________
Image


Top
 Post subject: Re: Painting a Picture in a Picture Tutorial
PostPosted: Mon Sep 10, 2012 3:23 pm  (#5) 
Offline
GimpChat Member
User avatar

Joined: Mar 23, 2012
Posts: 7309
Location: Göteborg at last!
That was a lot easier than I thought it would be. An excellent tutorial.

Image


Top
 Post subject: Re: Painting a Picture in a Picture Tutorial
PostPosted: Mon Sep 10, 2012 3:25 pm  (#6) 
Offline
GimpChat Member
User avatar

Joined: Aug 16, 2012
Posts: 4271
Location: Göteborg, Sweden
good job, erisian!

_________________


Top
 Post subject: Re: Painting a Picture in a Picture Tutorial
PostPosted: Mon Sep 10, 2012 3:28 pm  (#7) 
Offline
GimpChat Member
User avatar

Joined: Mar 23, 2012
Posts: 7309
Location: Göteborg at last!
:tyspin AnMal :) I couldn't have done it without coffee though. :hehe


Top
 Post subject: Re: Painting a Picture in a Picture Tutorial
PostPosted: Mon Sep 10, 2012 3:32 pm  (#8) 
Offline
GimpChat Member
User avatar

Joined: Aug 16, 2012
Posts: 4271
Location: Göteborg, Sweden
:yell you insist on using that language! if you're not nice i'll get my big brother!

_________________


Top
 Post subject: Re: Painting a Picture in a Picture Tutorial
PostPosted: Mon Sep 10, 2012 3:34 pm  (#9) 
Offline
GimpChat Member
User avatar

Joined: Mar 23, 2012
Posts: 7309
Location: Göteborg at last!
:bawl :bowdown :bowdown :bowdown

I promise I won't mention the C word again.


Top
 Post subject: Re: Painting a Picture in a Picture Tutorial
PostPosted: Mon Sep 10, 2012 3:36 pm  (#10) 
Offline
GimpChat Member
User avatar

Joined: Aug 16, 2012
Posts: 4271
Location: Göteborg, Sweden
hmm.. bows and crying are not good enough - i demand a paisley!

_________________


Top
 Post subject: Re: Painting a Picture in a Picture Tutorial
PostPosted: Mon Sep 10, 2012 3:37 pm  (#11) 
Offline
GimpChat Member
User avatar

Joined: Mar 23, 2012
Posts: 7309
Location: Göteborg at last!
OK but we've got to stop highjacking Molly's thread. :)


Top
 Post subject: Re: Painting a Picture in a Picture Tutorial
PostPosted: Mon Sep 10, 2012 3:38 pm  (#12) 
Offline
GimpChat Member
User avatar

Joined: Aug 16, 2012
Posts: 4271
Location: Göteborg, Sweden
sorry molly! i'm out of here

_________________


Top
 Post subject: Re: Painting a Picture in a Picture Tutorial
PostPosted: Mon Sep 10, 2012 3:51 pm  (#13) 
Offline
GimpChat Member
User avatar

Joined: Aug 28, 2012
Posts: 3062
Location: Idk where I am.
GAHAHAHA XD!

Nice tutorial Molly! :D

_________________
Image
Reality is a lovely place...But I wouldn't wanna live there.


Top
 Post subject: Re: Painting a Picture in a Picture Tutorial
PostPosted: Mon Sep 10, 2012 7:45 pm  (#14) 
Offline
GimpChat Member
User avatar

Joined: May 16, 2010
Posts: 14709
Location: USA
Very cool tutorial Molly! :)
I love this effect.

_________________
Image
Edmund Burke nailed it when he said, "The only thing necessary for the triumph of evil is for good men to do nothing."


Top
 Post subject: Re: Painting a Picture in a Picture Tutorial
PostPosted: Tue Sep 11, 2012 5:47 am  (#15) 
Offline
GimpChat Member
User avatar

Joined: Aug 24, 2011
Posts: 1785
Location: Dallas, TX
That's a really cool effect Molly. I can see a gif annimation in the near future to immulate one of those speed drawings. Now that would really be a tut!

AnMal - Don't believe a word that Erisian says...HE'S LYING! He will do it again, just wait.

Rod - Is that AnMal chasing Erisian? :rofl

(sorry Molly, couldn't resist)

_________________
Image


Top
 Post subject: Re: Painting a Picture in a Picture Tutorial
PostPosted: Tue Sep 11, 2012 6:14 am  (#16) 
Offline
Global Moderator
User avatar

Joined: Apr 07, 2010
Posts: 14182
Erisian wrote:
OK but we've got to stop highjacking Molly's thread. :)


thank you Erisian, you did a very nice job. I see you added the oil painting fabric, :clap

_________________
Image


Top
 Post subject: Re: Painting a Picture in a Picture Tutorial
PostPosted: Tue Sep 11, 2012 8:34 am  (#17) 
Offline
GimpChat Member
User avatar

Joined: Aug 24, 2011
Posts: 1785
Location: Dallas, TX
I was doing a wedding montage dvd for some friends and this gave me an idea. I had a dickens of a time finding a hand photo that I didn't have to pay for but I finally got this done. It is quite easy to do. Thanks for posting it Molly.


Attachments:
painting.png
painting.png [ 297.77 KiB | Viewed 2158 times ]

_________________
Image
Top
 Post subject: Re: Painting a Picture in a Picture Tutorial
PostPosted: Tue Sep 11, 2012 8:51 am  (#18) 
Offline
Global Moderator
User avatar

Joined: Apr 07, 2010
Posts: 14182
nice job Drac, thanks for doing my tutorial

_________________
Image


Top
 Post subject: Re: Painting a Picture in a Picture Tutorial
PostPosted: Tue Sep 11, 2012 8:57 am  (#19) 
Offline
Retired Staff
User avatar

Joined: May 22, 2008
Posts: 6947
Location: Somewhere in GIMP
This is an excellent tutorial, Molly. It was lotsa fun! :paint

Image

_________________
Image
World War IV will be fought with sticks and stones. - Albert Einstein


Top
 Post subject: Re: Painting a Picture in a Picture Tutorial
PostPosted: Tue Sep 11, 2012 9:09 am  (#20) 
Offline
Global Moderator
User avatar

Joined: Apr 07, 2010
Posts: 14182
That is a very nice job O,
I was wondering if you would paint left handed or right cuz I did know you were a south paw. Thanks for sharing my tute.

_________________
Image


Top
Post new topic Reply to topic  [ 82 posts ]  Go to page 1, 2, 3, 4, 5  Next

All times are UTC - 5 hours [ DST ]


   Similar Topics   Replies 
No new posts Attachment(s) A picture says it all.

4

No new posts Attachment(s) how to place text exactly into the picture - is there any help?

8

No new posts WebP picture for the attachment

1

No new posts Attachment(s) Feather in gimp gives unwanted lines in picture - SOLVED

9

No new posts VHS Look Landscape Painting

0


* Login  


Powered by phpBB3 © phpBB Group