It is currently Thu Apr 18, 2024 4:45 pm


All times are UTC - 5 hours [ DST ]


Post new topic Reply to topic  [ 12 posts ] 
Author Message
 Post subject: ezeestyles Bottletop Tutorial
PostPosted: Mon Oct 01, 2012 6:38 am  (#1) 
Offline
GimpChat Member
User avatar

Joined: Aug 30, 2012
Posts: 2174
This tutorial is in response to how to create a certain design, I haven't come up with this design only interrupted it into a tut, The original design is by micki and is a commercial venture for them, they have allowed the tutorial to show how bottlecaps can be made with Gimp, but please do respect its their intellectual property. THANKS.


Create a new image in gimp 512px * 512px and fill with white. Right click on Layer and in drop down Menu select "Add Alpha Channel"

Go Filters>Alpha to Logo>Bovination, settings should be default and the same as attached image. Then Click OK.

Image

You should now have 3 Layers in your Layers Dialogue Box, Background#1, Blur & Background. Delete the Layer named Blur.
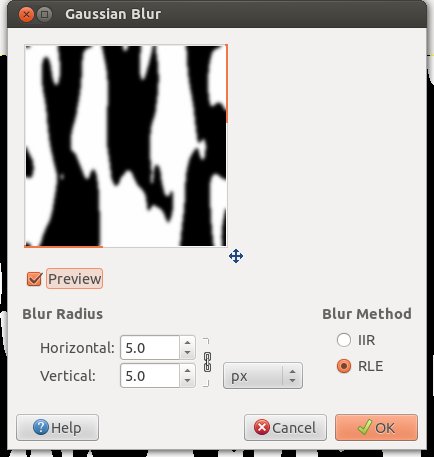
Select the Layer named "Background#1" and go Filter>Blur>Gaussian Blur, settings should be default and the same as attached image. Then Click OK.

Image

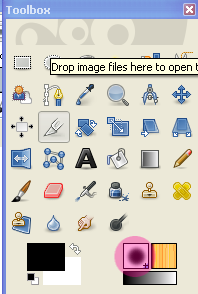
From the Toolbox select the Rotate Tool :rot 
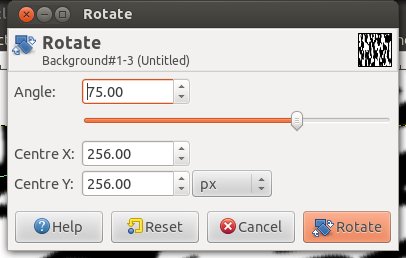
and click anywhere on your main image, this should bring up the rotate tool window, change angle to 75 and click rotate.

Image

Next we need to create two guides to locate the centre of the image, go Image>Guide>New Guide(by percent) and set direction to Horizontal and Position to 50 click Ok.
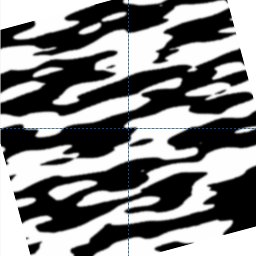
Repeat the above step but change Direction to Vertical, you should now see to guide on your image as below, if not go View and make sure show guides and snap to guides are ticked.

Image

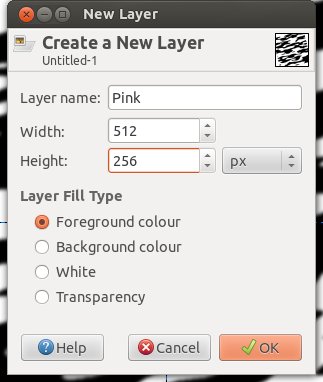
Change your foreground colour to ff69b4, then go Layer>New Layer and change settings to those shown in image and click OK.

Image

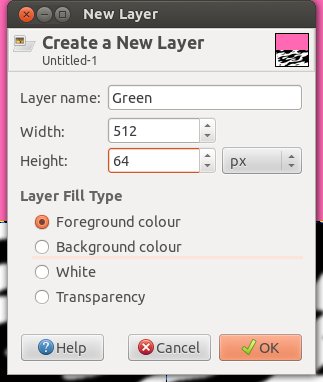
Change foreground colour to adff2f, then go Layer>New Layer and change settings to those shown in image and click OK.

Image

Now from the ToolBox select the move tool :move 
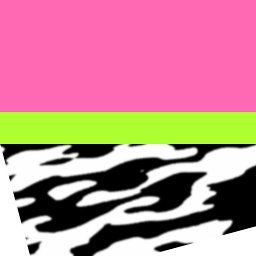
and click and hold left mouse button on your green layer and move it to centre of image, you should notice a tiny little crosshair denoting centre of layer, move this crosshair to the point where your guides cross and it should snap to that point, once happy with the postion release the left mouse button. Your image should now look the same as below.

Image

Make sure you are still on the green layer and go Edit>Copy Visible then Go Edit>paste As>New Layer. Select this new Layer and turn all other layers off except the white Background Layer, you turn layer off by clicking on the small eye icon next to layer.

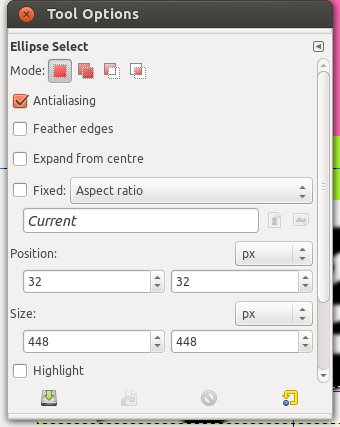
From you toolbox select the Elipse Section Tool :elipse and start to draw an elipse then you can change settings in the elipse window as shown in image below.

Image

Go Select>Invert then Edit>Clear and finally Select None.
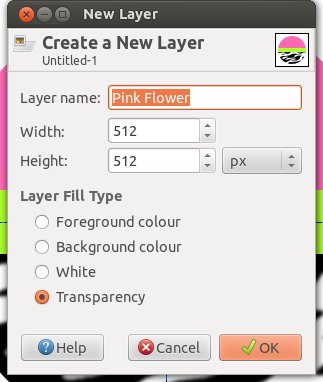
Go Layer>New Layer name Layer "Pink Flower" and make sure height & Width are set to 512px and that transparency is also checked click OK. Select this layer.

Image

Make sure your foreground colour is set to ff69b4 this is the pink colour we used earlier. The from Toolbox select your Elipse Selection Tool again and start to draw an elipse then change settings in the elipse window as shown.

Image

From ToolBox select your Bucket fill Tool :bucket and click inside selection to fill with pink.
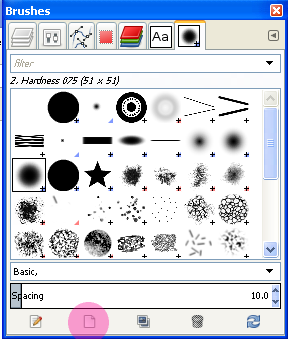
Then go to your brush Dialogue window and right click anywhere on the brushes and from the new drop down menu select "New Brush" enter settings as shown below.

Image

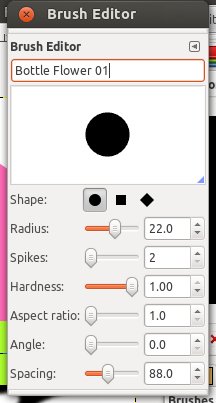
Make sure you have this brush selected.

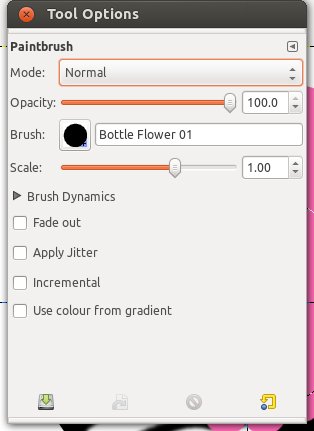
From Toolbox select the Paintbrush Tool and just check your brush is the chosen one and all other settings are unchecked and the same as the image below.

Image

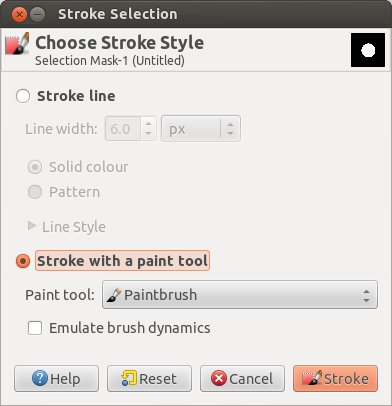
Go Select>Selection Editor this should open up your selection editor from the icons across the bottom click the last icon "Paint Along Selection" Image this should bring up this window make sure settings are the same and click stroke

Image

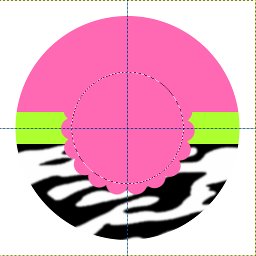
Your image should be the same as shown.

Image

Go Select>Shrink and change value to 12 and click OK. the go Edit>Clear, Create a new Layer and call it "White Centre", Select this Layer and from Toolbox select the bucket fill tool :bucket and fill selection with the Colour White. Then go Select>None

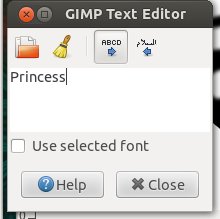
Make sure your foreground colour is ff69b4 the pink colour already used and that the layer White Centre is selected then from Toolbox select the text tool :text
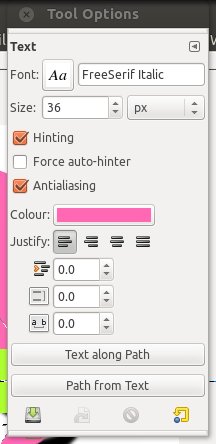
, click on your image an this should bring up the "Gimp Text Editor" enter text and in the Text dialogue window you can change the font and size of your text, this may well vary depending on the font you have chosen. I'm using a Linux version of gimp so fonts are slightly different but if your using a window version then there used to be a font called lucinda's Handwriting which might suit the style you are after better.

ImageImage

With your text layer selected go Layer>Autocrop and then from toolbox select the Move Tool :move and as before position text to centre of image, you will need to click on part of the text to move layer, otherwise you'll find yourself moving some of the lower layers, you can always turn off all layers until you have positioned you text Layer where you want it then switch them back on.

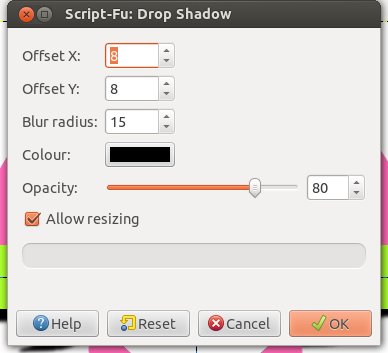
Finally and I know its not part of the original but I wanted the Pink Flower to Stand out more, so select the layer "Pink Flower then go Filter>Light and Shadow>Drop Shadow you can use the defaults as shown in the image then click OK.

Image

Thats it, now if you want to change the text all you need do is turn off your text layer and reselect the text tool and type in and position the new text.

Also if you want to scale your image go Edit>Copy Visible then Edit>Paste As>New Image, this will open up your picture as a new gimp file so as not to damage your original, the go Image>Scale Image here you can change your width and height.

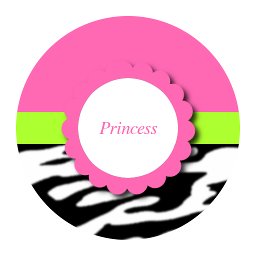
Heres my final image.

Image

And heres the XCF file

Bottletop.xcf

_________________
Image


Last edited by he4rty on Wed Oct 03, 2012 8:36 am, edited 2 times in total.

Share on Facebook Share on Twitter Share on Orkut Share on Digg Share on MySpace Share on Delicious Share on Technorati
Top
 Post subject: Re: ezeestyles Bottletop Tutorial
PostPosted: Mon Oct 01, 2012 1:38 pm  (#2) 
Offline
GimpChat Member
User avatar

Joined: Aug 30, 2012
Posts: 2174
Although the image in the tutorial is all very girly, I do like the results, but I just had to get all this girly stuff out of my system.

So I created one for boys.....

Image

_________________
Image


Top
 Post subject: Re: ezeestyles Bottletop Tutorial
PostPosted: Mon Oct 01, 2012 3:23 pm  (#3) 
Offline
GimpChat Member

Joined: Sep 30, 2012
Posts: 6
thats fab i have loads of ideas but the bottom pattern how do i get different styes like leopard and flower patterns what do i have to down load for them , ive downloaded some fonts and brushes and added them xxx


Top
 Post subject: Re: ezeestyles Bottletop Tutorial
PostPosted: Mon Oct 01, 2012 3:33 pm  (#4) 
Offline
GimpChat Member
User avatar

Joined: Aug 16, 2012
Posts: 4271
Location: Göteborg, Sweden
he4rty: a well made tutorial. i liked the rock star badge too - but come on, what's wrong with girly? no one died of a little pink fluff :) .

_________________


Top
 Post subject: Re: ezeestyles Bottletop Tutorial
PostPosted: Wed Oct 03, 2012 9:10 am  (#5) 
Offline
GimpChat Member
User avatar

Joined: Aug 30, 2012
Posts: 2174
ezeestyles wrote:
thats fab i have loads of ideas but the bottom pattern how do i get different styes like leopard and flower patterns what do i have to down load for them , ive downloaded some fonts and brushes and added them xxx


If you have a jpg or png file then you can simply go File>open as Layer and this will open your jpg/png as a new layer in your image.

Also so can use the bucket fill tool and set fill to Pattern and then choose a pattern from your dialogue window.

The post here has a lot of patterns to try Post your Patterns & Textures you'll find that some of the patterns will be a file.pat and these will need to be placed in your patterns folder hers a link to a much better explination about Patterns and Gimp in general Gimp Manual

_________________
Image


Top
 Post subject: Re: ezeestyles Bottletop Tutorial
PostPosted: Wed Jul 29, 2015 10:09 am  (#6) 
Offline
GimpChat Member

Joined: Jul 28, 2015
Posts: 9
Wow... finally a precise tutorial on round images i want to learn about... yaayyy!!

_________________
1 Corinthians 16:14 Let all that you do be done in love.


Top
 Post subject: Re: ezeestyles Bottletop Tutorial
PostPosted: Sat Aug 01, 2015 10:53 am  (#7) 
Offline
GimpChat Member

Joined: Jul 28, 2015
Posts: 9
I created one example using Hearty's tutorial, i got farther this time without giving up right away... LOL ! Although i could not turn them into 1" bottle cap images and into a template. When i tried to cut and paste, it only cut the center image. Also didn't figure out how to get into the brush editor to create the flower look. BUT I'LL KEEP TRYING... trials and errors ughhff!


Attachments:
Example BC Image.JPG
Example BC Image.JPG [ 26.9 KiB | Viewed 7063 times ]

_________________
1 Corinthians 16:14 Let all that you do be done in love.
Top
 Post subject: Re: ezeestyles Bottletop Tutorial
PostPosted: Sat Aug 01, 2015 1:56 pm  (#8) 
Offline
Global Moderator
User avatar

Joined: Nov 16, 2011
Posts: 5128
Location: Metro Vancouver, BC
Nice one 2CUTE4U, keep at it.
Check the lower right side Brushes dialog for the Edit Brush button.

_________________
Image
Gimp 2.8.18, Linux, median user
Gimp Chat Tutorials Index
Spirit Bear (Kermode)


Top
 Post subject: Re: ezeestyles Bottletop Tutorial
PostPosted: Sat Aug 01, 2015 3:51 pm  (#9) 
Offline
GimpChat Member
User avatar

Joined: Aug 16, 2012
Posts: 4271
Location: Göteborg, Sweden
2cute4u: :hi5 you're getting there now! nice job.
if you haven't already figured it out, this is what odin said but with picture aid:

if you have a window with this row of symbols, you can click where the pink dot is.
Image

if you don't have that window up, you can go to the toolbox and click where the pink dot is instead. the pink dot in both my images mark the brush menu, where you can select brushes.

Image

when you get up the brush menu, just click where the pink dot is in my image, and it will take you to the editor window that he4rty showed in his tut.

Image

good luck!

_________________


Top
 Post subject: Re: ezeestyles Bottletop Tutorial
PostPosted: Mon Aug 03, 2015 7:26 am  (#10) 
Offline
GimpChat Member

Joined: Jul 28, 2015
Posts: 9
:tyspin.

One more question please. :lol How do i make the image go underneath the template. I want to make a 4x6
1" bottle cap images sheet. Thank you all so much, my images are not to clean but I'm not a quiter!!! :lol :lol

_________________
1 Corinthians 16:14 Let all that you do be done in love.


Top
 Post subject: Re: ezeestyles Bottletop Tutorial
PostPosted: Mon Aug 03, 2015 11:22 am  (#11) 
Offline
GimpChat Member
User avatar

Joined: Aug 16, 2012
Posts: 4271
Location: Göteborg, Sweden
2cute4u: i think you need to look at your layer list more often :). if you only get the center of the image copied it's probably because that is the active layer. either make a new layer from visible (right click a layer in the layer list, then select "new from visible") and copy that layer, or do a "copy visible" (shift + ctrl + c or edit -> copy visible). that gives you the whole picture in the clipboard. also make sure you don't have any selections on before you do this.
to get your image into the template just open the template in gimp, paste the image as a new layer and then scale it to size. i think the simplest way when you want a set size is to go to image -> scale image, choose "inches" instead of "pixels" in the drop-down list and then just scale. move the resized image to where you want it, copy it, go to "layer - layer to image size" and then paste in the rest of the images in the right places. when you're done you can click the green down-arrow at the bottom of the layer list, that will move the images down below the template layer.

_________________


Top
 Post subject: Re: ezeestyles Bottletop Tutorial
PostPosted: Tue Aug 04, 2015 6:59 am  (#12) 
Offline
GimpChat Member

Joined: Jul 28, 2015
Posts: 9
Thank you Anmal. I'm taking notes. I'll post my results soon

_________________
1 Corinthians 16:14 Let all that you do be done in love.


Top
Post new topic Reply to topic  [ 12 posts ] 

All times are UTC - 5 hours [ DST ]


   Similar Topics   Replies 
No new posts Attachment(s) ilzaf tutorial

1

No new posts Attachment(s) Circlismic the Tutorial.

7

No new posts IN SEARCH OF TUTORIAL

2


* Login  


Powered by phpBB3 © phpBB Group