It is currently Tue Apr 23, 2024 11:49 am


All times are UTC - 5 hours [ DST ]


Post new topic Reply to topic  [ 14 posts ] 
Author Message
 Post subject: Warhol name tag (esp. for sallyanne)
PostPosted: Mon Oct 01, 2012 3:22 pm  (#1) 
Offline
GimpChat Member
User avatar

Joined: Aug 16, 2012
Posts: 4271
Location: Göteborg, Sweden
in the warhol text thread (gimp chat - warhol text) i posted a name tag i made for one of my sisters and sallyanne wanted to make something similar. i wrote a quick tut but i don't think it was very good and she wasn't happy with her results, so i post this more elaborate tutorial with pictures. hope it will be of use to anyone!

warhol name tag

Image


step 1.open a new image. it's easier to get a good text effect if you start with a fairly large image, you can always scale it down later. my image was 800X400 pixels. type in your text and make it big enough to reach almost to the sides of the image. to make it easier to follow the tutorial and keep some order among the layers, name this layer "first text".

step 2. right click on the first text layer and choose "alpha to selection".

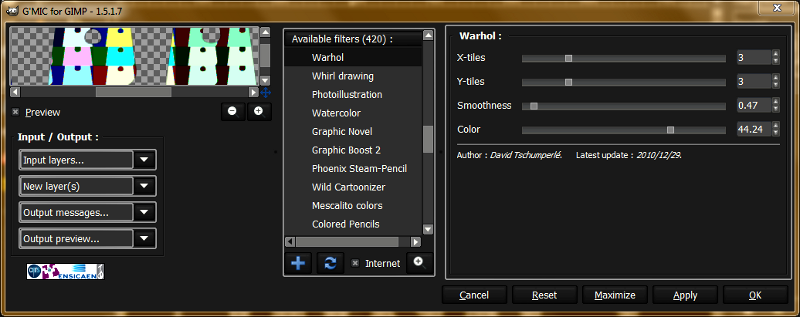
step 3. open g'mic and go to artistic -> warhol. use settings that make your text in text as clear and smooth as possible. here's the settings i used, and my result so far:
Image

Image

(the gimp version i use normally is set up in swedish, but everything's at least in the right places, so i don't think that should cause any problems - just think of it as an exotic touch to the tutorial :hehe)

note that i got two layers, that's important. if you didn't get two layers you should undo and go back to g'mic and change the settings in the output box to "new layer(s)". you might of course be lucky and get your text selection with text in it at this step, but that didn't happen to me this time and it rarely seems to happen at all.

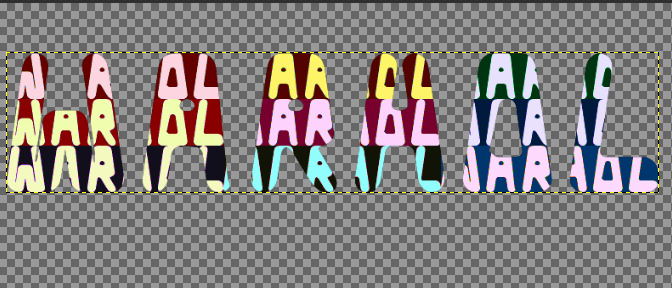
step4. name your new layer "warhol 1". now move the warhol 1 layer so it is right on top of your first text layer. invert the selection on your first text layer and then select your warhol 1 layer. first make sure the layer has an alpha channel. right click the warhol 1 layer in the layer menu and if "add alpha channel" isn't greyed out just click it.

then click delete or ctrl + x to get rid of the background and get your text in text.

Image

step 5
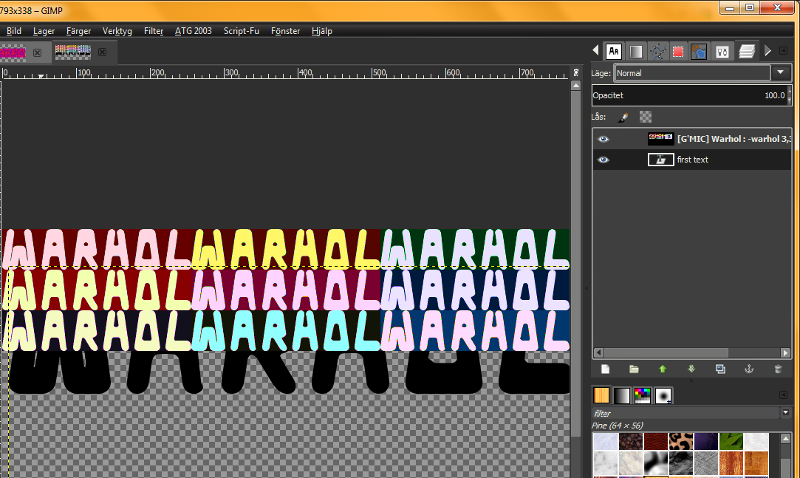
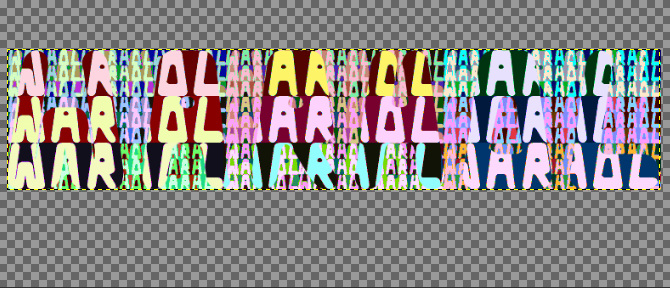
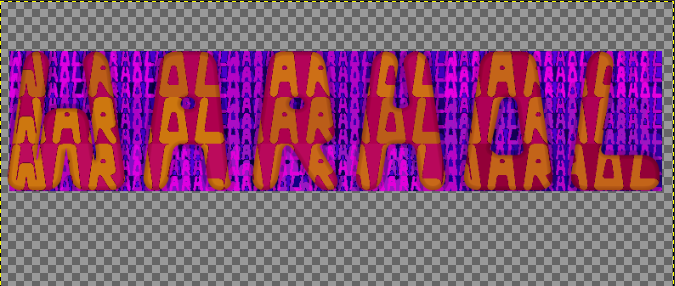
. you can make a choice here depending on what kind of effect you want on the background behind your warhol text. either you can select your warhol 1 layer or you can select your first text layer. in either case, go back go the warhol filter in g'mic, change the settings if needed, and click ok. in the first case, your image will look something like this:

Image

in the second case your image will look something like this:

Image

name your new layer "warhol 2".

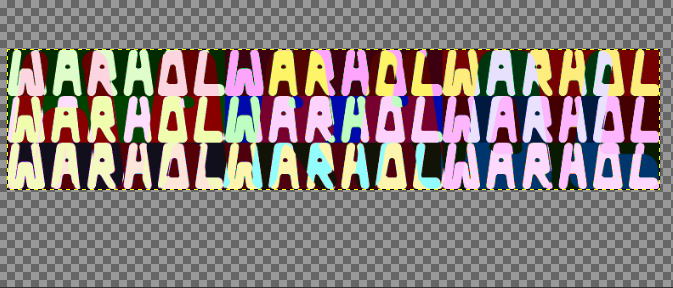
step 6. you may not be happy with the colours on your text layers - i am not, i rarely am. so let's change them a bit. select your warhol 1 layer. pick out a gradient or palette with nice colours in it and then go to colours -> map -> gradient map or colours -> map -> palette map.

i chose one of my own gradients and here is my result so far:

Image

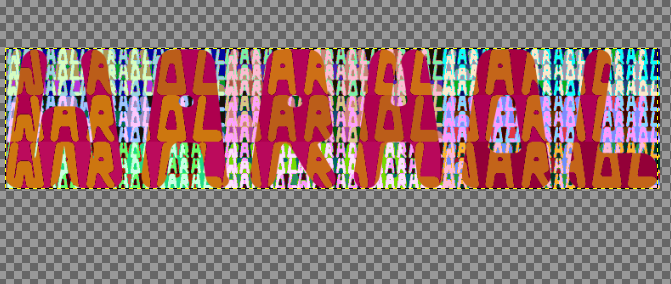
step7. select your warhol 2 layer and repeat step 6. you can pick a new palette or gradient or you can pick the same palette/gradient and tweak the colours with another tool later. i chose to use the same gradient and then went to colours -> hue, saturation and just pulled the hue slider til i got a background in blue and purple shades.
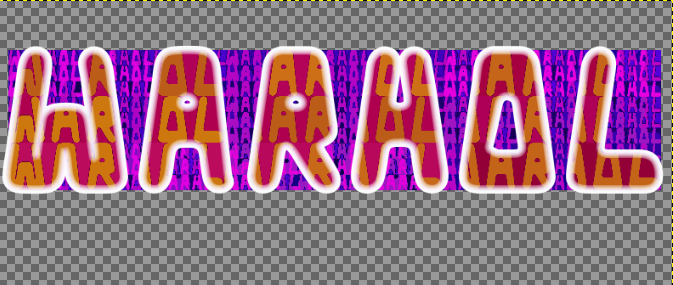
Image

step 8. you may want to add a little extra contour to your warhol text. right click the warhol 1 layer again and click alpha to selection. go to the selection menu and click "selection to path". turn off the selection.

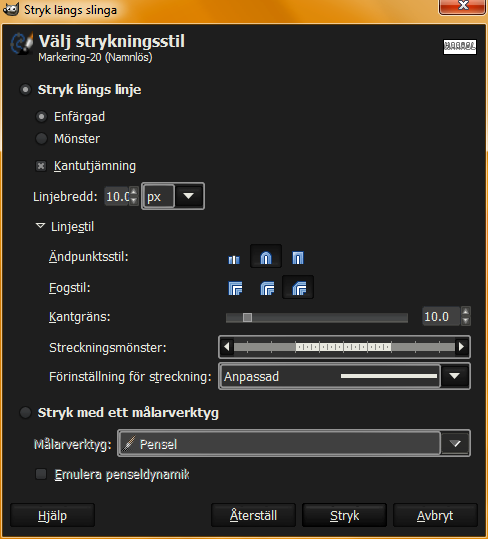
step 9. make a new (transparent) layer. set the foreground colour to white. go to the edit menu and click "stroke path". i used these settings:

Image

and here is the result:

Image
name the layer "contour".

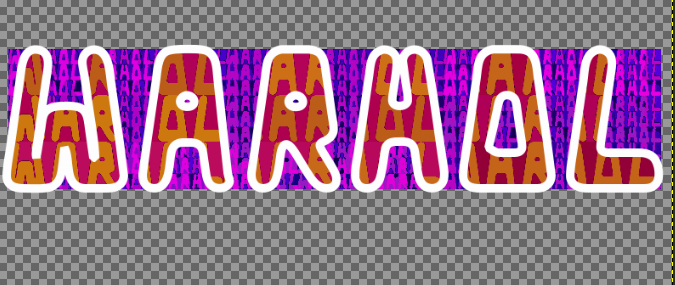
step 10. use the magic wand fuzzy select tool (magic wand) to select the area inside the letters in the contour layer. you will have to change the tool settings to "add to current selection" so you can select all the letters. grow your selection by 2 pixels, feather it by 10 pixels, then cut it by clicking delete or ctrl + X. you wil now have a fuzzy, white contour line much like this one:

Image

step 11. change the layer mode on the contour layer to grain extract.. you may of course want to play with other layer modes and with the opacity, but i chose grain extract and i set the opacity to 33.

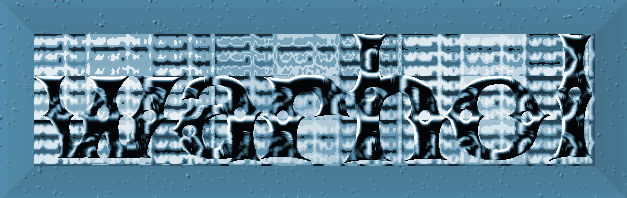
your image should now look something like this:

Image

step 12. go to image -> autocrop image. and now you're done!

_________________


Share on Facebook Share on Twitter Share on Orkut Share on Digg Share on MySpace Share on Delicious Share on Technorati
Top
 Post subject: Re: Warhol name tag (esp. for sallyanne)
PostPosted: Mon Oct 01, 2012 6:51 pm  (#2) 
Offline
GimpChat Member
User avatar

Joined: Mar 23, 2012
Posts: 7307
Location: Göteborg at last!
Nice effect AnMal. I'll have a go at this tomorrow.


Top
 Post subject: Re: Warhol name tag (esp. for sallyanne)
PostPosted: Tue Oct 02, 2012 1:02 am  (#3) 
Offline
Global Moderator
User avatar

Joined: Apr 01, 2012
Posts: 7712
Location: On the other side of this screen
Thank you anmal. If I can follow this correctly. I will post my results. Tut is set out well so I should.

_________________


Top
 Post subject: Re: Warhol name tag (esp. for sallyanne)
PostPosted: Thu Oct 04, 2012 4:01 am  (#4) 
Offline
Global Moderator
User avatar

Joined: Apr 01, 2012
Posts: 7712
Location: On the other side of this screen
I seem to having trouble with step 4. I must be able to select the first text layer and invert it but after deleting the warhol layer disappears completely. The text is still selected too.

_________________


Top
 Post subject: Re: Warhol name tag (esp. for sallyanne)
PostPosted: Thu Oct 04, 2012 10:35 am  (#5) 
Offline
GimpChat Member
User avatar

Joined: Aug 16, 2012
Posts: 4271
Location: Göteborg, Sweden
sallyanne: now, that's strange! can't imagine why that happens. hmm... do you get the marching ants around the inverted selection or do you get them just around the whole rectangle? there are ways to work around this step too, of course - using a layer mask, for example. but you shouldn't have to, really, it's very strange that basic functions like select-invert-delete shouldn't function properly! does it work if you do the same steps in other images? i don't think it could have anything to do with the warhol filter or this particular work process, it's always worked normally for me.

_________________


Top
 Post subject: Re: Warhol name tag (esp. for sallyanne)
PostPosted: Thu Oct 04, 2012 1:41 pm  (#6) 
Offline
GimpChat Member
User avatar

Joined: Aug 16, 2012
Posts: 4271
Location: Göteborg, Sweden
some new inspiration while you're working:
Attachment:
warhol text am.png
warhol text am.png [ 150.4 KiB | Viewed 8665 times ]

_________________


Top
 Post subject: Re: Warhol name tag (esp. for sallyanne)
PostPosted: Thu Oct 18, 2012 1:35 am  (#7) 
Offline
Global Moderator
User avatar

Joined: Apr 01, 2012
Posts: 7712
Location: On the other side of this screen
Thank you so much Anmal for going to all the trouble of doing this tut (esp for sallyanne). I have tried quite a few times now and still cannot get it.
I'm sure someone else will be able to use it. Thanks again. I may try again one day.

_________________


Top
 Post subject: Re: Warhol name tag (esp. for sallyanne)
PostPosted: Thu Oct 18, 2012 11:14 am  (#8) 
Offline
GimpChat Member
User avatar

Joined: Aug 16, 2012
Posts: 4271
Location: Göteborg, Sweden
sallyanne: it was no trouble at all :). just sorry to hear it didn't work out for you - but it's not like there's a lack of fun text effects to try out, is there :)?

_________________


Top
 Post subject: Re: Warhol name tag (esp. for sallyanne)
PostPosted: Mon Apr 22, 2013 1:53 am  (#9) 
Offline
Global Moderator
User avatar

Joined: Apr 01, 2012
Posts: 7712
Location: On the other side of this screen
Thought I would try this again today. Still not very good but I think I am getting there.
Image

_________________


Top
 Post subject: Re: Warhol name tag (esp. for sallyanne)
PostPosted: Mon Apr 22, 2013 10:52 am  (#10) 
Offline
Global Moderator
User avatar

Joined: Apr 01, 2012
Posts: 7712
Location: On the other side of this screen
Didn't try the outline earlier so just did 'edge detect'. Tried it just before and failed. I have made it this far I guess I will work it out eventually
Image

_________________


Top
 Post subject: Re: Warhol name tag (esp. for sallyanne)
PostPosted: Sat Apr 27, 2013 2:50 am  (#11) 
Offline
Script Coder
User avatar

Joined: Feb 18, 2011
Posts: 4827
Location: Bendigo Vic. Australia
I'm still going but will try something I else in this script tomorrow

Image

Image

_________________
Image
No matter how much you push the envelope, it'll still be stationery.


Top
 Post subject: Re: Warhol name tag (esp. for sallyanne)
PostPosted: Sat Apr 27, 2013 3:42 am  (#12) 
Offline
Global Moderator
User avatar

Joined: Apr 01, 2012
Posts: 7712
Location: On the other side of this screen
Thank you Graechan :)

_________________


Top
 Post subject: Re: Warhol name tag (esp. for sallyanne)
PostPosted: Wed May 01, 2013 6:27 am  (#13) 
Offline
GimpChat Member
User avatar

Joined: Aug 16, 2012
Posts: 4271
Location: Göteborg, Sweden
sallyanne: looks good to me - i like the edge detect, i never tried that :).

_________________


Top
 Post subject: Re: Warhol name tag (esp. for sallyanne)
PostPosted: Wed May 01, 2013 7:10 am  (#14) 
Offline
Global Moderator
User avatar

Joined: Apr 01, 2012
Posts: 7712
Location: On the other side of this screen
Thanks, now I feel rotten for what I said before. Everyone else seems to have got it.

_________________


Top
Post new topic Reply to topic  [ 14 posts ] 

All times are UTC - 5 hours [ DST ]


   Similar Topics   Replies 
No new posts Attachment(s) Homage to Sallyanne

26


* Login  


Powered by phpBB3 © phpBB Group