LT72884 wrote:
trying to do that with the gimp. i create a new layer, select my gradient colors i want and then i hit the gradient editor button in the tools box.
I would recommend not using the Gradient Editor for this. Though it can be done, it would require either a lot of trial and error or a good familiarity with the behavior of the Gradient Editor (if you wish to play around with "adjusting the triangles", you should first "Split the segment"). Also, the examples in that tutorial do not require the full color variations available with gradient editing.
Photoshop's interface is largely based on punching in numbers and checking boxes for options -- this makes things such as Layer Styles easy for Adobe to program, but personally I find it quite unintuitive. GIMP's approach is more organic. Rather than specify angles and scales, you paint the gradient onto a layer using the Blend Tool

. The angle is controlled by the direction of your "brush stroke", while the scale is controlled by the length your stroke. When dealing with just FG-to-BG or FG-to-transparency gradients, the "stop points" can effectively be controlled by the start and stop locations of your stroke. However, it may take a little practice until you become proficient at drawing such gradient blends. In the meantime, though, there is a way to otherwise be productive in using gradients.
This approach is to draw a full linear gradient across your drawing and then use either the Levels Tool or the Curves Tool to adjust the "shape" of this gradient. This can be done on a separate layer, thus allowing experimentation with the layer's opacity and blend modes. Here are the first few steps of that tutorial translated to this approach.
Start with a black background layer and add a new transparent layer above it.
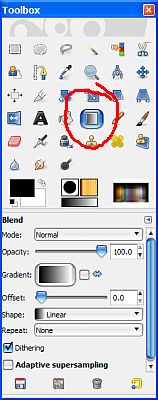
Set your FG color to green (74911d) and double-click on the Blend Tool
In the Tool Options dialog that appears, select the "FG to transparent" gradient and check the "Adaptive supersampling" box. Leave other options at their defaults (see screenshot below).
In your image window, draw a vertical stroke from the top of the image to the bottom (you can hold down the CTRL key while drawing to guarantee the line is vertical).
Attachment:
 SStool-options-1.png [ 54.85 KiB | Viewed 13168 times ]
Next, open the Curves dialog ("Colors->Curves") and set the Channel to "Alpha".
Move the node in the upper-right to the left a little bit (this corresponds to the right "stop bit" in the tutorial).
Move the node in the lower-left up a little bit (this corresponds to the left "stop bit" in the tutorial).
EDIT: This may not be correct (I do not have Photoshop available to check); it may be that moving the lower-left node horizontally to the right would correspond to changing the left "stop bit" in the tutorial.Add a new node in the middle of the curve and adjust it to obtain a suitable result (control of this adjustment is not directly provided with the tutorial's approach).
Attachment:
 SStool-options-2.png [ 98.47 KiB | Viewed 13168 times ]
Your result should be a green-to-black image that is more green than black.
Attachment:
 result-1.png [ 15.33 KiB | Viewed 13168 times ]
(continued in next post)


 Video from :