It is currently Fri Apr 19, 2024 10:22 am


All times are UTC - 5 hours [ DST ]


Post new topic Reply to topic  [ 258 posts ]  Go to page 1, 2, 3, 4, 5 ... 13  Next
Author Message
 Post subject: Environment Mapped Text Tutorial
PostPosted: Fri Aug 30, 2013 6:33 pm  (#1) 
Offline
GimpChat Founder
User avatar

Joined: May 22, 2008
Posts: 5242
Location: Gimpville
GIMP Chat - Environment Mapped Text Tutorial - GPL V3

This tutorial demonstrates using GIMP's Lighting Effects plug-in to generate environment mapped text (or other objects).

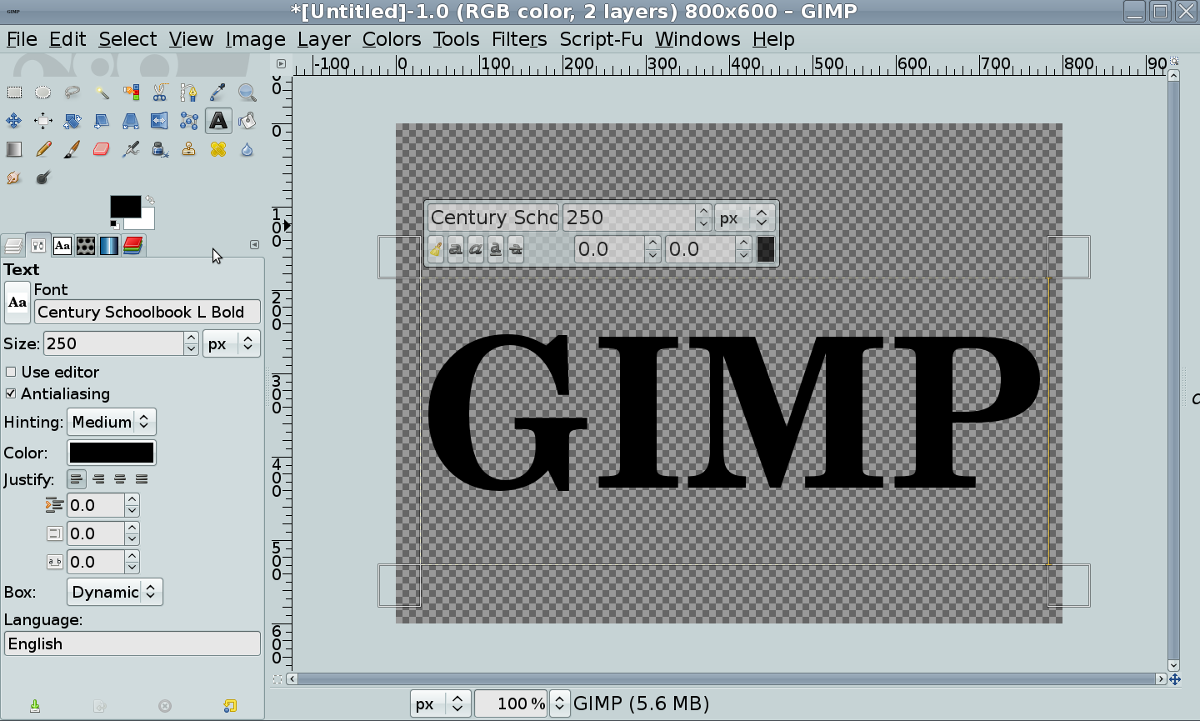
Step #1
Create a new image (File/New) and add text using the text tool :text . In this example, I'm using Century Schoolbook L Bold at 250px. Name the layer GIMP.
Image

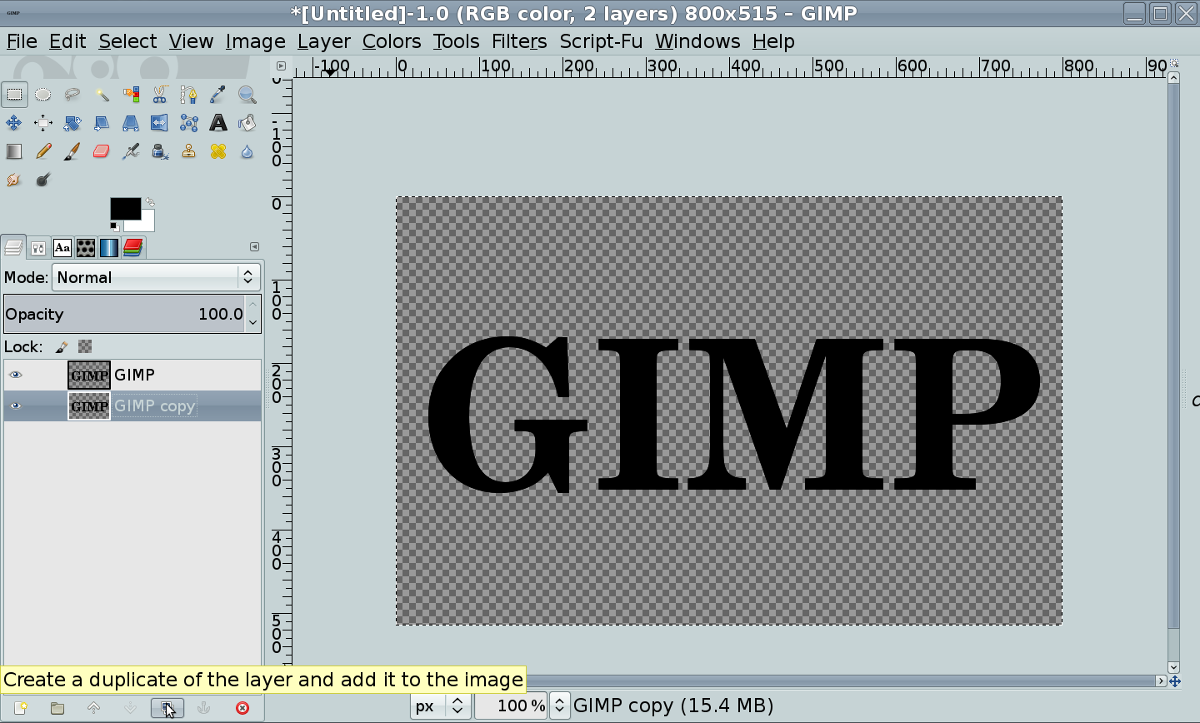
Step #2
Duplicate the text layer by clicking the duplicate button at the bottom of the layer dialog.
Image

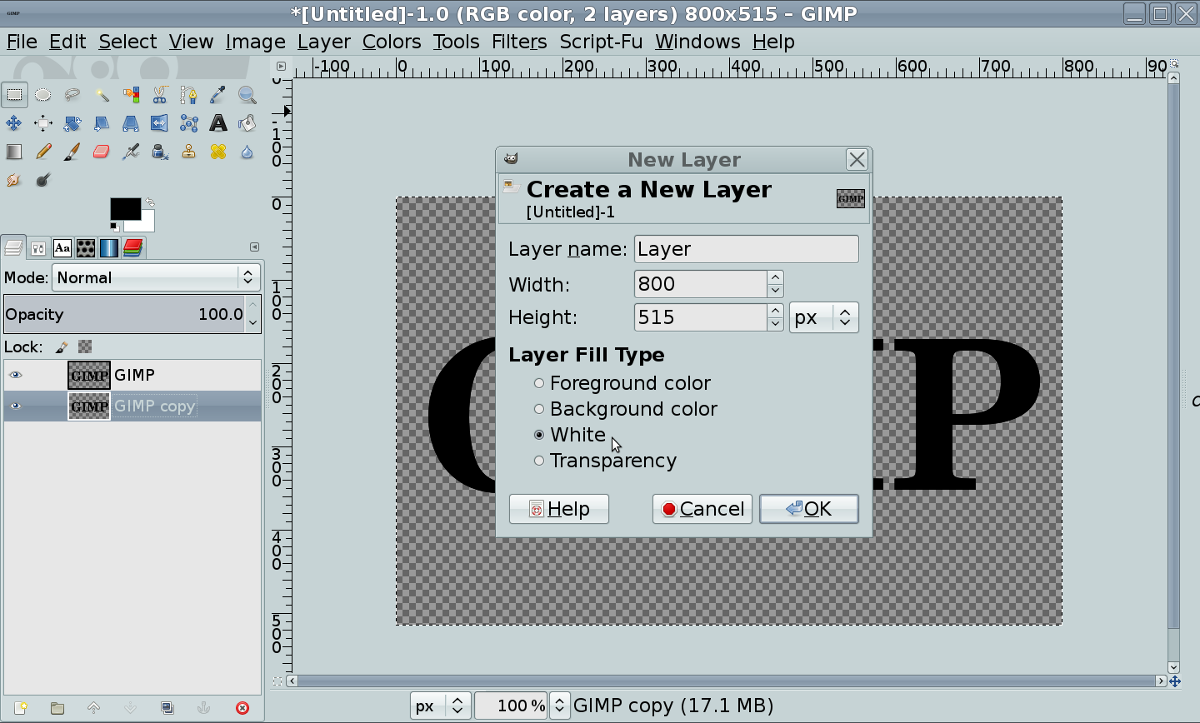
Step #3
Create a new "White" layer by selection Layer/New from the menu.
Image

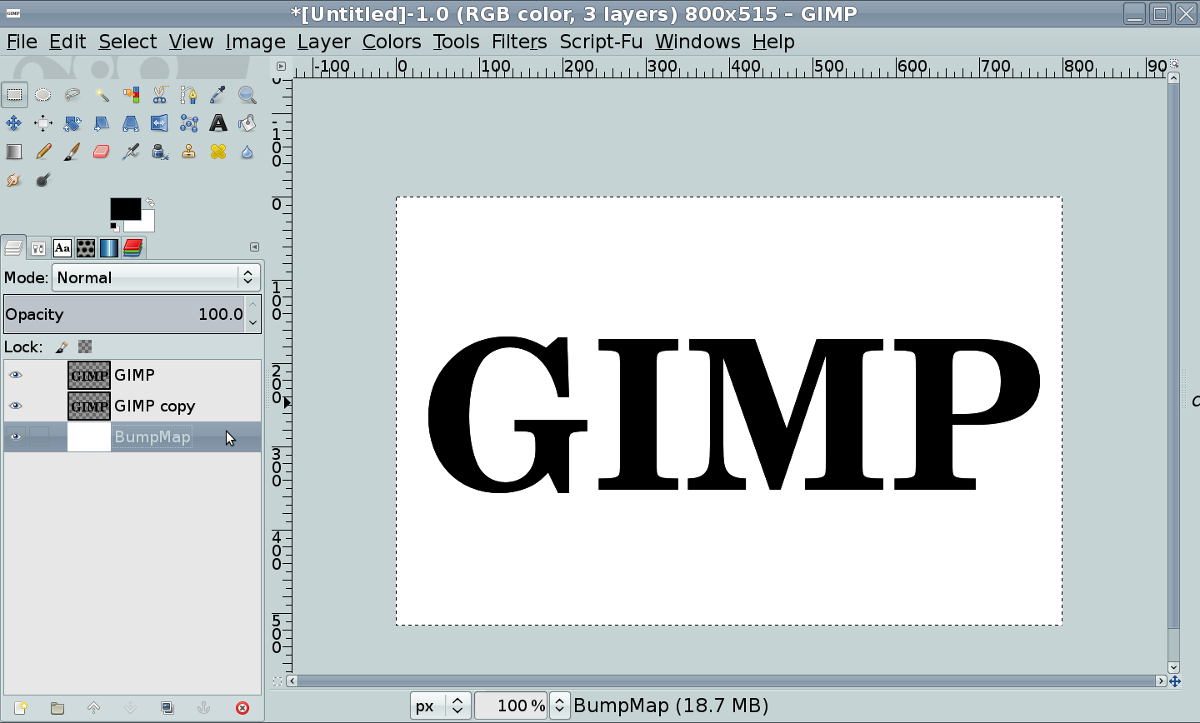
Step#4
Rename the layer to BumpMap and rearrange the layers by dragging them to the positions shown below.
Image

Step#5
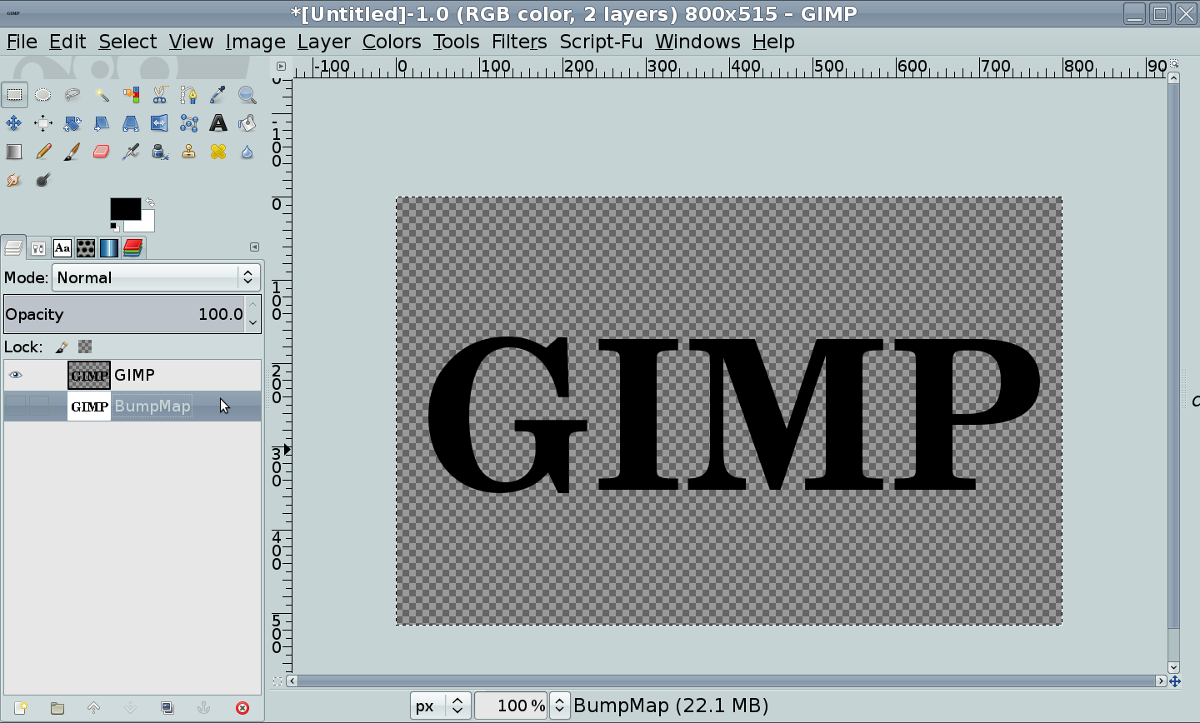
Right Click on the GIMP Copy layer and select Merge Down. Select the BumpMap Layer, as shown below.
Image

Step #6
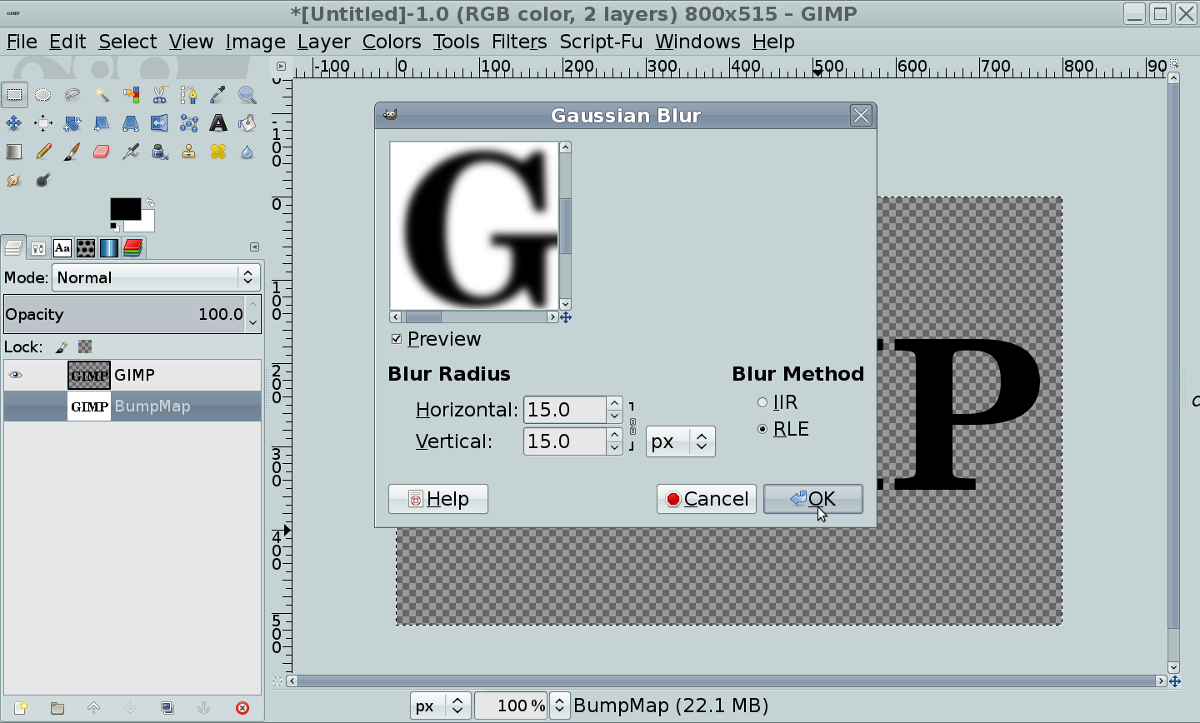
Select Filters/Blue/Gaussian Blur from the menu and set the Blur Radius to 15. Click OK.

Note: Increase or decrease the blur value for more or less beveling.
Image

Step #6a
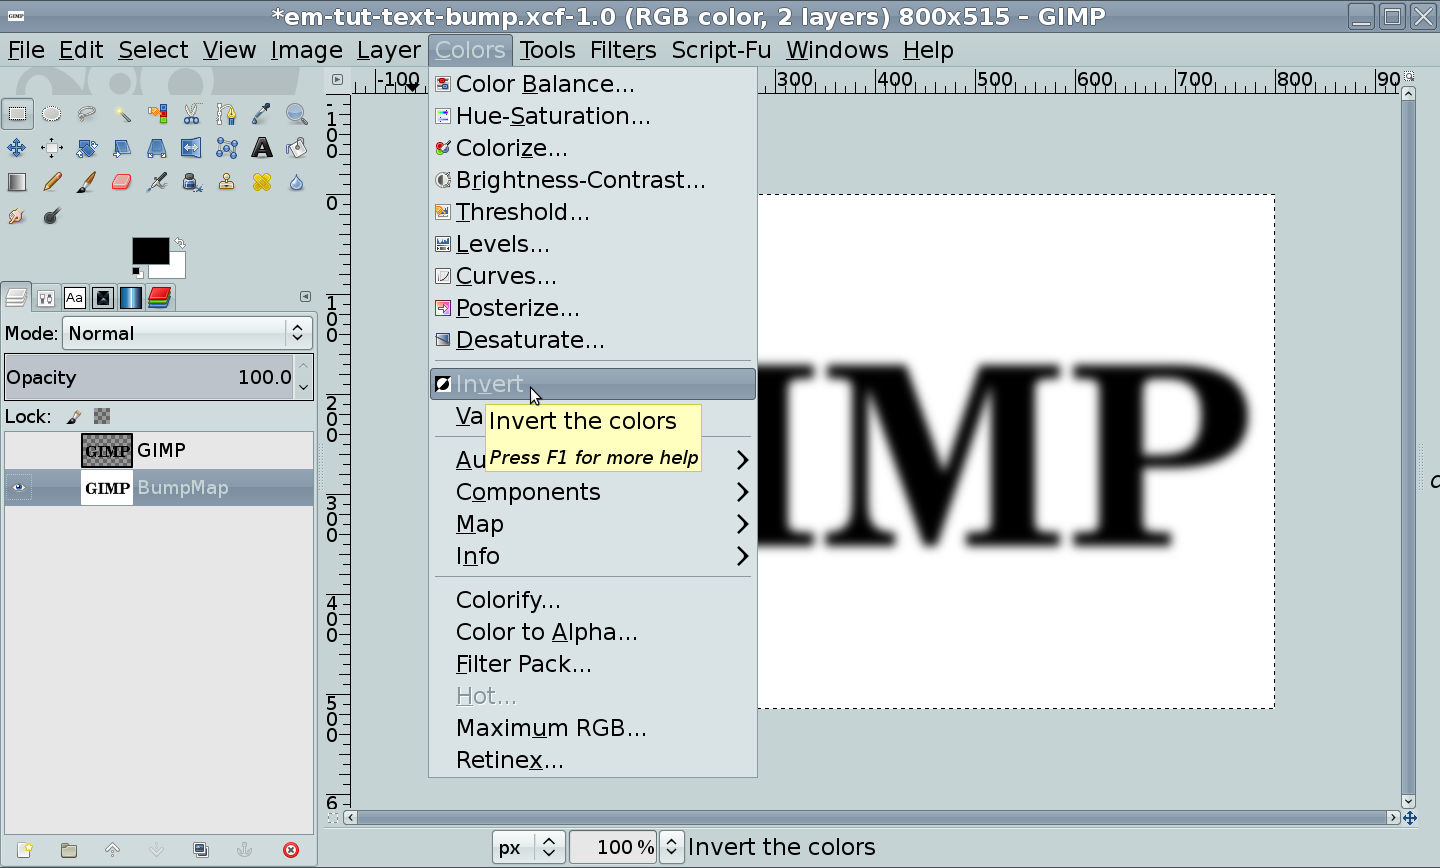
While still having the BumpMap layer selected, Choose Colors/Invert from the menu.
Image

Step #6b
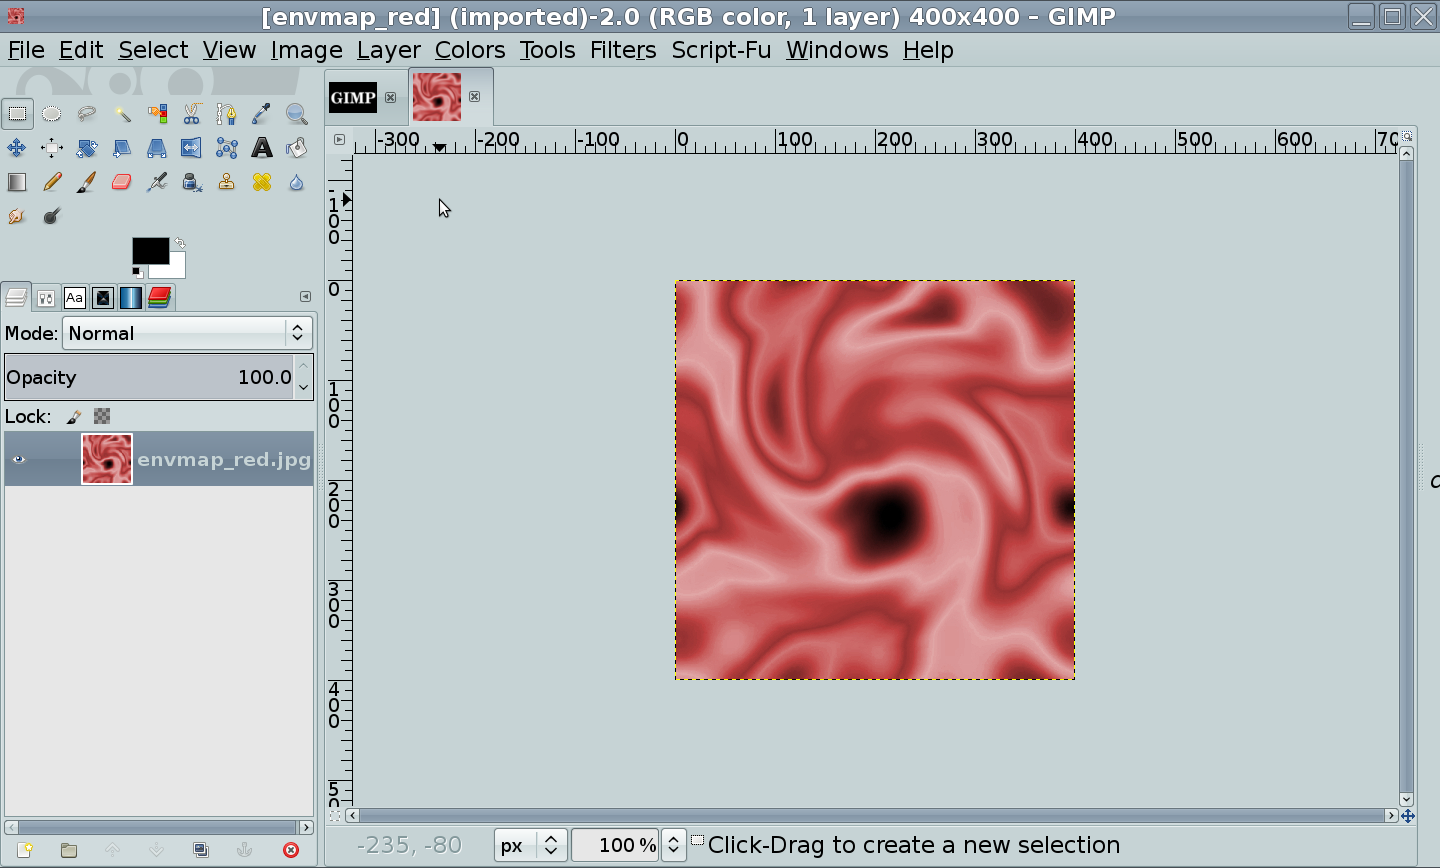
Open the Environment Map image: envmap_red.jpg (Image attached to this post). It will appear in a new tab in GIMP
Image

Step #7
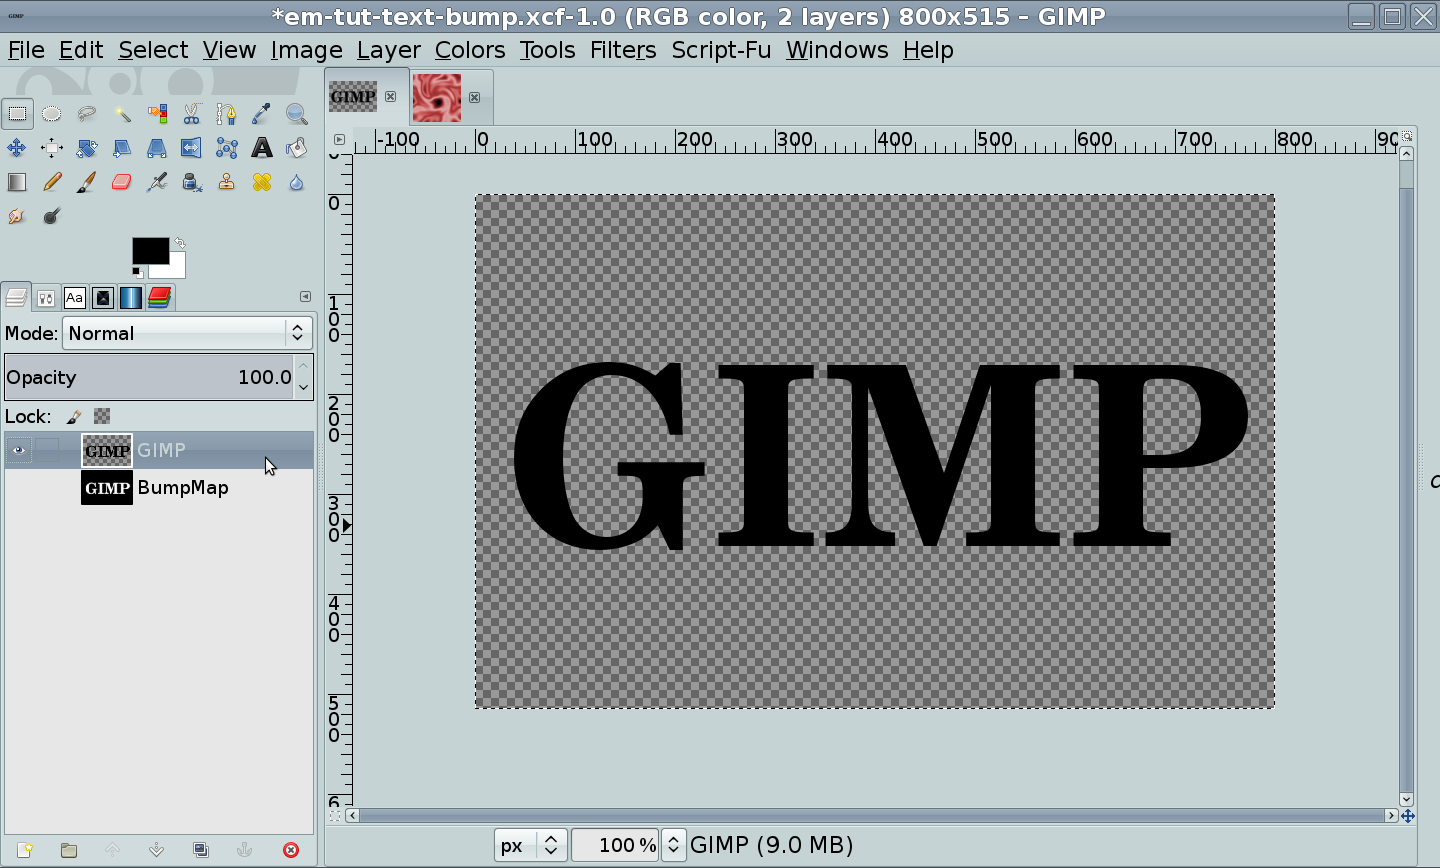
Click back to the GIMP tab at the top. Then click off the "eye" icon next to the BumpMap layer and select the GIMP text layer as shown below.
Image

Step #8
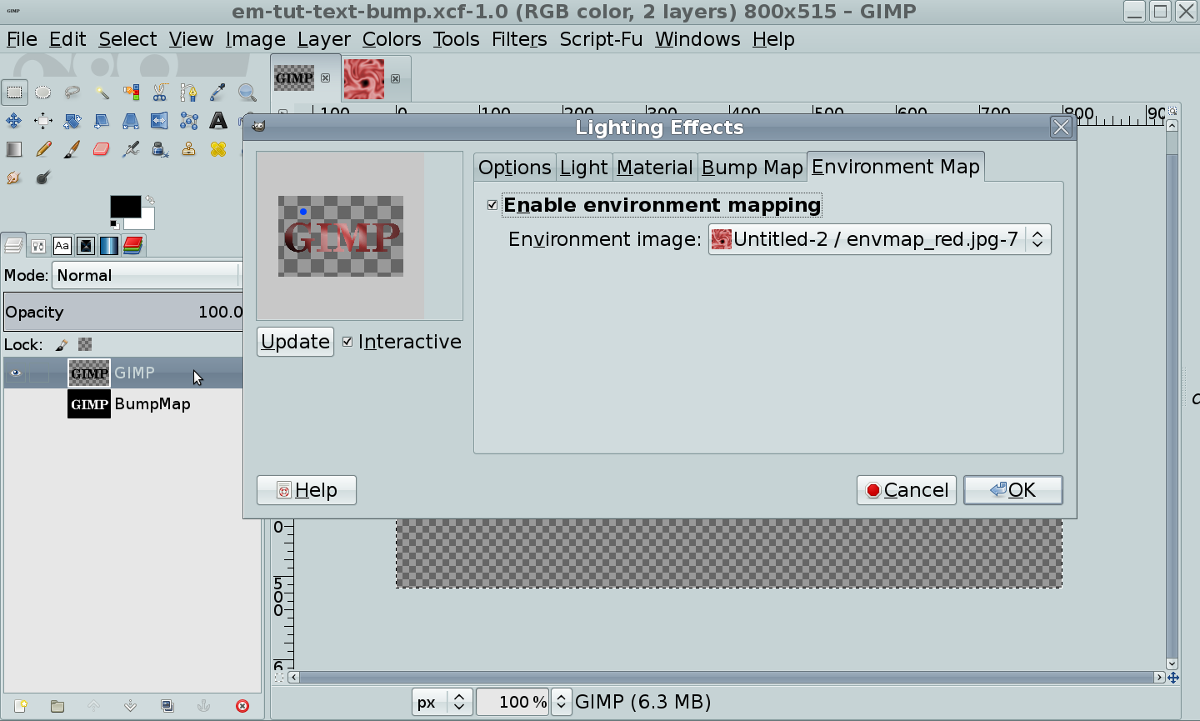
From the menu, select Filters/Light and Shadow/Lighting Effects. Under the environment tab, click "Enable Environment Mapping and select the environment map image we loaded in Step #6b.
Image

Step #9
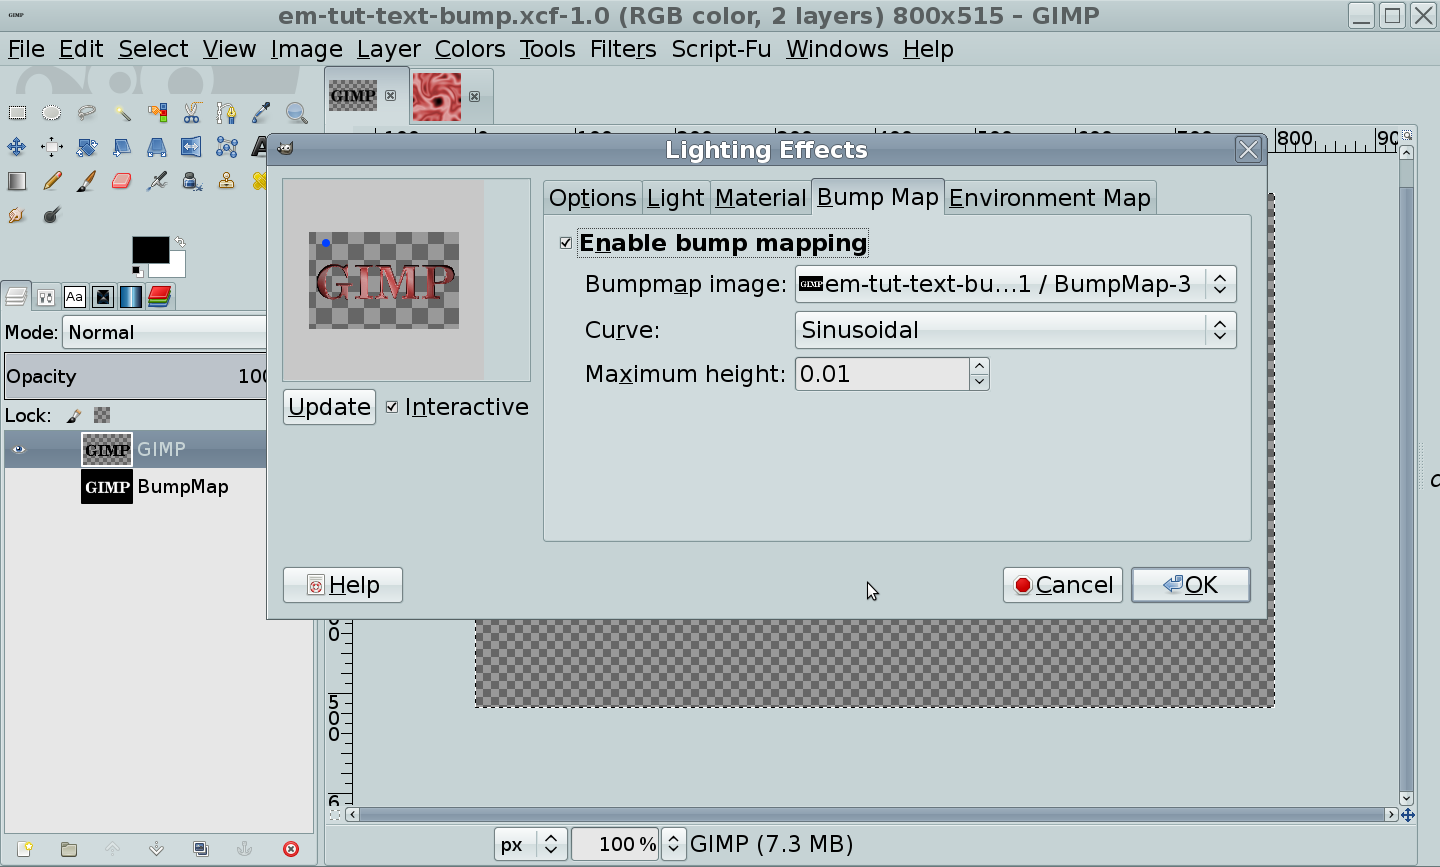
Under the Bump Map tab, select "Enable Bump Mapping", Select the Bumpmap image: BumpMap we created earlier. Select Curve "Sinusoidal" and set the Depth to 0.01.

Note: You will get different results by choosing a different curve at this step. I get better results when the Depth is low but there can be cases where you might need to increase the Depth to 0.02 or higher, depending on the font and the emap you are using.
Image

Step #10
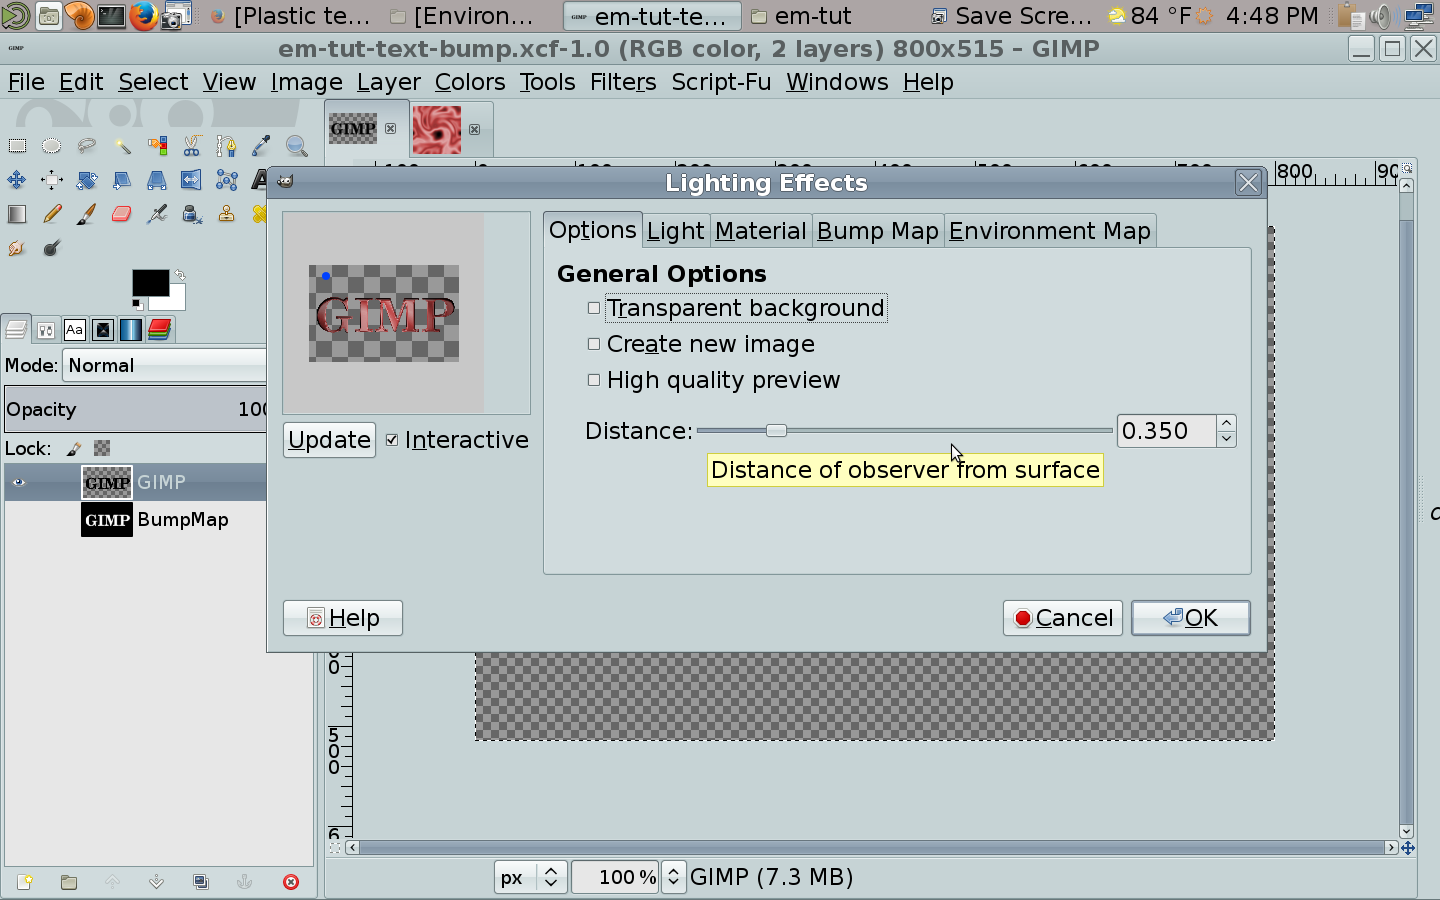
Under the Options tab, set the distance to .350. Increasing this value during this step will increase the amount of light falling on the object, while decreasing the value produces less light.
Image

Step #11
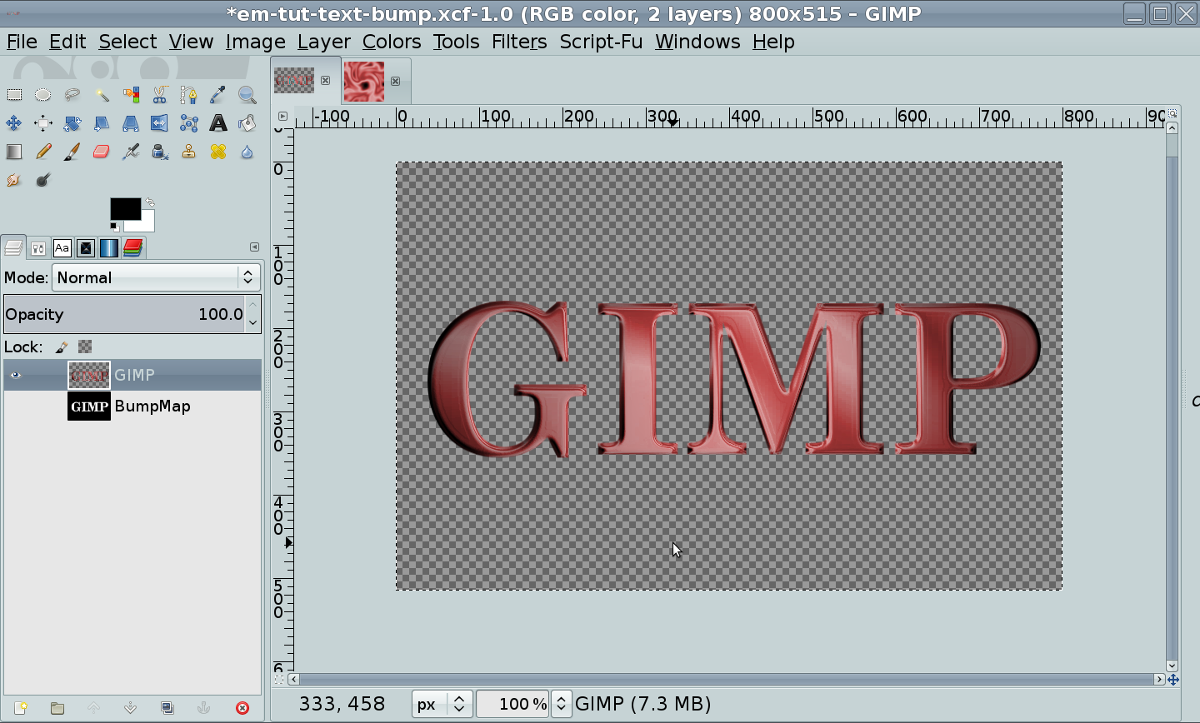
Click OK to produce the following image.
Image

Step #12
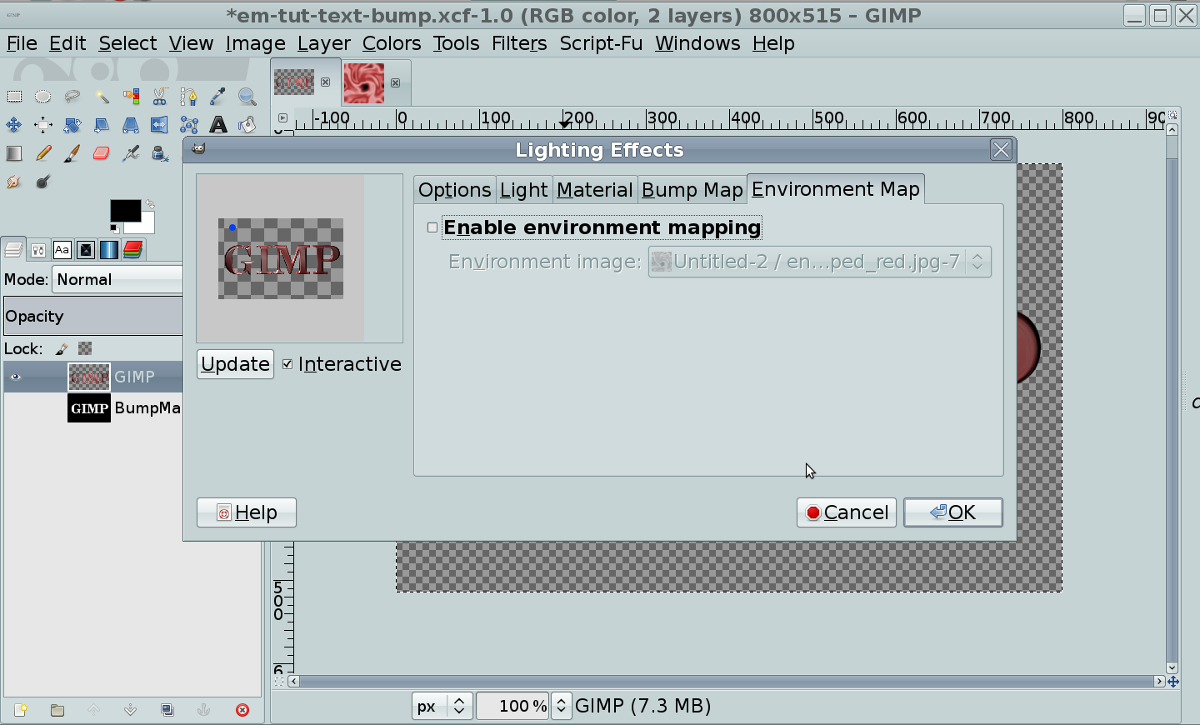
From the menu, Select Filters/Re-Show Lighting Effects. Under the Environment Map tab, deselect "Enable Environment Map".

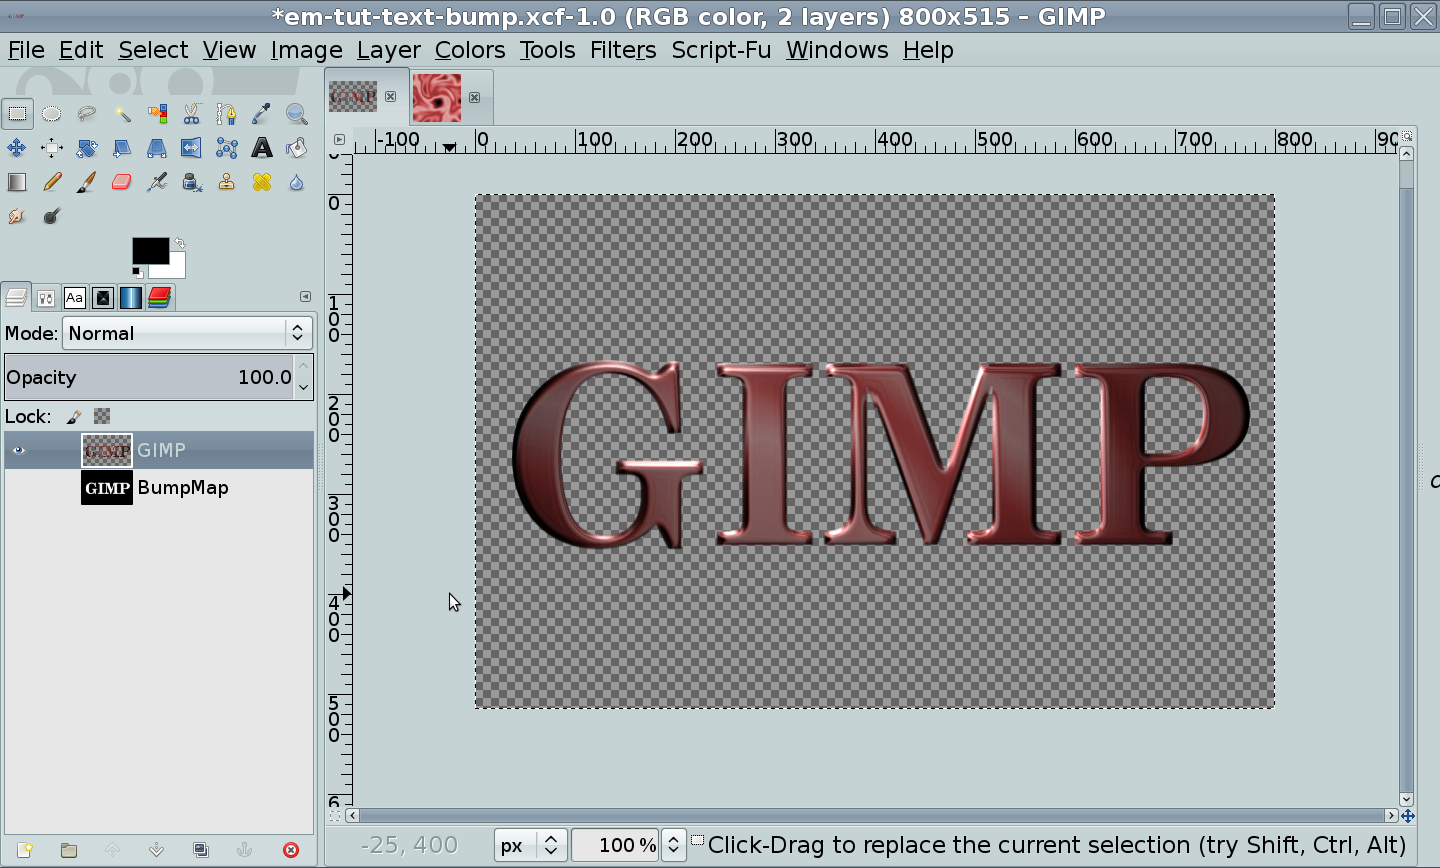
Note: #12 is an optional step but excellent results can be achieved by applying a 2nd round of lighting or lighting+bump to the previously mapped object. Changing the values in the material and light tabs will yield a wide range of interesting results. You can also specify multiple light sources and types in the light tab, which can quickly becomes confusing, so it's probably a good idea to keep track of your steps so you can duplicate the effect again.
Image

Step #12a
Click OK on the Lighting Effects dialog and the following image will be shown.
Image

Step #13
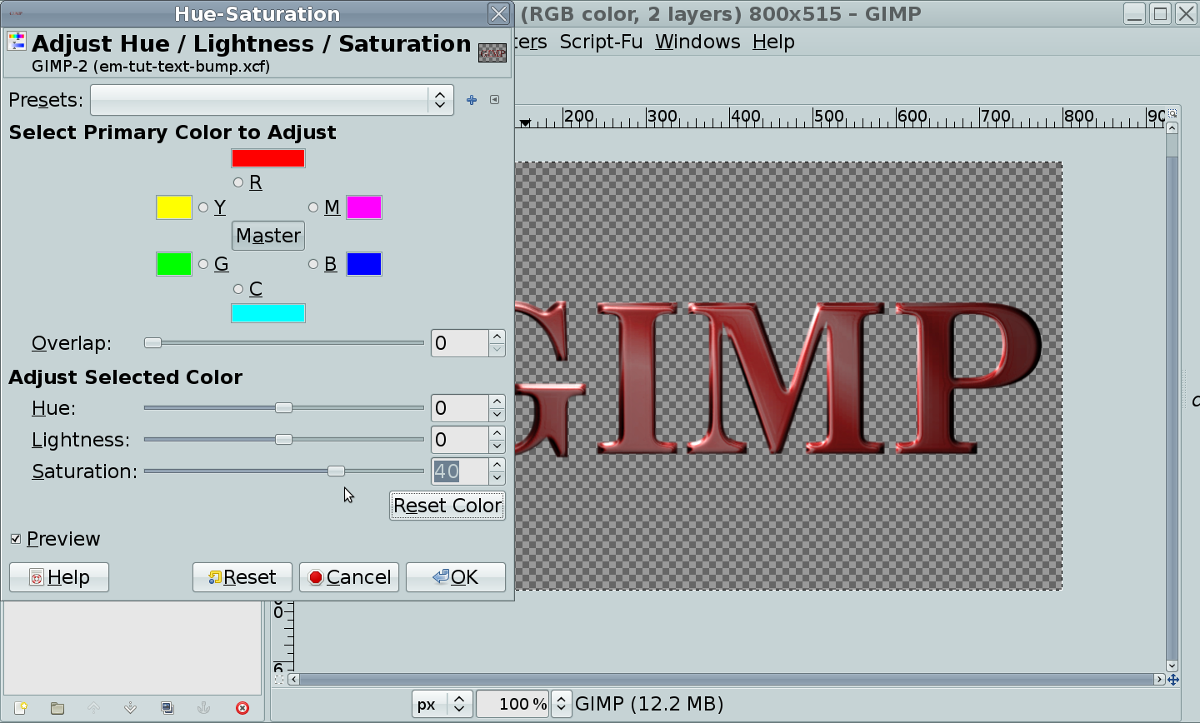
You can optionally increase the saturation, which is increased by 40 in this example.
Image

Step #14
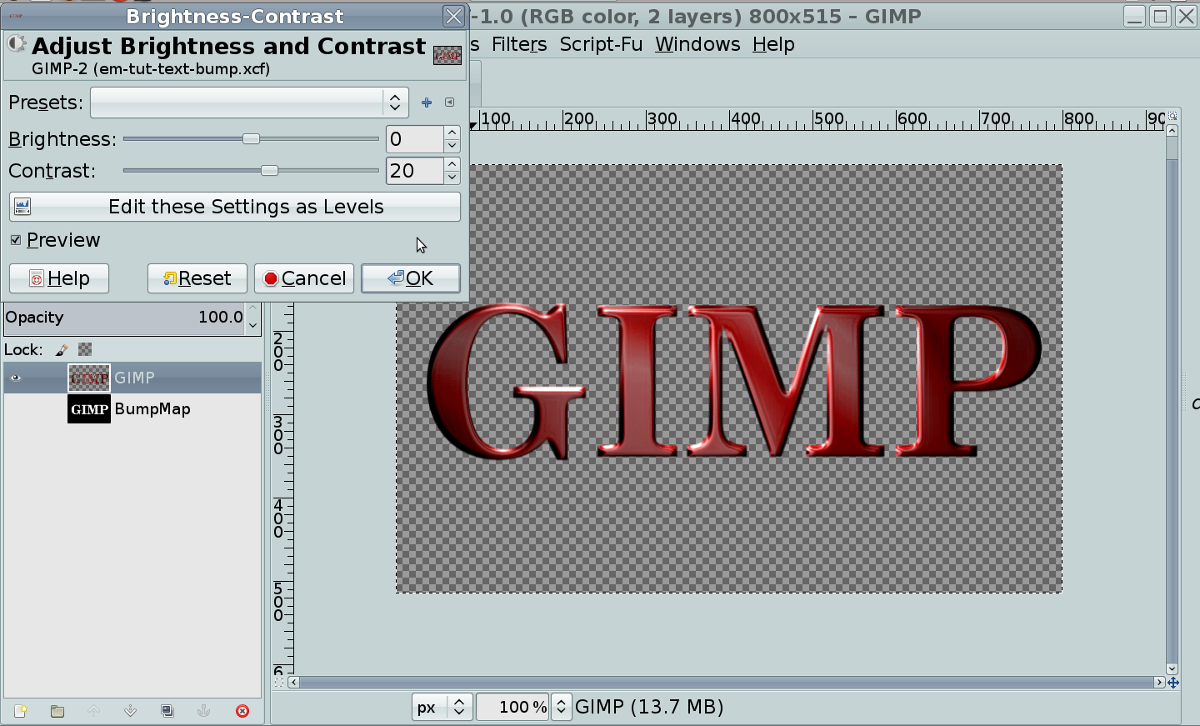
You can optionally increase the contrast, which is increased by 20 in this example.
Image

Step #15
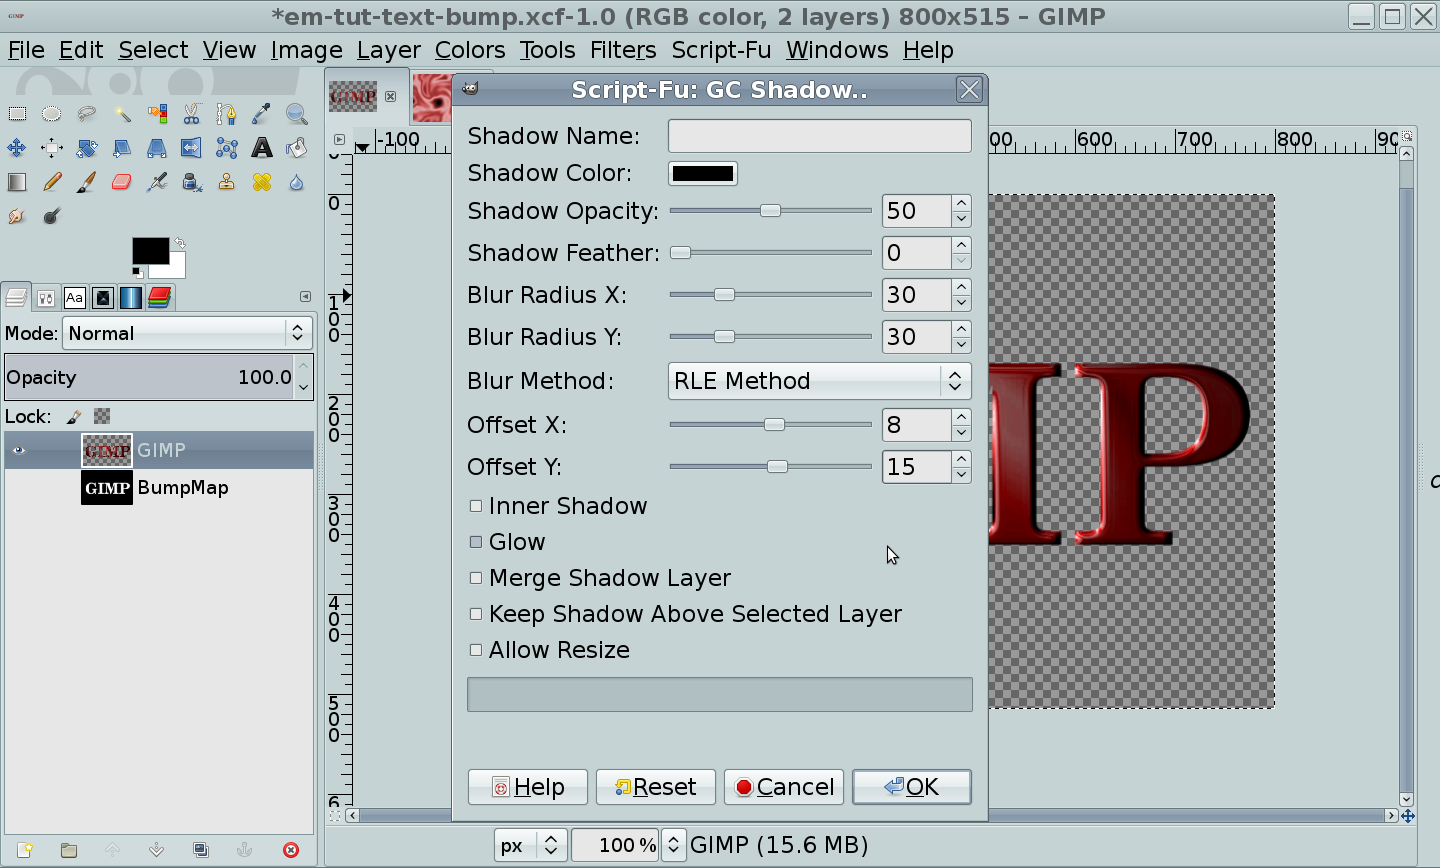
Create a Drop Shadow to make your image pop. I used GC-Shadow script (Filters/Light and Shadow/GC Shadow) with the following settings.
Image

Add a background layer of your choice, with the final result result shown below.

Image

The final result you get from this technique will depend on the environment map used. I've created a script called: Enviromap, which will assist in the creation of custom Environment maps. I have also created a script: EnviroLogo, which uses the techniques outlined in this tutorial to allow you to quickly produce environment mapped text and logos.

You can also tweak and experiment with any of the settings in the Lighting Effects Plug-in for a variety of cool & interesting results. Tweaking the values under the Materials Tab during Step #12 will yield excellent results, perhaps giving you an even better final result.

Attached is a zip file containing the Environment Map used in this tutorial and a sample XCF of the final result.

I'm also working on a Logo Script that leverages Environment Mapping. I won't be able exactly duplicate the steps in this tutorial, due to the fact that GIMP does not provide an API that includes all the parameters of the lighting effect plug-in, but I should be able to duplicate the final results, which is what matters anyway. :smiley2

I hope someone finds this tutorial useful, and more importantly, fun! :bigthup


Attachments:
Environment Mapped Text Tutorial.pdf [3.08 MiB]
Downloaded 815 times
File comment: Environment Tutorial Resources
em-tutorial-resources.zip [392.54 KiB]
Downloaded 941 times

_________________
“If you reach for the stars, you just might land on a decently sized hill.” - Stuart Hill
Share on Facebook Share on Twitter Share on Orkut Share on Digg Share on MySpace Share on Delicious Share on Technorati
Top
 Post subject: Re: Environment Mapped Text Tutorial
PostPosted: Fri Aug 30, 2013 7:06 pm  (#2) 
Offline
Global Moderator
User avatar

Joined: Apr 07, 2010
Posts: 14182
Very nicely written tutorial tux.Thank you

PDF included


Attachments:
Environment Mapped Text Tutorial.pdf [3.08 MiB]
Downloaded 717 times

_________________
Image
Top
 Post subject: Re: Environment Mapped Text Tutorial
PostPosted: Fri Aug 30, 2013 7:12 pm  (#3) 
Offline
GimpChat Member
User avatar

Joined: Jan 10, 2013
Posts: 863
GnuTux,
Was already at the time! :gaah
I used another font, and another script to the drop-shadow. But the important thing was to understand the process.
I never got good results using the Lighting Effects Plug-in. Now I understand the mechanics of this technique will be able to test new configurations.
Thx a lot for the tutorial :tyspin
Image

_________________
bbbbbbbbbbbImage
bbbbbbbbbbb Be patient, English is not my language.


Top
 Post subject: Re: Environment Mapped Text Tutorial
PostPosted: Fri Aug 30, 2013 7:22 pm  (#4) 
Offline
GimpChat Founder
User avatar

Joined: May 22, 2008
Posts: 5242
Location: Gimpville
Thanks, Molly. Perhaps somewhere in there could be a link back to the original tutorial on here.

Good results, Akros!

It looks like you might have set the depth level to 0.10, instead of 0.01 in the Bump Map section of the lighting plug-in. You'll get some unwanted artifacts if the depth is set to high in there. You can get more or less depth by adjusting the blur (or other aspects) of your BumpMap image.

_________________
“If you reach for the stars, you just might land on a decently sized hill.” - Stuart Hill


Top
 Post subject: Re: Environment Mapped Text Tutorial
PostPosted: Fri Aug 30, 2013 7:32 pm  (#5) 
Offline
GimpChat Member
User avatar

Joined: May 16, 2010
Posts: 14709
Location: USA
Nice Tux. Thanks for the tutorial. :)
And thank you Molly for the PDF.

_________________
Image
Edmund Burke nailed it when he said, "The only thing necessary for the triumph of evil is for good men to do nothing."


Top
 Post subject: temp
PostPosted: Fri Aug 30, 2013 7:42 pm  (#6) 
Offline
Global Moderator
User avatar

Joined: Apr 07, 2010
Posts: 14182
Something happened when I got to this step...
Step #12
From the menu, Select Filters/Re-Show Lighting Effects. Under the Environment Map tab, deselect
"Enable Environment Map". This is what happened below, I lost the puffy bumpmap look in that step.
Image

_________________
Image


Top
 Post subject: Re: Environment Mapped Text Tutorial
PostPosted: Fri Aug 30, 2013 7:44 pm  (#7) 
Offline
GimpChat Member
User avatar

Joined: Jan 10, 2013
Posts: 863
GnuTux wrote:
Good results, Akros!

It looks like you might have set the depth level to 0.10, instead of 0.01 in the Bump Map section of the lighting plug-in. You'll get some unwanted artifacts if the depth is set to high in there. You can get more or less depth by adjusting the blur (or other aspects) of your BumpMap image.

GnuTux,
You are right!
I used 0.1 and not 0.01 :oops:
Worse than testing enviromap.scm repeat that mistake! :roll:
Thank you for correcting me! :hi5

Edited:
Had not seen the pdf of Molly. I think she posted while I typed. :ninja
Thank you Molly! :tyspin

_________________
bbbbbbbbbbbImage
bbbbbbbbbbb Be patient, English is not my language.


Top
 Post subject: Re: temp
PostPosted: Fri Aug 30, 2013 7:58 pm  (#8) 
Offline
GimpChat Founder
User avatar

Joined: May 22, 2008
Posts: 5242
Location: Gimpville
molly wrote:
Something happened when I got to this step...
Step #12
From the menu, Select Filters/Re-Show Lighting Effects. Under the Environment Map tab, deselect "Enable Environment Map". This is what happened below, I lost the puffy bumpmap look in that step.

Hmmm. Perhaps some of the default settings in the lighting effects filter were changed. Maybe restarting GIMP to clear everything would help. The lighting effect filter is really picky and it keeps changed settings until you restart GIMP. It's probably best to not vary too much from the tutorial until you get the feel for how the Lighting Plugin reacts to changing its inputs. My advice is to make small changes and see how it reacts.

_________________
“If you reach for the stars, you just might land on a decently sized hill.” - Stuart Hill


Top
 Post subject: Re: Environment Mapped Text Tutorial
PostPosted: Fri Aug 30, 2013 8:02 pm  (#9) 
Offline
GimpChat Member
User avatar

Joined: Aug 11, 2013
Posts: 123
Location: Ohio
Thank you Gnutux. Very nicely written. I always struggled with the process of using this effect. Now I think I got the hang of it. I had a different image already up, so I used that one, instead of yours . Think I like the outcome. ;) Image

_________________
Image


Top
 Post subject: Re: Environment Mapped Text Tutorial
PostPosted: Fri Aug 30, 2013 8:15 pm  (#10) 
Offline
GimpChat Founder
User avatar

Joined: May 22, 2008
Posts: 5242
Location: Gimpville
I like that effect, Rellik419. :2thup

I've found out that if you use an image (or a pattern filled image) as an environment map, it needs to be at least 4x the size of the image you are mapping onto. It doesn't matter too much for the topographical/satin style maps, like the ones generated by enviromap.scm. They can be a minimum of 400x400 pixels, but other images used as environment maps need to be much larger. From my testing, Images filled with gradients need to be at least 2x the height of the image you want to map onto and more detailed patterns need to be 4x the size.

_________________
“If you reach for the stars, you just might land on a decently sized hill.” - Stuart Hill


Top
 Post subject: temp
PostPosted: Fri Aug 30, 2013 8:15 pm  (#11) 
Offline
GimpChat Member
User avatar

Joined: Jan 10, 2013
Posts: 863
I used the gradient wood1 of Gimp
Image
Image

_________________
bbbbbbbbbbbImage
bbbbbbbbbbb Be patient, English is not my language.


Top
 Post subject: Re: Environment Mapped Text Tutorial
PostPosted: Fri Aug 30, 2013 8:23 pm  (#12) 
Offline
GimpChat Member

Joined: Aug 27, 2010
Posts: 491
Excellent tutorial.

Image


Top
 Post subject: Re: temp
PostPosted: Fri Aug 30, 2013 8:31 pm  (#13) 
Offline
GimpChat Founder
User avatar

Joined: May 22, 2008
Posts: 5242
Location: Gimpville
Akros wrote:
I used the gradient wood1 of Gimp
Image

That looks good. Maybe some different settings in the enviromap script might produce an even better environment map.

You can probably get a better wood effect by filling an image with a wood pattern and using that as an environment map. You'll need to make that kind of map 4x the size of the image you plan to map onto. See the results here.

Mike wrote:
Excellent tutorial.

Image

Very nice, Mike. :hi5

Smooth results and I really like that background! :hehe

_________________
“If you reach for the stars, you just might land on a decently sized hill.” - Stuart Hill


Top
 Post subject: Re: Environment Mapped Text Tutorial
PostPosted: Fri Aug 30, 2013 8:35 pm  (#14) 
Offline
GimpChat Member

Joined: Aug 27, 2010
Posts: 491
One more, with an environment map from the EnviroMap script.

Image


Top
 Post subject: Re: Environment Mapped Text Tutorial
PostPosted: Fri Aug 30, 2013 8:35 pm  (#15) 
Offline
Global Moderator
User avatar

Joined: Apr 07, 2010
Posts: 14182
Beautiful results guys. I will do another one tomorrow.
Tux, I will post another PDF with the link in the morning.

_________________
Image


Top
 Post subject: Re: temp
PostPosted: Fri Aug 30, 2013 9:24 pm  (#16) 
Offline
GimpChat Member
User avatar

Joined: Jan 10, 2013
Posts: 863
GnuTux wrote:
That looks good. Maybe some different settings in the enviromap script might produce an even better environment map.

You can probably get a better wood effect by filling an image with a wood pattern and using that as an environment map. You'll need to make that kind of map 4x the size of the image you plan to map onto. See the results here.

Yah, the one is a beautiful result! :bigthup
My results with those settings (Bump map 15 Gauss blur, sinusoidal curve, Height .02 - .547 Distance - Shiny Material at .54.) Was a bit dark, after I applied lighting effects filter for the second time.
I'll play with the settings!
:tyspin

_________________
bbbbbbbbbbbImage
bbbbbbbbbbb Be patient, English is not my language.


Top
 Post subject: Re: Environment Mapped Text Tutorial
PostPosted: Fri Aug 30, 2013 9:32 pm  (#17) 
Offline
GimpChat Member
User avatar

Joined: Aug 11, 2013
Posts: 123
Location: Ohio
Tried it with a wood texture. :) Image

_________________
Image


Top
 Post subject: Re: Environment Mapped Text Tutorial
PostPosted: Fri Aug 30, 2013 9:45 pm  (#18) 
Offline
GimpChat Founder
User avatar

Joined: May 22, 2008
Posts: 5242
Location: Gimpville
Great results with that one, Rellik419! :yes

Mike wrote:
One more, with an environment map from the EnviroMap script.

Image

Another excellent result. Glad to see someone give the EnviroMap script a try. The effect came out great with the custom map. :cool

molly wrote:
Tux, I will post another PDF with the link in the morning.

Ok, Great. I've updated the tutorial with more details and added a link back to this thread in the title.

_________________
“If you reach for the stars, you just might land on a decently sized hill.” - Stuart Hill


Top
 Post subject: Re: Environment Mapped Text Tutorial
PostPosted: Fri Aug 30, 2013 9:55 pm  (#19) 
Offline
GimpChat Member
User avatar

Joined: Aug 11, 2013
Posts: 123
Location: Ohio
Thank you Gnutux! :tyspin

_________________
Image


Top
 Post subject: Re: Environment Mapped Text Tutorial
PostPosted: Fri Aug 30, 2013 11:11 pm  (#20) 
Offline
GimpChat Member
User avatar

Joined: Jul 17, 2012
Posts: 2770
great results in here !

i did some titanium

it would be great if the enviromap script could be ported into the lighting effects filter so that you could see the preview of what your text will look like, while you change the parameters of the environmentmap
but i guess thats not possible ?

Image


Top
Post new topic Reply to topic  [ 258 posts ]  Go to page 1, 2, 3, 4, 5 ... 13  Next

All times are UTC - 5 hours [ DST ]


   Similar Topics   Replies 
No new posts Attachment(s) Quick and Easy Text Tutorial

5

No new posts Attachment(s) Lurid text effect plugin from Conbagui's tutorial (Edited)

18

No new posts Change From Cross Hair To Pointer (Quick Tip Text Tutorial)

2

No new posts Attachment(s) GEGL Text Style Collection - plugin with many fancy text styles

14

No new posts script to load text file and create text layer

6


* Login  


Powered by phpBB3 © phpBB Group