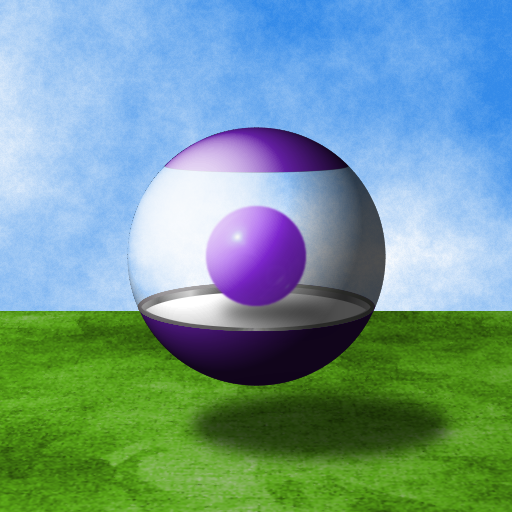
In this tutorial, we are going to create Crystal Globe Containers that look like this
The original concept for our creation was found on this Photoshop tutorial website
Kiosk Orbs. Further inspiration was found on Ali's GIMPtalk globe tutorial located here
Creating Globe in 2 Easy Steps. When I first came across the Photoshop site mentioned above, I was really excited about trying to create it with GIMP. But when I saw Ali's post, I got to thinking if it could somehow be accomplished with the Map Objects tool.
I'm here to tell you (and Show you!) that it can.
My biggest hurdle was getting a realistic glass effect. Although not perfect, I think it looks good and, as we learn more things about GIMP, maybe we can make it look even better.
As a matter of housekeeping, I used GIMP version 2.2.6. I believe that most older versions of GIMP should work fine; however, to be on the safe side, I recommend you install the most recent software.
To make the globe, you should have a basic understanding of selections, layers, and the Map Object tool. If you are not familiar with these tools, please read up on the other tutorials found on this site.
Are you ready? Let's begin.....
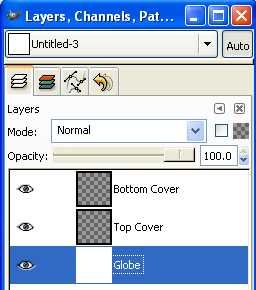
[*]Open up GIMP and create a new 400 X 400 layer with a white background and rename it "Globe"
[*]Now add two new transparent layers above it (also 400 X 400) and rename one "Bottom Cover" and the other "Top Cover"
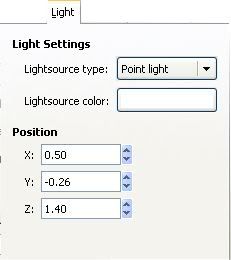
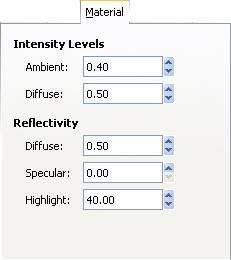
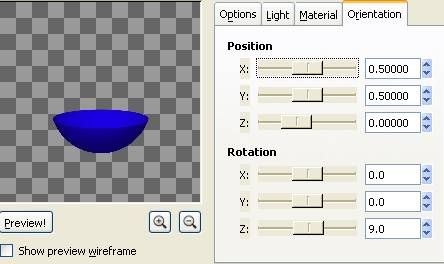
Now, with the Globe Layer active, go to Filters | Map | Map Object and set your settings like so:
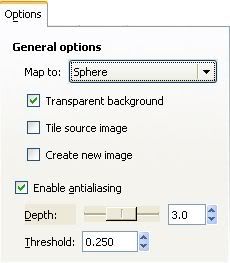
Leave the Orientation Tab "Rotation" settings at
all zeros.
Now, go to Filters | Colors | Color to Alpha ---> click the color bar and type in b7b7b7. I came up with this particular color
because that's what looked good to me. You can either use this setting or pick one of your own. Experiment!
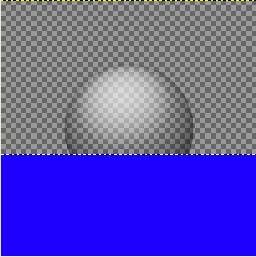
Your globe should now look like this. Looks fairly realistic, in my eyes anyway, but I wanted something a little bit different. Something a little more dramatic. I accomplised this by duplicating the globe layer and merging the two globe layers together.
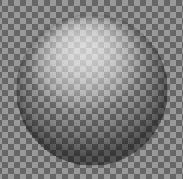 Note: the globe looks a little dark against the checkerboard background. Once you've put it up against a light background the effect will be reduced. But, if you're a little concerned at this point, go ahead and add a white background layer. I won't be, however, because I know what the final product looks like
 :w:
Now, let's make the top and bottom covers of the globe. I will be starting with the "Bottom Cover" layer, but the order does not matter. Just make sure you follow the instructions for each one, because they are not exactly the same. Now, with your "Bottom Cover" layer active:
[*]grab your "Rectangle Selection" tool and select a large portion of the layer's lower half. Mine is 160 pixels high, but you do what you like. Very important: Make sure your selection covers the entire width of the layer. If you don't, your Bottom Cover will have a gap in the back. You may have to increase the canvas size a bit if you can't get the proper seletion.
[*]Fill the selected area with the color of your choice.
[*]Deselect the layer.
[*]Go to the Map Objects tool again and, with the exception of the "Orientation" tab, use all the same settings as above. Here, we want to rotate the bowl a little bit to give us a "surface" to "hold" our items.
[*]Under "Rotation", set the Z axis to 9.0.
[*]Choose OK.
Now, we'll do the same thing for the "Top Cover". Since this is pretty much a duplicate step, I won't provide any pictures. This step, however, has one difference than the previous one. Make the layer active, grab your "Rectangle Selection" tool and select a large portion of the layer's upper half. Mine is 100 pixels high, but you do what you like. Again, make sure your selection covers the entire width of the layer.
[*]Fill the selected area with the color of your choice.
[*]Deselect the layer.
[*]Go to the Map Objects tool again and, with the exception of the "Orientation" tab, use all the same
settings as above. This time, under "Rotation", set the Z axis to 5.0.
[*]Choose OK.
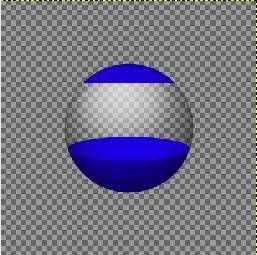
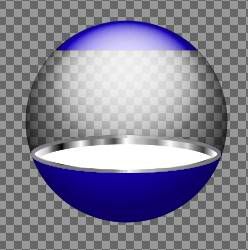
Your image should now look like this. How are you doing?
You probably won't believe this, but we're almost finished!
Let's add the final touches, shall we?
What I want to do now is make the surface for our objects to rest. There are 3 parts to the surface: a rim for the "Bottom Cover", a side wall, and the shelf.
The 3 parts are actually just ellipses that you could create with the ellipse selection tool and place them by hand, but for the tutorial, we'll be using guide lines to create/place them.
Let's go....
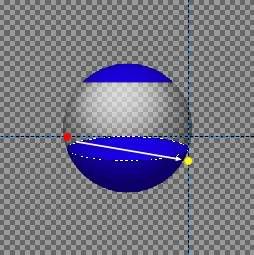
Put two vertical guidelines at the very edge of the Bottom Cover. The one on the left is at x=105, the right x=295. If you've used different dimensions for this exercise, modify your guidelines accordingly. Now add two horizontal guidelines at roughly y=214 and 252. Like so...
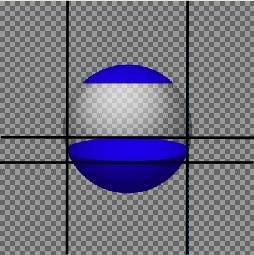
I've made the guidelines bold as they didn't show up well when I exported the image.
Make sure you've got Snap to Guides selected. You can find that under the "View" menu.
Now, grab your ellipse selection to and drag an ellipse from the upper left hand cornerof the guide intersection to the lower right handcorner of the guide intersection. I have designated these locations with a red and yellow dot, respectively. The dots will not be on your screen. If you performed this step properly, you should have a selection that matches the upper edges of the Bottom Cover.
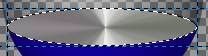
[*]Create a new layer and rename it "Rim"
[*]Grab your gradient tool and fill it with your choice of colors. I've used the "Brushed Aluminum" gradient with a Conical (sym) fill shape.
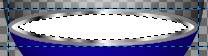
[*]Shrink the "Rim" selection by 3 pixels and create a new layer and rename it "Side Wall"
[*]Fill the new layer with a Linear Gradient from left to right. I used the "Flare Rays Size 1" gradient, but you can use whatever looks good to you.

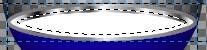
[*]Shrink the "Side Wall" selection by 3 pixels and create a new layer and rename it "Shelf."
[*]Fill the shelf with solid white.
Grab your move tool and move the shelf layer down to cover the bottom portion of Side Wall layer like so:
You are now officially finished with your container! Wasn't that easy?
Theoretically, the globe should be scaled to fit "inside" of the rim, but I think I've given you enough tools to make that happen.
Additionally, you need to bring the "Top Cover" layer below the globe layer to give it an extra shine.
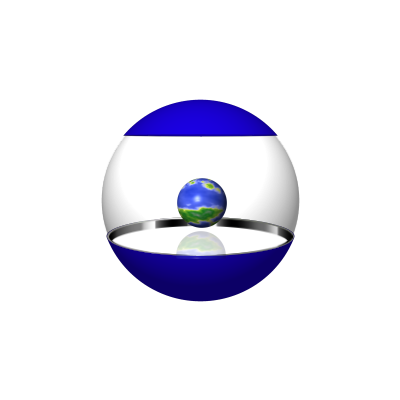
Don't forget to add some objects to your container.
Hope this was enlightening and fun! I've had a great time learning how to do it and sharing the information with you.
Happy Gimping!
Art