Many changes have taken place within GIMP since this tutorial was written. The steps described below refer to the creation of a "Toolbox" script, which are no longer part of the current GIMP structure; Toolbar scripts have been re-written and placed within the Image Window Menus. I will be updating this and other scripting tutorials to reflect those changes, but for the time being, I'm posting them here as a placeholder. While Toolbox scripts are no longer available for GIMP, the information provided below is still a good learning tool.Welcome to GIMP Scripting 102a! In this tutorial, we'll pick up where we left off in
GIMP Scripting 101 and create a simple script that will run from the Main GIMP Window ("The Toolbox"). In GIMP Scripting 102b, we'll cover a simple script that runs from an open Image Window. Both types are relatively straightforward to implement, but they do have have some differences. Hopefully, I can provide you with some useful information that will help you along the path to writing your own scripts.
I'd like to thank saulgoode for offering numerous suggestions, especially in regard to his suggestions on using the Script-Fu Console (SFC from here on out) / Procedure Browser (PB for the remainder of the tutorial), terminology, and for taking the time to proofread and critique this tutorial. Additionally, special thanks to ccbarr and PhotoComix for their in-depth reviews and suggestions. Without these guys, the tutorial would be lacking, incoherent, and full of mistakes! Thanks again, everyone! I'm deeply indebted to you.
Before we get down to business, you may be wondering why there are two different types of scripts: Toolbox & Image Window scripts. (I had this same question when I first started using GIMP). Well, scripts that are run from the Toolbox are meant to work in a stand-alone fashion....you don't have to have an image open to get them to work. The script will create the image itself. Image Window scripts require an Image to be open and either create a new image using the layers, channels, masks from the open image OR changes will be made directly to the open image itself. It's really that simple. Can a Toolbox script and an Image Window script do the same thing? Yes, they can. In fact, there are a number of default GIMP scripts that are made in both forms. For example, if you go to File > Create > Logos and compare it to Filters > Alpha to Logo > You'll see some similar names. The difference? The Toolbox Window scripts create a new image with the desired result and the Image Window scripts operate on an open image.
If you're reading this tutorial, I'm assuming you've experimented with GIMP Scripting 101 and feel comfortable enough getting around in the SFC/PB. If not, please take the time to read it, or re-read, depending on the situation, as I won't be covering those steps again. I'm sure most of you are ready to put a script into action and aren't interested in delaying this any further by rehashing old news, so I plan on working from the building blocks laid last time.
In this tutorial, you will learn:An improved way to work with information in the SFC
Create a simple Toolbox script
This tutorial is written using GIMP version 2.4.2. You may be able to follow along using older versions of GIMP, but there have been improvements to the SFC/PB/and Scheme language which might not produce the same results in older GIMP versions.
Depending on the web browser you're using, the images may be resized and appear of poor quality. Firefox users can right-click on the image and choose View Image from the dropdown menu to view it in full-size, best quality. I believe IE users can just click on the image to view it in full-size, best quality, but I'm not sure about IE since I generally use Firefox. Let's Begin!!Back to the SFC - Working More Efficiently with the SFCIn GIMP Scripting 101, we created a new image directly from the SFC using Procedures found in the PB. So that you don't have to refer back to the first tutorial, here's a quick recap of the Procedures and Parameters we used to create that new image:

To create the image, we did a LOT of typing of variable values in each step to get from point A to point B. Is there were an easier way to operate? There is and saulgoode suggested that I tell you about it!
You'll notice that many of the Parameters listed above are used in several Procedures. We can define our variables using the same names as those found in the Procedure and give those variables some initial values. Then, each time we click on the Apply button in the PB, our Parameters will already be filled in with the needed information.
For example: the Procedure (gimp-image-new) requires width height and type Parameters. If we define a variable as "width", "height", and "type" and assign acceptable values to it, we only have to type information once and let the PB/SFC do the rest.
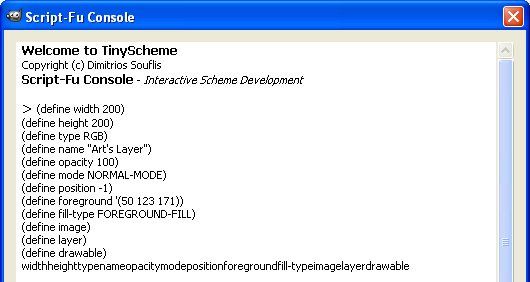
So, here's how we can work more efficiently in the SFC. To define a variable we use the following format (define "variable name" value). So type in the following in the SFC.
(define width 200)
(define height 200)
(define type RGB)
(define name "Art's Layer")
(define opacity 100)
(define mode NORMAL-MODE)
(define position -1)
(define foreground '(50 123 171))
(define fill-type FOREGROUND-FILL)
(define image nil)
(define layer nil)
(define drawable nil)
You should see something like this appear in the SFC Window:
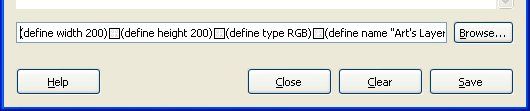
BTW, if you're using GIMP 2.4.x, you can enter this all on one line if you would like or one at a time, hitting the Enter Key after each variable you define. It's up to you. If you do decide to enter them on one line, the input would look something like this:
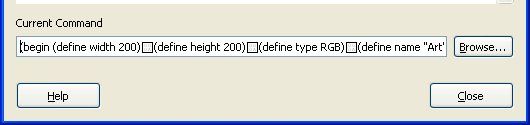
If you're using GIMP 2.2 or earlier, the console will only process one "command" at a time. An easy way to get around this is to add a "(begin...)" block around all of the variables you wish to define. For example (notice the "begin" block is highlighted in red):
(begin(define width 200)
(define height 200)
(define type RGB)
(define name "Art's Layer")
(define opacity 100)
(define mode NORMAL-MODE)
(define position -1)
(define foreground '(50 123 171))
(define fill-type FOREGROUND-FILL)
(define image)
(define layer)
(define drawable)
)The input line for GIMP 2.2 or earlier might look something like this (note: I'm only showing the first part of the begin block. You don't see the closing parenthesis in this screenshot.)
Also, here's some food for thought: the last three "define" statements ("image", "layer", "drawable") don't actually assign values to the variables; they are left as "null" values (a value of "nothing" or uninitialized). In previous versions of GIMP, you could represent it like so: "(define image)" and GIMP would recognize it. Unfortunately, GIMP 2.6 no longer works this way and a value must be assigned. In order for GIMP to understand what you are intending, define it like so: "(define image nil)" with nil representing a "null" value. Here's how you would describe them in the script:
(define image nil)
(define layer nil)
(define drawable nil)
While it's not necessary to do so at this time, if the TinyScheme developers decide to move forth with this concept, it will affect nearly every GIMP script ever written.
Now to make sure GIMP has assigned a value to our variables, simply type the name of one into the SFC and see what value is returned. I'll type in "width", "height", "opacity" and "name" (no quotes or parenthesis) hitting the Enter Key after each one. You could type in the variable names one right after the other with a space in-between and then hit the Enter Key. What values are returned? Here's a screenshot of my output.

How are you doing so far? Let's continue....I know you want to get to a script! If you look back to the area where I describe the Procedures, Parameters, and Return Values, you'll note that we have all the needed parameters to quickly create an image from the SFC with no changes to the values.
You may have noticed that we didn't actually "define" image, layer, and drawable with a value. Basically, we've just told the SFC to use those names as placeholders for use later on. The reason being is we want to use other function calls to define them, which requires some additional explanation.
Let's use a familiar every day object to explain how we move forward from here. So far we have all the "ingredients for the cake", but we haven't defined the "cake", the "icing", or the "flowers made of icing". The "cake" in this case, is the Image, the "icing" will be our Drawable, and the "flowers made of icing" will be our Layer. (Remember from Scripting 101 that a drawable can be a layer, channel, mask, etc.) To define these items, we're going to need to combine a bunch of ingredients. The "bunch" of ingredients is referred to as a list. A list can be one item, several items, or no items (a "null" value). In the previous tutorial, we typed the definitions for an image/layer directly into the SFC i.e. (gimp-image-new 200 200 RGB) and the output was given to us as a value for the Image/Layer ID's, which we used throughout the tutorial.
In scripting, we often need to use this information over and over and the best way to do that is to assign that value to a variable. We already know how to assign variables because we did it above for width, height, type, etc. But, how do we assign a list to a variable? In Scheme and in other programming languages there is a system of functions called "car" & "cdr" (and their many combinations) which are used to extract specific locations of a list. If we want the first item contained in a list, we use "car" if we want everything else in the list we can use "cdr". Car & cdr can also be combined to allow you to retrieve items from any position in a list. Since we are covering only basic examples here, we will simply focus on "car", do a google search on car/cdr/Scheme to get better explanations than I can give. You can also check out saulgoode's
An Introduction to Script-Fu for more in-depth information on this and other script-fu programming.
Back to the task at hand. We want to assign items from various lists as values of the given variables which will make up our Image (the Cake), the Drawable (the Icing), and the Layer (the Flowers made of Icing). To do that, we will "define" our variables by using the "set!" functon, like this:
(set! image (car (gimp-image-new width height type)))
(set! layer (car (gimp-layer-new image width height type name opacity mode)))
(set! drawable (car (gimp-image-get-active-drawable image)))
Let's walk through this. We are telling GIMP to define the variable image using the result given by the Procedure (gimp-image-new), which has the Parameters width, height, type (we've already defined those variables). In Scripting 101, we just typed in the Procedure directly and it spit out a list containing just one item, a number. Then, we told GIMP to get the first item in that list of one by using the "car" function and assigned it as the value for the variable "image". The same thing was done for the layer and drawable. Does this make sense? It may not at first, but it will if you keep reading what was just explained and looking at other scripts/reading other Scheme resources. Also, notice that instead of "define", I've used the function set!. We already defined the variables "image", "layer", and "drawable" even though we didn't assign values to them. Now, we're using the "set!" function to actually assign values to those variables.
Next, I want you to type this information into the SFC (type these in as separate commands, hitting the Enter key after each command):
(set! image (car (gimp-image-new width height type)))
(set! layer (car (gimp-layer-new image width height type name opacity mode)))
What does GIMP return? Here's what I've got. In my case, 11 represents the Image ID and 12 the Layer ID. If you get an error, you've typed in something wrong.

You might be wondering why we discussed "setting" the drawable variable above, but didn't add it into the SFC yet. Here's why: The drawable variable is set to be the result of the get-active-drawable.....until we actually "Add" the layer to the image, there is no active drawable. In this next step is where we will do that....
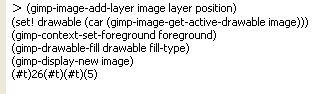
With everything but the drawable defined so far, copy and paste the information below into your SFC, hit the Enter Key and see what happens.
(gimp-image-add-layer image layer position)
(set! drawable (car (gimp-image-get-active-drawable image)))
(gimp-context-set-foreground foreground)
(gimp-drawable-fill drawable fill-type)
(gimp-display-new image)
Hopefully, the following image will pop-up:

and the SFC Window should resemble this:
If you received an error message, you probably made an error in typing. So, make sure you've got all the information correct.
TIP: If you enter a command into the SFC and make a mistake, you can use the UP Arrow on your keyboard to enter the last command that you typed again. Then you can go back and edit the command so that it's correct. This is a timesaver!
Creating a Script from the Information We've Learned Thus Far Now, the time you've all been waiting for! Let's create a script from all this information. Let's switch over from the SFC/PB to a text editor. I like Notepad or Wordpad, Linux/Mac users have your favorites, so pick one and fire it up.
We'll start by creating a Toolbox Script and then modify it to work as an Image Window script. I won't cover all the ins/outs or the rights/wrongs of defining our script....remember, I'm a newb too! But, I'll show you what's worked for me.
The basic layout of our scripts will have the following format:
Define the Function - Which will include the actual script operations
&
Registering the script with GIMP - Registers the script with the Procedural Database (PDB) so that GIMP can use it and contains information about the script, the author, and instructions on where to place the script. This section can also contain the User Input Values (will be described in greater detail later.) There are 7 required pieces of information for this section, which I'll explain below.
For our simple Toolbox script, let's add the following to the text editor. Notice there are some similarities and differences between the way we do things in the script and the SFC. I'll be explaining the steps in a minute, but for now, here's what we need to put into the text editor.
(define (script-fu-tutorial-image)
(let*
(
(width 200)
(height 200)
(type RGB)
(name "Art's Layer")
(opacity 100)
(mode NORMAL-MODE)
(position -1)
(foreground '(50 123 171))
(fill-type FOREGROUND-FILL)
(image nil)
(layer nil)
(drawable nil)
)
(set! image (car (gimp-image-new width height type)))
(set! layer (car (gimp-layer-new image width height type name opacity mode)))
(gimp-image-add-layer image layer position)
(set! drawable (car (gimp-image-get-active-drawable image)))
(gimp-context-set-foreground foreground)
(gimp-drawable-fill drawable fill-type)
(gimp-display-new image)
)
)
(script-fu-register "script-fu-tutorial-image"
"<Toolbox>/Xtns/Tutorial Image Script"
"Creates a new default GIMP image using my desired settings."
"Art Wade"
"Art Wade"
"January 2008"
""
)
That's it! Our script is now complete. We can save it to our scripts folder:
C:\Program Files\GIMP-2.0\share\gimp\2.0\scripts and add an "scm" extension to the end. I've saved mine as TutorialImage1.scm. Windows users: Windows has a nasty habit of adding a "txt" extension to the end of script files when using Notepad/WordPad. In Notepad, make sure you choose "All Files" under the Save As Type dropdown (don't use Text files) and in WordPad, make sure you use "Text Document" under the Save As Type Dropdown. I know it's a pain/confusing, but that's the way it is.
Then, go to the Toolbox Window and select Filters > Script-Fu > Refresh Scripts to see if the script is there. If everything has been done correctly, the menu should look like so:
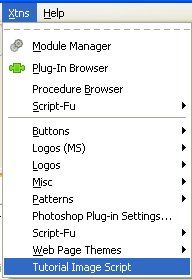
If it's there, click it and hopefully, the following image will appear (if not, make sure you've done everything as typed):
What did we just do?The first thing we did was to define a main function of the script. This was done with the step:
(define (script-fu-tutorial-image
parameter1 parameter2...parameter x)
)Notice that the last parenthesis is in red. In the script that we made, this parenthesis wasn't added at the end of the first line like above, rather, it was added at the very end of the script right before the Register Section. What this means is that everything after the script-fu-tutorial-image function is part of that function. Additionally, notice the "parameter" statements in blue. We did not need this information for our first script; however, these parameters coincide with values required for an Image Window script and scripts that let the user specify values when the script is run. (ie...If we were to add an option for the user to choose a background color rather than us deciding for the user what the color will be, etc.). We'll discuss this further in GIMP Scripting 102b and in the follow-up tutorial.
Moving right along, note the variable names and format under the "let*" block. Does it look familiar, yet somewhat different? It should. These are the same variables we defined using the "define" call in the SFC above. Here, we declare the variables and can assign some information to them, just as before. The format for the "let*" block is this:
(let*
( (variablex & the value assigned to x
) (variablex1 & the value assigned to x1
) (variablex2 & the value assigned to x2
)...
(variablexn....etc.
) ) ) I've colored the parentheses of the let block to point out something to you. There's a parenthesis immediately preceeding the "let*" (shown in red) followed by a space then another open parenthesis (in purple) followed by a space, then each of the declared variables/associated values is surrounded by a set of parenthesis (in green). Then, there's a closing parenthesis for the purple and for the red. Similar to the "define" area above, our final closing parenthesis for the let* block is not shown until the very end of the script. It is the second to last parenthesis before the Section.
VERY IMPORTANT: variables declared in the let* block are only good in the let* block. If you put these variables outside of the closing let* block parenthesis, the script will return an error. If you couldn't tell, the placement of parentheses is very important! Next, we used the same function calls that we did in the SFC to run the script. (i.e. define the image & layer, add the layer to the image, fill it with color, etc.) Pretty straightforward.
Now, that we've defined our function, declared the variables, and added the function calls, we need to register the function with the PDB for GIMP to use it. The PDB requires a Toolbox script to have 7 parameters, but we can add more as described when we defined the main function above....recall this: (define (script-fu-tutorial-image
parameter1 parameter2...parameter x). We'll discuss the additional parameters later. The 7 required ones are and should appear in the following order, with the entire statement enclosed in parenthesis:
(script-fu-register
"script-fu-tutorial-image"
"<Toolbox>/Xtns/Tutorial Image Script"
"Create a new default GIMP image using my desired settings."
"Art Wade"
"Art Wade"
"January 2008"
""
)
script-fu-register: This tells GIMP to register the main function with the PDB.
Each item from here on out needs to be in quotes with the exception of the closing parenthesis... "script-fu-tutorial-image" - The name of the main function.
Very important: This name needs to be unique to the PDB in order to run. If there is another function registered with the PDB that has the same name, one of them won't work. My suggestion is that before you choose a final function name, you type it into the PB (Procedure Browser) and see if another one appears in the list. If so, maybe add your initials to the end to differentiate it from the other one in the PDB -OR- select another unique name. Of course, it's not possible to know what functions are registered with someone else's GIMP PDB, but if they tell you the script is not working, there's a good chance (barring noted scripting errors) that there's a duplicate function registered with the PDB. "<Toolbox>/Xtns/Tutorial Image Script": This is the Menu Location for the script. Notice the word <Toolbox> appears before it. This means the script will be placed in the GIMP Toolbox, Under the Filters Menu and called "Tutorial Image Script". If you would like to assign an access key to a menu command to run the script, you simply add an Underscore symbol "_" in front of the desired letter in the Menu name. For example, "<Toolbox>/Xtns/Tutorial _Image Script" will let a user hit ALT-X and then "I" to run the script (assuming the Toolbox is the active window). Note the underscore in front of the "I" in Image will tell GIMP that it's to be used as an access key.
"Create a new default GIMP image using my desired settings.": This is a brief description of what the script does. It will pop up if you hold your cursor over the Script Name in the Menu. It will also appear in the PB (Procedure Browser).
"Art Wade": The Script Author. This is my name.
"Art Wade": Contact information of the script writer. I generally just put my name to limit spam.
"January 2008": The date the script was made or the last revision.
"": The type of image the script works on. Since our image is being created from scratch, nothing needs to be placed here. However, on Image Window Scripts, this is very important!
Lastly, and very important.....If you have taken a look at any of the scripts that you have on your computer, you may have noticed statements like this:
; This is a script and here's what it does.
; I wrote this script to make a pretty image
; While it may not be popular with everyone, I'm pretty darned proud of it!
A semi-colon ";" is used to add comments to the script so that others can understand what you've done, plus it's extremely helpful for troubleshooting or making modifications at a later date. This way, even if you don't look at the script for several weeks/months/years, you can recall why you did what you did. Our script above did not include comments because I wanted to keep things as simple as possible. However, get into the habit of commenting your scripts. You'll be very glad you did. Just add a semi-colon and the text you want. When GIMP sees a semi-colon, it won't read anything else after it. It will simply skip to the next line. It will read any information on the next line until it runs into another semi-colon. Make sure you don't put actual scripting information behind a semi-colon because GIMP will skip it and your script won't run as intended, if it runs at all.
Happy GIMPing!
Art