Many changes have taken place within GIMP since this tutorial was written. The steps described below may be slightly outdated, but I will be updating this and other scripting tutorials to reflect those changes. For the time being, I'm posting them here as a placeholder. While there have been some changes, the information provided below is still a good learning tool.Welcome to GIMP Scripting 102B! If you're reading this tutorial, I'm assuming you've experimented with
GIMP Scripting 101 and
GIMP Scripting 102A and feel comfortable enough getting around in the SFC/PB and creating a simple Toolbox script. If not, please take the time to read it, or re-read, depending on the situation, as I won't be covering those steps again. I'm sure most of you are ready to put a script into action and aren't interested in delaying this any further by rehashing old news, so I plan on working from the building blocks laid last time.
Again, I would like to thank saulgoode, ccbarr and PhotoComix for their review and suggestions. Without these guys, the tutorial would be significantly lacking. Thanks again, everyone!
To recap here's the differences between the script types: Toolbox scripts are meant to work in a stand-alone fashion....you don't have to have an image open to get them to work. The script will create the image itself. Image Window scripts require an Image to be open and either create a new image using the layers, channels, masks from the open image OR changes will be made directly to the open image itself. It's really that simple. Can a Toolbox script and an Image Window script do the same thing? Yes, they can. In fact, there are a number of default GIMP scripts that are made in both forms. For example, if you go to the Toolbox Window and look under the Xtns Menu > Logos and compare it to the Image Window under the Filters Menu > Alpha to Logo > You'll see some similar names. The difference? The Toolbox Window scripts create a new image with the desired result and the Image Window scripts operate on an open image.
In this tutorial, you will learn:
How to locate the image ID of an existing, open image
Create a simple Image Window script
This tutorial is written using GIMP version 2.4.2. You may be able to follow along using older versions of GIMP, but there have been improvements to the SFC/PB/and Scheme language which might not produce the same results in older GIMP versions.
Depending on the web browser you're using, the images may be resized and appear of poor quality. Firefox users can right-click on the image and choose View Image from the dropdown menu to view it in full-size, best quality. I believe IE users can just click on the image to view it in full-size, best quality, but I'm not sure about IE since I generally use Firefox.Let's Begin!!
Here's the simple Toolbox script we created in GIMP Scripting 102A. We'll use this as a basis for our Image Window script.
(define (script-fu-tutorial-image)
(let*
(
(width 200)
(height 200)
(type RGB)
(name "Art's Layer")
(opacity 100)
(mode NORMAL-MODE)
(position -1)
(foreground '(50 123 171))
(fill-type FOREGROUND-FILL)
(image nil)
(layer nil)
(drawable nil)
)
(set! image (car (gimp-image-new width height type)))
(set! layer (car (gimp-layer-new image width height type name opacity mode)))
(gimp-image-add-layer image layer position)
(set! drawable (car (gimp-image-get-active-drawable image)))
(gimp-context-set-foreground foreground)
(gimp-drawable-fill drawable fill-type)
(gimp-display-new image)
)
)
(script-fu-register "script-fu-tutorial-image"
"<Toolbox>/Xtns/Tutorial Image Script"
"Create a new default GIMP image using my desired settings."
"Art Wade"
"Art Wade"
"January 2008"
""
)
Image Window ScriptsWriting an Image Window script really isn't any more difficult than a Toolbox script, but there are some things we need to add to the script in order for it to work properly, plus there are some additional things we'll want to add to improve their functionality. We won't need to cover a lot of detail because we've built up a good foundation so far, but I will try to properly explain the new items we're adding.
As previously discussed, an Image Window script works from the Image Window menu of an open image, rather than from the Toolbox window. The script may create a completely new image or modify the currently open image. Because of this, some of the criteria we specified in our first script is already taken care of and doesn't need to be defined by the our new script. For example, in order to create a new image from a Toolbox script, we needed to specify the dimensions of the image and its type (RGB, grayscale, etc.) In an Image Window script, the dimension/type of image are determined by open image itself. These values are still important to us and we may want/need to use them in the scripts we create, but we don't need to explicitly define them.
Additionally, let's take a look at the registry block of our previous script and discuss a few differences that we must address in order to allow us to create an Image Window Script.
(script-fu-register
"script-fu-tutorial-image"
"<Toolbox>/Xtns/Tutorial Image Script"
"Create a new default GIMP image using my desired settings."
"Art Wade"
"Art Wade"
"January 2008"
""
)
Notice the two quote marks "" below the date of the script. The information that goes here tells the Procedural Database what type of image(s) the script works on (RGB, RGBA, GRAY, GRAYA, INDEXED, INDEXEDA). NOTE: The "A" in RGB"A", GRAY"A" and INDEXED"A" represents images of that particular type that have an Alpha Channel in them. In a Toolbox script, we assigned the type to one of the variables. However, on Image Window Scripts, we need to tell GIMP on what type of images this script can work. You may say to yourself, "I want this script to work on ALL image types." While that is a nice thought, it's not practical and, in some cases, not even possible. Here's why, many of GIMP's filters work only on RGB images. If you tell GIMP that your script can run on Grayscale or Indexed images that require the use of filters that only work on RGB, your script won't work right. This is very important! So, it's up to you to decide how the script is supposed to work.
So, let's say, you want your script to work on RGB and GRAYSCALE Images. Then, that particular part of the script would look like this:
"RGB GRAY" The image types are listed and separated by a space.
If you wanted it to work on RGB RGBA GRAY GRAY images, you could type in this:
"RGB RGBA GRAY GRAYA" or you could simplify matters and type in this "RGB* GRAY*" using the asterisk (*) as a wildcard indicating that it can also work on the corresponding image type with an Alpha Channel.
If the image is to run on ALL image types, I suggest you use this "*", just an asterisk surrounded by the quotes. If you've reviewed many Image Window scripts, you may have noticed that sometimes there are just two quote marks with nothing in-between them. This is NOT recommended for many reasons. I've noticed that it has a strange effect on scripts: they still run just fine, but if you undo the script operations after you run them, you won't be able to do a Filters Menu > Repeat (Ctrl+F) or Filters Menu > Reshow (Shift+Ctrl+F), you'll have to go back to the exact menu location to run it again. That's not a difficult thing to do, but it can be annoying, so I suggest you get in the habit of filling in the "type" section of the script accordingly. There are other problems this might create, so make sure you put the appropriate image type(s) between the quotes.
Now, we've got one more thing to cover before we move into the actual script. Remember above when I said that the Toolbox script required 7 parameters in order to register it with the PDB? Well, for an image script we need the same parameters, plus at least two more parameters AND we need to add two corresponding variables to the area where we defined the main function. The parameters for an Image Window script are as follows and need to be in the listed in this order:
(script-fu-register
"script-fu-tutorial-image-script" "
<Image>/Filters/Tutorial Image Script"
"
Create a new default GIMP image using my desired settings."
"Art Wade"
"Art Wade"
"January 2008"
"
RGB*"
SF-IMAGE "Image" 0 SF-DRAWABLE "Drawable" 0)
Remember, we need a NEW function name to be registered with the PDB. So, this time, I've called it script-fu-tutorial-image-script. Make sure you change the name in the define section as well (I describe that below). Also, we've moved it from the <Toolbox> Window to the <Image> Window and under the Filters Menu. You could put it under any menu, but for our purposes, this is sufficient. We've told the script to run on RGB* images and we've added the required parameters for it to work on an open image.
The SF-IMAGE and SF-DRAWABLE parameters need to be listed in the order shown and with the number zero after each. The parameter labels "Image" and "Drawable" can probably be anything you want, but I'd recommend you leave them as is. No need to complicate matters! However, despite what you decide to call the parameter labels, SF-IMAGE/SF-DRAWABLE must always be there in caps.
When we discussed defining the main function in GIMP Scripting 102a, I showed you the define function could take the following form:
(define (script-fu-tutorial-image
parameter1 parameter2...parameter x))
The parameters listed in blue are where we will add the parameters for SF-IMAGE and SF-DRAWABLE. I've highlighted them below. The main function name has been updated to correspond with the name assigned above in the register section and we've added two variables for the SF-IMAGE/SF-DRAWABLE parameters.
(define (
script-fu-tutorial-image-script image drawable)
NOTE: The "image" and "drawable" variables can be called anything you want, but I recommend you keep them named something similar to the purpose they provide so you can easily keep track of them later.
In essence, we've made the necessary changes to the script to allow it to run from an Open Image. To do this, you could make these changes to the original Toolbox script, save it with a new name, refresh your scripts, and then from an Open Image Window select: Filters > Tutorial Image Script... and a
new image with a single layer would appear. While this serves a purpose, it's not what I really intended for our first Image Window script. What we want to do next is create an Image Window script that will add a new layer to an Existing Image and fill that layer with color.
The Image Window script would look like this is in its current (but very
temporary form!):
(define (script-fu-tutorial-image-script image drawable)
(let*
(
(width 200)
(height 200)
(type RGB)
(name "Art's Layer")
(opacity 100)
(mode NORMAL-MODE)
(position -1)
(foreground '(50 123 171))
(fill-type FOREGROUND-FILL)
(image nil)
(layer nil)
(drawable nil)
)
(set! image (car (gimp-image-new width height type)))
(set! layer (car (gimp-layer-new image width height type name opacity mode)))
(gimp-image-add-layer image layer position)
(set! drawable (car (gimp-image-get-active-drawable image)))
(gimp-context-set-foreground foreground)
(gimp-drawable-fill drawable fill-type)
(gimp-display-new image)
)
)
(script-fu-register "script-fu-tutorial-image-script"
"<Image>/Filters/Tutorial Image Script"
"Create a new default GIMP image using my desired settings."
"Art Wade"
"Art Wade"
"January 2008"
"RGB*"
SF-IMAGE "Image" 0
SF-DRAWABLE "Drawable" 0
)
Let's modify our script a bit to operate on an existing open image. But, before we do, let's cover how to find the ID number of open image.
How to Locate an Existing Image's ID NumberIn GIMP Scripting 102a, we created an image from scratch, letting GIMP assign the Image ID number from within the SFC. In the script above, we used the same technique, but it's really not necessary. GIMP already knows the ID of an open image. At some point, we'll need this information as well. How can we obtain it? Simple. At the top of an open image window, you see something that resembles this:
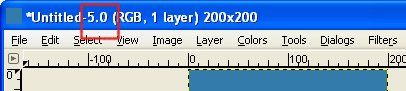
The number 5 is the Image ID, the number after the decimal place, in this case zero, is the View number since you can have more than one view of the same image open at once.
Let's proceed!
As previously stated, we want our particular image script to add a new layer to an existing, open image and fill it the new layer with color. Our current script just creates a brand new image with a single, color-filled layer. In order to test things out, let's go back into the SFC/PB, but this time have an image already open in GIMP. From the SFC, we'll actually witness the changes to our open image. To keep things simple, let's use the new image created by one of our scripts...doesn't really matter which script you use because they both do exactly the same thing.
Let's think about the process for a minute...
If we are adding a drawable (a layer in this case) to an open image, we no longer need to use the (set! image (car (gimp-image-new width height type))) function call to describe the image dimensions/type (which ultimately sets the Image ID). That information already exists. Above, I described above an easy way to get the Image ID....mine is 5. Take note of your Image ID, as it's probably different from mine and you'll need it in the SFC. Also, since the type and image dimensions are already defined by the open image, there's no need to explicity assign values to them.
We know from the previous tutorials, that in order to add a layer to an image, the first thing we need to do is decide on the layer's dimensions. (A layer does not need to be the same size as the image). We also know that we need to specify the type, give it a name, assign the opacity and the blend mode. Recall the function call:
(set! layer (car (gimp-layer-new image width height type name opacity mode)))
While this is still a valid command and you can certainly use it in the next script, I'd like to introduce a new Procedure to you, which I'll do in a minute.
Lastly, we need to decide the where to place the image in the stack. Do you want it above the current layer? Below it? Placed to the very top/bottom of a multi-layer image? Since we're keeping things simple, let's place our image immediately above the active layer. Simple enough....how do we tell GIMP what the active layer is? Glad you asked! I'll explain that right now!
To get the active layer of an image, we simply use the following, substituting the image number or putting in the appropriate image variable in place of "image" in bold below.
(gimp-image-get-active-layer
image)
Why not try typing this into the SFC and see what value GIMP has assigned to your active layer. You do have an image open, don't you?
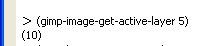
My value was returned as "10". Keep this in mind for the time being.
Since we are NOT creating an image, the script will use the SF-IMAGE parameter and its associated variable to represent the open image. So, if I were to call my variable that represents the image - "image" then I wouldn't need to substitute anything at all here. But, regardless of what you call the variable, GIMP will get look to see what the active layer is and assign a value to it.
Now that we know what our active layer is, we can tell GIMP that we want to place our new layer above it. But, before we do that, I'll show you a new way of "defining" a layer. As I stated above, we previously defined a layer by using this command:
(set! layer (car (gimp-layer-new image width height type name opacity mode)))
While that is still a valid way to do it, I would like to show you
another way. In reality, most of us probably do this already when we use GIMP. If you look at the bottom of the layer dialog window (the one that shows all your layers), you'll see a button that resembles two image windows (it's the duplicate layer button). This button makes an exact copy of the active layer and adds it to the image above your active layer. Well, that's what we're going to do here. To do that we need to use the following command:
(gimp-layer-copy layer add-alpha)
Since we want to make a copy of the active layer, we substitute the value we obtained from the (gimp-image-get-active-layer image) command and decide if the copy should have an alpha channel (TRUE if we want one; FALSE if we don't). I want an alpha channel, so if I substitute the values in the command, it will look like this:
(gimp-layer-copy 10 TRUE)
So, enter this command in the SFC, hit the ENTER key, and you should get the something like the following:
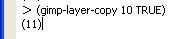
Notice that while a value was returned for the new layer, but a new layer was not added to the image. Why? Well, as was mentioned in the previous tutorials, we have to tell GIMP add it. Which is straightforward enough. To do that, we use the same command as we used in our Toolbox script:
(gimp-image-add-layer image layer position)
In the SFC, substitute the information you obtained for the image ID, the ID of the
copied layer, and the Position. GIMP uses a position of "
-1" to place it above the active layer. My command looks like this:
(gimp-image-add-layer 5 11 -1)
If you've done everything correctly, a new layer should appear above the previously active layer and the new layer is now active.
A simple "copy" is nice, but let's change the color of the foreground and fill the layer with the new color. To do that, we use the same commands as our simple Toolbox script as shown:
(gimp-context-set-foreground foreground)
(gimp-drawable-fill drawable fill-type)
Remember, the foreground color value is represented by a list containing an R G B value. So, since I want my foreground color to be a "greenish" one, I'll go to make color selector and pick the R G B values for the desired color and fill them in like this (remember the list must be preceded by a single quote and in parenthesis):
(gimp-context-set-foreground
'(9 107 39))
Enter your command into the SFC and if everything was entered correctly, your foreground color swatch should change to your chosen color. Now, simply use the (gimp-drawable-fill drawable fill-type) to fill the layer. Remember, a layer is a drawable so substitute your layer ID for drawable.
(gimp-drawable-fill
11 FOREGROUND-FILL)
If you've done everything correctly, your new layer should now be filled with the desire color.
From the SFC standpoint, we've done all the steps we need to do to add a new layer to an open image, place the new layer above the active layer, and fill the new layer with a new color. Now, it's time to take those same commands and fit them into the "scripting protocol" and test our new script.
The Revised Image Window ScriptHere's the Image Window Script we prepared at the very beginning of the tutorial. We will modify this script using the steps we just went through in the SFC to work on an open image. So, if your previously created Image Window script isn't open, open it up in your text editor and let's begin.
(define (script-fu-tutorial-image-script image drawable)
(let*
(
(width 200)
(height 200)
(type RGB)
(name "Art's Layer")
(opacity 100)
(mode NORMAL-MODE)
(position -1)
(foreground '(50 123 171))
(fill-type FOREGROUND-FILL)
(image nil)
(layer nil)
(drawable nil)
)
(set! image (car (gimp-image-new width height type)))
(set! layer (car (gimp-layer-new image width height type name opacity mode)))
(gimp-image-add-layer image layer position)
(set! drawable (car (gimp-image-get-active-drawable image)))
(gimp-context-set-foreground foreground)
(gimp-drawable-fill drawable fill-type)
(gimp-display-new image)
)
)
(script-fu-register "script-fu-tutorial-image-script"
"<Image>/Filters/Tutorial Image Script"
"Create a new default GIMP image using my desired settings."
"Art Wade"
"Art Wade"
"January 2008"
"RGB*
SF-IMAGE "Image" 0
SF-DRAWABLE "Drawable" 0
)
As you recall, the script above actually functions to create a new GIMP image. Since the script works, but not in the fashion we want it to, we'll just change the appropriate parts to meet our needs. In this case, we'll only change the "let* block" and some of the commands. The "define function" and "register" blocks are completely fine in this case, other than the description, which we'll modify later. I'll describe exactly what you need to change and why.
Let's start with the "let* block". The following variables were assigned:
(width 200)
(height 200)
(type RGB)
(name "Art's Layer")
(opacity 100)
(mode NORMAL-MODE)
(position -1)
(foreground '(50 123 171))
(fill-type FOREGROUND-FILL)
(image nil)
(layer nil)
(drawable nil)
For our new revised script, we no longer need the variables that describe the new layer: width, height, type, name, and opacity. Why? Well, as we previously discussed, we're simply going to make a copy of the active layer as the basis for our new layer. GIMP already knows those values, so they are unnecessary. Additionally, we no longer need the variables
image, layer, and drawable. Why? Remember, the
image and
drawable variables are already assigned through the SF-IMAGE and SF-DRAWABLE parameters. The layer variable was used to as the "placeholder" for the information describing the dimension and type of the new layer. Since we're making a copy of layer, we don't need that information.
But, we DO need to add a couple of new variables so that GIMP can process them in the script. Recall from the steps we used in the SFC above, that we need to determine the active layer and make a copy of the active layer. The commands in the SFC is simple enough, but we need to assign that values that are returned from those commands to "something". So, we'll create a variable for active layer, for simplicity sake, we'll call it "active-layer". Likewise, now that we have a variable to store the value of the active layer, we need a variable to store the value of the copy of the active layer, we'll call it "copy-layer". Simple enough. We now have all the variables we need to completely revise our "let* block". The revised "let* block" should look like so:
(let*
(
(position -1)
(foreground '(9 107 39))
(fill-type FOREGROUND-FILL)
(active-layer nil)
(copy-layer nil)
)
Here, we've defined the position (for placement of the new layer), the new foreground color to fill the layer with, the fill type, and told GIMP we want to use
active-layer and
copy-layer in our script. Those two will be defined in just a minute.
The commands from our previous script look like this:
(set! image (car (gimp-image-new width height type)))
(set! layer (car (gimp-layer-new image width height type name opacity mode)))
(gimp-image-add-layer image layer position)
(set! drawable (car (gimp-image-get-active-drawable image)))
(gimp-context-set-foreground foreground)
(gimp-drawable-fill drawable fill-type)
(gimp-display-new image)
In light of our new information we placed in the "let* block", we need to modify it accordingly. For example, we removed the
image,
layer and
drawable variables from the "let* block", therefore we need to delete the following from ours, as they are no longer needed:
(set! image (car (gimp-image-new width height type)))
(set! layer (car (gimp-layer-new image width height type name opacity mode)))
(set! drawable (car (gimp-image-get-active-drawable image)))
But, we need to assign values to
active-layer and
copy-layer using the "set!" function. Recall from above that the command to determine the active layer of an image is: (gimp-image-get-active-layer image). Since, we've set the variable for the image as
image in the register section of the script, we can simply "set" the
active-layer variable using this format:
(set! active-layer (car (gimp-image-get-active-layer image)))
Likewise, to make a copy of the active layer in the SFC, we used this command: (gimp-layer-copy layer add-alpha), with "layer" being the layer we are making the copy of. Since we are making a copy of the
active-layer we substitute the
active-layer variable in place of "layer", like this: (gimp-layer-copy active-layer TRUE) Remember, TRUE is giving the copy an alpha channel. Therefore, to "set" our
copy-layer variable, we use this format:
(set! copy-layer (car (gimp-layer-copy active-layer TRUE)))
We still need to add the new layer to the image, but we need to modify the command from this:
(gimp-image-add-layer image layer position)
to this:
(gimp-image-add-layer image
copy-layer position)
The
copy-layer is what we're adding to our image, not
layer - the variable
layer no longer exists. Since we've already assigned the
position variable to
-1 in the "let* block", GIMP knows to place the
copy-layer above the active layer.
The command to change the foreground color - (gimp-context-set-foreground foreground) - is still valid and no changes need to be made to it. However, we do need to change the "fill" command - (gimp-drawable-fill drawable fill-type) - because the variable
drawable still exists (remember, we identified the drawable in the register section of the script), we don't want to fill the drawable with the new color. We want to fill the
copy-layer with the foreground color. So, our revised "fill" command will look like so:
(gimp-drawable-fill copy-layer fill-type)
and since the
fill-type variable was defined in the "let* block" we don't need to change anything.
We need to add a brand new command. When working on an open image, GIMP needs to be told to update the display (kinda like a "refresh" option, if you will). To do that we add the command:
(gimp-displays-flush)
This command requires no variables. It simply tells GIMP to update the display.
The last thing to do is to update the description of the script, which is found in the register section. The current description looks like so:
"Create a new default GIMP image using my desired settings." I suggest you make change it to this:
"Create a copy of the active layer, add it above the active layer, and fill it with color."
We are now finished with our revised script. Here's what it should look like:
(define (script-fu-tutorial-image-script image drawable)
(let*
(
(position -1)
(foreground '(9 107 39))
(fill-type FOREGROUND-FILL)
(active-layer nil)
(copy-layer nil)
)
(set! active-layer (car (gimp-image-get-active-layer image)))
(set! copy-layer (car (gimp-layer-copy active-layer TRUE)))
(gimp-image-add-layer image copy-layer position)
(gimp-context-set-foreground foreground)
(gimp-drawable-fill copy-layer fill-type)
(gimp-displays-flush)
)
)
(script-fu-register "script-fu-tutorial-image-script"
"<Image>/Filters/Tutorial Image Script"
"Create a copy of the active layer, add it above the active layer, and fill it with color."
"Art Wade"
"Art Wade"
"January 2008"
"RGB*"
SF-IMAGE "Image" 0
SF-DRAWABLE "Drawable" 0
)
Now, save your new script. No need to do a
Save As... because the goal was to revise the previously created image script. Refresh your scripts and run it. Remember, it's found under Filters > Tutorial Image Script. Hopefully, the script will run fine and you'll see a new layer added above the active layer. If not, go back through the script and make the necessary changes.
Well, this concludes this portion of the tutorial! In the next tutorial, we'll learn how to add "User Input" functionality to our scripts.
Until then, Happy GIMPing!
Art