Many changes have taken place within GIMP since this tutorial was written. The steps described below may be slightly outdated, but I will be updating this and other scripting tutorials to reflect those changes. For the time being, I'm posting them here as a placeholder. While there have been some changes, the information provided below is still a good learning tool.Good day, class! Welcome to my final lessons on scripting. In these last two sessions, we'll pick up where we left off in Scripting 102A and 102B, to create a script that allows the user to decide how the script should perform, rather than us making all the decisions. While some scripts are meant to do one thing, one way each time they are run, this could get boring for other types of scripts. To see an example of a script that does one thing, one way, take a look at Image > Guides > Remove All Guides.
For the remaining lessons, we will be preparing a script that will create a layer that looks like it's made of satin as shown in the image below. The steps for how to create a satin layer can be found in my tutorial here (yes, another shameless plug!):
Satin Texture in GIMP. This lesson will focus on creating a <Toolbox> script. The follow-up (and final) lesson will describe the steps needed to run it from an open image, an <Image> script.

If you haven't read my previous scripting tutorials, I suggest you take a look at them. There's a lot of basic information, that will help you along the way. The tutorials can be found here:
GIMP Scripting 101GIMP Scripting 102aGIMP Scripting 102bIf you've already gone through the previous lessons, you should have a pretty good understanding of what is required to create simple scripts. I'm sure you still have questions and haven't absorbed everything, but the concepts should make more sense. Because of this, I won't be explaining every little detail; it's just not necessary at this point. I will still cover what needs to be dealt with (I promise I won't leave you hanging!), but I think you're at a level now where you'll be able to move along rather quickly with less detail. For these last 2 lessons, we won't be using the Script-Fu Console and Procedure Browser; however, you might want to have the Procedure Browser open so you can look at the required parameters/additional information for each command.
This tutorial is written using GIMP version 2.4.2. For users of GIMP version 2.2.x, one command needs to be changed in order for the script to operate correctly. I will explain which command it is and how to modify it correctly at the appropriate time. So, GIMP 2.2.x users, feel free to follow right along!With all of that out of the way, let's begin!
Download the Template ScriptI've prepared a Template Script for you to work with that has some basic information filled in for you (ie..the main function with user input parameters, the variables we'll be using, the registration information, and setting up the user input area with the required values.) The Template Script also has only 2 comments at the very end next to the two closing parentheses. This is to help you know which parenthesis goes where. (Nothing kills a script faster than incorrect parenthesis placement. It's also one of the most frustrating things in scripting!) So, please copy and paste the Template Script code into your favorite text editor:
(define (toolbox-satin-script height width hue saturation lightness)


    (let*
    (
   (theImage)
   (satinLayer)
   (noiseLayer)
   (counter 15)
   (X1)
   (X2)
   (Y1)
   (Y2)
    )


)   ;closing parenthesis for let* block
)   ;closing parenthesis for the define function block


(script-fu-register    "toolbox-satin-script"
         "<Toolbox>/Xtns/Satin..."
         "Create a Satin Fabric"
         "Script Author's Name"
         "Script Author's Contact Information"
         "Script Creation/Modification Date"
         ""
         SF-ADJUSTMENT     "Image Height"    '(400 50 10000 1 10 0 1)
         SF-ADJUSTMENT     "Image Width"    '(400 50 10000 1 10 0 1)
         SF-ADJUSTMENT     "Satin Color (order of color is R O Y G B V - Red is zero)" '(20 0 360 1 10 0 0)
         SF-ADJUSTMENT     "Color Saturation - Its Depth" '(50 10 100 1 10 0 1)
            SF-ADJUSTMENT     "Color Lightness - Its Brightness" '(0 -50 70 1 10 0 1)
)
Take a look at the following information in the script (I've highlighted certain features which I will explain below):
(define (toolbox-satin-script
height width hue saturation lightness)
SF-ADJUSTMENT "Image Height" '(400 50 10000 1 10 0 1)
SF-ADJUSTMENT "Image Width" '(400 50 10000 1 10 0 1)
SF-ADJUSTMENT "Satin Color (order of color is R O Y G B V - Red is zero)" '(20 0 360 1 10 0 0)
SF-ADJUSTMENT "Color Saturation - Its Depth" '(50 10 100 1 10 0 1)
SF-ADJUSTMENT "Color Lightness - Its Brightness" '(0 -50 70 1 10 0 1)
The define section of the script is where we define our main function with the name "toolbox-satin-script" and identify function parameters, which in this case are: "height", "width", "hue", "saturation", and "lightness". The parameters are "carriers" of the information assigned to them by the user in the dialog box that appears when the script is first run. Notice that there's a parameter in the define section that corresponds to a parameter in the register section of the script (our parameters are listed as "SF-ADJUSTMENT......"). In order to create a dialog box, we have to tell GIMP what parameters we want want and then decide how it should appear in the dialog box. Using the information above, GIMP will create a dialog box that looks like so:
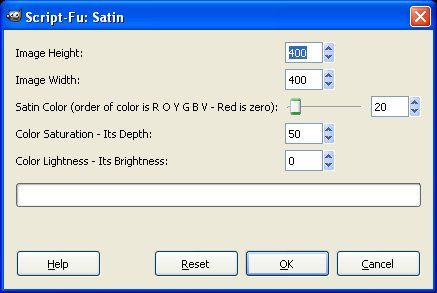
To accomplish this, GIMP requires that each parameter be specified in a certain fomat. I'll use the "Image Height" as an example:
SF-ADJUSTMENT "Image Height" '(400 50 10000 1 10 0 1)
- In the above code, GIMP is instructed to use an Adjustment Parameter as called by "SF-ADJUSTMENT" (No quotes are used in the script for the Parameters. I put them there for clarity). Depending on the values described, the Adjustment Parameter can be a Spinner or Slider. I used the Spinner types for all, but the Satin Color. I just did that so you could get familiar with the different options.
- Next, in quotes (the labels have to be in quotes), is the label I give to that Parameter ("Image Height"). This is what the user sees in the dialog box - compare what's in quotes to the screenshot. Notice on the label for the Satin Color I've added "(order of color is R O Y G B V - Red is zero)" Because this tool is not run interactively in the script, the user may not know what color zero represents. So, I just threw in a little extra information to help out. Red, Orange, Yellow, Green, Blue, Violet with Red being zero.
- Finally, you see a list of information (recall the single quote mark in front of a set of values placed in parentheses is a list). Each Parameter type has a required set of information. An Adjustment Parameter requires 7 values. I explain them in order below:
'(400 50 10000 1 10 0 1)
400 - The first value in an Adjustment Parameter list is the default value that Parameter will have. I'm telling GIMP that the default image height is to be 400. You can make it whatever you want.
50 - This value represents the smallest value the user can enter. I decided that for this script, I wanted to limit the user to an image size of 50 pixels in height. You could set the value smaller or larger. It's a matter of preference.
10000 - This is the largest value the user can enter. I felt 10000 was sufficient. Again, it's your decision.
1 - This is the increment the
spinner will move with each click. I've set mine to move in increments of 1, but you could set it to 10, 25, 50, etc. Again, it's your choice.
10 - This is the increment the
slider will move with each click. If you notice in the screenshot above, I've used a slider to represent the Satin Color. A slider is always depicted with a slider bar AND a spinner. If you click next to the slider bar, the bar will move in increments set with the number. But, the spinner will move in the increments set with the previous value. Again, the value you use is up to your discretion.
0 - This value can only be a 0 (zero) or a 1 (one). A zero tells GIMP that the values entered by the user can only be integers (numbers without decimal places). A one tells GIMP that the values entered by the user can have decimal places. In all of my Parameters, I only allow the user to enter integers. Why? Well, none of the parameters I'm using can use values with decimal places. For example: There's no point in allowing the user to specify the width of an image as 402.5 and the height as 425.75. GIMP can only create an image with dimensions based on whole numbers. However, if you're wanting the user to be able to specify a setting for say, Gaussian blur, you could use numbers with decimals. So, the number type you use is up to you, but it's important to know how the numbers can be used.
1 - This value can only be a 0 (zero) or a 1 (one). A zero tells GIMP to use a slider and a one tells GIMP to use a spinner. I've used a spinner for all of my options, with the exception of the Satin Color. You use what works best for you.
Simple enough right?
Look through the other Parameters shown above and consider why I chose the values I did. Some of them were for personal preference. Others, I had a good reason why I did so. The last 3 Parameter values will ultimately be used in the Colorize plugin:
Colors > Colorize...(Take a look at that plugin to see what's available there. The plugin is where I chose my values from and based on the results each would provide to the image)
So, with the above information, when the script is run, the user will be able to enter the Image Height, Image Width, Satin Color, Color Saturation, and Color Lightness. Those values will be "carried" into the script using the corresponding parameters: "height", "width", "hue", "saturation", and "lightness".
Now, you might be wondering if there are other types of Parameters you can use and the answer is "yes". I'm only discussing the Adjustment Parameter because it's the one we're using for this tutorial. However, if you would like to see what other ones are available, you can download a modified version of a script that comes with the GIMP source code called "test-sphere.scm"
Here's the code. Copy and paste it into your favorite text editor and save it as a script. I had to modify this script so that it would actually work. For some reason, the version I got in the source code would not work, so I "fixed" it. If you open this script, the comments section at the top explains the various types of Parameters you can use and what values they need to work.
; This is a a test script to show and test the possibilities of the
; Script-Fu parameter API.
;
; ----------------------------------------------------------------------
; SF-ADJUSTMENT
; is only useful in interactive mode, if you call a script from
; the console, it acts just like a normal SF-VALUE
; In interactive mode it creates an adjustment widget in the dialog.
;
; Usage:
; SF-ADJUSTMENT "label" '(value lower upper step_inc page_inc digits type)
;
; type is one of: SF-SLIDER(0), SF-SPINNER(1)
;
; ----------------------------------------------------------------------
; SF-COLOR
; creates a color button in the dialog. It accepts either a list of three
; values for the red, green and blue components or a color name in CSS
; notatation
;
; Usage:
; SF-COLOR "label" '(red green blue)
; SF-COLOR "label" "color"
;
; ----------------------------------------------------------------------
; SF-FONT
; creates a font-selection widget in the dialog. It returns a fontname as
; a string. There are two new gimp-text procedures to ease the use of this
; return parameter:
;
;  (gimp-text-fontname image drawable
;                      x-pos y-pos text border antialias size unit font)
;  (gimp-text-get-extents-fontname text size unit font))
;
; where font is the fontname you get. The size specified in the fontname
; is silently ignored. It is only used in the font-selector. So you are
; asked to set it to a useful value (24 pixels is a good choice) when
; using SF-FONT.
;
; Usage:
; SF-FONT "label" "fontname"
;
; ----------------------------------------------------------------------
; SF-BRUSH
; is only useful in interactive mode. It will create a widget in the control
; dialog. The widget consists of a preview area (which when pressed will
; produce a popup preview ) and a button with the "..." label. The button will
; popup a dialog where brushes can be selected and each of the
; characteristics of the brush can be modified.
;
; The actual value returned when the script is invoked is a list
; consisting of Brush name, opacity, spacing and brush mode in the same
; units as passed in as the default value.
;
; Usage:
; SF-BRUSH "Brush" '("Circle (03)" 100 44 0)
;
; Here the brush dialog will be popped up with a default brush of Circle (03)
; opacity 100 spacing 44 and paint mode of Normal (value 0).
; If this selection was unchanged the value passed to the function as a
; parameter would be '("Circle (03)" 100 44 0).
;
; ----------------------------------------------------------------------
; SF-PATTERN
; Only useful in interactive mode. It will create a widget in the control
; dialog. The widget consists of a preview area (which when pressed will
; produce a popup preview ) and a button with the "..." label. The button will
; popup a dialog where patterns can be selected.
;
; Usage:
; SF-PATTERN "Pattern" "Maple Leaves"
;
; The value returned when the script is invoked is a string containing the
; pattern name. If the above selection was not altered the string would
; contain "Maple Leaves"
;
; ----------------------------------------------------------------------
; SF-GRADIENT
; Only useful in interactive mode. It will create a widget in the control
; dialog. The widget consists of a button containing a preview of the selected
; gradient. If the button is pressed a gradient selection dialog will popup.
;
; Usage:
; SF-GRADIENT "Gradient" "Deep Sea"
;
; The value returned when the script is invoked is a string containing the
; gradient name. If the above selection was not altered the string would
; contain "Deep Sea"
;
; ----------------------------------------------------------------------
; SF-PALETTE
; Only useful in interactive mode. It will create a widget in the control
; dialog. The widget consists of a button containing a preview of the selected
; palette. If the button is pressed a palette selection dialog will popup.
;
; Usage:
; SF-PALETTE "Palette" "Named Colors"
;
; The value returned when the script is invoked is a string containing the
; palette name. If the above selection was not altered the string would
; contain "Named Colors"
;
; ----------------------------------------------------------------------
; SF-FILENAME
; Only useful in interactive mode. It will create a widget in the control
; dialog. The widget consists of a button containing the name of a file.
; If the button is pressed a file selection dialog will popup.
;
; Usage:
; SF-FILENAME "Environment Map"
;             (string-append "" gimp-data-directory "/scripts/beavis.jpg")
;
; The value returned when the script is invoked is a string containing the
; filename.
;
; ----------------------------------------------------------------------
; SF-DIRNAME
; Only useful in interactive mode. Very similar to SF-FILENAME, but the
; created widget allows to choose a directory instead of a file.
;
; Usage:
; SF-DIRNAME "Image Directory" "/var/tmp/images"
;
; The value returned when the script is invoked is a string containing the
; dirname.
;
; ----------------------------------------------------------------------
; SF-OPTION
; Only useful in interactive mode. It will create a widget in the control
; dialog. The widget is a combo-box showing the options that are passed
; as a list. The first option is the default choice.
;
; Usage:
; SF-OPTION "Orientation" '("Horizontal" "Vertical")
;
; The value returned when the script is invoked is the number of the
; chosen option, where the option first is counted as 0.
;
; ----------------------------------------------------------------------
; SF-ENUM
; Only useful in interactive mode. It will create a widget in the control
; dialog. The widget is a combo-box showing all enum values for the given
; enum type. This has to be the name of a registered enum, without the
; "Gimp" prefix. The second parameter speficies the default value, using
; the enum value's nick.
;
; Usage:
; SF-ENUM "Interpolation" '("InterpolationType" "linear")
;
; The value returned when the script is invoked corresponds to chosen
; enum value.
;
; ----------------------------------------------------------------------


(define (script-fu-test-sphere radius
                               light
                               shadow
                               bg-color
                               sphere-color
                               brush
                               text
                               multi-text
                               pattern
                               gradient
                               gradient-reverse
                               font
                               size)
                               ;unused-palette
                               ;unused-filename
                               ;unused-orientation
                               ;unused-interpolation
                               ;unused-dirname
                               ;unused-image
                               ;unused-layer
                               ;unused-channel
                               ;unused-drawable
                ;unused-vectors)

(let* (
        (width (* radius 3.75))
        (height (* radius 2.5))
        (img (car (gimp-image-new width height RGB)))
        (drawable (car (gimp-layer-new img width height RGB-IMAGE
                                       "Sphere Layer" 100 NORMAL-MODE)))
        (radians (/ (* light *pi*) 180))
        (cx (/ width 2))
        (cy (/ height 2))
        (light-x (+ cx (* radius (* 0.6 (cos radians)))))
        (light-y (- cy (* radius (* 0.6 (sin radians)))))
        (light-end-x (+ cx (* radius (cos (+ *pi* radians)))))
        (light-end-y (- cy (* radius (sin (+ *pi* radians)))))
        (offset (* radius 0.1))
        (text-extents (gimp-text-get-extents-fontname multi-text
                                                      size PIXELS
                                                      font))
        (x-position (- cx (/ (car text-extents) 2)))
        (y-position (- cy (/ (cadr text-extents) 2)))
        (shadow-w 0)
        (shadow-x 0)
        )

    (gimp-context-push)

    (gimp-image-undo-disable img)
    (gimp-image-add-layer img drawable 0)
    (gimp-context-set-foreground sphere-color)
    (gimp-context-set-background bg-color)
    (gimp-edit-fill drawable BACKGROUND-FILL)
    (gimp-context-set-background '(20 20 20))

    (if (and
         (or (and (>= light 45) (<= light 75))
             (and (<= light 135) (>= light 105)))
         (= shadow TRUE))
        (let ((shadow-w (* (* radius 2.5) (cos (+ *pi* radians))))
              (shadow-h (* radius 0.5))
              (shadow-x cx)
              (shadow-y (+ cy (* radius 0.65))))
          (if (< shadow-w 0)
              (begin (set! shadow-x (+ cx shadow-w))
                     (set! shadow-w (- shadow-w))))

          (gimp-ellipse-select img shadow-x shadow-y shadow-w shadow-h
                               CHANNEL-OP-REPLACE TRUE TRUE 7.5)
          (gimp-context-set-pattern pattern)
          (gimp-edit-bucket-fill drawable PATTERN-BUCKET-FILL MULTIPLY-MODE
                            100 0 FALSE 0 0)))

    (gimp-ellipse-select img (- cx radius) (- cy radius)
                         (* 2 radius) (* 2 radius) CHANNEL-OP-REPLACE TRUE FALSE 0)

    (gimp-edit-blend drawable FG-BG-RGB-MODE NORMAL-MODE
                     GRADIENT-RADIAL 100 offset REPEAT-NONE FALSE
                     FALSE 0 0 TRUE
                     light-x light-y light-end-x light-end-y)

    (gimp-selection-none img)

    (gimp-context-set-gradient gradient)
    (gimp-ellipse-select img 10 10 50 50 CHANNEL-OP-REPLACE TRUE FALSE 0)

    (gimp-edit-blend drawable CUSTOM-MODE NORMAL-MODE
                     GRADIENT-LINEAR 100 offset REPEAT-NONE gradient-reverse
                     FALSE 0 0 TRUE
                     10 10 30 60)

    (gimp-selection-none img)

    (gimp-context-set-foreground '(0 0 0))
    (gimp-floating-sel-anchor (car (gimp-text-fontname img drawable
                                                       x-position y-position
                                                       multi-text
                                                       0 TRUE
                                                       size PIXELS
                                                       font)))

    (gimp-image-undo-enable img)
    (gimp-display-new img)

    (gimp-context-pop)
  )
)

(script-fu-register "script-fu-test-sphere"
  _"_Sphere..."
  "Simple script to test and show the usage of the new Script-Fu API extensions."
  "Spencer Kimball, Sven Neumann"
  "Spencer Kimball"
  "1996, 1998"
  ""
  SF-ADJUSTMENT "Radius (in pixels)" '(100 1 5000 1 10 0 0)
  SF-ADJUSTMENT "Lighting (degrees)" '(45 0 360 1 10 1 1)
  SF-TOGGLE     "Shadow"             TRUE
  SF-COLOR      "Background color"   "white"
  SF-COLOR      "Sphere color"       "red"
  SF-BRUSH      "Brush"              '("Circle (03)" 1.0 44 0)
  SF-STRING     "Text"               "Tiny-Fu rocks!"
  SF-TEXT       "Multi-line text"    "Hello,\nWorld!"
  SF-PATTERN    "Pattern"            "Maple Leaves"
  SF-GRADIENT   "Gradient"           "Deep Sea"
  SF-TOGGLE     "Gradient reverse"   FALSE
  SF-FONT       "Font"               "Agate"
  SF-ADJUSTMENT "Font size (pixels)" '(50 1 1000 1 10 0 1)
 ; SF-PALETTE    "Palette"            "Default"
 ; SF-FILENAME   "Environment map"
 ;               (string-append gimp-data-directory
 ;                             "/scripts/images/beavis.jpg")
 ; SF-OPTION     "Orientation"        '("Horizontal"
 ;                                      "Vertical")
 ; SF-ENUM       "Interpolation"      '("InterpolationType" "linear")
 ; SF-DIRNAME    "Output directory"   "/var/tmp/"
;  SF-IMAGE      "Image"              -1
;  SF-LAYER      "Layer"              -1
;  SF-CHANNEL    "Channel"            -1
;  SF-DRAWABLE   "Drawable"           -1
;  SF-VECTORS    "Vectors"            -1
)

(script-fu-menu-register "script-fu-test-sphere"
                         "<Toolbox>/Xtns/Languages/Script-Fu/Test")
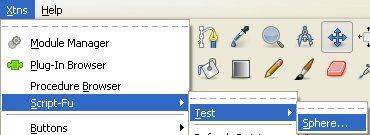
The test-sphere script, once added to your scripts folder, will appear here in the GIMP menu (Filters > Script-Fu > Test > Sphere...)
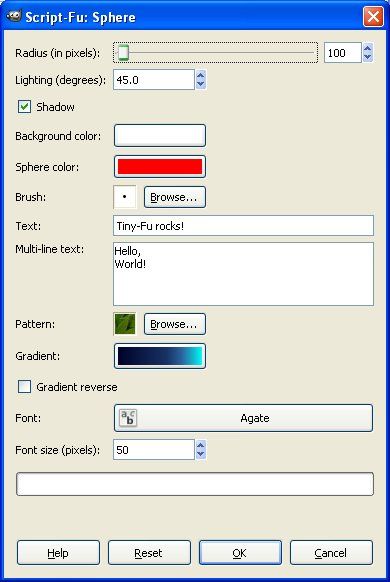
Here's a sample screenshot of the dialog box created by the test-sphere script:
Now that we have that under our belt, let's talk about how we manually create the satin layer and then we'll come back to our script.
Creating the Satin Layer (How to accomplish it manually)To save space, I'll run through the steps to creating the satin in bullet fashion rather than with all of the images and such. You can always refer to the tutorial if you need to. Here are the steps (my steps listed below don't follow the step numbers in the tutorial exactly, but are listed in the same order. I've done this for clarity purposes):
1. Create a new image of the desired height, width and type and add a "satin" layer to the image and fill it with white.
2. Set the foreground color to black; background color to white.
3. Set the gradient tool to Linear with No Repeat and mode to Difference. I've used the adaptive supersampling in the tutorial, but for the script, I've disabled that feature as it's not really necessary.
4. With the gradient tool active,
randomly drag across the "satin" layer
several times.
5. Run the Gaussian Blur filter on the "satin" layer (horizontal 25 / vertical 25).
6. Run the Edge Detect filter on the "satin" layer (Sobel Algorithm / amount 2.0 / Black edge behavior.)
7. Invert the Colors of the "satin" layer and adjust the levels, setting the Low Input level to 135.
8. Run the Gaussian Blur filter again on the "satin" layer to smooth things out a bit (horizontal 2.5, vertical 2.5).
9. Create a "noise" layer and fill it with a medium gray (RGB 128 128 128)
10. Then, on the "noise" layer add Scattered Noise (~0.20 for R, G, & B/ 0 on the Alpha / Correlated & Independent unchecked).
11. Run the Motion Blur filter on the "noise" layer (Linear Blur Type / Length 15 / Angle 135)
12. Run the Displacement Filter on the "noise" layer using the "satin" layer as the displacement map. The settings we use are: 15 for X-displacement / 15 for Y-displacement / Smear on the Edges).
13. Merge the "noise" and "satin" layers together and colorize.
This, my friends, is how we create satin! Not too bad.....13 steps. Well, in order to make our script run, we're going to need more than that! But, don't fret, I've done the work for you and will explain exactly what we need to make this thing work. Plus, once we're done, you'll be able to start creating/troubleshooting your own scripts. Yay you!
Back to the Template Script - Assigning the VariablesWe've already discussed how the user can now set the image height, width, satin color, color saturation, and color lightness. But, as in the scripts we've previously prepared, we need some variables to work with. I've already given them to you in the script under the let* block. They are as follows:
(let*
(
(theImage)
(satinLayer)
(noiseLayer)
(counter 15)
(X1)
(X2)
(Y1)
(Y2)
)
"theImage" - will be used to create the image and be the Image ID "carrier" so it can be called upon later. Right now, it is set to a "null value". We will set it later in the script.
"satinLayer" - will be used to create the "satin" layer and "carry" the "satin" layer ID number so it can be called upon later. Right now, it is set to a "null value". We will set it later in the script.
"noiseLayer" - will be used to create the "noise" layer and "carry" the "noise" layer ID number so it can be called upon later. Right now, it is set to a "null value". We will set it later in the script.
"counter" - if you look at the satin tutorial steps above, you'll notice in step 4, I have the words "randomly" and "several" in bold. The "counter" variable will be used to "decide" how many "several" is. In this case, I've set "several" to 15. I want GIMP to draw a gradient 15 times on the "satin" layer. I'll explain later why I've called it "counter". "Randomly" will be discussed next.
"X1", "X2", "Y1", "Y2" (I'll explain the last four variables at one time since they do the same thing.) - again, look at step 4 in the satin tutorial above. I've highlighted the word "randomly" because we want GIMP to add the gradients a different way each time a gradient is created (in our case it will be "15" as set by the variable "counter".) To manually create a gradient in GIMP, you choose the gradient tool and pick on a spot on the image, identified by an X, Y value (X1, Y1) and then you drag to some other location, which is identified by another X, Y value (X2, Y2). So, we will tell GIMP to randomly pick values from the image and then use them as start/stopping points each time the gradient tool is run (again 15 times.) That way, no two satin layers will look alike! Cool huh?!
Creating the ScriptNow it's time to to put our script together. So, with your template script open, place your cursor somewhere in the red box (in your text editor, silly, not your monitor!) and let's start coding!

Giving the Script a "Temporary Operating State"The first line of code we'll add to our script is a "non-essential" command; the script will run fine without it, but it is a nice option to include. Scripts often change certain GIMP settings in order to function correctly (for example, changing the foreground/background colors.) Well, what happens if you don't tell GIMP to "undo" those changes? They'll still be there when the script is finished running. So, if you had your foreground/background colors set up the way you wanted them BEFORE you ran the script and you didn't tell GIMP to reset them back when the script was done, you would have to go in and reset them. That's not difficult, but an annoyance. So, we'll do our users a favor and code our scripts to work in a "temporary operating state." To do that, we have to use 2 lines of code: one to initiate the "temporary" state, the other to deactivate the "temporary" state and reset the previous user settings. The code is as follows:
(gimp-context-push) - Initiates the temporary state.
(gimp-context-pop) - Deactivates the temporary state and resets the previous user defaults.
If you plan on using this feature, you have to use BOTH of the commands or you will receive an error. For the time being, we only need to add the first command (I'll tell you when to add the other one). So, add this line of code to your script template (I'm gonna add a comment to this line of code - you should get in the habit of commenting your scripts, but for the remainder of the tutorial, I won't add comments.) Here's what our code should look like (remember type this in the red box as shown above).
Make sure you hit the enter key after you enter the command!.
; Puts GIMP in a temporary operating state
(gimp-context-push)Create the ImageNow, we need to create our image. An image requires a width, height, and type. We've told GIMP that the user will be defining the width and height as Parameters (recall our discussion above). For this exercise, we'll define the image type. In the let* section of the script, we set up some variables to use in the script. The first one, "theImage" is going to be used to create the image. We didn't actually create the image in the let* section, so we will define it now. To define the variable, we use the set! function (we've used this before in GIMP Scripting 102a/B)/> in combination with the command for creating a new image. Type the following code into your script:
(set! theImage (car (gimp-image-new width height RGB-IMAGE)))A quick refresher (I won't be going over this again): notice the "car" in front of the command for creating an image.....everything in parenthesis (gimp-image-new width height RGB-IMAGE) is a list. The "car" tells GIMP to get the first value in that list, the ID if you will, and assign it to "theImage" variable. Now, you see that we've assigned a value to "theImage", which will represent our image (the image ID). Where did the values for "width" and "height" come from? The user entered them when the script was first run and they were carried into the script using the names "width" and "height"! Since they have a value, we can just "plug them in" wherever we need to! We also, specified that we want it to be and RGB image.
Temporarily Disable the UndoSince we're creating a brand new image, let's just turn off the "undo" option temporarily. There's really no need to leave "undo" available. This is another one of those commands that isn't necessary to run the script, but is a nice feature. If you want to see what happens if you don't use the command, simply place the command behind a comment (semi-colon) and run the script. What will happen is that you'll be able to undo each step the script did. If the command is used, you don't get an undo option. Also, this is another command which works in tandem: one to initiate the disabling of the undo feature, the other to enable the undo feature. Here are the required codes (note you have to specify the image you're working with - for us, it's the variable "theImage"):
(gimp-image-undo-disable theImage) - Initiates the disabling of the undo feature.
(gimp-image-undo-enable theImage) - Re-enables the undo feature.
Enter, this command now (I'll tell you when to add the other one):
(gimp-image-undo-disable theImage)Creating the "Satin" Layer and Adding it to the ImageWith our image now created, we need to create the Satin Layer and then add it to the image. As previously explained above, we set aside the "satinLayer" variable in the let* block to be our "satinLayer". Just as we did with "setting" the image variable, we need to "set" our "satinLayer" variable. As you may recall from the previous tutorials, to create a new layer requires several parameters. I won't cover them in great detail here, but if you don't recall what they are, make sure you check out the command in the Procedure Browser. The command we use to create our layer looks like so (type this into your script):
(set! satinLayer (car (gimp-layer-new theImage width height RGBA-IMAGE "Satin Layer" 100 NORMAL-MODE)))Again, we're using "theImage", "width", "height" information that we either created or was passed into the script by the user!
Now, we need to add the "satinLayer" to the image. To do that, enter the following into your script:
(gimp-image-add-layer theImage satinLayer 0)We've just told GIMP to add the satinLayer to theImage at position 0 (zero) or the top of the layer stack.
Here's what your script should look like up to this point. How are you doing?
(define (toolbox-satin-script height width hue saturation lightness)

    (let*
    (
    (theImage)
    (satinLayer)
    (noiseLayer)
    (counter 15)
    (X1)
    (X2)
    (Y1)
    (Y2)
    )

(gimp-context-push)
(set! theImage (car (gimp-image-new width height RGB-IMAGE)))
(gimp-image-undo-disable theImage)
(set! satinLayer (car (gimp-layer-new theImage width height RGBA-IMAGE "Satin Layer" 100 NORMAL-MODE)))
(gimp-image-add-layer theImage satinLayer 0)

)    ;closing parenthesis for let* block
)    ;closing parenthesis for the define function block


(script-fu-register     "toolbox-satin-script"
            "<Toolbox>/Xtns/Satin..."
            "Create a Satin Fabric"
            "Script Author's Name"
            "Script Author's Contact Information"
            "Script Creation/Modification Date"
            ""
            SF-ADJUSTMENT      "Image Height"     '(400 50 10000 1 10 0 1)
            SF-ADJUSTMENT      "Image Width"     '(400 50 10000 1 10 0 1)
            SF-ADJUSTMENT      "Satin Color (order of color is R O Y G B V - Red is zero)" '(20 0 360 1 10 0 0)
            SF-ADJUSTMENT      "Color Saturation - Its Depth" '(50 10 100 1 10 0 1)
              SF-ADJUSTMENT      "Color Lightness - Its Brightness" '(0 -50 70 1 10 0 1)
)
In keeping with our tutorial, we need to set the foreground and background colors to black and white, respectively. We will use these colors to create our gradient blend. Remember, that since we're adding the context-push/pop commands to the script, whatever the colors were before the script was run, will be reset after the script is finished!
To change the foreground/background colors, we add these two lines of code:
(gimp-context-set-background '(255 255 255))
(gimp-context-set-foreground '(0 0 0))Now, let's fill our "satinLayer" with the background color (white). Add this code to your script:
(gimp-drawable-fill satinLayer BACKGROUND-FILL)Creating the Gradient Blend - The Basis for our SatinHere's the fun part!! In the scripts we've previously created, everything was done by single commands with no "decision-making" process on the part of the script. Well, all that's about to change! As I previously described in my discussion of the variables and in the reiteration of the tutorial steps, to create our base for our satin, a linear gradient blend needs to be made "several" times in "random" locations. To handle the "several" times part of it, we assigned the variable "counter" to 15 and also set up some 4 variables (X1, Y1, X2, Y2) to give us some "random" locations to start and stop the blend operation. Why did I choose "15" for the counter? After several tests, it seemed to give me the best results.
So, how do we get this to work? Well, there's the LONG way (which we're not going to do!) and the easy way (which we are going to do! Yay us!) The long way would be typing in the code 15 times to generate the blend at random locations. No way! Ain't happening. We're going to use a nifty function called "while" to accomplish our goal, which by-the-way, we only have to enter once (much better than 15!)
The form for our "while" function looks like this (shown in quotes. Not syntactically correct, but shown this way for reading purposes):
"(while (our counter is greater than zero)
Set random values to X1 (starting X-coordinate), Y1 (starting Y-coordinate), X2 (ending X-coordinate), Y1 (ending Y-coordinate),
Do a gradient blend using settings from the tutorial starting and stopping at the random coordinates set in the previous step.
Reduce the value of the counter by 1
)"
So, as long as our "counter" is greater than 0 (zero), random X and Y values will be set and a gradient will be added to our "satinLayer"! That's why I called the variable "counter"! It keeps count for me (and GIMP!)
Here's the actual code to enter into your script (highlighted in red).
(while (> counter 0)
(set! X1 (rand width))
(set! X2 (rand width))
(set! Y1 (rand height))
(set! Y2 (rand height))
(gimp-edit-blend satinLayer FG-BG-RGB-MODE DIFFERENCE-MODE GRADIENT-LINEAR 100 0 REPEAT-NONE FALSE FALSE 3 0.2 TRUE X1 Y1 X2 Y2)
(set! counter (- counter 1))
) ; the closing parenthesis for the "while" functionWe used the gimp-edit-blend command to create our gradient blends. That command needs to know which layer we're running it on (satinLayer), blend mode (FG-BG-RGB-MODE), paint mode (DIFFERENCE-MODE), gradient type (GRADIENT-LINEAR), opacity (100), offset (0), repeat (REPEAT-NONE), reverse (FALSE), supersample (FALSE), max-depth (Goes with supersampling. Even though we've chosen no supersampling, we need to put values here or GIMP will give us an error. I just put 3, which is the default in GIMP, but 0 would work fine.), threshold (Same as max-depth explanation), dither (TRUE), X1 (starting X), Y1 (starting Y), X2 (ending X), Y2 (ending ). These values are taken right from the tutorial. Also, the command "rand" is understood by GIMP to pick a random number. I want a random number chosen based on the image width and image height. So, we plugin the width and height parameters we already know. See the Procedure Browser for other acceptable values or more information on this command.
One last thing of importance. Notice how the "math" is done:
> counter 0 and
- counter 1In our typical way of doing math, we would say, "counter > 0" or "counter - 1". In Scheme, the operator (>, -, + , *) is listed first. As another example: 2 * 5 would be listed * 2 5. The order of the values in the equation is also important. (- counter 1) and (- 1 counter) would not return the same thing. In the first case, it would be counter - 1 (say 15 - 1), but in the latter case it would be 1 - counter or 1 - 15.
How you doing so far?
Ok, so far we've created our image, set the colors, and created a satin layer on which we've added 15 gradient blends in difference mode. That brings us up to Step 5 of 13! Lots yet to go, but it's all pretty straightforward. After you added that last bit of code (the "while" stuff), make sure you place your cursor
outside the last parenthesis of the "while" statement (notice there is a single parenthesis below the command where we reduce the counter by 1). This last parenthesis is part of the "while" function and we're finished with that part (I added a comment after it in the code above to make sure you saw it.)
Satin Layer OperationsThe next several operations take place on the "satinLayer" (steps 5-8 of tutorial steps listed above). Rather than break down each step into a separate heading, I think it's ok to cover them at one time. As the tutorial states, after creating the gradient blends, we need to run the Gaussian Blur filter on the "satinLayer". To do that, we use the following code (enter this code into your script):
(plug-in-gauss RUN-NONINTERACTIVE theImage satinLayer 20.0 20.0 1)This says we're running the plugin in a non-interactive fashion (no need for user input here, although you could give the user the ability to set his/her own options by replacing "RUN-NONINTERACTIVE" with "RUN-INTERACTIVE"). We'll be using the specified image (theImage). The layer we will be running it on is "satinLayer" and we'll be using horizontal/vertical blur settings of 20.0 and using the RLE blur method (represented by the value of "1"). See the Procedure Browser for other acceptable values or more information on this command.
Next, we want to run the Edge Detect filter. To do that, we use this command:
(plug-in-edge RUN-NONINTERACTIVE theImage satinLayer 2.0 2 0)The plugin is again run in a non-interactive fashion using theImage. We're running it on the satinLayer with an edge detection amount of 2.0, wrap mode 2 (which represents "Black") and using the Sobel edge detection method (represented by the value 0). See the Procedure Browser for other acceptable values or more information on this command.
Now, we need to invert the colors of the satinLayer. Simple enough. Add the following command to your script:
(gimp-invert satinLayer)After that, we want to adjust the Color Levels of the satinLayer. To do that, we use the following command and enter in the settings from the tutorial:
(gimp-levels satinLayer HISTOGRAM-VALUE 135 255 1.0 0 255)Here, we tell GIMP to use the levels tool on the satinLayer. We want it to run on the value channel (HISTOGRAM-VALUE), with the low input set at (135), high input (255), gamma - the middle spinner in the input level (1.0), low output (0) and hight output (255). These settings are taken right out of the tutorial steps. See the Procedure Browser for other acceptable values or more information on this command.
Lastly, we need to run the Gaussian Blur filter again. Since I've already explained the various settings above, I won't explain them again, other than to state that we're using a horizontal/vertical blue of 2.5. Enter the command as shown:
(plug-in-gauss RUN-NONINTERACTIVE theImage satinLayer 2.5 2.5 1)Creating the "Noise" Layer and Running Operations on itAs we just did, I'll cover several tutorial steps under this heading. I'm sure if you've read everything so far, you probably have a pretty good idea how to wrap this up....it's not that hard, is it? So, the next thing we should do is change the foreground color to a medium gray, using the following command:
(gimp-context-set-foreground '(128 128 128))This color will be used to fill our noiseLayer.
Next, we need to create the noiseLayer. To do that, let's simply make a copy of our satinLayer. We do that like so:
(set! noiseLayer (car (gimp-layer-copy satinLayer TRUE)))We've just told GIMP to set the variable "noiseLayer" to be the result of the list for the command (gimp-layer-copy), which is a copy of the satinLayer and the TRUE value says we want the copy to have an Alpha Channel. See the Procedure Browser for other acceptable values or more information on this command.
Now that we've created the noiseLayer, let's fill it with our new foreground color. To do that, enter the following command into your script:
(gimp-drawable-fill noiseLayer FOREGROUND-FILL)Nothing new here. We've used this one before!
With our noiseLayer ready, let's add it to our image. We've seen this one before. We need to tell GIMP which layer we are adding to which image and where in layer stack. We show that by entering this command:
(gimp-image-add-layer theImage noiseLayer -1)The -1 tells GIMP to add it to the layer stack above the current active layer, which in our case is the satinLayer. See the Procedure Browser for other acceptable values for this command.
The next step isn't required, but I'm throwing it in anyway! Let's give our noiseLayer a name. Ultimately, this layer will be merged with the previously created satinLayer and the name will be gone. But, if we didn't merge them, it would be nice to know what the layer represents. To give it a name, enter this command:
(gimp-drawable-set-name noiseLayer "Noise Layer")Now, as in the tutorial steps, we need to change the blend mode of the noise layer to Overlay. To do that, enter the following into your script:
(gimp-layer-set-mode noiseLayer OVERLAY-MODE)Nothing earth-shattering here. See the Procedure Browser for other acceptable values or more information on this command.
What would a "noise" layer be without any noise?! Well, let's add some. But, before we do, I need to let you know that this is where the script differs between GIMP 2.2 and 2.4. It's not a big difference (only the command name is different), but if you don't use the right command, your script won't work in desired version of GIMP. Since I'm using GIMP 2.4, I'll show you that command first and then I'll follow-up with the command for GIMP 2.2 users.
GIMP 2.4 users, enter the following command into your script, to add the desired noise:
(plug-in-rgb-noise RUN-NONINTERACTIVE theImage noiseLayer 0 0 0.2 0.2 0.2 0)GIMP 2.2 users, add this command to your script:
(plug-in-scatter-rgb RUN-NONINTERACTIVE theImage noiseLayer 0 0 0.2 0.2 0.2 0)Notice the only difference is the plugin name. What we've instructed GIMP to do is run the appropriate RGB Noise plugin in a non-interactive fashion (we don't want user input here, although as previously explained, we could allow it). We're running it on theImage, specifically on the noiseLayer. Using the settings from the tutorial, we're not applying it to the channels independently (0), nor are we making the noise correlated (0). We are setting the red noise channel to 0.2, the green noise channel to 0.2 and the blue noise channel to 0.2. Lastly, we're not using any noise in the alpha channel - 0. See the Procedure Browser for other acceptable values or more information on this command.
Next, we need to run the motion blur filter on the noiseLayer. To do that, enter the following command into your script (the remaining steps will apply to all GIMP versions):
(plug-in-mblur RUN-NONINTERACTIVE theImage noiseLayer 0 15 135 0 0)Again, we're running the plugin in a non-interactive fashion on theImage and specifically on the noiseLayer. We're using a linear blur type (value of 0), a length of 15 and an angle of 135. This particular command requires two other values, a center-x and center-y value to know where it should start the blur. The linear blur type does not use this information, so I just set the x and y values to 0. See the Procedure Browser for other acceptable values or more information on this command.
Now we need to displace our noiseLayer using the satinLayer as the displacement map. To do that, add the following command to your script:
(plug-in-displace RUN-NONINTERACTIVE theImage noiseLayer 15 15 1 1 satinLayer satinLayer 1)As before, we're running the displace filter non-interactively on theImage, specifically the noiseLayer. We're setting the displace x amount to 15, the displace y amount to 15. We're telling GIMP to use the x displace value as shown by the number 1 (represents TRUE, zero would be FALSE) and the same for the y displace value (set to 1). We're using the satinLayer as the displacement map for both x and y directions and the edge behavior is Smear (value of 1). See the Procedure Browser for other acceptable values or more information on this command.
The last thing we are going to do to the noiseLayer is merge it with the satinLayer. To accomplish this, enter the following command into your script:
(gimp-image-merge-down theImage noiseLayer CLIP-TO-IMAGE)This one's pretty straightforward. We're telling GIMP to run the layer merge operation on theImage, specifically merging down the noiseLayer and setting the merge type to CLIP-TO-IMAGE. See the Procedure Browser for other acceptable values or more information on this command. Pretty easy.
Coloring our SatinThe last thing we need to do to create our satin, is to apply the color selected by the user. We've moved along pretty well and most of you are probably thinking this step is a piece of cake. And, it is, BUT, before we get too far ahead ourselves, we need to cover a very important detail.
When we were running the steps on the satinLayer, we could easily type in the variable "satinLayer" and GIMP would know which layer we were referring to. Likewise, with the noiseLayer. However, when we merged the noiseLayer with the satinLayer, GIMP no longer treats the satinLayer as the "satinLayer". The satinLayer as we knew it no longer exists. In fact, neither does the noiseLayer. If we were to try and tell GIMP to color the satinLayer, it would return an error.
What's a poor GIMP script writer to do? Easy. Just because our satinLayer doesn't exist, doesn't mean we can't use the variable again. All that we have to do is reassign the variable to the layer we want to use. After the merge took place, there was only one layer left in our image and it was made active. All we have to do is tell GIMP to get the ID of the active layer and assign it to our variable, "satinLayer", and then we can once again refer to our satinLayer with a variable. To do that, add the following command to your script:
(set! satinLayer (car (gimp-image-get-active-layer theImage)))Simply get the active layer of theImage and give it the name satinLayer!
In the tutorial, I used the Colorize tool the Colorize tool to give the satin color. There are other methods you could use, but this is the one I chose. When we first set up the script, we let the user choose the "satin color", "saturation", and "lightness" and we carried those values into the script using these names: "hue", "saturation", and "lightness". To color our script using the Colorize tool, add the following command to your script:
(gimp-colorize satinLayer hue saturation lightness)We tell GIMP to use the Colorize tool on the new satinLayer using the hue, saturation and lightness settings, which in this case were set by the user when the script was first run.
Resetting GIMP and Displaying our Final ProductRemember at the beginning of the script, we added a line to disable the undo option and run GIMP in a temporary state? Well, now here is where we set everything back! To enable the gimp undo operation, add the following to your script:
(gimp-image-undo-enable theImage)To reset the colors and other changes that the script made, add this line of code:
(gimp-context-pop)Lastly, we need to display our image. To do that, add the following code:
(gimp-display-new theImage)That's it! Our script is now complete. The script for GIMP 2.4 should look like this (GIMP 2.2 users should look almost identical with the exception of the noise plugin command):
(define (toolbox-satin-script height width hue saturation lightness)

    (let*
    (
    (theImage)
    (satinLayer)
    (noiseLayer)
    (counter 15)
    (X1)
    (X2)
    (Y1)
    (Y2)
    )

(gimp-context-push)
(set! theImage (car (gimp-image-new width height RGB-IMAGE)))
(gimp-image-undo-disable theImage)
(set! satinLayer (car (gimp-layer-new theImage width height RGBA-IMAGE "Satin Layer" 100 NORMAL-MODE)))
(gimp-image-add-layer theImage satinLayer 0)
(gimp-context-set-background '(255 255 255))
(gimp-context-set-foreground '(0 0 0))
(gimp-drawable-fill satinLayer BACKGROUND-FILL)

(while (> counter 0)
(set! X1 (rand width))
(set! X2 (rand width))
(set! Y1 (rand height))
(set! Y2 (rand height))
(gimp-edit-blend satinLayer FG-BG-RGB-MODE DIFFERENCE-MODE GRADIENT-LINEAR 100 0 REPEAT-NONE FALSE FALSE 3 0.2 TRUE X1 Y1 X2 Y2)
(set! counter (- counter 1))
) ; closing parenthesis for while function

(plug-in-gauss RUN-NONINTERACTIVE theImage satinLayer 20.0 20.0 1)
(plug-in-edge RUN-NONINTERACTIVE theImage satinLayer 2.0 2 0)
(gimp-invert satinLayer)
(gimp-levels satinLayer HISTOGRAM-VALUE 135 255 1.0 0 255)
(plug-in-gauss RUN-NONINTERACTIVE theImage satinLayer 2.5 2.5 1)
(gimp-context-set-foreground '(128 128 128))
(set! noiseLayer (car (gimp-layer-copy satinLayer TRUE)))
(gimp-drawable-fill noiseLayer FOREGROUND-FILL)
(gimp-image-add-layer theImage noiseLayer -1)
(gimp-drawable-set-name noiseLayer "Noise Layer")
(gimp-layer-set-mode noiseLayer OVERLAY-MODE)
(plug-in-rgb-noise RUN-NONINTERACTIVE theImage noiseLayer 0 0 0.2 0.2 0.2 0)
(plug-in-mblur RUN-NONINTERACTIVE theImage noiseLayer 0 15 135 0 0)
(plug-in-displace RUN-NONINTERACTIVE theImage noiseLayer 15 15 1 1 satinLayer satinLayer 1)
(gimp-image-merge-down theImage noiseLayer CLIP-TO-IMAGE)
(set! satinLayer (car (gimp-image-get-active-layer theImage)))
(gimp-colorize satinLayer hue saturation lightness)
(gimp-image-undo-enable theImage)
(gimp-context-pop)
(gimp-display-new theImage)
) ; closing parenthesis for let* block
) ; closing parenthesis for main function

(script-fu-register     "toolbox-satin-script"
            "<Toolbox>/Xtns/Satin..."
            "Create a Satin Fabric"
            "Script Author's Name"
            "Script Author's Contact Information"
            "Script Creation/Modification Date"
            ""
            SF-ADJUSTMENT      "Image Height"     '(400 50 10000 1 10 0 1)
            SF-ADJUSTMENT      "Image Width"     '(400 50 10000 1 10 0 1)
            SF-ADJUSTMENT      "Satin Color (order of color is R O Y G B V - Red is zero)" '(20 0 360 1 10 0 0)
            SF-ADJUSTMENT      "Color Saturation - Its Depth" '(50 10 100 1 10 0 1)
              SF-ADJUSTMENT      "Color Lightness - Its Brightness" '(0 -50 70 1 10 0 1)
)
Check yours over and if everything looks correct, save it to your scripts folder:
C:\Program Files\GIMP-2.0\share\gimp\2.0\scripts and add an "scm" extension to the end. Windows users: Windows has a nasty habit of adding a "txt" extension to the end of script files when using Notepad/WordPad. In Notepad, make sure you choose "All Files" under the Save As Type dropdown (don't use Text files) and in WordPad, make sure you use "Text Document" under the Save As Type Dropdown. I know it's a pain/confusing, but that's the way it is.
Then, go to the Toolbox Window and select Xtns > Script-Fu > Refresh Scripts to see if the script is there. If everything has been done correctly, the script should appear in: Xtns > Satin...
Give it a run and hopefully you'll have some satin you can share with your friends!
Well, this have been a long tutorial and I'm sure you need a break (as do I!). So, go over this tutorial and try it out using different settings. See what you can come up with. In the last tutorial, I'll show you how to take the script and make it work on an open image, which really isn't hard at all.
Until then, happy GIMPing!
Art


 Lots easier to run scripts than it is to make them and all that reading, ugh!
