Many changes have taken place within GIMP since this tutorial was written. The steps described below may be slightly outdated, but I will be updating this and other scripting tutorials to reflect those changes. For the time being, I'm posting them here as a placeholder. While there have been some changes, the information provided below is still a good learning tool.Welcome class to my final tutorial on scripting! In this tutorial, we will modify the satin script we created in
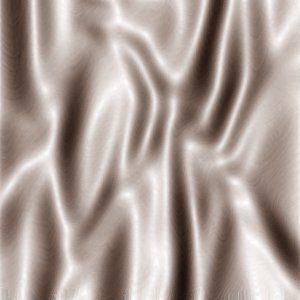
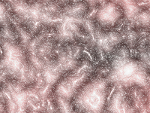
GIMP Scripting 103A and make it a script that runs from an open image. The output from our tutorial will look like this:
If you haven't read my previous scripting tutorials or need a refresher, I suggest you take a look at them. There's a lot of basic information, that will help you along the way. The tutorials can be found here:
GIMP Scripting 101GIMP Scripting 102AGIMP Scripting 102BGIMP Scripting 103AThe steps to make the satin script work as an <Image> script are very similar to the steps in our <Toolbox> script. In fact, there are not many differences at all. However, I felt it best to break the steps into two separate tutorials for clarity purposes and not overwhelm you with too much at one time. So, I'll only cover the
differences between the two scripts and let you copy and paste the duplicate code into your template script. We won't be using the Script-Fu Console and Procedure Browser as we did in the first 3 tutorials; however, you might want to have the Procedure Browser open so you can look at the required parameters/additional information for each command.
This tutorial is written using GIMP version 2.4.2. For users of GIMP version 2.2.x, one command needs to be changed in order for the script to operate correctly. I will explain which command it is and how to modify it correctly at the appropriate time. So, GIMP 2.2.x users, feel free to follow right along!With all of that out of the way, let's begin!
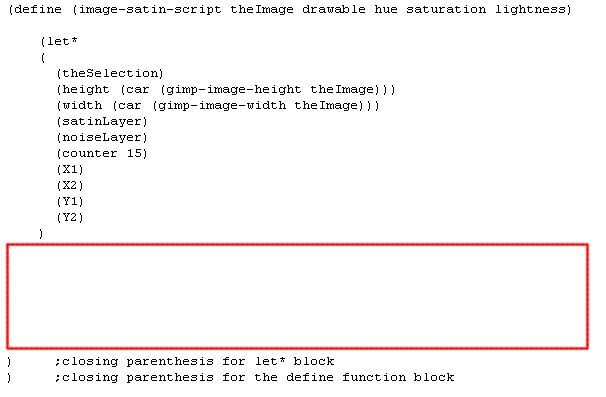
Download the Template ScriptI've prepared a Template Script for you to work with that has some basic information filled in for you (ie..the main function with user input parameters, the variables we'll be using, the registration information, and setting up the user input area with the required values.) The Template Script also has only 2 comments at the very end next to the two closing parentheses. This is to help you know which parenthesis goes where. (Nothing kills a script faster than incorrect parenthesis placement. It's also one of the most frustrating things in scripting!) So, please copy and paste the code for the template script into your favorite text editor.
(define (image-satin-script theImage drawable hue saturation lightness)

    (let*
    (
   (theSelection)
   (height (car (gimp-image-height theImage)))
   (width (car (gimp-image-width theImage)))
   (satinLayer)
   (noiseLayer)
   (counter 15)
   (X1)
   (X2)
   (Y1)
   (Y2)
    )


)   ;closing parenthesis for let* block
)   ;closing parenthesis for the define function block

(script-fu-register    "image-satin-script"
         "<Image>/Filters/Render/Satin..."
         "Create a Satin Fabric"
         "Art Wade"
         "Art Wade"
         "Feb 2008"
         "RGB*"
         SF-IMAGE      "image" 0
         SF-DRAWABLE   "drawable" 0
         SF-ADJUSTMENT     "Satin Color (order of color is R O Y G B V - Red is zero)" '(20 0 360 1 10 0 0)
         SF-ADJUSTMENT     "Color Saturation - Its Depth" '(50 10 100 1 10 0 1)
            SF-ADJUSTMENT     "Color Lightness - Its Brightness" '(0 -50 70 1 10 0 1)
)
Take a look at the following information in the script (I've highlighted certain features which I will explain below):
(define (image-satin-script
theImage drawable hue saturation lightness)
(script-fu-register "image-satin-script"
"<Image>/Filters/Render/Satin..."
"Create a Satin Fabric"
"Script Author's Name"
"Script Author's Contact Information"
"Script Creation/Modification Date"
"RGB*"
SF-IMAGE "image" 0
SF-DRAWABLE "drawable" 0
SF-ADJUSTMENT "Satin Color (order of color is R O Y G B V - Red is zero)" '(20 0 360 1 10 0 0)
SF-ADJUSTMENT "Color Saturation - Its Depth" '(50 10 100 1 10 0 1)
SF-ADJUSTMENT "Color Lightness - Its Brightness" '(0 -50 70 1 10 0 1)
The define section of the script is where we define our main function with the name "image-satin-script" and identify function parameters, which in this case are: "theImage", "drawable", "hue", "saturation", and "lightness". (You may need to type this function name into the Procedure Browser to make sure there isn’t a function already there with this name. If there is, modify the function name appropriately. Make sure you also change the function name in the “script-fu-register section” to ensure the script operates correctly). The parameters are "carriers" of the information assigned to them by the user in the dialog box that appears when the script is first run. Notice that there's a parameter in the define section that corresponds to a parameter in the register section of the script (our parameters are listed as "SF-ADJUSTMENT......"). In order to create a dialog box, we have to tell GIMP what parameters we want want and then decide how it should appear in the dialog box. Using the information above, GIMP will create a dialog box that looks like so:
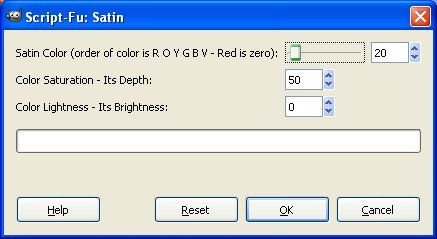
If you recall from our last tutorial, we had two Parameters called "width" and "height" that let the user specify the image dimensions, but in this script we don't have that. The reason for this is because we will use a command to obtain the image dimensions and assign them to the variables "width" and "height" and then use those values to create our layers. Additionally, you may also recognize that we've added the Parameters "SF-IMAGE" and "SF-DRAWABLE" to our script and those Parameters correspond to "theImage" and "drawable" in the define section of the script.
Remember (and this is very important), <Image> scripts must have:
SF-IMAGE "image" 0
SF-DRAWABLE "drawable" 0
as the first Parameters in the register section of the script AND in that order. (Please see GIMP Scripting 102b if you need a refresher on this.) The labels "image" and "drawable" can be anything you want, but I suggest for clarity you keep it simple as I have above. "theImage" will carry the Image ID into the script which we will need throughout our script.
Alos notice two other things about this script that is different than our <Toolbox> script template: The menu location has changed to Filters > Render > Satin... using this call:
"<Image>/Filters/Render/Satin..."
and we've told GIMP the script can work only on images that are RGB and RGB with alpha channels using the following:
"RGB*"
I won't cover how the Parameters are created to allow user input as I covered that in GIMP Scripting 103A. If you would like to see what other Parameters are available and the various requirements to make them work, you can download the code for a modified version of a script that comes with the GIMP source code called "test-sphere.scm" You can find it in the GIMP Scripting 103A tutorial.
As described above, we no longer let the user decide the size of the image, after all, the image is already open and has dimensions established. We will let the image size dictate the size of the satin and noise layers. The user will, however, still choose the satin color, saturation and lightness as before.
Assigning the VariablesWe've already discussed how the user can now set the satin color, color saturation, and color lightness. But, as in the scripts we've previously prepared, we need some variables to work with. I've already given them to you in the script under the let* block. They are as follows:
(let*
(
(theSelection)
(height (car (gimp-image-height image)))
(width (car (gimp-image-width image)))
(satinLayer)
(noiseLayer)
(counter 15)
(X1)
(X2)
(Y1)
(Y2)
)
"theSelection" - we want our script to work on the whole layer. If there are any active selections when the script is run, we will temporarily store them in a channel using this variable and turn off the selection, so the script can run on the whole layer. At the end of the script, we will recall the selection for the user and delete the temporary channel. Right now, it is set to a "null value". We will set it later in the script.
"height" - this variable has already been set to the image's height, using the command (car (gimp-image-height image))) - notice that since this variable is assigned under the let* block, we don't have to use the 'set!' function. We will use this variable to create our "satinLayer" height.
"width" - this variable has already been set to the image's width, using the command (car (gimp-image-width image))) - notice that since this variable is assigned under the let* block, we don't have to use the 'set!' function. We will use this variable to create our "satinLayer" width.
"satinLayer" - will be used to create the "satin" layer and "carry" the "satin" layer ID number so it can be called upon later. Right now, it is set to a "null value". We will set it later in the script. This is exactly the same way we did it in our satin <Toolbox> script.
"noiseLayer" - will be used to create the "noise" layer and "carry" the "noise" layer ID number so it can be called upon later. Right now, it is set to a "null value". We will set it later in the script. This is exactly the same way we did it in our satin <Toolbox> script.
"counter" - if you look at the satin tutorial steps above, you'll notice in step 4, I have the words "randomly" and "several" in bold. The "counter" variable will be used to "decide" how many "several" is. In this case, I've set "several" to 15. I want GIMP to draw a gradient 15 times on the "satin" layer. I'll explain later why I've called it "counter". "Randomly" will be discussed next. This is exactly the same way we did it in our satin <Toolbox> script.
"X1", "X2", "Y1", "Y2" (I'll explain the last four variables at one time since they do the same thing.) - again, look at step 4 in the satin tutorial above. I've highlighted the word "randomly" because we want GIMP to add the gradients a different way each time a gradient is created (in our case it will be "15" as set by the variable "counter".) To manually create a gradient in GIMP, you choose the gradient tool and pick on a spot on the image, identified by an X, Y value (X1, Y1) and then you drag to some other location, which is identified by another X, Y value (X2, Y2). So, we will tell GIMP to randomly pick values from the image and then use them as start/stopping points each time the gradient tool is run (again 15 times.) That way, no two satin layers will look alike! Cool huh?! This is exactly the same way we did it in our satin <Toolbox> script.
Creating the ScriptNow, it’s time to put our script together. So, with your template script open, place your cursor somewhere in the red box and let's start coding!
 Giving the Script a “Temporary Operating State”
As with our <Toolbox> Satin Script, we want our script to instruct GIMP to work in a “temporary operating state” which allows the scripts to change various settings while the script is running and then set them back the way they were prior to running the script. This isn’t a required feature, but it is a nice thing to do. For this to work, we need two commands which work in tandem with one another. They are as follows:
(gimp-context-push) - Initiates the temporary state.
(gimp-context-pop) - Deactivates the temporary state and resets the previous user defaults.
For now, we only need to initiate the “temporary operating state” (we’ll add the other command later in the script) so enter the following command into your script:
(gimp-context-push)Enable an Undo GroupSince we’re creating our satin layer on an open image and it takes several steps to create the satin, it would be nice to allow the user the undo all of the steps performed by the script as a single operation. (Please note: this is different than the “Undo Disabling” commands we used in our <Toolbox> Script). Similar to the “temporary operating state” commands, an “undo group” is not a requirement in any script, but it is a nice thing to implement. Also, as with the “temporary operating state” the commands, to create an “undo group” we need two commands to work in tandem with one another:
(gimp-undo-push-group-start theImage) - Initiates the “undo group”.
(gimp-undo-push-group-end theImage) - Deactivates the “undo group”.
Enter this command into your script (I’ll tell you when to add the other one):
(gimp-undo-push-group-start theImage)Temporarily Disabling Active SelectionsWe now need to instruct our script to temporarily turn off any active selections that might exist on the image. Why? Well, if we don’t there’s a possibility that our script won’t give the desired results because many of the steps will only work on the selected area. We want the script to affect the whole layer. Sometimes you may want your script to operate on a selection and you don’t need to go through this process. But, for our purposes we need to turn the selections off temporarily. One way you could disable the selected area is simply turn it off. However, that might not make the user happy. What if they wanted that selection and didn’t know our script was going to arbitrarily delete it? Well, we would have an unhappy customer which is not what we want! So, we’ll not only turn it off, but we’ll tell GIMP to save it and then restore it again prior to ending the script. This way, everyone stays happy!
If you recall from above, in the let* block we set aside a variable to store the selection in a channel (We called it “theSelection”). Well, now here’s where we implement it. Using the set! function, we tell GIMP to get the selected area from the image and assign the head of that list to “theSelection” by using the following (enter this into your script):
(set! theSelection (car (gimp-selection-save theImage)))Now that we’ve temporarily stored our selection in a channel, let’s go ahead and turn off our selection using this command:
(gimp-selection-none theImage)The Satin StepsWell, at this point, I’m gonna let you off easy! The steps for creating the satin are now exactly the same as our <Toolbox> Script. So, we can just simply copy and paste that code in! Since we’re not creating a new image, I’ve left out the commands for that as well as the commands for the image-undo-disable.
GIMP 2.4 users, copy and paste this code into your script:(set! satinLayer (car (gimp-layer-new theImage width height RGBA-IMAGE "Satin Layer" 100 NORMAL-MODE)))
(gimp-image-add-layer theImage satinLayer 0)
(gimp-context-set-background '(255 255 255))
(gimp-context-set-foreground '(0 0 0))
(gimp-drawable-fill satinLayer BACKGROUND-FILL)
(while (> counter 0)
(set! X1 (rand width))
(set! X2 (rand width))
(set! Y1 (rand height))
(set! Y2 (rand height))
(gimp-edit-blend satinLayer FG-BG-RGB-MODE DIFFERENCE-MODE GRADIENT-LINEAR 100 0 REPEAT-NONE FALSE FALSE 3 0.2 TRUE X1 Y1 X2 Y2)
(set! counter (- counter 1))
)
(plug-in-gauss RUN-NONINTERACTIVE theImage satinLayer 20.0 20.0 1)
(plug-in-edge RUN-NONINTERACTIVE theImage satinLayer 2.0 2 0)
(gimp-invert satinLayer)
(gimp-levels satinLayer HISTOGRAM-VALUE 135 255 1.0 0 255)
(plug-in-gauss RUN-NONINTERACTIVE theImage satinLayer 2.5 2.5 1)
(gimp-context-set-foreground '(128 128 128))
(set! noiseLayer (car (gimp-layer-copy satinLayer TRUE)))
(gimp-drawable-fill noiseLayer FOREGROUND-FILL)
(gimp-image-add-layer theImage noiseLayer -1)
(gimp-drawable-set-name noiseLayer "Noise Layer")
(gimp-layer-set-mode noiseLayer OVERLAY-MODE)
(plug-in-rgb-noise RUN-NONINTERACTIVE theImage noiseLayer 0 0 0.2 0.2 0.2 0)
(plug-in-mblur RUN-NONINTERACTIVE theImage noiseLayer 0 15 135 0 0)
(plug-in-displace RUN-NONINTERACTIVE theImage noiseLayer 15 15 1 1 satinLayer satinLayer 1)
(gimp-image-merge-down theImage noiseLayer CLIP-TO-IMAGE)
(set! satinLayer (car (gimp-image-get-active-layer theImage)))
(gimp-colorize satinLayer hue saturation lightness)
(set! satinLayer (car (gimp-layer-new theImage width height RGBA-IMAGE "Satin Layer" 100 NORMAL-MODE)))
(gimp-image-add-layer theImage satinLayer 0)
(gimp-context-set-background '(255 255 255))
(gimp-context-set-foreground '(0 0 0))
(gimp-drawable-fill satinLayer BACKGROUND-FILL)
(while (> counter 0)
(set! X1 (rand width))
(set! X2 (rand width))
(set! Y1 (rand height))
(set! Y2 (rand height))
(gimp-edit-blend satinLayer FG-BG-RGB-MODE DIFFERENCE-MODE GRADIENT-LINEAR 100 0 REPEAT-NONE FALSE FALSE 3 0.2 TRUE X1 Y1 X2 Y2)
(set! counter (- counter 1))
)
(plug-in-gauss RUN-NONINTERACTIVE theImage satinLayer 20.0 20.0 1)
(plug-in-edge RUN-NONINTERACTIVE theImage satinLayer 2.0 2 0)
(gimp-invert satinLayer)
(gimp-levels satinLayer HISTOGRAM-VALUE 135 255 1.0 0 255)
(plug-in-gauss RUN-NONINTERACTIVE theImage satinLayer 2.5 2.5 1)
(gimp-context-set-foreground '(128 128 128))
(set! noiseLayer (car (gimp-layer-copy satinLayer TRUE)))
(gimp-drawable-fill noiseLayer FOREGROUND-FILL)
(gimp-image-add-layer theImage noiseLayer -1)
(gimp-drawable-set-name noiseLayer "Noise Layer")
(gimp-layer-set-mode noiseLayer OVERLAY-MODE)
(plug-in-scatter-rgb RUN-NONINTERACTIVE theImage noiseLayer 0 0 0.2 0.2 0.2 0)
(plug-in-mblur RUN-NONINTERACTIVE theImage noiseLayer 0 15 135 0 0)
(plug-in-displace RUN-NONINTERACTIVE theImage noiseLayer 15 15 1 1 satinLayer satinLayer 1)
(gimp-image-merge-down theImage noiseLayer CLIP-TO-IMAGE)
(set! satinLayer (car (gimp-image-get-active-layer theImage)))
(gimp-colorize satinLayer hue saturation lightness)
HOW COOL WAS THAT?! I’m all for easy and that was just about as easy as they come…..of course, we did have to create it the first time!
Reactivating the SelectionsWe’ve added all the instructions for creating the satin and it’s time to put the finishing touches on our <Image> Script. We want to turn on any selection that we previously deactivated so the user can have it available again once the script is finished. So, we tell GIMP to reload the selection by using this command (make sure you add this code
after the code you just pasted in!):
(gimp-selection-load theSelection)Next, let’s delete the channel that was used to store the selection using this command:
(gimp-image-remove-channel theImage theSelection)Disabling the Undo GroupWe’ve already instructed GIMP to allow the script steps to be undone in one step by enabling an Undo Group. Here’s where we instruct GIMP to disable that feature. Add the following code to your script:
(gimp-undo-push-group-end theImage)Instruct GIMP That a Change Has Been Made to the ImageIn order for the image display to refresh and show us the output, we have to tell the script to do so. Add this command to your script to refresh the display:
(gimp-displays-flush)Deactivating the “Temporary Operating State”To reset the colors and other changes that the script made, add this line of code:
(gimp-context-pop)That’s it! Your <Image> Satin Script is complete! The script for GIMP 2.4 should look like this (GIMP 2.2 users should look almost identical with the exception of the noise plugin command):
(define (image-satin-script theImage drawable hue saturation lightness)
(let*
(
(theSelection)
(height (car (gimp-image-height theImage)))
(width (car (gimp-image-width theImage)))
(satinLayer)
(noiseLayer)
(counter 15)
(X1)
(X2)
(Y1)
(Y2)
)
(gimp-context-push)
(gimp-undo-push-group-start theImage)
(set! theSelection (car (gimp-selection-save theImage)))
(gimp-selection-none theImage)
(set! satinLayer (car (gimp-layer-new theImage width height RGBA-IMAGE "Satin Layer" 100 NORMAL-MODE)))
(gimp-image-add-layer theImage satinLayer 0)
(gimp-context-set-background '(255 255 255))
(gimp-context-set-foreground '(0 0 0))
(gimp-drawable-fill satinLayer BACKGROUND-FILL)

(while (> counter 0)

(set! X1 (rand width))
(set! X2 (rand width))
(set! Y1 (rand height))
(set! Y2 (rand height))
(gimp-edit-blend satinLayer FG-BG-RGB-MODE DIFFERENCE-MODE GRADIENT-LINEAR 100 0 REPEAT-NONE FALSE FALSE 3 0.2 TRUE X1 Y1 X2 Y2)
(set! counter (- counter 1))

)

(plug-in-gauss RUN-NONINTERACTIVE theImage satinLayer 20.0 20.0 1)
(plug-in-edge RUN-NONINTERACTIVE theImage satinLayer 2.0 2 0)
(gimp-invert satinLayer)
(gimp-levels satinLayer HISTOGRAM-VALUE 135 255 1.0 0 255)
(plug-in-gauss RUN-NONINTERACTIVE theImage satinLayer 2.5 2.5 1)
(gimp-context-set-foreground '(128 128 128))
(set! noiseLayer (car (gimp-layer-copy satinLayer TRUE)))
(gimp-drawable-fill noiseLayer FOREGROUND-FILL)
(gimp-image-add-layer theImage noiseLayer -1)
(gimp-drawable-set-name noiseLayer "Noise Layer")
(gimp-layer-set-mode noiseLayer OVERLAY-MODE)

(plug-in-rgb-noise RUN-NONINTERACTIVE theImage noiseLayer 0 0 0.2 0.2 0.2 0)
(plug-in-mblur RUN-NONINTERACTIVE theImage noiseLayer 0 15 135 0 0)
(plug-in-displace RUN-NONINTERACTIVE theImage noiseLayer 15 15 1 1 satinLayer satinLayer 1)
(gimp-image-merge-down theImage noiseLayer CLIP-TO-IMAGE)
(set! satinLayer (car (gimp-image-get-active-layer theImage)))
(gimp-colorize satinLayer hue saturation lightness)
(gimp-selection-load theSelection)
(gimp-image-remove-channel theImage theSelection)
(gimp-undo-push-group-end theImage)
(gimp-displays-flush)
(gimp-context-pop)
) ;closing parenthesis for let* block
) ;closing parenthesis for the define function block
(script-fu-register "image-satin-script"
"<Image>/Filters/Render/Satin..."
"Create a Satin Fabric"
"Art Wade"
"Art Wade"
"Feb 2008"
"RGB*"
SF-IMAGE "image" 0
SF-DRAWABLE "drawable" 0
SF-ADJUSTMENT "Satin Color (order of color is R O Y G B V - Red is zero)" '(20 0 360 1 10 0 0)
SF-ADJUSTMENT "Color Saturation - Its Depth" '(50 10 100 1 10 0 1)
SF-ADJUSTMENT "Color Lightness - Its Brightness" '(0 -50 70 1 10 0 1)
)
Check yours over and, if everything looks correct, save it to your scripts folder:
C:\Program Files\GIMP-2.0\share\gimp\2.0\scripts and add an "scm" extension to the end. Windows users: Windows has a nasty habit of adding a "txt" extension to the end of script files when using Notepad/WordPad. In Notepad, make sure you choose "All Files" under the Save As Type dropdown (don't use Text files) and in WordPad, make sure you use "Text Document" under the Save As Type Dropdown. I know it's a pain/confusing, but that's the way it is.
Then, go to the Toolbox Window and select Xtns > Script-Fu > Refresh Scripts. If everything has been done correctly, the script should appear in an open image under Filters > Render > Satin...
Give it a run and hopefully you'll have some satin you can share with your friends!
Well, this is my last tutorial for awhile on scripting. I hope this series has been informative and not too overwhelming.
Happy Scripting!
Art


 . I hope fencepost doesn't mind, but i pdf'd his tutorials. the the text scrolls are a bit rough but the documents are intact.