(this tutorial is also available over on my site
ragnarb.com)
In this second tutorial on Making Comics with GIMP, we’ll cover how to create panels, gutters and panel borders. Panel borders are the lines around each drawing, or panel, of a comic, while gutters are the spaces between the panels. We’ll start of where we left of in the
previous tutorial on page setup, with a page with a margin defined by a path (the red line in the image below).

If you would rather jump straight in, you can create a new image, and simply select everything with the Select>All (Ctrl-A) menu, and then shrink the selection to how wide a margin you want by choosing Select>Shrink… Finally, convert this selection to a path, by choosing Select>To Path, and you’ll have page you can use as starting point.
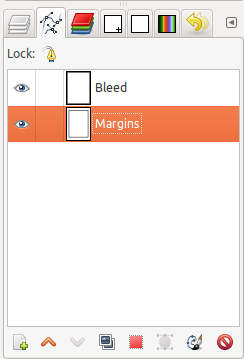
Making PanelsFor making the panels we’ll be using the selection tools to create paths. So the first thing you want to do is open up the ‘Paths Dialog’ (Windows>Dockable Dialogs>Paths). If you followed my
previous tutorial you’ll have a Bleed and Margins paths in place. The margin defines the outer border of all our panels, and we’ll be cutting it up to build our individual panels.
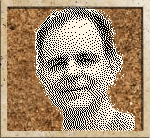
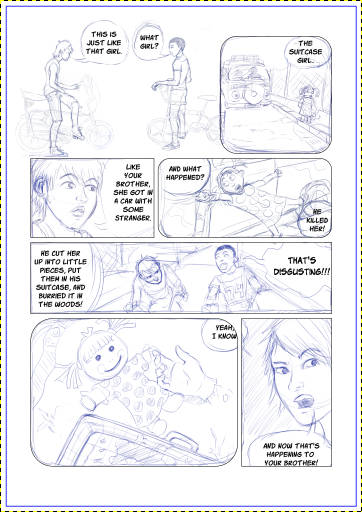
Creating panel borders is the last thing I do before I begin inking the comic. I like to have the freedom to easily change panel and page layout while pencilling, so I don’t want to be restricted by a fixed panel layout. The page I’m using in this tutorial is from a short nine page comic I’m working on.
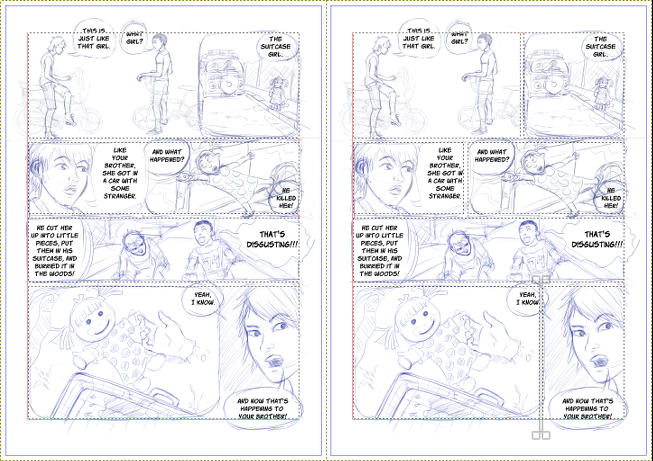
This page has a number of different panels. The first one is completely borderless, simply showing the two boys on their bikes against a white background. The second, fourth and sixth panels have rounded corners, to indicate they are part of the story one of the boys is telling, while the rest are standard rectangluar panels. In addition to rounded and square panels, I’ll be covering how to make panels with diagonal borders.
In the GuttersBefore you start you need to decide on the width of your gutters. Many comics have narrower vertical gutters, than horizontal ones. This connects the panels better together in the reading direction, be it left to right or right to left, and makes them easier to read. If you’re unsure how wide your gutters should be, just take a ruler to your favorite comic books, and use that as a reference.
For my comic I’m using 0.0825″ vertical gutters, and 0.1″ horizontal gutters. Since I’m working at 400 pixels per inch (ppi), this means my vertical gutters are 33 pixels (0.0825*400=33), and my horizontal ones are 40 pixels (0.1*400=40).
 Cutting Up Panels
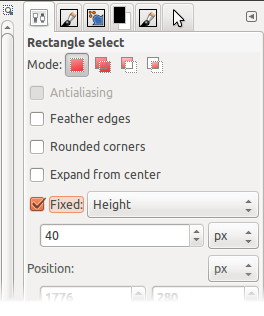
The first thing we need to do is convert the margins to a selection. The easiest way to do this is to select the ‘Margins’ path in the ‘Paths Dialog’, and hit the ‘Path to Selection’ button (the red square with a dotted line around it) at the bottom of the dialog. We’ve now selected the area where we’re going to make our panels. Pick the ‘Rectangle Select Tool’ (R), and in the ‘Tool Options’ dialog, check the ‘Fixed’ option. We’ll start by doing horizontal cuts, so from the pop-up menu next to where it says ‘Fixed’, choose Height, and set it to 40 pixels. This will constrain our selection to 40 pixels in height.
Holding down Ctrl, drag across our current selection, from the left margin to the right margin, where you want your horizontal gutters to be. Holding down Ctrl, subtracts from the current selection, so will cut up our selected area. You’ll notice that no matter where you move the mouse, the height of your selection is fixed to 40 pixels, so you get a clear 40 pixel wide gutter across the page.
With the horizontal cuts in place, it’s time to move on to the vertical ones. In the ‘Tool Options’ for the ‘Rectangle Select Tool’, switch from Height to Width, and set the width to 33 pixels. Now cut up the panels like you did before, holding down Ctrl, but this time we only want to cut one panel at a time, and not go all the way across the page from margin to margin.
Now we should have all our panels selected, with a crawling ant borders around them. Convert this selection to paths, either using Select>To Path from the menu, or the ‘Selection to Path’ button at the bottom of the ‘Paths Dialog’ (it’s the round red button, with bezier handles on it). Rename the newly created paths to ‘Panels’ in the ‘Paths Dialog’. If this page only had normal rectangular panels, we would be done now, and could move on to drawing the panel borders (see below), but since we have both borderless and rounded panels, we still have some work to do.
Borderless PanelsThe first panel has no borders at all, so we want to remove that panel from the ‘Panels’ paths we just created. There are two ways to do this. We could have done it in the previous step, before converting our selection to paths, by simply holding down Ctrl and using the ‘ Rectangle Select’ tool (without the ‘Fixed’ option), and dragging over the panel to subtract it from the selection.
If you already have the paths in place, you can use the ‘Paths Tool’ to remove a panel afterwards. With the ‘Panels’ paths selected in the ‘Paths Dialog’, use the ‘Paths Tool’ to shift-click the four corners of the first panel to select them, and hit Backspace to delete them.
Rounded PanelsWith the ‘Panels’ paths selected in the ‘Paths Dialog’, convert the paths to a selection (red square button). This should select all our panels. We’ll start with rounding of the corners of the second panel, so we need to deselect all the other panels using the ‘Rectangle Select’ tool while holding down Ctrl to subtract them from the selection. This should leave us with only panel number two selected. To make the corners of our selection round, go into the Select>Round Rectangle… menu, and choose a percentage for how much rounding your want. 30% is about right for what I want. You can always try different values, and just Undo if you don’t like the result. 100% will turn your selection into a circle. Finally, turn your selection into a path (the round red button in the ‘Paths Dialog’), and name the path ‘Panel 2′. Repeat the steps for panels 4 and 6, so we have three rounded panels.
Merging the Paths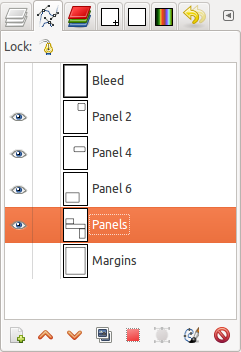
We should now have three paths with nice round corners. We want to merge these round panels with the rectangular ones we have from before. To do this, we first need to delete the rectangular panels for panels two, four and six, so we can replace them with our rounded versions. You can do this the same way you removed the first panel, as explained in Borderless Panels above, either by using the ‘Paths Tool’ to select and delete them, or converting them to a selection, deselecting those panels, and converting them back into a path. Note that the ‘Paths Tool’, selects and moves in one go, so try to keep your mouse still when selecting points with it.
Finally hide the Margins and Bleed paths, while showing all the ‘Panels’ paths. Then simply right click the ‘Paths Dialog’ and choose ‘Merge Visible Paths’ from the pop up menu. Name the merged paths to ‘Panels’ in the Paths dialog.
Diagonal Gutters
Our sample page lacks any diagonal panel borders, though these are quite common in comics, especially manga. There are several ways to make diagonal panel borders. The quick and easy way is to simply use the ‘Lasso Tool’ in a similar way you used the rectangle select tool previously to cut up the panels. Just hold down Ctrl, and mark out the gutter by hand. The width may not be 100% accurate, but it probably won’t be noticeable.
An alternative is to create square panels, and the use the ‘Path Tool’ to edit the resulting paths. With two corners on either side of a gutter selected, you can use the arrow keys to move them accurately around to where you want them.
A third method is to use the rectangle select tool, to mark out a vertical or horizontal selection, and then rotating that selection. To rotate a selection only, and not the selected part of the drawing, you need to choose the ‘Transform: Selection’ (the red box) option, in the ‘Tool Options’ for the ‘Rotate Tool’. Then you can rotate and move the selection in place, without touching the drawing underneath. Once you have the selection where you want it, create a path from this single gutter. In the Paths dialog select the main ‘Panels’ paths, that contains all the panels, and make them into a selection. Then select your new diagonal cut path, and subtract this from the selection. You do this by holding Ctrl, as you hit the red square ‘Path to Selection’ button in the ‘Paths Dialog’. You can now turn this new selection into paths, and you have panels with diagonal gutters. Rinse and repeat for multiple diagonal cuts.
Generally I’ll just use the first or second method, as they are a whole lot quicker than the last one.
Drawing the Panel BordersThe paths we have in place now will not be visible when we export our page, so we need to draw them in. For this we want to create a separate layer for the panel borders. Go to the ‘Layers Dialog’, hit the + sign at the bottom left corner, and create a new transparent layer called ‘Panel Borders’. Place this layer above your artwork.
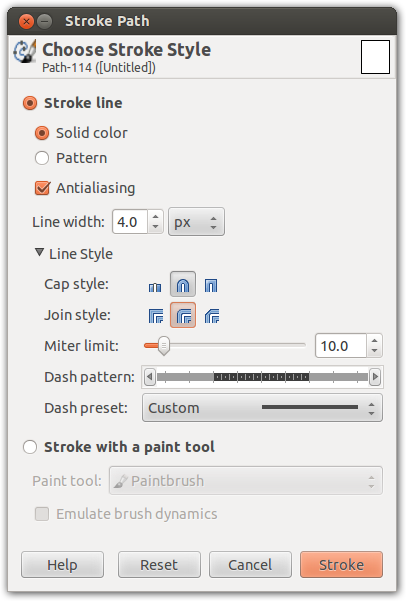
With the ‘Panel Borders’ layer selected, go to the ‘Paths Dialog’, and right click the ‘Panels’ path, and choose ‘Stroke Path…’ from the pop-up menu. From here you can choose a variety of different stroke styles to use for your panel borders. For my comic, I’m using 4 pixel wide lines, with a rounded Cap and Join style to make the corners of my rectangular panels slightly rounded.
The lines are drawn using the Foreground Color, so changing that, will change the colors your panel borders are drawn in. You can also use the paint tool to stroke the paths in different styles, using any brush you have in GIMP, for some creative panel borders.
If you have panels that go of the edge of the page, you’ll notice that the path that’s at the very edge of the page also gets drawn, which you probably don’t want. Fortunately paths can exist outside the page area, so a simple solution to this is to use the ‘Paths Tool’ to select the paths at the very edge of the page, and then using the arrow keys to shift them 10 or pixels outside of the canvas. This way they still function to select the panel, but you don’t get a panel border at the very edge of the page.
Masking Out the GuttersIn addition to creating panel borders, the paths we’ve created can be used to mask of the gutters, so you don’t accidentally draw or color into them.
Create a new transparent layer called ‘Panel Mask’. Convert the ‘Panels’ paths to selection, and invert the selection using Select>Invert (Ctrl+I) from the menu. Fill (Edit>Fill with FG Color) the selection with white, black, or whatever color you want to use for your gutters. Place this layer above your artwork, but below your panel borders, and it will effectively hide any any lines drawn outside the panels.
For my sample page, this would hide the artwork of the first panel, as it’s not within any panel borders. An easy solution to this, is simply to place the ink and color layers for that first panel above the masking layer, while rest of the artwork goes underneath it. I can always use the ‘Panels’ selection, to delete any lines from these layer that accidentally cover the other panels.
I guess that’s the gist of it. You should now be able to use these techniques to create panels of any shape or size. As for me, I still have a lot of work left on this page. Besides inking and coloring it, I need to add speech bubbles, which will likely all be subjects for future tutorials in this series. So what are you waiting for, stop reading this and get to work on your comic book…which is probably what I should be doing too.