Configuring a tif print with wide border
Mon Aug 07, 2023 5:17 pm
not sure if this is the right forum
I am trying to put a wide white border around a photo then take the file to a printer
My portfolio case has dimensions of 12.5 x 16 inches in the inside so the paper print cannot be larger than that
I tried to export as a tif, but it came out as a white square, my photo was missing. I think this had something to do with alpha channel.
I have tried making two separate files then copy pasting the photo on top of a white square file which would be underneath as the border but when I try to change the size of the photo the underlying border file size also changes.
if the total width of the print can be no more than 12.5 and the height 16, and with a wide white border, the photo should be around 9 inches wide
Any suggestions appreciated.
Re: Configuring a tif print with wide border
Mon Aug 07, 2023 11:17 pm
Apuleius wrote:not sure if this is the right forum
I am trying to put a wide white border around a photo then take the file to a printer
My portfolio case has dimensions of 12.5 x 16 inches in the inside so the paper print cannot be larger than that
I tried to export as a tif, but it came out as a white square, my photo was missing. I think this had something to do with alpha channel.
I have tried making two separate files then copy pasting the photo on top of a white square file which would be underneath as the border but when I try to change the size of the photo the underlying border file size also changes.
if the total width of the print can be no more than 12.5 and the height 16, and with a wide white border, the photo should be around 9 inches wide
Any suggestions appreciated.
Sounds like you have two layers
The white square and the photo on top
Treat them as such. Make sure your photo layer is selected.
Then scale the layer - not the image. (Top menu - layer down to scale layer and in the window that opens, give it the dimensions you want. Then ok.
Also some image viewers that you can print from will give your image a white border anyhow - if the paper you are printing on is white.
Re: Configuring a tif print with wide border
Tue Aug 08, 2023 6:21 am
Apuleius wrote:not sure if this is the right forum
...snip...if the total width of the print can be no more than 12.5 and the height 16, and with a wide white border, the photo should be around 9 inches wide
Any suggestions appreciated.
Lots can go wrong when you set up for a printer. First is the printing resolution, pixels-per-inch (ppi) and for a photograph quality 300 ppi is the custom.
Does not have to be that see: https://www.gimp-forum.net/Thread-Image-size-in-Gimp
For your project 12.5" x 16" that makes a background canvas 3750 x 4800 pix.
- 01-tifprint.jpg (67.26 KiB) Viewed 2941 times
Open your photo File -> Open as Layers and that plants it bang in the center of the canvas
For scaling just that layer use: Layer -> Scale Layer and if you use inches as the units you cal set something 9" x whatever, the Width and Height are linked, change one changes the other. If you have to scale up or down a great deal then go back and review your original photograph.
- 02-tifprint.jpg (106.6 KiB) Viewed 2941 times
You still have two layers. Tiff format can keep layers as pages, that is probably why you printed a blank canvas. Two ways.
(1) Image -> Merge Visible Layers (keeps any transparency) or Image -> Flatten Image (loses transparency)
(2) Use the tif export and untick Save Layers.
- 03-tifprint.jpg (133.37 KiB) Viewed 2941 times
Whichever way you choose, make sure Export as BigTiff and Save Thumbnail are unticked. Both can cause problems. Lots of things can go wrong, printing is a big subject.
Re: Configuring a tif print with wide border
Sun Aug 13, 2023 11:27 pm
thanks to sallyanne and rich2005 for responding
I found that if I create only one layer then if I want to tweak the photo, I have to tweak everything
so I created a white layer underneath, did my tweaks to the photo and copy pasted it onto the background layer.
but the proportions were not right, so when I tried to fit photo into the background border layer, background border layer also changed.
I change the background layer back to 12.5x16 in. the size of the portfolio case.
then I selected the photo layer and resized that to 9 x 11.
But then the background layer also resized.
this goes on back and forth
Re: Configuring a tif print with wide border
Sun Aug 13, 2023 11:45 pm
....
....
Open your photo File -> Open as Layers and that plants it bang in the center of the canvas
For scaling just that layer use: Layer -> Scale Layer and if you use inches as the units you cal set something 9" x whatever, the Width and Height are linked, change one changes the other. If you have to scale up or down a great deal then go back and review your original photograph.
this is where I am having a problem. even when I select the background white layer, the photo layer on top gets resized
I thought if I just brought in my original jpg, not a tif, that it might be easier but the same problem arises. I must not be clicking something
Re: Configuring a tif print with wide border
Mon Aug 14, 2023 3:56 am
Apuleius wrote:....
this is where I am having a problem. even when I select the background white layer, the photo layer on top gets resized
I thought if I just brought in my original jpg, not a tif, that it might be easier but the same problem arises. I must not be clicking something
You should be nowhere near the background layer for scaling the photo layer, however watch this video https://youtu.be/uW1vWo_Llfc It might give a clue to your workflow. Long one for me, 6 and a half minutes.
Also covers initial canvas resolution (much overlooked by beginners) Suitable photosize for use, as well as scaling the layer and eventual Save / Export.
Re: Configuring a tif print with wide border
Thu Aug 17, 2023 8:27 am
sallyanne wrote:
Sounds like you have two layers
The white square and the photo on top
Treat them as such. Make sure your photo layer is selected.
Then scale the layer - not the image. (Top menu - layer down to scale layer and in the window that opens, give it the dimensions you want. Then ok.
Also some image viewers that you can print from will give your image a white border anyhow - if the paper you are printing on is white.
yes, I am working with 2 layers. I guess I still don't understand the difference between layer, canvas, and image. I like to search the menus to crop the layer and canvas down to the same size as my image, so I am just working with one thing.
Re: Configuring a tif print with wide border
Thu Aug 17, 2023 8:44 am
rich2005 wrote:
You should be nowhere near the background layer for scaling the photo layer, however watch this video https://youtu.be/uW1vWo_Llfc It might give a clue to your workflow. Long one for me, 6 and a half minutes.
Also covers initial canvas resolution (much overlooked by beginners) Suitable photosize for use, as well as scaling the layer and eventual Save / Export.
I have followed your method, but somehow GIMP gave me something acceptable almost by accident before I thought I was done.
I don't edit both the background and photo at the same time.
1) I bring in the photo and set the dimensions that it must have. Then I export it as tif (I am also following some of michael davies's advice.) and close it out of gimp.
2)I next make the background layer which becomes my border.
3) I opened the tif photo again "as layers" as you suggest. The photo hit the background in a pretty good position. So I decided to quit while I was ahead and run with that. There was only one layer to the file so, I did not have to deal with layer merge.
In a fine art print, we want the photo centered horizontally but vertically we want to raise the photo a little above center. But I had had so many problems making these fine adjustments in the past. Changing the vertical borders would be an adjustment that would have to be made with both background and photo open, so I did not risk it this time around.
after I had finished I realized that I had one more tweak to make -- to do unsharp mask on the photo.So I repeated my steps. Time will tell if the print is any good. I am not posting the finished print for copyright reasons.
Thanks to Sallyanne and Rich2005 for your help.
Re: Configuring a tif print with wide border
Thu Aug 17, 2023 10:31 am
Have no fear, I will not make any more tedious videos for you.
I would be very careful with MD advice, a Photoshop user making money from Gimp
I know exactly what you mean. In a physical picture frame + ground , the bottom margin is wider than the top and sides. In Gimp, when you File -> Open as Layers" the imported file is planted in the center. Use the Move tool and nudge that layer up using the keyboard arrow keys.
Yeah, Remeber it is all about the image ppi. 72 ppi is rubbish , 300 ppi is good.
All depends on country location, but this is from the printer I use.
- To get the best results please work in sRGB colour space ( please do not work in CMYK ).
- Files should be supplied in 8-bit mode. We use Noritsu 3701HD and 3704HD printers and a Chromira printer for large format prints and these will only handle 8-bit files. When working with 16 bit files please change to 8 bit as the last step of your workflow.
- All prints up to and including 18″x12″ (plus panoramic format prints up to 36″x12″) are printed on our Noritsu machines. Ideally these should be supplied at the required print size at 300ppi.(For good quality we advise at least 200ppi.)
- All prints larger than 18″x12″ are printed on our Chromira 50 printer and these should be supplied at the required print size at 300 ppi. (For good quality we advise at least 200ppi.)
- If you do send TIF files for very large prints please flatten your images and do not use LZW compression.
The advise is...consult your printer.
...Then I export it as tif (I am also following some of michael davies's advice.) and close it out of gimp...
I would be very careful with MD advice, a Photoshop user making money from Gimp
In a fine art print, we want the photo centered horizontally but vertically we want to raise the photo a little above center.
I know exactly what you mean. In a physical picture frame + ground , the bottom margin is wider than the top and sides. In Gimp, when you File -> Open as Layers" the imported file is planted in the center. Use the Move tool and nudge that layer up using the keyboard arrow keys.
Time will tell if the print is any good.
Yeah, Remeber it is all about the image ppi. 72 ppi is rubbish , 300 ppi is good.
All depends on country location, but this is from the printer I use.
- To get the best results please work in sRGB colour space ( please do not work in CMYK ).
- Files should be supplied in 8-bit mode. We use Noritsu 3701HD and 3704HD printers and a Chromira printer for large format prints and these will only handle 8-bit files. When working with 16 bit files please change to 8 bit as the last step of your workflow.
- All prints up to and including 18″x12″ (plus panoramic format prints up to 36″x12″) are printed on our Noritsu machines. Ideally these should be supplied at the required print size at 300ppi.(For good quality we advise at least 200ppi.)
- All prints larger than 18″x12″ are printed on our Chromira 50 printer and these should be supplied at the required print size at 300 ppi. (For good quality we advise at least 200ppi.)
- If you do send TIF files for very large prints please flatten your images and do not use LZW compression.
The advise is...consult your printer.
Re: Configuring a tif print with wide border
Thu Aug 17, 2023 7:44 pm
Apuleius wrote:I am trying to put a wide white border around a photo then take the file to a printer
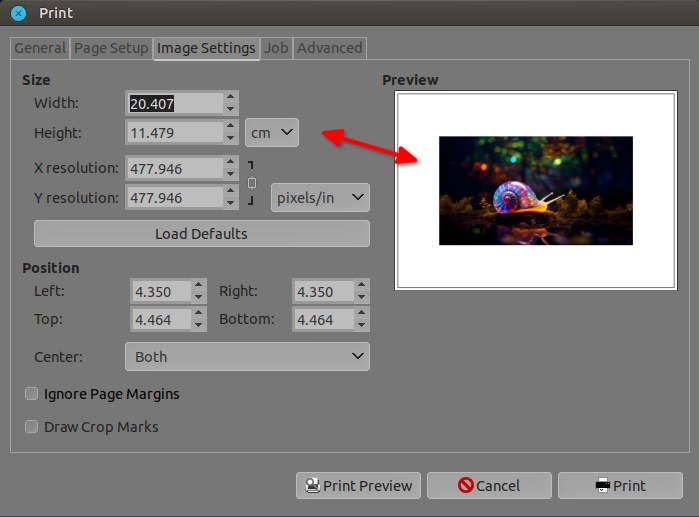
To my knowledge no one print white, white is the paper, not the ink (unless you print on metal or special material/support).
But for white paper you don't need to add a white border on your photo.
Just tell the people at the printer shop you want a border, they will put it in their setting
A bit like this:
Re: Configuring a tif print with wide border
Sat Aug 19, 2023 2:54 am
PixLab wrote:snip
To my knowledge no one print white, white is the paper, not the ink (unless you print on metal or special material/support).
But for white paper you don't need to add a white border on your photo.
Just tell the people at the printer shop you want a border, they will put it in their setting
....
This is good advice. If it works it will save me a lot of work. Thanks
Re: Configuring a tif print with wide border
Sat Aug 19, 2023 3:02 am
rich2005 wrote:Have no fear, I will not make any more tedious videos for you....Then I export it as tif (I am also following some of michael davies's advice.) and close it out of gimp...
I would be very careful with MD advice, a Photoshop user making money from GimpIn a fine art print, we want the photo centered horizontally but vertically we want to raise the photo a little above center.
I know exactly what you mean. In a physical picture frame + ground , the bottom margin is wider than the top and sides. In Gimp, when you File -> Open as Layers" the imported file is planted in the center. Use the Move tool and nudge that layer up using the keyboard arrow keys.Time will tell if the print is any good.
Yeah, Remeber it is all about the image ppi. 72 ppi is rubbish , 300 ppi is good.
All depends on country location, but this is from the printer I use.
- To get the best results please work in sRGB colour space ( please do not work in CMYK ).
- Files should be supplied in 8-bit mode. We use Noritsu 3701HD and 3704HD printers and a Chromira printer for large format prints and these will only handle 8-bit files. When working with 16 bit files please change to 8 bit as the last step of your workflow.
- All prints up to and including 18″x12″ (plus panoramic format prints up to 36″x12″) are printed on our Noritsu machines. Ideally these should be supplied at the required print size at 300ppi.(For good quality we advise at least 200ppi.)
- All prints larger than 18″x12″ are printed on our Chromira 50 printer and these should be supplied at the required print size at 300 ppi. (For good quality we advise at least 200ppi.)
- If you do send TIF files for very large prints please flatten your images and do not use LZW compression.
....
I liked your video a lot, so please don't refrain from making them on my account if there is a need in the future.
I note also that your printer instructions do not follow Davies's advice about CMYK color profile. sRGB is easier for me to do at my end, since the print shop workers do not know the color profiles of their machines.
I forgot to flatten image and avoid LZW for this photo so I may have to redo it; it is impossible to know what a photo on a computer screen will look like on a big format paper print.
Re: Configuring a tif print with wide border
Sat Aug 19, 2023 3:42 am
Your perseverance deserves help. Some printers (companies) will list CMYK in their requirements although send a RGB and they use it anyway.
Whichever way you do it there is a change in colours (look up gamut). Some RGB colors that you can see on your monitor (in particular, blue, green and all bright vibrant colors) cannot be printed and/or replicated with standard CMYK inks.
Nothing you can do about that, look for a printer that uses laser printers, those Noritsu, for example, work in RGB and any half decent printer should supply icc's for their paper.
Gimp works in RGB. There is a plugin CYAN that as a final stage will make a cmyk file. (edit: CYAN also works stand-alone)
A bit about it here https://www.gimp-forum.net/Thread-CMYK- ... -Gimp-2-10 That is a bit old now, worth a look.
Possibly for you, a better way is using the free graphics program Krita. You can open a RGB image, change the colour space and export a CMYK tif or jpeg.
Very, very true. The serious users have their monitors color calibrated. I use a laptop, not calibrated but with brightness turned down to get a better representation (I know my computer). Gimp does have a soft-proofing option see: https://www.gimp-forum.net/Thread-The-R ... t-Proofing but it is not 100% accurate when it comes to out-of-gamut colours.
If you are worried, crop a 6" x 4" area out and get a print of that. Look at colours / brightness / contrast that might need tweaking. Some good printers do that for free. (edit: or send you a sample/calibration print +image)
best of luck
Whichever way you do it there is a change in colours (look up gamut). Some RGB colors that you can see on your monitor (in particular, blue, green and all bright vibrant colors) cannot be printed and/or replicated with standard CMYK inks.
Nothing you can do about that, look for a printer that uses laser printers, those Noritsu, for example, work in RGB and any half decent printer should supply icc's for their paper.
Gimp works in RGB. There is a plugin CYAN that as a final stage will make a cmyk file. (edit: CYAN also works stand-alone)
A bit about it here https://www.gimp-forum.net/Thread-CMYK- ... -Gimp-2-10 That is a bit old now, worth a look.
Possibly for you, a better way is using the free graphics program Krita. You can open a RGB image, change the colour space and export a CMYK tif or jpeg.
..it is impossible to know what a photo on a computer screen will look like on a big format paper print.
Very, very true. The serious users have their monitors color calibrated. I use a laptop, not calibrated but with brightness turned down to get a better representation (I know my computer). Gimp does have a soft-proofing option see: https://www.gimp-forum.net/Thread-The-R ... t-Proofing but it is not 100% accurate when it comes to out-of-gamut colours.
If you are worried, crop a 6" x 4" area out and get a print of that. Look at colours / brightness / contrast that might need tweaking. Some good printers do that for free. (edit: or send you a sample/calibration print +image)
best of luck